Jan 7, 2016 | Life
 I’ve found that the right attitude is truly half of a chic life.
But sometimes, even if life isn’t getting us down and we aren’t depresssed per se, we can get into a rut of wake up, go to work, go through the motions, come home, go to sleep, and do it all the next day…without even feeling present in our own lives. We can feel complacent and bored; tired and irritable; or just flat-out burnt-out.
To feel that you are indeed RIGHT THIS VERY MINUTE living a chic life, full of abundance, comfort, and happiness, requires a massive shift in focus. But it can be a very tiny change in what you think, to start a cascading ripple that emanates out to all other areas in life. So often we focus on minutiae: what hasn’t been done, what lacks in organization, never-ending home repair projects, the tediousness of daily life. In order to rediscover the minutiae that bring happiness, sometimes it is as simple as writing it down.
How to Start a Gratitude Journal
To Start Small:
Write one thing you are grateful for down in your place of choice before going to bed.
What makes you smile, what are you glad to have? What couldn’t you do without? How is your life blessed? Focus on each one as you write it, truly feeling thankfulness as you write it. Write it on paper, spell it out with scrapbooking stickers, leave a note on the mirror in lipstick. Any way to permanently record something that you are aware of that makes your existence better in some way.
To Reiterate:
Write down ONE. Just ONE. One thing, little or big – from that you’re grateful to have a roof over your head to you’re grateful for your best friend to your grateful that it’s tangerine season because you love snacking on those little suckers. Challenge yourself to write something different each day (doesn’t have to be anything earth-shattering)
And then…:
At the end of a week, re-read everything you’ve written and feel it wash over you like a wave.
Finally:
Upgrade your journaling habit to include what you will do to show this gratitude to the person/thing referenced when you note it down at the end of the day, as a To Do for tomorrow. Feel it tonight, create some action tomorrow. Whether it’s calling your Mom to tell her you love her, slipping a note under your neighbor’s door, complimenting a coworker, texting an old friend out of the blue. Write…then show. And watch how these actions create bigger ripples of positivity and happiness in your life – and the lives of others.
You have abundance. You have many things. You have many friends. You are living a full life.
This lovely Gratitude Journal was given to me by my friend, Lex Casciato (also known as the musician Little Warrior, who put together a lot of cool curated Spotify playlists for this site awhile ago). I am filling it daily with my gratitude – and my first entry was all about my bestie and how talented and thoughtful she is!
Here are a couple of my favorite Gratitude Journals:

1 / 2 / 3 / 4 / 5 (aff. links)
And there is even an app for that! TheGratitudeApp
Do you keep a Gratitude Journal? Has it helped your outlook or mood at all?

xo
Carly
P.S. The gold bangle in the top 2 photos is my DIY Free People Wrapped Quartz Bangle – click for the tutorial!
Save
Leave Comment
Jan 5, 2016 | Beauty
This is a sponsored post written by me on behalf of Burt’s Bees for IZEA. All opinions are 100% mine.

Burt’s Bees has just come out with a NEW line of luscious lipsticks available at Target – and I’m over the moon about them!
These lipsticks not only provide 8-hour hydration and moisturizing for dry lips, they also are 100% natural and thus: great for you. (Especially considering the average woman will likely consume a large amount of the lipstick she wears on her lips over a course of time…you can only imagine what tiny doses of methylparaben, colorants, and tocopheryl acetate can do when compounded in the body. Blech!) When it comes to something that’s on the lips and easily licked off or absorbed, it’s far safer to go with products that are safe to ingest and have no harmful effects.

These lipsticks are formulated with Moringa oil (full of essential fatty acids, and helps to soften and condition skin), and raspberry seed oil to improve skin elasticity, as well as vitamin E and of course, beeswax, a Burt’s Bees staple. Available at Target (or Target.com), each lipstick is $8.99 or less (look out for those Target coupons or Cartwheel offers!) and comes in 14 versatile shades that work great with a variety of skin tones.

I’m super-pale, so I chose to swatch and sample 3 colors that I felt would be ultra-useful for a number of different makeup looks: Nude (500), a warm beige with slightly blue undertones, Iced (510), a pretty pastel pink, and Magenta (511), a deep Winter berry color.

Here’s how they turned out:
Burt’s Bees Lipstick in Nude

I have very pigmented lips so I need to put on a layer of concealer over my lips so that lipsticks “read true.” Even so, Nude is a lovely, pigmented beige, that was surprisingly opaque even without the concealer (though that did help a bit for me). It makes a perfect 70’s-style lip…and could be dressed up for evening with a dab of gold gloss in the center of the lip.
Burt’s Bees Lipstick in Iced

I had to do the same concealer trick for Iced, but this time it was quite difficult to get the color to read. Unlike Nude, Iced seems to be more transparent, and would work well as a color for mixing or layering. It imparts a very soft pink sheen, very girly and sweet.
Burt’s Bees Lipstick in Magenta

For Magenta I didn’t even need to do the concealer trick – the formula was pigmented and went on beautifully. Such a pretty lip color for Winter (pair with flushed cheeks and dark, dark eyelashes!).
All of the colors were very slick and soft and extremely moisturizing. I’d even go so far as to say that Iced was more like a lip gloss! (Plus, no weird taste when you lick your lips because the formula is all-natural, yay!)
Since they’re available at Target (and less than $9 each, hello!) you can have your pick of color.
Check them out here:
Available at Target

Which Burt’s Bees lipstick color did you like best? (Help – I can’t choose!!)
xo
Carly

Leave Comment
Jan 4, 2016 | DIY
 Oh metallic lurex thread, how I love thee!! It adds so much dimension, so much Wintry sparkle, so much glamour to just plain old fabrics. But it’s a demon to clean.
Once I found a beautiful silvery sweater at H&M on the clearance rack for a mere $8.95. And it happened to be in my size, too. I wore it often for many years. I wore it here, for example.
And then while at work one day I dropped my lunch on it. A small mouthful of leftover Thai drunken noodles. In oily brown sauce. And my favorite sweater was ruined forever.
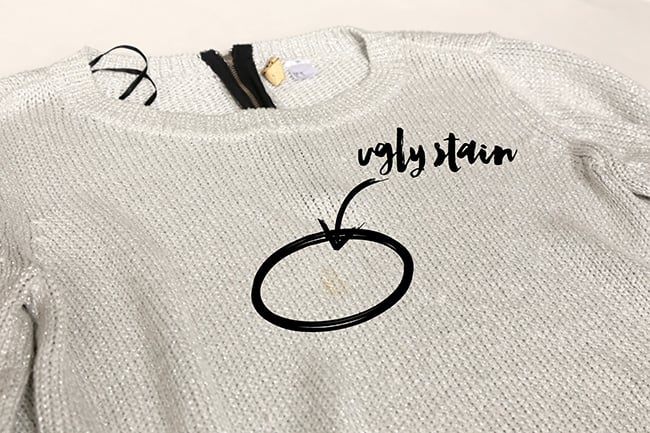 I washed it multiple times, in both cold and warm water, and tried every stain remover known to woman. But nothing got the stain out of acrylic. That brownish-yellow stain would not budge. I tried to wear it after the unfortunate incident, but the stain was too obvious, and I felt self-conscious. I thought about discarding the sweater (heck, I had only paid $8.95 for it so it wasn’t a huge investment)…but I wanted to save it if I could.
And then I had an epiphany…to combine that trend of one big word on your shirt…with my poor abused sweater…hence forever covering up that stain and allowing me to wear it again (or at least, until it got too pilled and stretched out to even resemble clothing anymore). Hence this DIY. Here’s how to cover up that horrible stain on your own shirt if it has befallen similar circumstances:
DIY Shine Word Sweater (or, How to Cover a Stain on Your Sweater)
You Need:
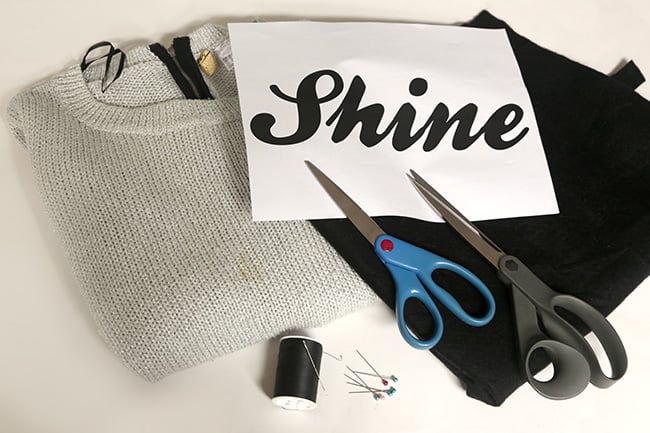 sweater or top / black felt / fabric scissors / needle and matching thread / pins / graphic program to create your word if you’re not using the download below / printer (or print at an office store) / regular scissors
How To:

- Choose what word you’re going to put on your top. It took me forever to finally choose a word (and yes, I browsed Pinterest, blogs, and magazines for what seemed like ages). But I found it: Shine. Quite ironically literal. So I went with that, and typed it out in Photoshop using the Ballpark Weiner font and printed out a copy of the word to see if the spacing and font would indeed cover up the stain. It did so I went with that.

- Cut out the word using regular scissors. Don’t forget to cut out dots on i’s or punctuation as well. I didn’t cut out the negative space inside the letters at this point.
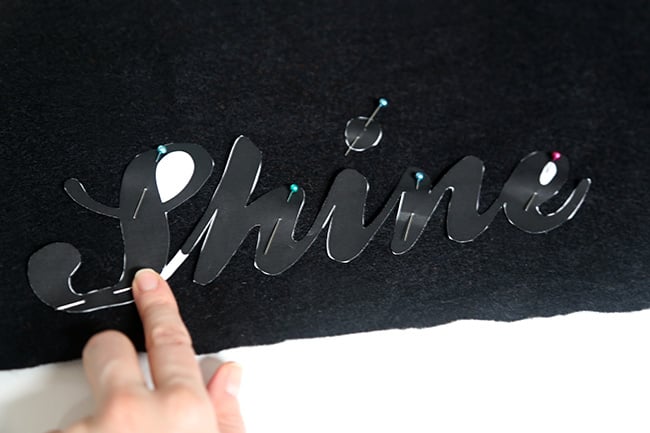
- Pin the word to your felt.

- Use fabric scissors to cut around your word carefully. You may need to make certain areas wider than the font so the felt doesn’t pull apart. For cutting the negative space out of the inside of loops, I just eyeballed it, cutting smaller than I needed to and then widening once I laid the cut-out on the original font.

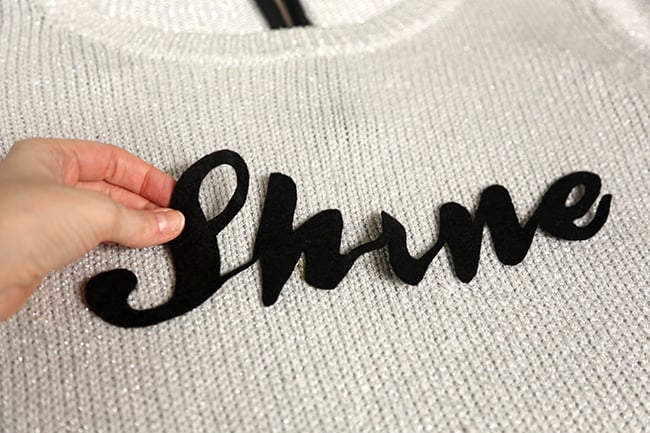
- Place the the cut out felt word to the center of your top, and pin down so it is flat.

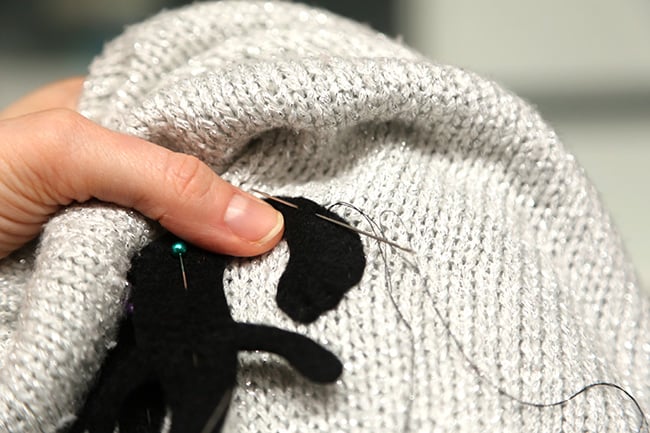
- Use a running stitch (looks like – – – – ) around the inside edges of the felt to secure the word to your top. This is long and tedious – make sure you have some Netflix or mindless TV to get you through. Also stitch on any i dots or punctuation as well. (If you’re dealing with a stretchy top like a sweater, be careful not to stretch the knit too much as you are sewing or else the finished word will pucker.)
 And that’s it! A pretty upgrade to a soiled mistake…and I’ve just saved a major piece in my wardrobe. How to cover a stain on your sweater is really as easy as a bit of felt, time, and thread!
 This is something you will need to hand-wash cold and lay flat to dry. You could also use suedecloth or any other fabric that doesn’t fray when you cut it – leather or vinyl I would think a little tough to hand-sew but you could always try it if you prefer that look.
Download my DIY Shine Word Sweater graphic here if you’d like to make your own “Shine” version (click below):
(77 KB PDF, sized at 300 dpi, for 8.5″ x 11″ paper)

 Shine on, my friends!
Ever had a stain on your shirt where you did something creative to cover it up? Do tell!
xo
Carly
Save
Leave Comment
Jan 1, 2016 | Life

To all my readers, wishing you the Happiest of New Years – hope 2016 started off with a bang for everyone!
Things are going to be changing around here, but I hope you stick around, because it’s going to get…ideally…awesome!
See you soon with new content, ideas, DIY’s, and a fresh start!
Thanks for reading with me for so long, and here’s to the new 🙂
xo
Carly
Leave Comment
Dec 14, 2015 | Media
 This is such an adorable book, I can’t stop raving about it.
Washi tape has been around forever and I’ve been an avid collector of it for many years, ever since I first spied it while living in Japan 15+ years ago. My stash has grown and grown – and somehow just looking at all those pretty patterns and colors puts a smile on my face.
But what to do with all of that tape? Besides using it on my planners and calendars, I also have been known to use it as home decor on my walls. And wrapping presents of course. But besides that…? I’m kind of at a loss with how to use it in a cute and functional way.
Enter this awesome book, jam-packed with tons of tutorials and crafts for finally putting that washi tape to good use! With 110 ideas for using your tape (plus 10 original included tape rolls for you to play with!) this book can kickstart just about any project or idea for gifts, decor, accessories, office supplies, kiddie crafts…and on and on and on.
Written by the one and only Amy Anderson (of Mod Podge Rocks! fame – and accompanying Mod Podge universe website), the book brings Amy’s whimsical sense of design married to practicality and easy-to-follow step-by-steps.
After first laying out basic techniques and skills when working with washi tape like cutting clean edges, creating corners, weaving, punching shapes, and making patterns, the book dives into the projects section.
Between Goods and Gifts, Home Decor, Jewelry and Fashion, Holidays and Celebrations, and Just For Fun, there are so many projects to choose from. Though some projects may seem pretty basic (Embellished Envelopes, Photo Coasters, Wall Art) – I guarantee there will be many that make you go “I never thought of that!” and send you scurrying to your tape stash.
Some are incredibly innovative, like the Paper Planes Wall Mural, Wishy-Washi Window Blinds, Faux Floor Rug, Headboard, Party Mask, and Faux Floral Bouquet that are so fun to try out.


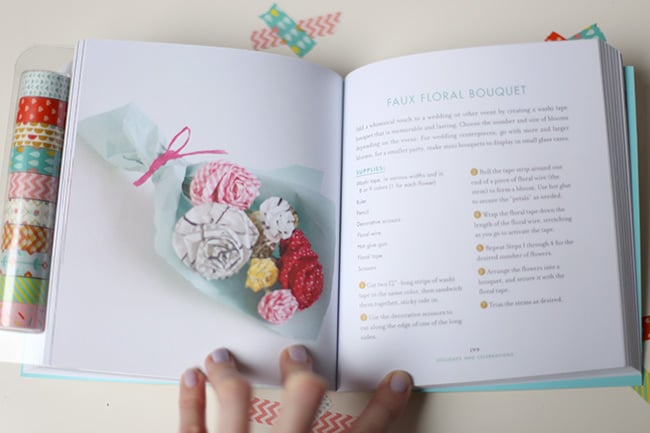
If you have a craft-loving friend, this book would be an excellent holiday gift for them – and will keep them crafting well into the New Year!
(aff. link)

You can also get in on the washi tape fun at Amy’s website WashiTapeCrafts.com.
xo
Carly
FTC Disclosure: I received one complimentary copy of Washi Tape Crafts for review purposes. I have not been otherwise compensated for this review. My full Disclosure Policy is here.
Leave Comment











