Jul 26, 2010 | Beauty
Add a brooch to a folded wide scarf for a headband-look. (Fold scarf into about 3″ wide to replicate this.)
I know you guys are probably completely sick of my going on and on about my favorite magazine Vivi, but I thought this particular editorial on styling with hair accessories was really useful. With summer here I’m suffering from bad hair day after bad hair day (what with the hot, dry Oregon summer and me growing my hair out n all) – so hair accessories for me a MUST to induce a little bit of chic-ness into my outfit when everything on my head has fallen flat.
So here you go – I made these extra big so you can click on them and enlarge to see the how-to. Hope this is helpful and gives you some styling ideas!
Bohemian-style hair: using an elasticized headband and a flower headband.
Using scarves: 1) Regular Bow (uses 30″ square scarf) and Big Bow (uses 69″ long scarf) , 2) Petite Ponytail Scarf (uses 19″ square scarf), 3) Turban (uses 63″ long scarf)
from Vivi Magazine August issue
xoxox
Carly
Leave Comment
Jul 25, 2010 | DIY, From You, Life
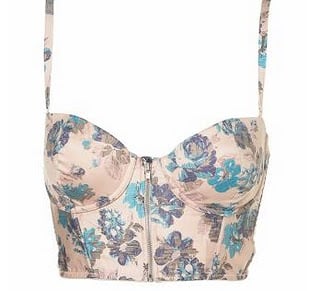
from formspring.me:
Hey I wondered if you could help me with making one of these “bralets”, do you know how to make a pettern for them? http://api.ning.com/files/zcwHPg1VgsLUzsS1e99DsdD4ZlRqQdct0bCSs9*1rseLJIAKirKx55a0ARHDEJCLVDBdi8fpp9Gn0zIw37Jm5Vb-jsk5K1bz/bralet.jpg
Leave Comment
Jul 24, 2010 | DIY, Score!
Sponsored by New York Design Shop and Style Sample Magazine, this DIY competition pits 10 selected crafty blogs against one another – with the challenge of creating some crafty pieces and sharing them on the NYDS blog. We’ve each been sent the same package of DIY must-haves (courtesy of NYDS) and have been set the task of making something with the contents.
A box brimming with lovely, tactile embellishments and trims!
Announced on page 3 of the latest issue of Style Sample Magazine, and on the NYDS Blog in a “Meet the Bloggers” feature, I’m up against the likes of …love, Maegan, Fvncy, and Alisa Burke!
All the projects and finished DIY’s that each blogger submits will be posted on the New York Design Shop’s blogs (I’ll post the link once it’s up)…and then it’s up to you, lovely readers, to have your say and give your input!! The competition is decided by VIEWER VOTE – that is, you all get to decide who YOU think should be the blogger to win the entire competition!
The prize is an Alternative Apparel dress, $50 worth of DIY materials –ooh, think of what I could do with that!!—, assorted accessories from New York Design Shop, and most importantly to me: a FEATURE INTERVIEW in the September/October issue in Style Sample Magazine! This is what I’m really shooting for; I so want to return to designing accessories {at least to start} on a more permanent basis, and exposure like an interview in such a widely-read online magazine would be a dream come true to help me reach out to women who might want to wear my jewelry and accessories. The potential exposure for a struggling designer like me is what makes this prize priceless!
Also, just by commenting on any of the projects submitted, YOU TOO will be entered to win a finished project by the winning blogger! (Anyone want a free piece of clothing or an accessory to start off the school year with?? Sounds good to me!)
So the deadline for entries (Sunday) is drawing near and I’m working hard on all my DIY’s…having just arrived back from Tokyo on Monday, I’ve had less than a week to get this all done! I’m hitting my stride, though, and hope to have all my photos and everything done by tomorrow. Whew*.*
Once everything’s been submitted and the voting’s open, I’d be honored for my readers to check it out! And if you like what I make, I’d love to have your vote too!;-)
Oh…and the competition guidelines said “make one or more projects with these materials.” We aren’t allowed to use any other trims (besides chain) than what we were sent above, though we were encouraged to use a non-kit item as a “base,” like a shirt or a pair of flip flops etc.
I was so jetlagged and busy after we got back I wasn’t able to start actually making anything until Thursday of this week!
So the question is…
How many DIY creations and projects did I make with the stuff that I got in the box above???
Remember, I could only use the trims/embellishments from the box – and once they ran out, that was it!
Edit 7/26: I’ve submitted all my projects and will be announcing the winner shortly! You don’t need to leave your best guess in the comments section anymore:-)
The first person who correctly guesses how many finished projects I submitted in time (using the above materials) will get a little surprise from me in the mail! (Won’t say what it is just yet…you’ll have to wait and see!;-)
So – take your best guess!
How many creations + tutorials did I make in 3 days?
I MADE 12!
xoxox
Carly
Leave Comment
Jul 23, 2010 | DIY, From You
from formspring.me:
Hi! Do you have any tips on how to recreate this necklace? http://img824.imageshack.us/img824/5264/dsc0749.jpg Thanks!
Leave Comment
Jul 21, 2010 | Life
Pudding out and about.
I’m going to be busy the next couple days getting over the jetlag from Japan, unpacking, and DIY’ing my heart out for a cool project I’ll share with you all very soon.
The hydrangea finally is beginning to bloom!
These shots were actually taken in late June, before I went to Japan, but I thought them nice and summery – just at the beginning of what can truly be called “summer” here. Of course, by now there’s a lot more happening in the garden right now, but I thought to share these photos first.
Foxglove.
I was going to get rid of the foxgloves in my garden when I read that touching them with bare hands can cause a rash at the very least (since foxgloves are extremely poisonous due to chemicals from them once being extracted to create Digitalin – a group of medicine used to treat heart disease!! Even a nibble on the topmost leaves can cause death, apparently.) But they’re so pretty I left them in the backmost corners of the garden, hoping Lil Tot and Pudding don’t come in contact with them very much. The other one that is flowering right now has light pink varying to white flowers.
The nasturtium bloomed too! And a nice shot of Pudding’s butt.
In early June all the wild strawberries we have finally produced fruit – tiny, compact little bites. Very sweet!
Hope you guys are having a great summer!
xoxo
Carly
Leave Comment