Jun 27, 2010 | DIY
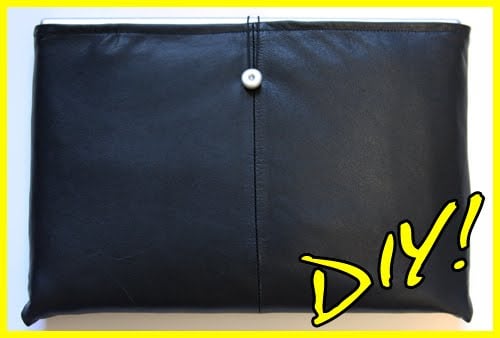
As you may recall from a previous project I posted, we still have the rest of the thrifted leather jacket leftover to something fantastic with! So with my Hubby’s birthday quickly approaching, I decided to make him a homemade sleeve for his laptop computer. Sure you can buy one from the store – and I did scrounge up a tutorial for using some neoprene from an old wetsuit [and here, too!] (like I have many of those laying around!)…but I wanted to try a different material. Leather is cushioning and sleek – but if you prefer manmade leather or vinyl (or even fabric, corderuoy, or denim!) this project will work just as well. I was inspired by those wraparound manila envelopes – but you can always use a strip of material and velcro as a closure, or fashion a long strip with a parachute buckle around the entire laptop, or extend one side of the outer material and use it as a closure flap, or even add a couple inches to each end and use a zipper as closure, turning this sleeve into a simple zippered bag. The possibilities are endless!
You Need:
*leather jacket with lining (or leather/other material + lining fabric, if you are not repurposing a jacket)
*quilt batting (I used Low-Loft crib-sized batting, and had quite a bit left over)
*1 button
*black elastic cord
and…
*marking chalk
*leather shears
*fabric scissors
*matching All Purpose thread
*sewing machine needle for leather
*sewing machine needle for wovens
*hand-sewing needle (not needed if your button is not shanked)
*leather/vinyl glue
*tape
Optional
*matching upholstery thread
*walking foot or Teflon foot for sewing machine
*clothespins or binder clips
How To:
Prep Your Parts
1. Place laptop on your sleeve material, right side up, front edge facing away from you. Trace around laptop on all sides, adding 1″.
2. Lift and rotate laptop up on its back edge towards you, then wrong side up on top of the material. (Front edge will be facing towards you.) Keep drawing 1″ around all edges. (I know this sounds somewhat confusing, so I included the diagram above to show how the material was measured.)
3. Cut the rectangle out of the material (cutting through both outer and lining if you are using a jacket), using leather shears. If you do not have a lining, place this rectangle on top of your lining material, trace around, and cut using fabric scissors.
4. Cut a small piece of leather about 1″ square.
5. Unroll batting from package, and leave it doubled up as you flatten it out. Place rectangle of material on top of the batting. Cut a piece of batting the same size as the lining, then trim batting about 1/2″ on the sides only.
Time to Sew!
6. Fold material rectangle in half, and machine-stitch the edges together, using a needle for leather and upholstery thread. (Upholstery thread is not a must-have…but it is a lot stronger that regular cotton/poly mercenized, and is more suited to sewing leather and taking the stress of repeat usage. Also, f you have a walking foot or Teflon foot for your machine, it can help the leather from sticking.)
Clip corners and turn right side out.
7. Fold lining rectangle in half, and machine-stitch the edges together, using a needle for wovens and regular thread. This will make the lining into a “pouch.” Do not turn right side out; the right side needs to remain on the inside.
8. Wrap batting around the outside of the lining pouch. Fold upper edges of lining pouch down and overlap batting piece at top edges. (Trim batting top edges if they are too bulky or long.)
Machine-stitch the lining edges down over the batting, at about a 3/8″ hem.
Closing It Up
9. Sew button to the material pouch you made in Step 6), about 2″ down from the top edge on the front of the pouch.
10. Slide the lining into the material pouch, and slip the laptop inside to check for sizing. On the back side of the material pouch, tape one end of the elastic cord to the center, about 2″ down from the top edge.
11. Wrap elastic cord around button, and bring the other end to the back, cutting it and gluing it down next to the other end. Make sure the cord is taut around the button and will keep the laptop from falling out.
12. Trim the cord to meet the taped-down end.
13. Re-tape cords down with the ends free. Place a dab of glue under the ends and press them into it.
13. Remove tape and glue the small square over the ends of the cords.
14. Remove laptop and lining from the material pouch, and machine-sew the square over the elastic cord ends, first sewing a square around the edge, then an “X” shape in the center.
Finishing
14. Spread glue on the inside of the outer pouch, close to the top edge. Turn down top edge about 3/8″; clamp until dry.
15. Slip the lining back inside the outer pouch, pushing the corners all the way in.
Stitch around upper edge of laptop sleeve to secure the lining to the outer material, using a needle for leather and upholstery thread.
Et voila!
Finally, a homemade FUNCTIONAL accessory that my husband will actually use! (And it’s unisex, so can be a great gift for a man or woman!)
Happy DIY’ing and Happy Birthday, Hub!
xoxox
Carly
This is my last post for Threadbanger – wish I could do more! Hasta la vista, TB!
Save
Leave Comment
Jun 25, 2010 | DIY, From You
from formspring.me:
Could you do a tutorial on how to make one of these headbands?
That’s an easy one! They’re exactly the same principle as the instructions for making the main fabric part of my DIY Jennifer Behr Spiked Turban, except these headbands use a slightly wider piece of fabric, folded over and knotted in the middle. (You don’t need to do an underpanel like in the Jennifer Behr turban; that was merely to protect the forehead from being scratched by the spikes. For this version, “fluff up” the center knot to give it more volume so it doesn’t cinch the fabric too tightly.) To me – it looks like one of the headbands is a stretch black velvet, but that could just be the lighting. Definitely use a piece of fabric that has some stretch to it (i.e., lycra).
Hope that helps!
Have fun making your own-
xoxox
Carly
Leave Comment
Jun 25, 2010 | DIY
Sneak peek of a current project on my DIY desk…will be revealing the results shortly! (Think flowers, summery…hair???!!)
But now it’s that time again! If you have a DIY project or tutorial, please feel free to link below! (However you can only link YOUR OWN PROJECT. Please do not link others’ projects!)
If you’ve linked up your project to the Roundup, feel free to grab the button below.
Can’t wait to see everyone’s projects!
xoxox
Carly
Leave Comment