Oct 31, 2009 | DIY

Tie-dyed denim is ba-a-aaack this season (sure you probably thought you’d never see the day) but it’s a blotchy, abstract dye that’s all over the runways…and all over celebs and fashionistas in the know. (And what I got knocked for in Challenge #1 in America’s Most Stylish Blogger competition. Whatever! If you haven’t noticed this trend – insert your head back in its hole in the sand.) Whether you embrace it or stay far, far away – using the crumple dye technique on your fabric is fun and virtually hassle-free (compared to some other tie-dye techniques that involve rubber-banding, stirring fabric for 15 minutes continuously etc.).
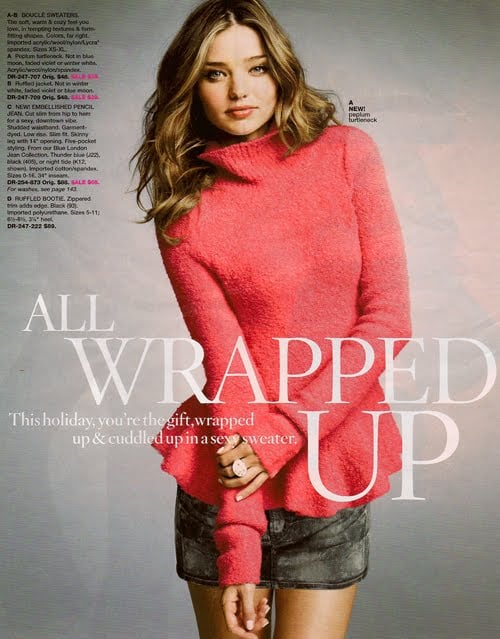
This is an image from Victoria’s Secret most recent catalog…and you can buy the sweater here but the skirt strangely seems to be unavailable. And I want that skirt.
So I used Tulip Permanent Fabric Dye and a denim miniskirt I found at the thrift store to create an abstract, funky dye-pattern.
The first step was bleaching the skirt to remove the color. This was accomplished by soaking in a hot water & bleach solution (ratio like 8:1 or something like that)…for like 8 hours. Had I used full-strength bleach (or a smaller ratio of water to bleach), the process would have been much quicker, but it also would have caused rusting on the metal embellishments on the skirt (zipper, grommets etc.), weakened the fabric fibers and seams, and even perhaps burned holes in the fabric or given the piece an orange tint. So to be safe I diluted.
 Most of the color was removed by this method. Ran it through the wash cycle (with detergent) to get rid of any remaining bleach.
Now it’s time for the dye!
Following the instructions, I created a dyebath of Black fabric dye…and dipped the skirt into it. I then pulled it out quickly, crumpled it on top of a spread-out garbage bag, and spooned dye from the bath onto certain areas of the skirt. Hmm…it didn’t work so well. By giving it that initial dip in the bath, I found that the skirt soaked up a base gray color that wouldn’t show any darker black areas like I had intended. Ohwell. Frustrated, I poured some bleach (undiluted this time) back on the skirt in certain areas. After a few minutes as I watched some areas of the skirt lighten to a muddy brown, I washed the whole thing in cold water, then threw it in the wash cycle of the washing machine (sans detergent this time). And this is what I got:
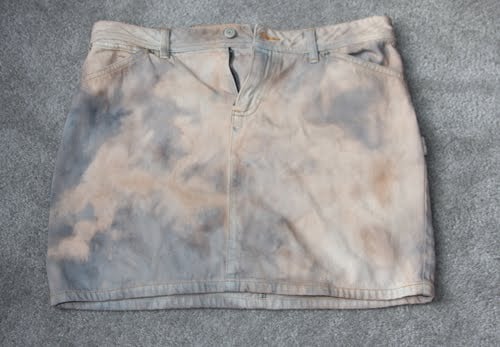 Definitely not what I was going for. I then wet the skirt, crumpled it up again on another garbage bag, and spooned black dye from the dyebath onto certain areas of the skirt, crumpling as I went. I left it for a short time, covered in garbage bag, then pulled it out and ran cold water through it. Back to the washing machine (no detergent) and into the dryer, and I got this…
It’s hard to see, but the skirt is more gray-and-white-tinted than before.
(Kenneth Cole new york sweater, DIY Old Navy denim mini-skirt, Sam Edelman Zoe boots, unknown puffball ring)
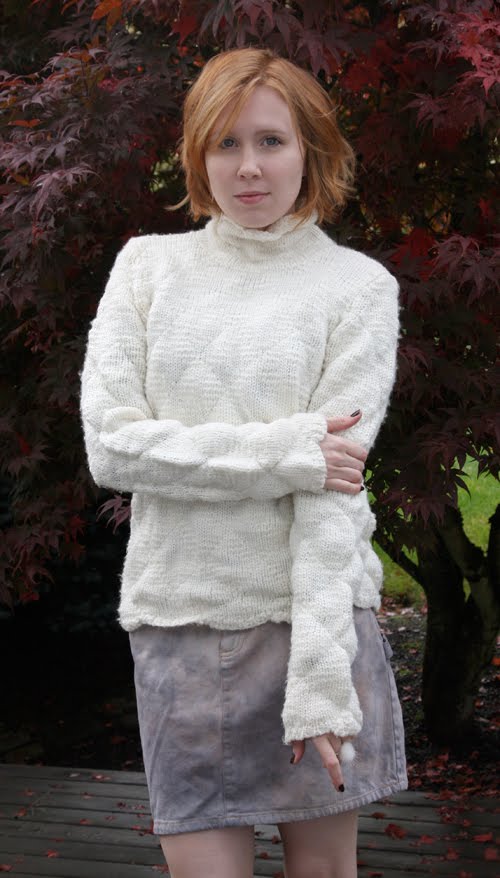
Somehow I never look quite the same as the Victoria’s Secret model does. Hmmm.
And EVERYONE needs a puffball ring. It’s just a Fact of Life.
The final product: the tie-dyed skirt. I definitely wanted it to be black & gray…but this stone blue/gray/little bit of brown thing is cool, too. You just never know when you’re dying denim and working with bleach!
In reality Tulip One-Step Fashion Dye would make more sense for this project, especially since you’re applying dye directly to the fabric. But I used what I had! Perhaps I’ll try another application to make it more black at some point in the future, but I’m kind of satisfied with what I have now.
Also, if you’d like some different fabric-dyeing projects to try out (just in the nick of time if you’re still stuck on ideas for a Halloween costume!) download the free Fun with Fabric Dye eBook from FaveCrafts.com…This eBook features 28 free fabric dye craft projects organized by 18 different dye techniques, with step-by-step photo instructions. Not only does the eBook include a great variety of stylish clothing craft projects for all ages, but it also features home decorating projects, accessories and holiday projects too.
Definitely try your hand at the DIY tie-dye denim mini…just don’t dip the whole thing in the dye after you’ve bleached it out…crumple and spoon, my friends!
Happy DIY’ing…and Happy Halloween!
xoxox
Carly
Save
Leave Comment
Oct 30, 2009 | Fashion
 Oh, ASOS. You taunt me with your fabulous, fashion-forward designs that are so utterly affordably…until I factor in the $15+ shipping fee. Well, not this weekend!
Is it wrong to spend $300 just because I’m saving $15??
-Carly J. Cais
Leave Comment
Oct 29, 2009 | DIY


So, were you watching the last Sex and the City movie close enough to notice those adorable half-gloves Carrie was wearing while using a pay phone in one scene?
Such a subtle difference to the regular wrist-length leather glove…but oh so cute. The gloves were actually from Ines Gloves, available for $147.
Ines gloves…so cute…but oh so expensive too. Why does this hand model lady have such hairy arms? This confuses me…and dissuades me from wanting to spend that $147 for some reason.
But we wouldn’t think of paying that much for such a simple accessory, now would we?
So why buy when you can D.I.Y.?!
 Enter a typical pair of wrist-length leather gloves (mine I got at the Buffalo Exchange for $8). Wish that they were gray or brown…but c’est la vie. (I didn’t want to go through the whole rigmarole of painting them with leather paint…or worse yet, attempting to dye them. I don’t even know if that would be possible with black gloves. In any case.)
By using the photos on the website as reference, I sketched the scoop shape using an eraseable fabric pen onto the gloves. 
You can see the white lines on the gloves…I tried a couple variations before deciding on the shape. Always make sure your pencil comes off of leather BEFORE you draw all over your gloves!
Add 1/4″ seam allowance below the line, and cut with a pair of sharp shears. Behold the scoop shape! Cut with a pair of sharp shears. I don’t have leather scissors, for some insane reason. Oh yes, because they’re ridiculously expensive and I just squandered my available funds on some new sewing scissors.
Using Loctite Vinyl, Fabric, and Plastic Glue, turn under that 1/4″ seam allowance and secure it to the underside of the glove. (Barge cement is a be-otch to work with since you have to wait 15 minutes after applying it before sticking your surfaces together…a total hang-up for a DIY’er in a rush like me…) ‘Tis necessary to glue the seam allowance since leather gloves are usually made from a thin and soft lambskin…which rolls and shifts uncontrollably as you sew it on a home sewing machine…unless you’re an all-star with sewing lightweight leathers, I’d recommend gluing it down to get that clean seam first!
The seam allowance glued (for the most part) down to the inside.
Then, using a leather needle (medium-weight leather, since we’re going through two thicknesses + two thicknesses of the lining), edge-stitch about 1/8″ from the edge of your gloves to secure that hem. (sorry no photo of the stitching…couldn’t work with the sewing of something black, with black thread, in a might-as-well-be-pitch-black poorly-lit sewing room.)
You’re done! Step back and admire.

LEATHER-SEWING TIPS:
Use a longer stitch than you normally would when it comes to leather…and a good tip when sewing leather is to crank the needle forward manually so that it has pierced the leather completely…BEFORE pressing with the presser foot of the machine to sew your line of stitching. Start sewing with the needle already in the leather to say it another way. Also, you can’t go super-fast or super-slow…there’s a happy medium where your machine’s feed dogs advance the leather at the right speed, the needle punches through the leather without jarring and hitting the needle plate, and the needle goes in vertically and doesn’t hit the bobbin case. Too fast and the aforementioned problems will crop up; too slow and the needle won’t punch through the leather. It’s different for every machine – just something you need to experiment with. (Of course, if you’re using a heavy-duty/industrial machine for sewing leather, you can completely ignore what I’ve just written.:-)
When starting your line of sewing, DO NOT BACKSTITCH. Go all the way around the edge, then back into the first ONE or TWO stitches you did at the beginning of the line. Backstitch ONCE. This will create a nice, professional look to your stitching.
Also, do not start stitching directly on a seamline. This will usually cause the needle to jar and hit your presser foot/needle plate/bobbin case. Sewing machine needles for leather (for the home sewing machine) are pieces of s$#@. They will snap willfully at ANY irregularity of thicknesses in your material; or bend and not punch the leather vertically at certain speeds…ugh. Buy more needles than you think you need!
Can’t wait to work these in a new outfit…the leather glove is THE must-have accessory this Fall, so rock it while you can!
Happy DIY’ing!
xoxo
Carly
Save
Leave Comment
Oct 29, 2009 | DIY
 Few things add edge to a look like bits of metal leering out from an unexpected angle; in combination with swingy fringe, the trend has continued to stomp down many a runway.
Adding a touch of tough to pieces you already have in your wardrobe is a fun way to freshen up your look. But be careful: there is a wrong way to stud and fringe your basics, so we’ve put together this helpful little primer on Badass Embellishment Skills 101.
To sex up a boring black leather tote, this is what you’ll need:
Leave Comment
Oct 28, 2009 | Fashion, Media
 A preview of Willy Vanderperre’s resort story in the next V Magazine issue #62 which comes out November 3rd, featuring Miranda Kerr in her much–buzzed–about high fashion turn. Also featured is model Ana Beatriz Barros.
 The theme of the story is sort of “postmodern pinup,” a subversive take on sexy, courtesy of Olivier Rizzo. Miranda Kerr is best-known for being an Australian supermodel, the girlfriend of actor Orlando Bloom and a Victoria’s Secret angel.


 V Magazine, issue #62 – www.vmagazine.com
“PIN ME UP, PIN ME DOWN”
Sex, meet deconstruction. Deconstruction, meet sex. The cruise collections get smart with a postmodern take on pinup dressing, featuring Victoria’s Secret weapons Miranda Kerr and Ana Beatri Barros
Photography by Willy Vanderperre; Styling by Olivier Rizzo
Don’t you just love the idea of wearing lingerie over a one-piece bathing suit and a sweater??
xoxox
Carly
Leave Comment


 Most of the color was removed by this method. Ran it through the wash cycle (with detergent) to get rid of any remaining bleach.
 Definitely not what I was going for. I then wet the skirt, crumpled it up again on another garbage bag, and spooned black dye from the dyebath onto certain areas of the skirt, crumpling as I went. I left it for a short time, covered in garbage bag, then pulled it out and ran cold water through it. Back to the washing machine (no detergent) and into the dryer, and I got this…











