Jun 1, 2014 | DIY
 Happy June! Father’s Day is coming up soon, and I’m in a DIY mood. What better way to show that special Dad in your life some love than something handmade you’ve put your time and energy into? Here are a couple ideas to get you going: (more…)
Leave Comment
May 31, 2014 | DIY
 I received an inquiry from a company called YOUNIQUE earlier this month, who sent me a set of their Moonstruck 3D Fiber Lashes to try out. I have to admit: I was a bit skeptical at first, since I couldn’t exactly see how fiber lashes that were sprinkled on top of one’s already existing mascara could really make much difference. I mean, was this extra step in the beauty routine really necessary? But once I tried them out I became a believer – and you will too once you see these AMAZING before & after photos. (more…)
Leave Comment
May 27, 2014 | Fashion

Geode Slice Swarovski Crystal Earrings:
handmade by me (similar here). White Embellished U Choker Necklace:
DIY (
tutorial here). Reversible 6-in-One Gossip Girl/Risto Bimbiloski-inspired Dress:
handmade by me (see
here for it worn frontways and inside-out), similar
here. Box clutch: ? (a Goodwill find), similar
here. Shark Tooth bangle: c/o PERSONA.
Pamela Mann Studded Tights in Black/Silver: c/o MyTights.com. Silver Round-Toe Heels: Michael Kors (a Goodwill find), similar
here.
 Going out in the evening, which necessitated a little bit of much-needed dressing up, so I chose my favorite and ultimately versatile handmade reversible (front-to-back AND inside-out) Gossip Girl-inspired dress. It’s very simple and elegant, so it works for a variety of occasions. I wore it backwards for this evening, with the zipper in the back. (more…)
Leave Comment
May 22, 2014 | DIY, Fashion, Life
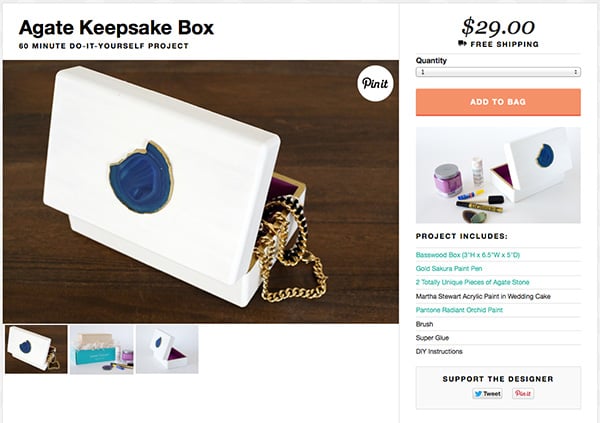
 Hello friends! I am back from my trip to Arizona to see my Dad, and am so pleased to announce that my recent DIY project for Darby Smart has launched! Woohoo! I’m officially a Darby Smart Designer!
Inspired by all those chic lacquer boxes I’m seeing everywhere lately like on Joss & Main (and that just so happen to cost a fortune), I crafted this with some great supplies from Darby Smart. And the kit is now available for everyone to buy – only $29! This would be an amazing graduation gift for someone special, a wonderful birthday present, or a cute addition to a bookshelf or vanity.
Check out their version! Which one do you like better – blue agate or purple??!
Thanks so much to Darby Smart for the collab!
xo
Carly
P.S. Oh, and if you end up making this DIY, please share your version with hashtags #DARBYSMART and #MADEBYME on Twitter and Instagram!
Leave Comment
May 14, 2014 | DIY
 Now I’m sure you guys have heard of that amazing crafting supply that does practically everything: Mod Podge. There are major devotees to this glue/decoupage medium/finisher, and for good reason! Because it’s nontoxic, cheap, provides a variety of finishes, and it just plain flat-out works!
Amy Amderson, the amazing and multi-talented blogger brand representative of Mod Podge (and the brainchild behind the cool blog Mod Podge Rocks!) sent me a package from her brand-new Mod Podge Peel & Stick Stencils line, designed exclusively for PLAID Enterprises. I had a blast playing with the stencil, and I fashioned this chic patterned update to an old photo frame I had. Check out how I did it:
You Need:
photo frame / Mod Podge Peel & Stick stencil (mine is in Tangier) / foam pouncer / Mod Podge (matte) / silver leaf / gloss spray acrylic sealer / paintbrush (not pictured)
How To:
1. Place your stencil onto your photo frame. (If your photo frame is very smooth, you may need to rub it with fine grit sandpaper to give it some surface to the Mod Podge to stick evenly on to.)
2. Pour out some Mod Podge and dip the foam pouncer into it, wiping off excess.
3. Dab the pouncer on top of the stencil.
4. Peel off the stencil and allow the Mod Podge to sit for a few minutes to become tacky.
5. Place some silver leaf onto where the Mod Podge was applied.
6. Use a soft, dry paintbrush to remove the excess silver leaf.
7. Once one side is fully leafed, repeat placing the stencil, applying the Mod Podge, and applying the silver leaf in sections across the photo frame.
8. Finish wish a spray of acrylic sealant to keep that silver leaf looking gorgeous!

And that’s it! I love how designer-y and high-end the photo frame now looks…even though it was a super-cheap piece from IKEA. I also love the worn look of the silver leaf and the great pattern that emerged as I applied it. The stencil was super-easy to work with, and sticky enough that I could wipe it off each time and re-use it on different parts of the frame, no problem. The perfect addition to this frame was a photo of Lil Tot practicing his best flying ninja stab jump with my rake. Stab that leaf pile!!
You can find Mod Podge Rocks! Peel & Stick Stencils in craft stores such as Jo-Ann Fabrics and Michael’s, or at the PLAID store online here. I guarantee, they will take your Mod Podge projects to the next level!
 Thanks Amy and the team at PLAID! It was so fun to make this little project 🙂
Happy DIY’ing!
xo
Carly
FTC Disclosure: I was sent a Mod Podge stencil, 2 small tubes of glitter, and 2 foam pouncers courtesy of PLAID Enterprises. I have received no compensation for this post. The above opinions are my own. To read my full Disclosure Policy, click here.
Save
Leave Comment

 DIY Agate Keepsake Box on Darby Smart










