Jul 17, 2010 | From You
from formspring.me:
do you have any idea why corinne, rob, and meg stopped making videos for threadbanger?
Leave Comment
Jul 17, 2010 | From You
from formspring.me:
HI! I LOVE LOVE LOVE your blog! You are so amazing! I just discovered it a couple of weeks ago and passed it on to all my best friends. Do you think you could do a DIY on this dress? http://www.forever21.com/product.asp?catalog_name=FOREVER21&category_nam
Hi there and thanks for your question!
Could you post the full URL in the comments to this post? Unfortunately formspring cut it off and I’m not sure which dress you’re referring to…
Thanks!
xoxo
Carly
P.S. And thanks so much for passing on my blog to your friends, too! That was so sweet of you 🙂
Leave Comment
Jul 16, 2010 | DIY
To continue on in the theme of strange things to wear on your wrists…
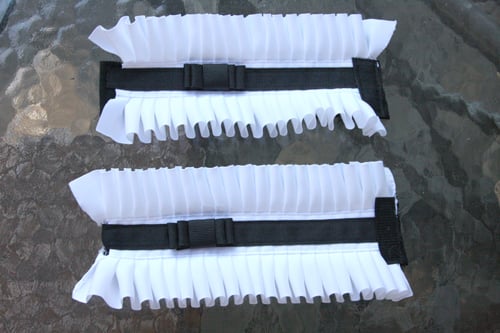
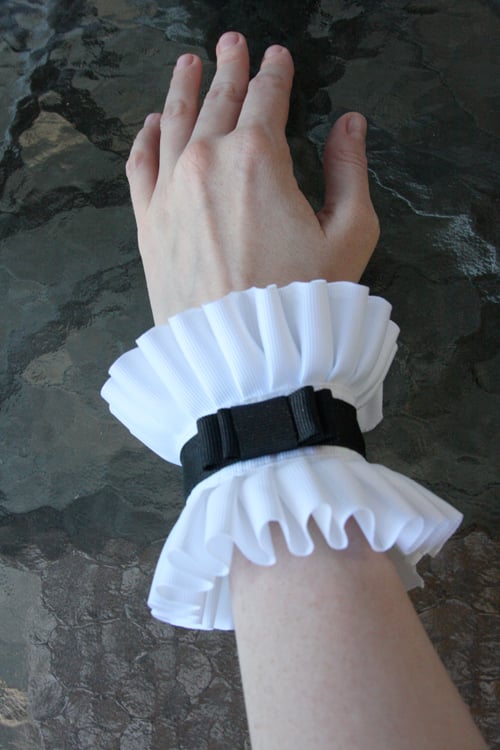
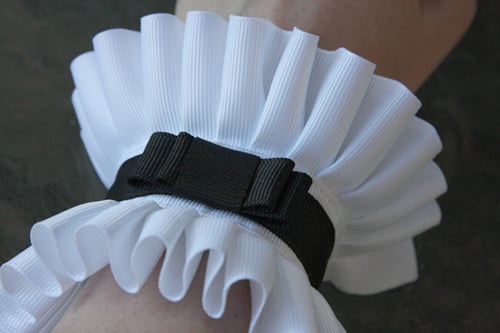
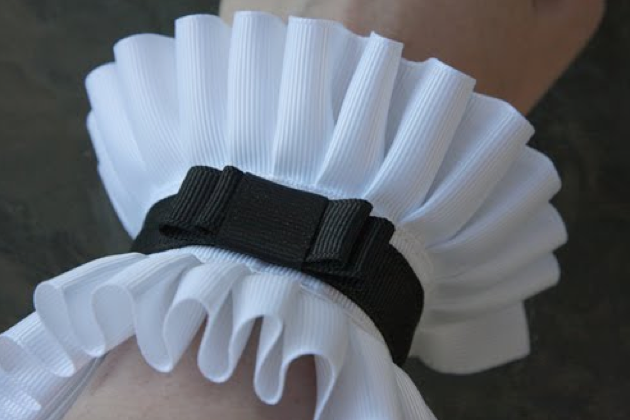
I’d like to share with you how to make your very own pair of pleated wrist cuffs.
As an accessory they may be somewhat unusual – but maybe you noticed them on China Chow from a previous episode of Bravo’s Work of Art? (Episode 3; the one where the artists have to create a piece of art for a book cover; I can’t find the screencap from Bravotv.com. She’s wearing them though!!)
They’ve been seen on celebrities such as Audrina Patridge and Brooke Hogan, courtesy of Cuffs Couture, but at $58-$90 for a single cuff I find this brand a bit out of my budget.
I actually saw the cuffs I got the idea from in a February 2010 issue of Vivi magazine, and thought they were a great idea to wear with bare arms to add a bit of romance to an outfit.
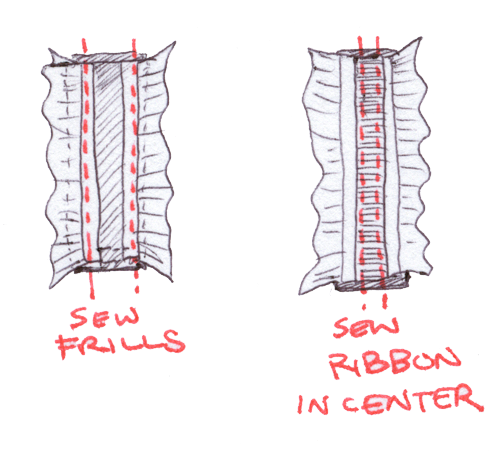
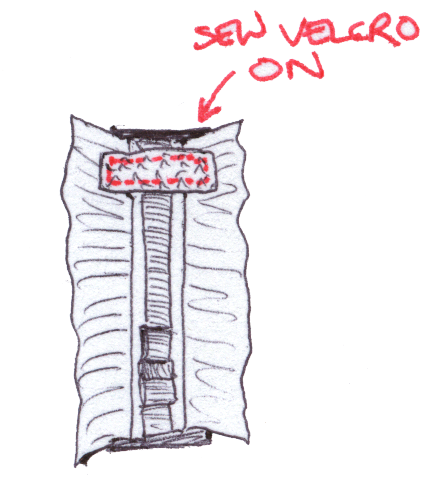
You Need: (sorry for the hand-drawings, I didn’t photograph the step-by-step)
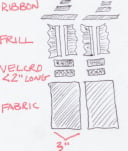
*2 pieces of black woven fabric, each about 3″ wide and long enough to wrap loosely around one wrist with about a 2″ overlap
*2 sets of black velcro strips (the furry side and the hooked side = 1 set), each about 2″ long
pleated white trim (mine was grosgrain ribbon trim I found at Jo-Ann’s Fabrics, though if you can find pleated silk or cotton that would be soooo much better)
*black grosgrain ribbon, 1/2″ wideAnd…
*fabric scissors
*flame
*sewing machine and needle for wovens
*hand-sewing needle
*black thread
*white thread
*fabric glueHow To:
1. Turn under all the raw edges of each fabric piece about 1/2″, and sew.
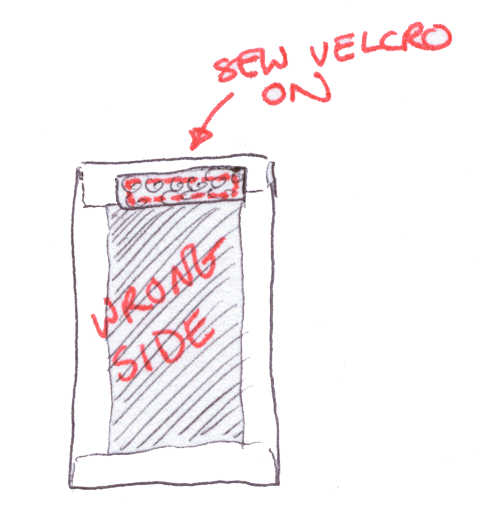
2. On the underside of one of the smaller ends of a fabric piece, sew a piece of velcro (the furry side out). Do the same for the other fabric piece.
3. Cut 2 pieces of your black grosgrain ribbon and 4 pieces of pleated trim to the same length as your finished fabric pieces.
Use an open flame to heat-seal the edges if they are synthetic fibers; if cotton you will have to either fold the raw edges under or seal them with Fray-Check.
4. Sew 2 pleated trim pieces onto each long side of one of the fabric pieces. Place them just far apart enough so that the 1/2″ wide ribbon placed in-between them will just overlap them in the center. Do the same for the other fabric piece and remaining pleated trim.
5. Sew each piece of black grosgrain ribbon down in the center of the fabric pieces.
6. Make the bow: (For my bow I made two loops; one a little smaller than the other, and placed them on top of each other, gluing the top loop onto the bottom one, then wrapping the center and securing with stitching underneath. You can make two or one or however many loops you want! The methodology is the same anyway. The following directions are for a single-loop bow🙂
*Cut a 2.5″-long piece and a 1.5″ piece of grosgrain ribbon. Double-thread your hand-sewing needle with black thread, and double-knot the end.
*Create a loop with the longer piece of ribbon, underlapping the ends.
*Push your needle into the underlapped pieces to the inside of the loop, then back through and out, pulling the knot tight onto the ribbon underside.
*Pierce the end of the smaller piece of ribbon and push it all the way down to anchor it onto the underside of the loop you just made.
*Curl the small ribbon around the loop, and anchor the other side of it with the needle and thread.
*Sew an X through all layers except for the tops of the loops, knot, and cut the thread.
*Make one more bow.
7. Use a dab of fabric glue to glue each bow onto the center ribbon of each cuff.
8. Sew the other velcro strips onto the opposite ends of the fabric cuffs, onto the right sides, the hooked side facing outwards.
Each cuff is fastened by pressing the strips of velcro together on the underside of your wrists.
The stiffness of the ribbon pleats makes it stand out from the wrist more than I had hoped, thus something that is softer or thinner would be a better choice for the pleating. You could even make the pleating by hand (with the help of an iron) if you were particularly hardcore.
I think they look equally as good with a casual ensemble as with a slinky LBD!
Hope this has inspired you to make your own!
Happy DIY’ing!
xoxox
Carly
~If you liked this post, please share it!~
Save
Leave Comment
Jul 15, 2010 | DIY
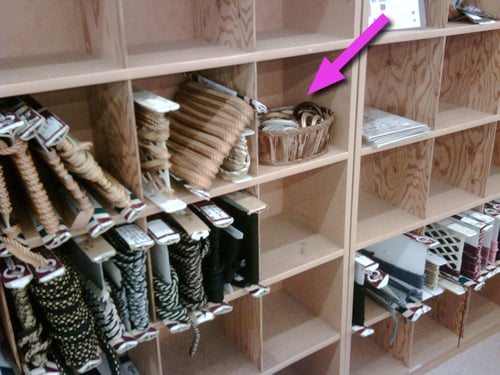
The other day I was just browsing in my local fabric and notions store, and something in the interior fabrics and curtains section caught my eye.
Yes, this little basket. Full of wooden and antiqued curtain rings for super-large curtain rods.
Gold, bronze, and bone craquel enamel carved rings, and dark wooden rings.
It was like a basket full of happiness.
Not that I was really looking for curtain rings. I just had my cheapskate ‘n’ DIY thinking cap on.
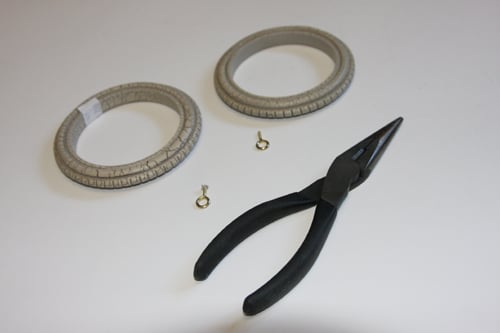
These curtain rings are so beautifully unique with the enamel craquelure! I’ll just remove the eye screws…
And now I have a one-of-a-kind pair of boho bangles!
You can also find large rod curtain rings in flea markets, antique stores, and interior hardware shops, so keep an eye out and your cheapskate cap on…
Though at $2.50 apiece maybe Forever21 is cheaper??
xoxox
Carly
Leave Comment
Jul 14, 2010 | Fashion, From You
from formspring.me:
How do you get used to wear high heels for long periods of time? I keep buying high heels but never wear them as they make my feet hurt.
Wearing high heels, especially the higher ones, takes lots of practice, and is an acquired skill despite what shoe manufacturers and advertising want you to think. It’s definitely something you have to work up to condition your feet to get used to the wonky position they are forced into. I may not be the best person to ask since I can rarely wear heels as a stay at home mom with no full-time job, but once upon a time I too was wearing heels all day. When I was in school in Japan I remember challenging myself with wearing a pair of 5″ platform boots all day long and not falling down: 20 minutes walking to the train station, 10 minute standing train ride in rush hour, changing trains going up and down long flights of stairs, a 15 minute standing train ride still in rush hour, and 10 minutes walking to the school, going to classes, walking around campus, and then repeating it all to go home 7 hours later. I was really careful and managed it though my feet were ready to kill me by the end of the day!

Probably the best way to go about conditioning your feet is to do lots of walking in general – and if you can, try it in shoes that are comfortable but have a low wedge (like 1/2″). Once you do all your normal walking in this shoe, change them out for a short time during the day to a higher kitten heel that you wear for an hour or so in the beginning. (Still wear your sneaks on Sunday or one day of the week; and after a long day of wearing heels-even low ones-do foot stretches and runners’ stretches so the soles of your feet don’t bunch up [i.e., you don’t get plantar fasciitis, which is really, really painful!] and you don’t get Charley horses.)
Daily increase the hours that you are wearing your kitten heels until you can comfortably walk in them. As you get used to them, your feet will naturally develop calluses wear the shoes rub; these you don’t want to pumice off or else you’ll get blisters instead. (The unfortunate side effect of wearing heels all the time is ugly feet.)
Once you’re wearing the kitten heels on an almost daily basis, then start switching them out for a few hours to a higher pair, and continue to work in this manner until you can wear your highest heels for hours without cramping or falling over. The higher you go, the more often you will have to slip them off periodically to stretch your bare feet – but don’t slip on sneakers or flats to walk around in for any long period of time in-between wearing heels since that will undo all the work you’ve done. If your feet start to hurt chronically or you feel twinges in your legs or back, stop with the heels immediately, and see a podiatrist if you can.
Ankle-strengthening exercises like those found in ballet (the releve position, for instance) or calf-lifts on a stair riser, using 5-10 lb. dumbbells, can help reduce the wobble and uncertainty of your feet and ankles when wearing high stilettos.
Always arm yourself with blister-bandaids and moleskin to stick on the inside of your shoes if they start rubbing, use Dr. Scholl’s ball-of-foot cushions or arch-support inserts to ease the ‘slam, ‘slam’ of the balls of your feet on the pavement, have a pair of lower heels to switch out to, and treat your feet at the end of the day to a rub with warming massage cream or a soak in the tub.
And have an extra pair of flats for driving purposes only, if you plan to drive a car. Wearing your heels at home (if you wear shoes in the house), running around, jumping, and dancing for practice can also help condition your feet and body to navigating the world in higher heels.
You can also check out here and here for more advice on walking in heels, and here is a former runway model’s advice on the subject below:
http://www.modelinia.com/videos/embed/181
See more videos on modelinia.com
Hope that helps and with a little perseverance and practice you’ll be trotting about in the highest heels in no time!
xoxox
Carly
imgs from coolfunpics.com, bizrate.com, badmintoncentral.com, fitsugar.com, paisonflamenca.com, and jakandjil.com
Leave Comment
Jul 13, 2010 | Fashion
Sunglasses-print T-shirt: Pineapple County (Honolulu)
Distressed Boyfriend Denim Shorts: Hudson
Leggings: Old Navy (rolled up since they don’t stock capris right now)
Oxidized Puzzle Necklace: Kaza (LaForet Harajuku)
2-finger floating rhinestone ring, gold feather curlicue ring, and watch: Forever 21
Beaded Bracelets: self-made with beads from Michael’s and Etsy
Bag: Bought in Honolulu
(please forgive the photo quality; we only brought a small digital camera that only has a built-in lens, and I have no photo-editing software here, so you get to see me in all my unedited glory, heh heh)
The problem with going shopping in Japan is that you have to walk – lots. It’s not a question of driving to the mall, parking, and then walking around in it…you have to walk to the train station, take the train to the shopping areas, and then walk from the station to wherever you want to go.
Thus you need incredibly comfortable shoes. Here you often see trendy girls walking around in 4-inch heels, and I always wonder how do they do it? And the girls who staff the boutiques are required to wear the clothing that they sell – they are literally walking, talking, live models – and thus have to wear the trendiest and highest of heels all day – and they’re never allowed to sit down anywhere where the customers can see. It truly boggles the mind.
Add to that it’s 98 degrees with a super-high humidity factor here, you have to weather extreme changes in temperature as you go from train to outside to store to outside again, and your viable wardrobe diminishes.
Plus if you’re going shopping or navigating the train stations you don’t want anyone peering up your skirt as you ascend the escalator.
So this is my go-to outfit for walking around and window-shopping in Japan, trying to beat the heat: trendy tee, cross-body bag, denim shorts, leggings, and printed sneakers. At least for today – until I get used to all the walking. I was really happy with the way my self-designed Miu Miu-esque swallow-printed shoes from Zazzle turned out…the colors and print are so pretty! I was a little sad to find that the Keds sneakers run large – and my usual 7.5 is too big for me. Ah well.
With all the humidity my hair falls flat in an instant – and can’t hold a style – and so I’m loving these clip-in bangs from Jessica Simpson’s HairDo line. (I think they may be a little long for me, but I don’t want to get them cut just yet.) They’re so soft and feel just like real hair, the longer pieces at the sides frame the face perfectly, and the color for me is such an exact match I can’t tell where my real hair ends and they begin.
They’re a great option for girls like me who have thinner bangs, or who don’t want to commit to cutting a thick bang halfway up their crown and then have the agony of growing it out if they don’t like it.
(Of course I forgot to take photos before I actually went anywhere – and ended up taking them at the end of the day, after I’d been walking around for hours and was all hot and sweaty. Eek!)
Hope you guys had a great weekend! More sweaty outfits and clip in hair to come!
xoxo
Carly
Leave Comment
Jul 12, 2010 | Beauty, From You
img from giftofhair.org
from formspring.me (continued from an earlier question):
I will be shaving my head in a couple of weeks for charity and as I will be pretty much bald (eek!) I was wondering if you had any ideas for cool hats or headscarves to cover me up during the hot summer. For more info on the cause visit my blog: www.susanna-d.blogspot.com
Wow! Good for you! That takes guts to do, though it’s certainly for a great cause.
If you’re looking to cover up and aren’t into purchasing a wig while waiting for your hair to grow back, either a hat or a head-scarf (or a combination of the two!) will probably be your best bet.
clockwise, from green hat:
Right now is a really great time for hats, as Target currently is stocking their Eugenia Kim for Target line of stylish, chic hats – for a fraction of the cost of what Eugenia Kim hats usually sell for. Kim, who shaved her head after suffering a bad haircut, found there was such a lack of stylish headgear on the market that she designed her own cover-up. Thus, she’s certainly no stranger to your dilemma – and I love that this wide-brimmed straw hat has its own scarf built in to it – an added plus. This green fedora is super-cute and city sassy, which would look great paired with a floaty tee and bermuda shorts. You could also try different shapes to see what works with your body type and style; military-style caps, wide sunhats, and boater hats are all on-trend options.
If you’re uncomfortable about a lack of hairline showing, then a head-scarf underneath your hat may be a good (though warm) choice. You could also, of course, wear the head-scarf on its own, tied in a chignon, bow, or donut shape. A fun print (like this monotone faces print) can look summery or sophisticated depending on how you tie it. Here is a video showing 3 variations of tying a head scarf and here is a list of links to other headscarf-tying resources. If you’re daring, you could also try a turban, though you’d have to pick and choose your coordinating outfit carefully to avoid it looking too matronly.
A cloche is always a great option since it covers your head completely, though they’re often made of felt and may be too warm for summer. A cloche-shaped straw hat, though, has a slightly retro-feminine feel to it, and looks super-sweet with any casual, breezy outfit. As the weather cools down you can also go for bucket-shaped and fuller hats made of thicker materials. Small details like ribbon trim, a flower or rhinestone clip, bows, or tiny fabric flowers elevate something that looks like you’re desperately trying to cover your head up…to a stylish accessory in your ensemble.
Excellent sources of such accoutrements (besides the obvious like department stores or boutiques) are places that specialize in headgear for people who have suffered hair loss for medical reasons, like chemotherapy, alopecia, or trichotillomania. Headcovers Unlimited and Hat, Scarves, and More are two great online places to start. (The reversible soft hats from Just In Time are super-chic too!) And since I’m suck a DIY maniac, I might try my hand at sewing up my own head-covering, choosing from the wide variety of patterns for hats and scarves from Brimming with Love.
As always, the more confidence you have, the less people will notice any lack of hair – and most people will just assume any head-covering is part of your stylichly chic ensemble anyway!
Best of luck-
xoxox
Carly
Leave Comment
Jul 8, 2010 | DIY
Well everybody, since I’m on the other side of the world I have no idea what time it is – but I have the feeling it’s time for another DIY Roundup! First let me share with you a recent piece I made (tutorial coming soon). It’s a cuff made of pleated trim and grosgrain ribbon – and it’s a cute little accessory that adds a touch of femnine whimsy to an otherwise plain outfit.
So now you get to share your own DIY’s! If you have a DIY project or tutorial, please feel free to link below! (However you can only link YOUR OWN PROJECT. Please do not link others’ projects!)
If you’ve linked up your project to the Roundup, feel free to grab the button below.
Can’t wait to see everyone’s projects!
xoxox
Carly
Leave Comment
Jul 8, 2010 | DIY, From You
from formspring.me:
Any suggestion to DIYing something like Sergio Rossi’s Powder suede and nappa silk fishnet booties with crystals? http://www.sergiorossi.com/us/en/eStore/women/women-shoes-SpringSummer2010-Collection/Boots/P-PELLE-Powder-Suede-Nappa-Silk-Fishnet-Bootie-C
Leave Comment
Jul 8, 2010 | DIY, Media
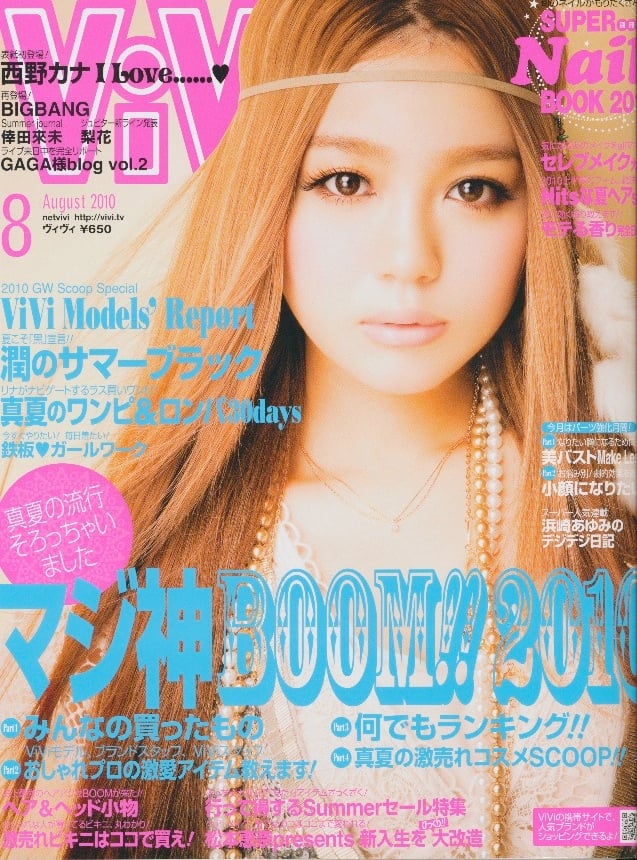
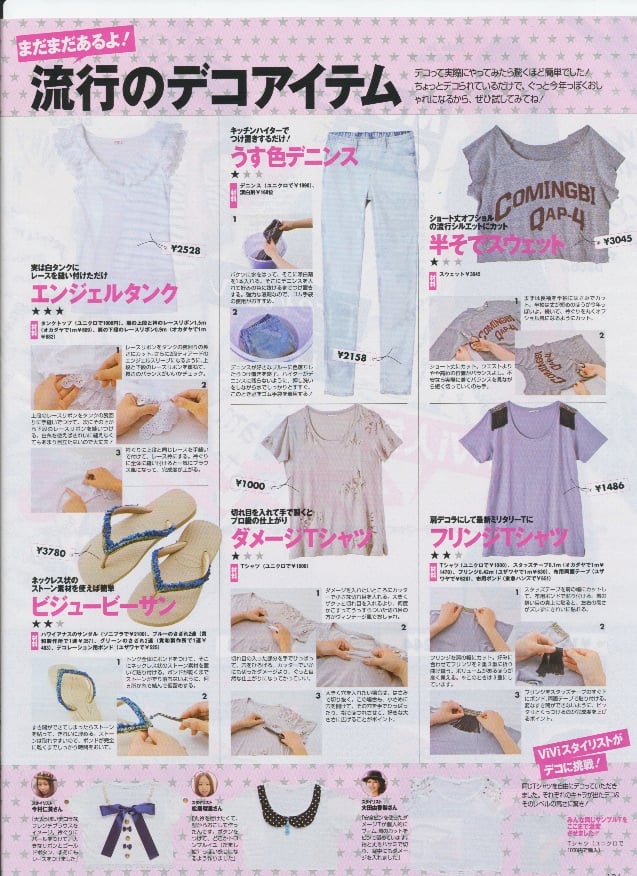
Not, not of me. (I wish!!) I was very surprised to see in the August issue of Vivi magazine, no less than TWO DIY features! They call it “Deko” (short for “decoration”)…but it’s DIY, to be sure.
Times are totally a-changing!
Yup, that model on the far left is part of the DIYers since she actually painted on her Balenciaga. The heart trembles.
If you’re familiar with Vivi, it’s a fashion-forward, extremely trendy Japanese magazine (kind of like Marie Claire…kinda…but with few written features, crammed with product shots and street style photos, as well as the same familiar models wearing the latest and trendiest) – and it’s packed to the gills with trendy photos of all the latest clothing, shoes, and accessories. It’s a consumer’s heaven!
Unlike the Gothic and Lolita movements in Japan, where many followers are extremely crafty and make their clothing, accessories, jewelry, and bags from scratch (and there are many magazines devoted to this…my fave is ‘Gosu Rori‘), the trendy “Gal” – style has never espoused making anything yourself…unless it’s wildly complicated nail art, or maybe, recently, adding Swarovski crystals and deco objects to your cell phone, compact mirror, pen, business card holder, or date planner. (“Deko”; i.e., “deco”rating your accessories with crystals and plastic objects, has been a trend for the last two years, but it didn’t seem to reach beyond the ream of blinging out your accessories.) Nope, its mantra was “buy, buy BUY!” and where to buy, what’s the newest, what’s selling the most, how to navigate a sale, etc.
Above, from right to left: Frill Socks by adding lace; Super Destroyed Denim by cutting and bleaching: M.J.-Style Oxfords by adding crystals; Studded Vest by ironing on stud trim
Since the mid-nineties (or even earlier), there has been a “remake” subculture, mostly centered around Harajuku, where girls and guys would refashion their clothing and accessories – upcycle them, if you will. Many shops in that area solely deal in used clothing and upcycled clothing, and there are quite a few brands that create fashion-forward, gorgeous pieces using only recycled materials. (guriguri is one of my ABSOLUTE FAVES – their bags are to die for, and with a price tag to match.;-)
Above, from right to left: Fabric-Lined Basket Bag; Lace-Trimmed Shirt; Metallic Trim Headband; Lace-Inset Tee
But this is not making items from scratch, like the Gothic Lolitas; nor is it upcycling, really. It’s unequivocally D.I.Y.: i.e., adding low-cost embellishments and using a variety of techniques to add value and trendy style to a piece.
“Trendy DIYs”: (clockwise from top right) Short-Sleeve Sweatshirt; Fringe-Shoulder Tee; Damaged T-Shirt aka the Balmain; Bejeweled Sandals; Frilly Lace Angel Tank; Bleached Denim.
Bottom Row, left to right: “3 stylists take on a plain white T”: French Blouse with pearls, ribbon, and gold buttons; Fabric-Collared Button Tee; Shredded and Safety-Pinned
So this is HUGE for all this to be in such a mainstream mag. The projects are cute and still look “Japanese” (though many of us out there who’ve been following the DIY movement on the internet and blogosphere can say that we’ve seen a lot of this already)…but this is a huge leap forward in terms of attitude and fashion-consciousness for this style. It is yet anther facet of consumer culture (instead of buying the piece ready-made, you now have to amass the tools and materials to add to the store-bought item), so it may indeed start spreading through this subculture, so focused as it is on “new” and “trendy” and “pretty/sexy.” I am so keeping tabs on this!
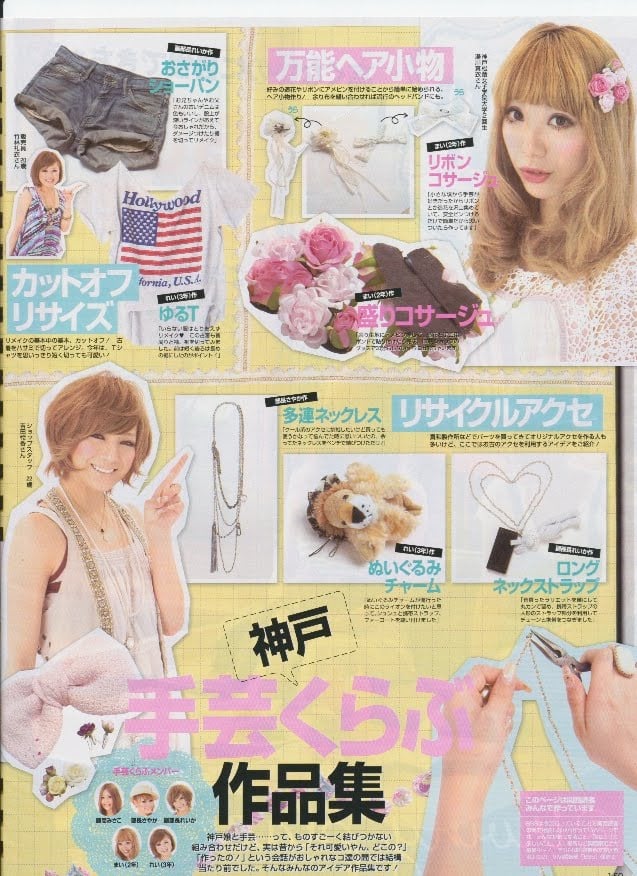
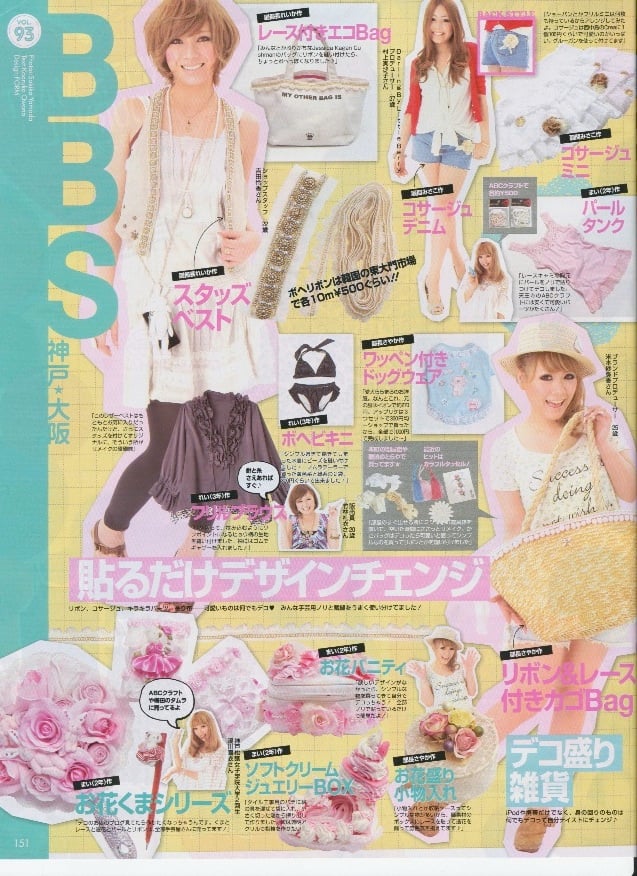
The second feature in the magazine: reader-submitted “Kobe Craft Club” (a group of girls who get together to do DIYs – like the Japanese version of the SixSixSick girls?!): (from top left, clockwise) CUT OFF/RESIZED DIYs: Loose Denim Shorts; Loose T; GENERAL HAIR ACCESSORIES: Ribbon Corsage; Flowered Corsage; RECYCLED ACCESSORIES: Triple-Chain Necklace; Stuffed Animal Charm; Long Necklace Strap
I do wish that one of the features had made mention of these projects that have already been shared on the internet by many other crafters, and offered no resources for people who are interested in DIY’ing more. And I certainly doubt Tavi, Keiko Lynn, and Julia Frakes being icons of DIY – though all their blogs are arresting and creative for other reasons. Another disconnect that Japanese pop culture seems to have with the rest of the world. Ah well. Things are definitely moving forward!
from top left, clockwise: Lace on a Canvas Tote; Corsage Denim Shorts; Corsage Mini Skirt; Pearl-Embellished Tank; Applique Patch Dog Clothing; Ribbon & Lace Dresses Basket Handbag; Flowered Box; Softserve Ice Cream Jewelry Box [the epitome of the
Sweets Deko movement of the last 2 years]; Flower Makeup Pouch; Flower Bear Series mirrors; Frill Blouse w/ Leopard Hem; Beaded Bikini; Studded Leather Vest
I also found a book at the bookstore called “Deko Remake” which appears to be the official designation for DIY’ing your clothing and accessories (thus distinguishing it from the Japanese “Deko” bling embellishment movement and from the “remake” or upcycle movement)…more on this book and its contents later.
xoxox
Carly
Leave Comment