Nov 12, 2009 | DIY, Fashion
To subject y’all to entirely non-fashion-related babbling drivel for a little bit…
One of the things that we were so psyched about when we moved from Honolulu to Oregon 2 years ago was…drumroll please….
Ikea within driving distance.
Yes, I know it’s sad and bourgeosie. Or strident middle-class desperation. Whatever. In Hawaii, the furniture available at most furniture stores is utter crap and ridiculously, ridiculously overpriced. And either teak (endangered…weighing a thousand pounds…um, no thanks) or wicker (infested with bugs, “island-style casual”…blech.) Nothing modern, nothing clean and streamlined…unless we wanted to pay thousands of dollars at Natuzzi or Z Design or somewhere. We lived in a beautiful condominium with cardboard boxes and junky mismatched stuff from Wal-Mart and cabinets from Home Depot.
Until we came to Oregon, finally visited Ikea, and were in heaven. Seriously, for the amount that you have to pay to furnish a home beautifully in a contemporary style in the islands…it would be cheaper to fly to the mainland, stock up at Ikea, and ship everything to Hawaii instead! Ikea could even raise their prices by 20% and still undercut what’s available in Honolulu by hundreds of dollars. Ikea people, take note!
But I digress. I love the textile patterns available in their fabric department; they’re so cool, so clean and uncomplicated. I must admit I went on a bit of a spree in the textiles department, picking myself up 2 yds of Patricia printed fabric last time I visited the mecca of Swedish design watered down for the average consumer palate.

And I made myself a dress. The fabric is stiff and 100% cotton, so it doesn’t lend itself well to anything but structured clothing, IMHO. I had to line the dress in poly satin since the fabric is really too rough to sit against the skin.
I wanted structured sheath dress with a little twist, so I chose Vogue pattern V1068 (dress on upper left). I had to make multiple alterations on the dress once made since of course the top part didn’t fit like the pattern said it would. I hate store-bought patterns. I thought the neckline was a little bit interesting. Not earth-shattering, but interesting.
This is why i.d. Bare Minerals is a travesty for my skin. It settles into all the fine lines around my eyes and makes me look like a perfectly lovely 60-year-old when I laugh.
I’m also working on a little removable puff-peplum for this dress…it won’t be done before the leaves start to decay, so I wanted to get these shots first. And a clutch handbag where I’m shading in the flowers with a fabric marker in various tones of gray…should be cool.
I’ve left the garden in this atrocious state for more than a week, reasoning that I wanted to do a photoshoot on top of all those beautiful Japanese Maple leaves before I rake them up. That’s my story and I’m sticking with it. I had a little Marilyn Monroe moment there with the elbow-length gloves…from Target, can you believe it?!

Now I’m off to rake me some leaves!
xoxox
Carly
Leave Comment
Nov 11, 2009 | DIY

As most of you probably already know, I did a DIY refashion of a Men’s Shirt to a Cute Summer ShirtDress that I posted back in August. One of my lovely readers, Amanda V., sent me a photo of the dress she made following the tutorial.
Amanda’s dress. Fabulous!
So I decided to do another shirt dress tutorial…this time using a men’s plaid shirt as the base, and changing up the front embellishment.
Are you ready? Here we go…
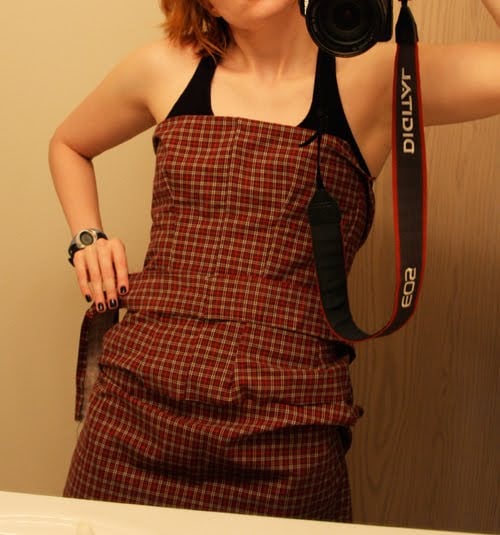
How to Make a Bustier Dress with a Peplum, Faux Waistband, Zip Back, Bust Darts, Tulip Skirt, & Front Cascading Folds
(say that 10 times fast!)
You’ll Need:
*1 men’s shirt (I used an Eddie Bauer M size shirt)…preferably not flannel
*1 invisible 14″ zipper
*12″ of 1/4″ wide elastic
*hook and eye
*thread matching topstitching thread in shirt
seam ripper / fabric scissors / pins / hand-sewing needle / sewing machine + regular sewing foot / zipper foot for sewing machine / a friend (or, a sewing dummy to pin on)
How To:
PREP YOUR PARTS
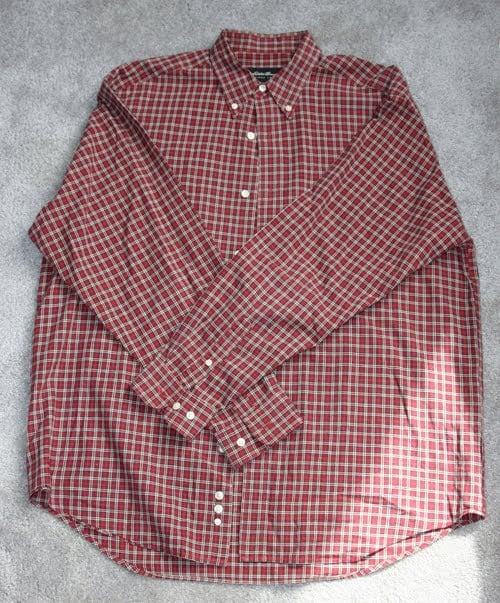
1. Cut shirt as follows:

- cut button placket off front
- cut sleeves off body
- rip pocket off front with seam ripper
- cut bottom off shirt, going straight across from underarms, through front and back
For each sleeve:
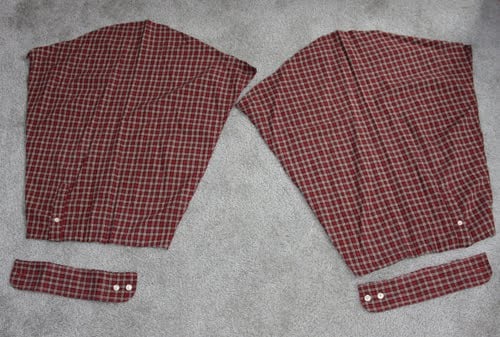
cut top rounded part off sleeves (we won’t use the tops)
2. Remove buttons from button placket.
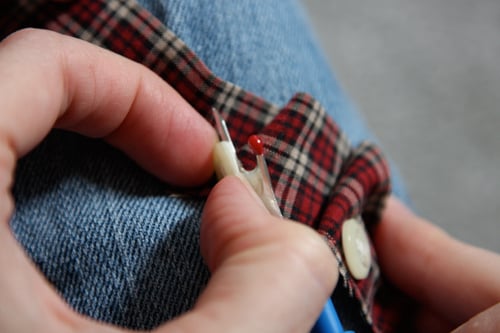 Bye-bye buttons!
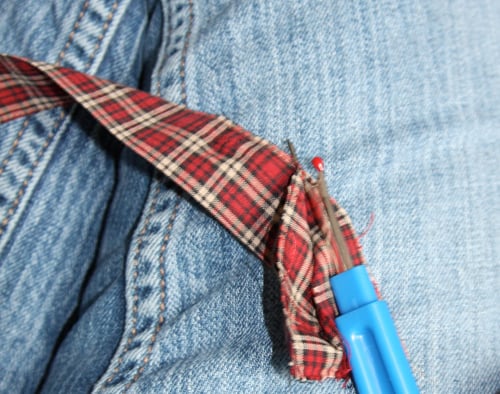
Use seam ripper to open topstitched edges of button placket, making it into a flat piece of fabric.
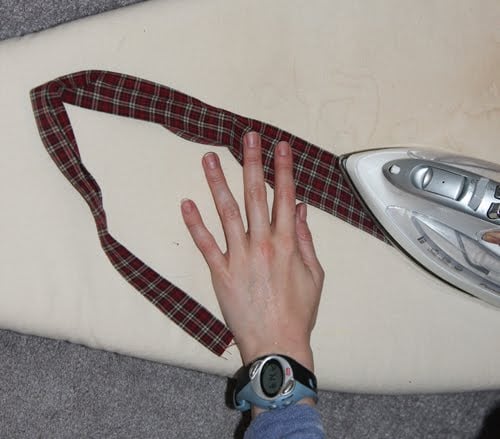
Iron it completely flat.
3. Use seam ripper and open cuffs up at edge seams all the way to buttonholes; remove buttons.
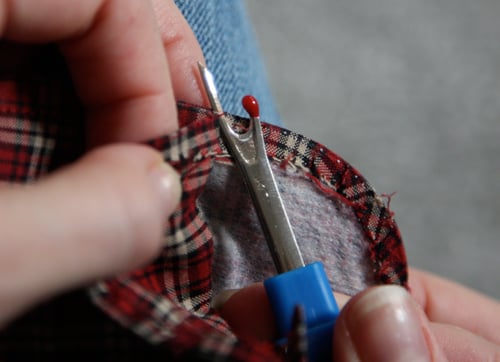
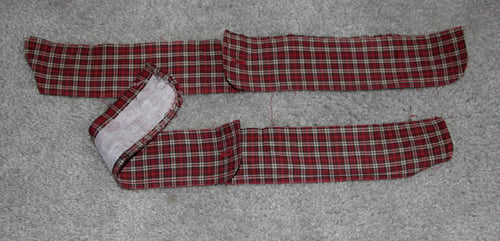
Cut off ends of cuffs where the buttonholes are (we won’t use those parts).
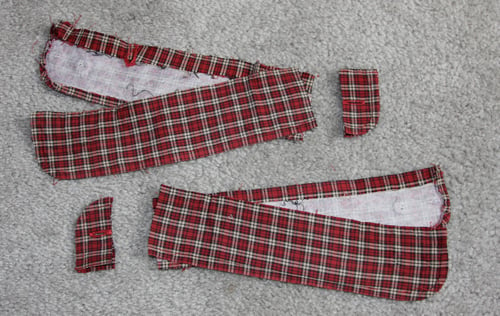
Peel off any interfacing that’s stuck to your cuffs and discard.
PIN
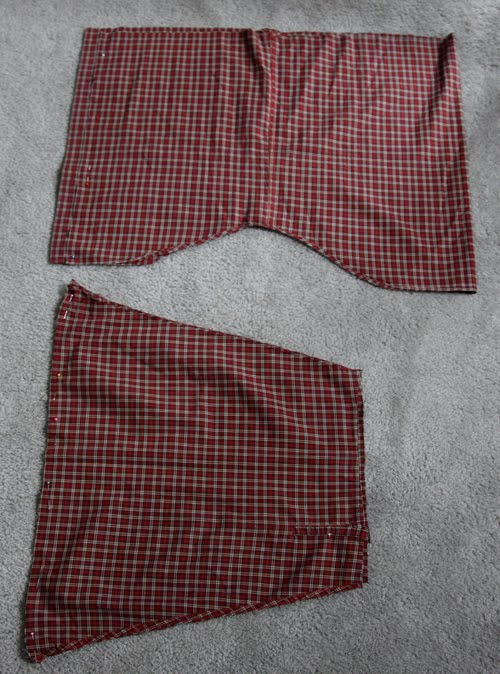
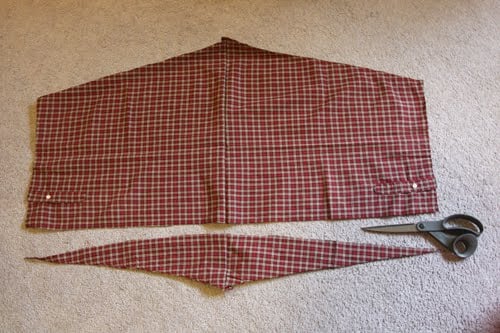
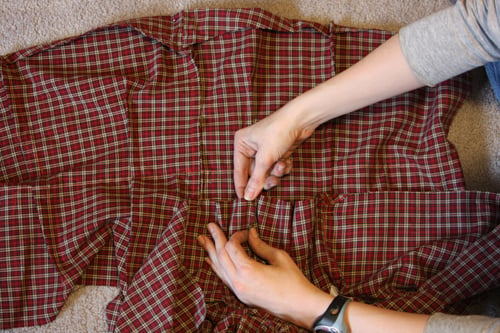
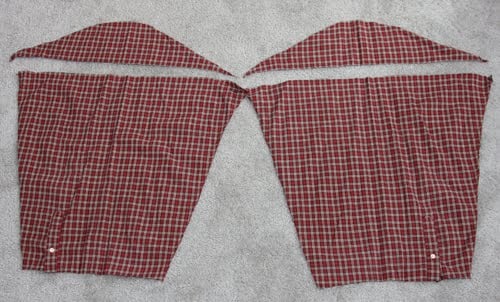
4. Turn shirt bottom inside out and cut off buttonhole placket. Pin edges together (where button placket formerly was). This will be your skirt. (top piece in photo; the shirt bottom is folded in half and flat)5. Pin the two sleeve pieces right sides together, matching the line where you cut the rounded tops off them. This will become the bodice of the dress. (bottom in photo above)
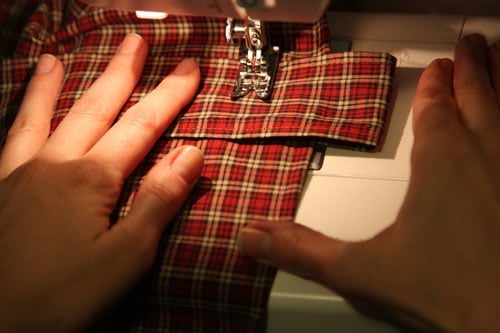
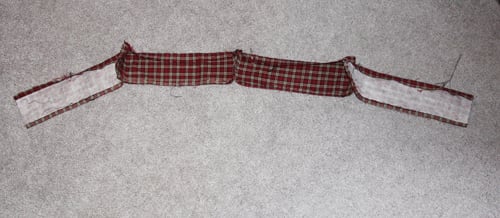 5. Pin cuffs together, matching short ends, to make a long line. (I matched the center two so the curved parts of the cuffs will be in the center.) This will be your waistband. (I haven’t yet removed the interfacing in the photo below. My bad.:-)
SEW
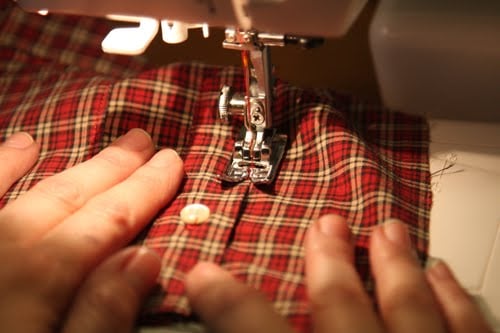
6. Topstitch sleeve opening plackets closed on the back side of your bodice.
Sew both bodice pieces together where you pinned. (not pictured)
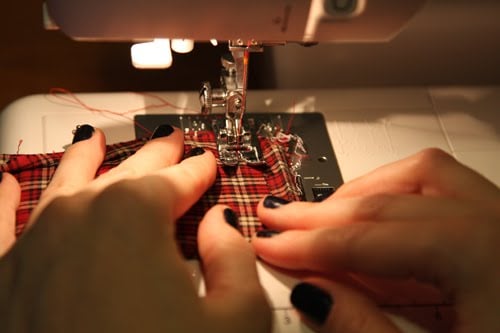
8. Sew all cuffs together at their ends.
This is what the waistband will look like once all your cuffs are connected.
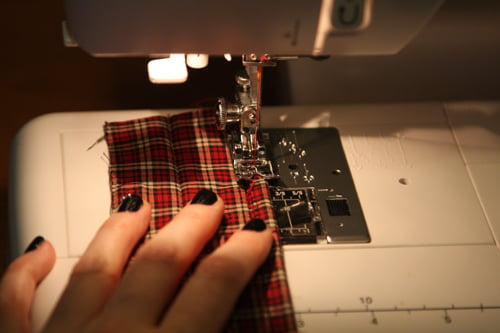
9. Turn under about 1/4″ on each long side of the button placket you ironed back in Step 2). Sew 1/8″ from edges.
10. Sew along line you pinned on the shirt bottom in order to make the skirt, leaving about 5″ unsewn at the top of the skirt. (not pictured)
DART THE BUST
11. Cut off bottom of sewn bodice piece straight across. (This is the edge closest to your sleeve opening plackets.)
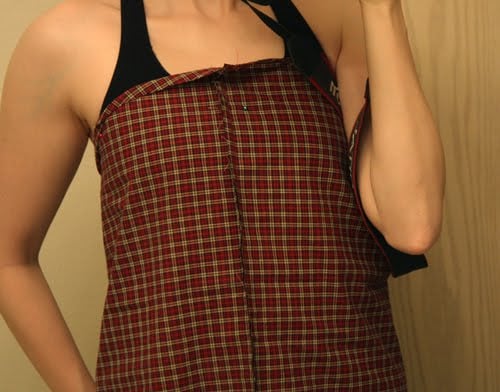
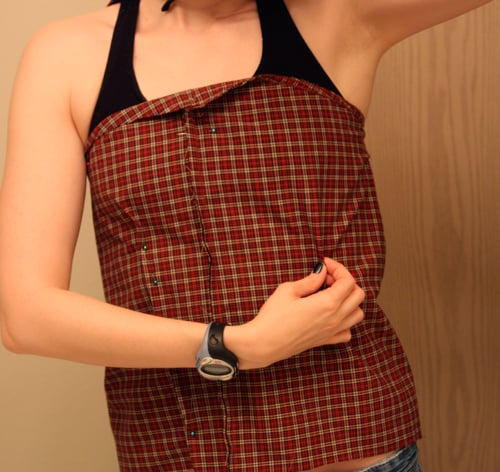
12. Wear a well-fitting sports bra or tank top that can support the weight of your dress bodice, and pin bodice (wrong side out) to your top in the center and at each of the side seams under your arm. (I’m referring to the side seams of the bra/tank top you are wearing.)
13. Using your fingers, start “pinching” the fabric outwards starting right below the fullest part of your bust on the right (usually where your nipple is). Pin as you go, moving downwards towards your waist. Do the same for your left side. Stand with both arms flat at your sides, move around, bend, etc…and see if the fabric pulls in strange ways. Alter your darting until both darts are relatively the same size and begin and end at symmetrical points to either side of your center front seam. (Measuring by the plaid pattern helps.)
14. Create side seams by the same method, using the side seams on your sports bra/tank as guidelines.
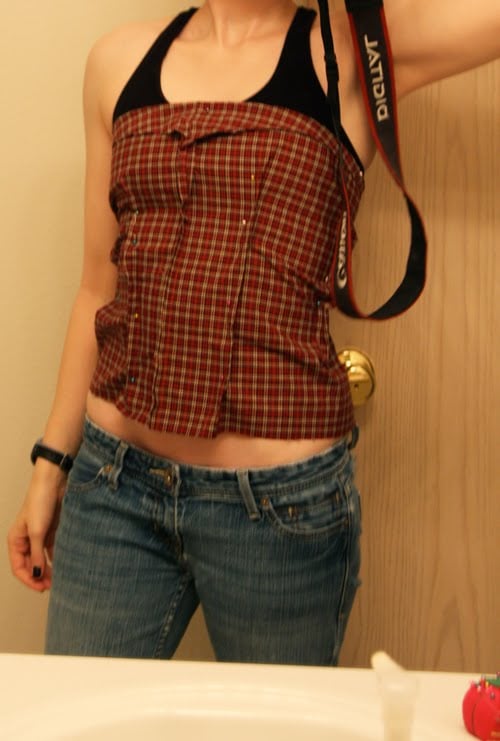 I know it looks like it’s pulling in a lot of directions – mostly it’s because I’m raising one arm to take the photo.
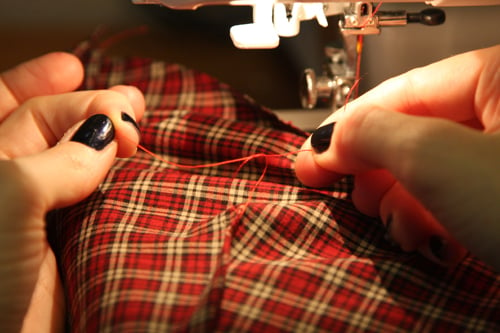
15. Take off the bodice and sew the darts on your machine, starting at the bottom and moving up to the bust point.
Leave two long threads at the end and knot the threads. Sew the side seams, and trim the seam allowance, notching where necessary.
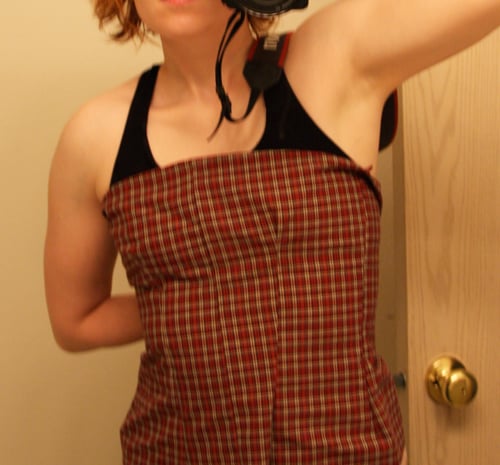
16. Try the bodice on again, this time right side out. Are you pleased with the fit? No weird bobbles or anything? If it’s a little off, go back and fix. Also, does your bodice go all the way around your body? If not, now’s the time to add in some fabric salvaged from the leftover bits of your shirt – and add it to both sides of the open back. (You need enough fabric to touch at your center back PLUS 1/2″ on EACH SIDE.)
SEW THE TOP TO THE BOTTOM; MAKE THE PEPLUM
17. Pin the bodice back on your shirt/bra top. Pin the skirt underneath (onto a pair of tight-fitting leggings/underwear that you’re wearing underneath). Make sure the skirt underlaps the bodice part all the way up to your waist, since that will be the connection point of the skirt and the bodice. You need to match the side seams of that skirt to the side seams of what you’re wearing on the bottom…and place the seam that you sewed down the front of the shirt…at your center back. Place waistband over bodice at your natural waist, matching center fronts. Pin waistband to bodice all the way to the side seams. Make sure top of skirt underlaps bottom of waistband (or top of waistband, if you want a super-short miniskirt). Pin skirt bottom to bodice in center and at side seams only.
Take everything off.
18. Place dress on a flat surface. Continue pinning waistband all the way around to back parts of bodice. Pin skirt back to bodice back (pinning thru waistband) and gathering skirt at back where needed. Gather skirt at front between pins, and pin gathers in place.Creating gathers in the skirt part with my fingers.
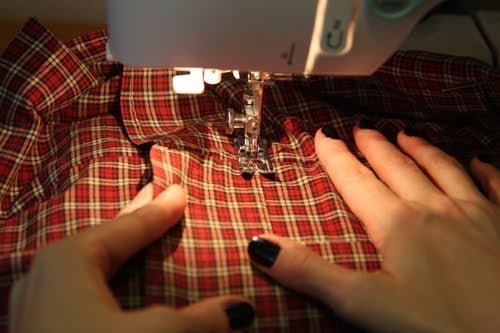
19. Topstitch top of waistband through all layers.
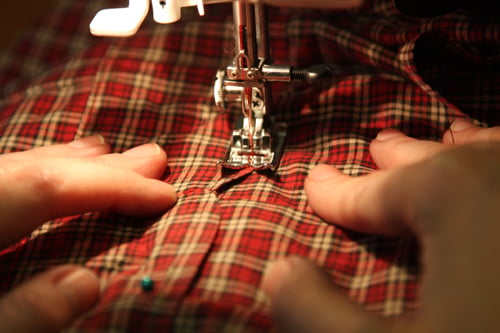
See the little w-shaped center to the waistband? A new day – you can see I’ve ditched the black nails.:-)
20. Topstitch bottom of waistband through all layers, preserving gathers in skirt as you stitch through them.
You can see the angle of the peplum at the center back.
21. Using a seam ripper, open the front bodice darts below the waistband to create a flared peplum. Fold under the ends of your peplum at an angle towards the center back, and topstitch edges.
PLACE THE ZIPPER
22. Try dress on inside out. Have a friend pin the dress at center back to create the seam allowance for the zipper. Also measure the zipper against the back of the dress and place a pin in the center back at the point where the zipper ends. (not pictured)
23. Take the dress off again. Sew the CB seam on your skirt up to the pin your friend placed. (not pictured)
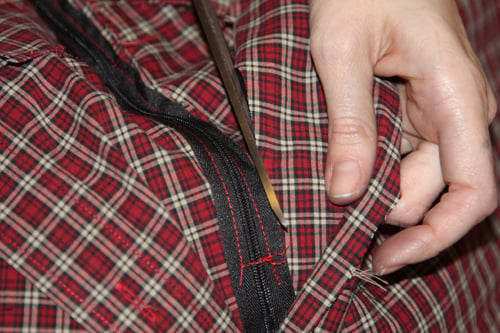
24. Place the dress on a flat surface and pin the zipper to one side of the CB opening. Sew the zipper on one side, using a zipper foot. (Pre-basting if necessary.) Close the zipper, pin to other side of CB opening, and sew. Make sure not to catch the peplum in your stitching. (not pictured) Trim seam allowance next to zipper.
FINISHING TOUCHES
25. Put the dress on again. Fold under top of bodice to create a straight line, and pin. Take dress off; trim seam allowance under top. Stitch a 1/4″ seam at the top. (not pictured)
26. Try the dress on yet again. If the bodice seems too loose, zigzag-stitch a piece of elastic on each side of the back bodice, at the top on the wrong side of the garment. (not pictured)
27. Place top of flattened button placket on underside of top of bodice, matching edge of placket to edge of bodice top seam allowance. Center on bodice. Stitch placket to bodice on right side, going through all layers.
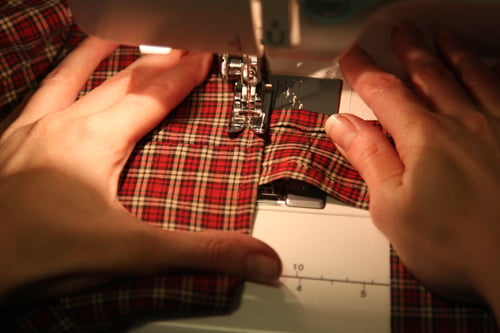
28. In order to make the cascading folds in the placket, measure out about 2″ from secured top of placket, and fold under, underlapping about 0.5″.
Sewing the first fold. The loop will actually hang a little below the line of sewing, camouflaging it. Work from the top to the bottom of the bodice in this way.
Push placket fabric up and out of the way, and sew straight across placket to secure at 1″ down from top of bodice. Repeat another 4 times to create cascading ripples down the front of the bodice; cut placket at appropriate length. The bottom looped ripple will cover up the end of the placket if you sew the end about 0.5″ above the bottom of the loop, and where the waistband top hits. (Your bottom loop will overlap the waistband slightly.)
28. Add a hook-and-eye closure above the zipper in the back. (not pictured)
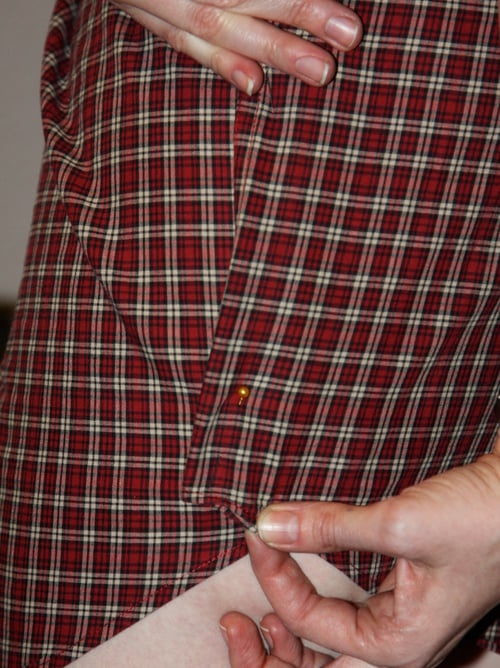
29. To create a tulip-like effect to the skirt, overlap the edges at the side seams slightly, pin, and topstitch.Believe it or not, you’re finally done!!
I’m a Misses’ Size 4/6 (usually a S in dresses though sometimes a medium because my waist is kind of thick). A Men’s M shirt was sufficient for my size…if you are larger, choose a larger shirt to work with!
Not loving the ripply back, though. It might need a little nip in the back to make it sit right.

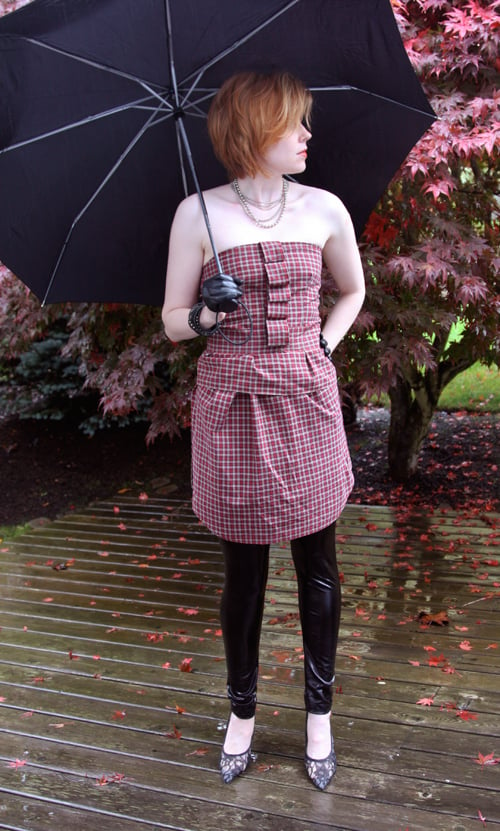
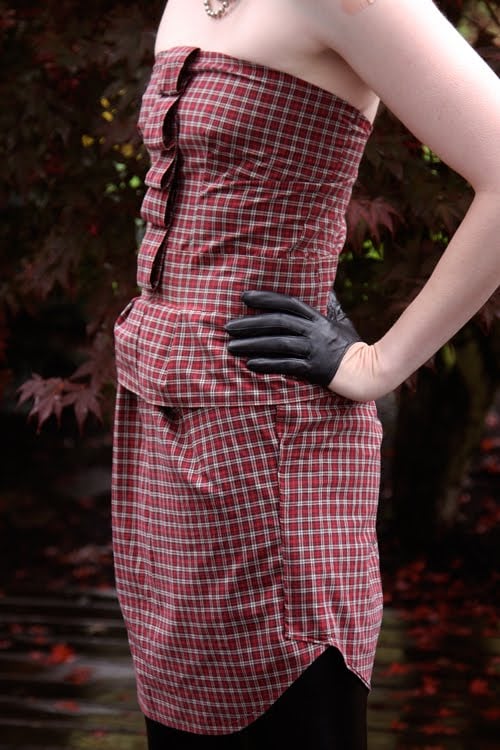
Whew! This took me awhile to write. I know the darting method I’m using is not exactly accurate (and most patternmakers would have my head), but as you can see, it works fairly well! The poor man’s (er, woman’s) version of bust darts.LOL
Thoughts: I’m thinking this is just too many elements for one dress. The point is for you to add and take away as you like. The peplum is not as full as I would like it – instead of being fashioned out of the bodice, it needs to be made from a completely rectangular piece of fabric to create the necessary flare. I’m also not liking the skirt gathers; I think instead the skirt should have pleats in the front to create the tulip shape; the gathers just look messy to me. I’m going to do a little makeover on this piece, but otherwise, I hope this gives you the tools to make your own!
Happy DIY’ing!
xxoxo
Carly
~If you liked this post, please share it!~
Leave Comment
Nov 10, 2009 | Score!
 Another week, another miserable ranking for me.:-( (*shakes self and becomes perky again*)
(My photo is on the far right if you’re not sure!;-)
It’s time to vote on our outfits again! Watch the video below to see what designer Nicole Miller has to say about the outfits:
http://c.brightcove.com/services/viewer/federated_f9/10032373001?isVid=1&publisherID=1612833736
And then vote below!
http://widgets.clearspring.com/o/4ae0eafa40215f96/4ae0f42e2fe90d64/4ae0eafa40215f96/6bd8203c
I’m dead LAST and I definitely need some help!
(Don’t forget you get an entry in that $1000 Bluefly.com sweepstakes just by voting!) And you can vote once every day…open to anyone, 18 yrs. and older. (Shopping spree sweepstakes only open to U.S. residents; not sure why that is.:-(
Thank you so much for your support!
xoxo
Carly
Leave Comment
Nov 10, 2009 | Fashion, Score!
 Something this pink deserves to be paired with pieces that allow it to shine. As an anchor to this outfit, it’s teeny and tight, so legs need to be matte, black, and look super-long with black lace-up booties. Topping things off with a DIY altered band jacket to add some kooky-sexy, this is the perfect outfit for that urban excursion or first date.
(DIY band jacket, white t-shirt, silver hammered bangles, silver and rhinestone wave rings, stretch elastic studded belt, Necessary Objects Pink Stretch Poly Mini Skirt, patent clutch handbag, tights, suede oxford booties)
Styling Tip: If you want to embrace a current trend, you don’t need to go out and buy a brand new wardrobe. By looking at what you already have in your closet – and taking a trip to the sewing store – you can give many of your pieces a new life. Using funky trims, different buttons, padding, and safety pins, you can add or take away elements from your clothing…none of which need to be permanent alterations! For example, I wanted a structured marching band jacket but didn’t want to buy it. Instead, I took a mandarin-collar cropped jacket I already had, and folded the hemline under, safety-pinning it to create that cutaway line. I pinned shoulder pads inside, and then stitched on some trim from the fabric store in a curlicue pattern. For all of $9, I had myself a brand-new jacket – one that I can convert back to the cropped collared jacket anytime the trend dies.
Thank you for looking and I’d love to have your vote on Bluefly.com or StyleList.com!
xoxox
Carly J. Cais
Leave Comment
Nov 9, 2009 | Score!

Who doesn’t love fashion-forward designer shopping?
And if you can win a shopping spree…even better!
Singer22 and WhoWhatWear.com are offering the opportunity to win a
$4,000 Singer22.com Gift Card
just in time for a fall shopping splurge!
Starting TODAY (11/09/09) to 11/16/09, visit this link http://tinyurl.com/ycskcte for a chance to enter this fabulous contest!
So what are you waiting for? ENTER NOW!
-Carly J. Cais
Leave Comment
Nov 9, 2009 | Score!
 Ooh! I was able to find you guys a 20% off coupon for dressbarn!
Just print out, bring into your local dressbarn store to use! (Maybe pick up one of their cute sweaters while you’re there?) I know you’ve probably already seen the one I found: Hurry – this coupon expires November 30…so grab it and pay them a visit soon!
Leave Comment
Nov 9, 2009 | Fashion
 Okay, yes, I draw. The jig is up. I haven’t wanted to put my stuff out there for fear of…well, I don’t know. Criticism? Getting ripped off? I’m not exactly sure. Anyway, here’s some recent pieces.
 I loved how when I scanned this the scanned caught the edge of the drawing pad so the face looks like it’s falling off the paper.
 Perhaps I should make a series? Maybe it looks a little too close to those silly Harajuku Lovers fragrance bottles. It certainly wasn’t intentional.
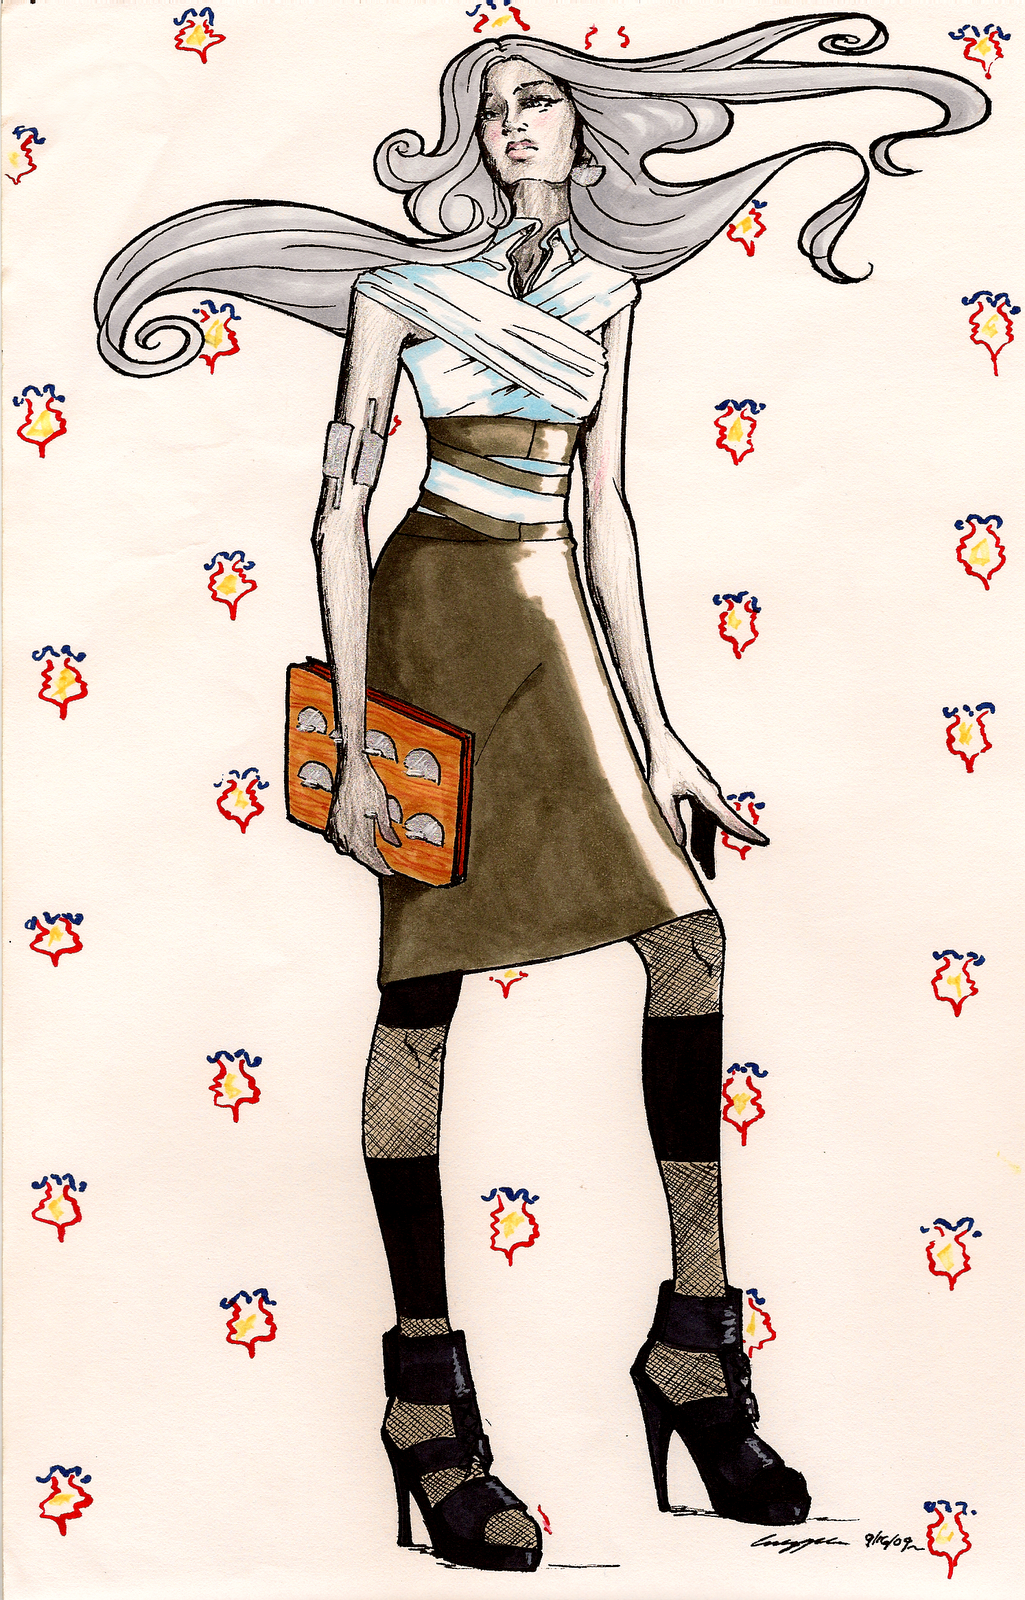 Fashion design. I’m loving the background less the more I see it.
all copyright Carly J. Cais, 2009
Leave Comment
Nov 8, 2009 | DIY

A little DIY project for your Sunday!:-)
I wore my version of the hardware necklace in the latest styling challenge for America’s Most Stylish Blogger Competition.
(And if you may remember, in the video intro’ing the look for this week Tibi designer Amy Smilovic said I should have worn tights with my look. Funny thing…
I brought TWO pairs of tights to the studio one the night we shot: one gray, and one brown. For almost 20 minutes I debated the tights, and then finally decided against them, because:
- I wanted the shoes to pop. If the legs were almost the same color, the shoes got drowned out.
- Bare legs evoke far more sensuality and romance than covered legs…since almost everything else on me is covered.
- Wearing tights took away the “glam” factor and downgraded it to a casual day look. Not what I was going for.
And it doesn’t need a pop of color since I was going for monochromatism (I know that’s not a word, just bear with me) and I wanted the gold, silver, and shoe studs to be gleaming out from a sea of textures of brown and gray.
Just sayin.’)
Here’s the whole photo again, just to refresh:
 Ah, the fickleness of fashion!
Okay, back to the necklace. Here’s a closeup from my photo:

We all saw last season’s Lanvin runway collection and those chunky, statement necklaces made from what looked like bits and bobs from the hardware store.
Queen Michelle over at Kingdom of Style did her own DIY tutorial on the trend for Vogue Girl Korea – so there’s really no reason for me to rehash it in step-by-step detail. It’s pretty straightforward.
(photo: Kingdom of Style)
Basically, in order to make this necklace, I purchased from the Home Depot plumbing section:
*1 pack of 3/4 x 3/4 straight couplings (5 to a pk)
*2 packs of 1/2″ compression nuts (3 to a pk)
*1 pack of 5/8″ compression nuts (3 to a pk)
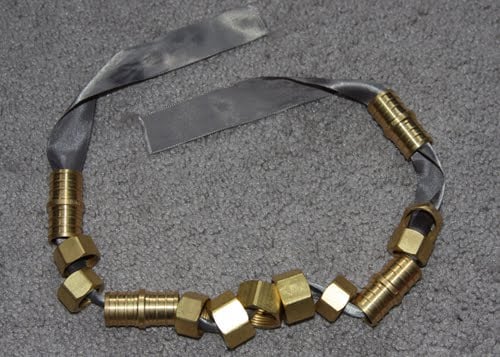 And strung them on a dark gray satin ribbon. I folded the ends of the ribbon over 2 gold split rings I had banging around in my findings box (D-rings would have been better, but whatever); machine-stitched to reinforce the ends, and attached a heavy-duty lobster claw clasp and jumpring to one side.
Presto! In less time than it’s taken me to write this post, I had a gorgeous, shiny chunky statement necklace – for about $8 from the hardware store. (You may want to wipe your findings with alcohol to clean off any machinery grease/hardware store/raging testosterone smell from them.)

And…funny story…while I was in line at the register to pay for my findings, a sort of a roughneck-looking man with a little Jack terrier in tow lined up behind me. (Though why the dog was allowed inside the Home Depot I’m not quite sure – he definitely was too tiny to be a seeing-eye dog LOL) The guy goggled at all the findings I had plunked on the register conveyer belt and said “I see someone gave you a list” in that condescending ‘what’rya doin’ here, li’l lady?’ sort of tone. (This is my imagined scene from some Dirty Harry movie, none of which, I hate to admit, I’ve ever seen.)
It took me a moment to figure out what he was talking about. “Oh no,” said I. “No list.”
His eyebrows shot up almost into his thinning hairline. “You mean you picked all that out yourself?”
“Yup,” I said.
“Got a job to do, eh?”
I laughed and then said (which I ended up mentally kicking myself for later), “It’s not like I was looking for anything specific.”
He started to chortle. (I’m sure ladies don’t know s*** about plumbing was going through his mind about then.) “What did you need them for then? You making some sort of art piece?”
“No, jewelry,” I said.
“Ah. Jewelry.” Everything clicked in Mr. Females Don’t Know Hardware’s brain, and all was right with the world.:-)
Hope you all are having a great weekend!
Happy DIY’ing!
xoxo
Carly
Save
Leave Comment
Nov 7, 2009 | Fashion
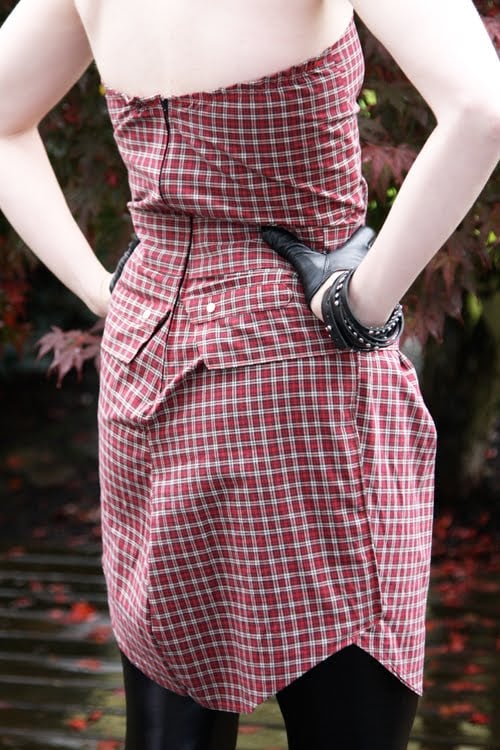
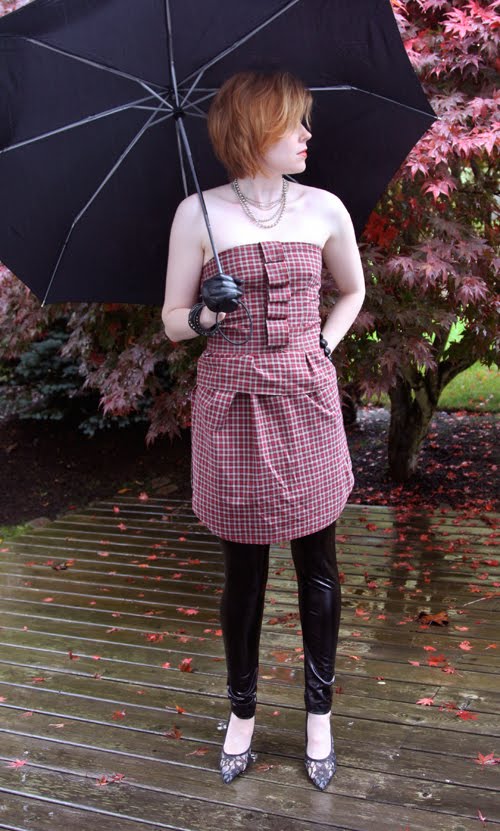 (handmade dress from a men’s shirt, Claire’s ball-chain necklaces, studded leather bracelet from Buffalo Exchange, Forever21 vinyl leggings, Newport-News lace pumps, DIY leather half-scoop gloves)
This was one of the main reasons I chose to shoot in a studio for my America’s Most Stylish Blogger entries: Portland weather has been like this pretty much every day for 3 weeks. (It has mysteriously cleared up for the weekends…but timing-wise I was only ready to shoot my outfits during the week…I put a lot of thought into each one, and since I don’t get the item from Bluefly until Friday, it didn’t give me enough time to formulate something in time for the rare and unexpected good weather.) Blah. So it’s been cold and wet consistently, but I wanted to post this outfit while it’s still Fall for goodness’ sakes.
Inspired by a reader’s version of the Cute Summer ShirtDress from a Men’s Shirt I made back in August, I chose a plaid shirt for my newest men’s shirt makeover…and created a bustier top with a zip-back, bust-darts, folded front detail, faux belt, peplum, and tulip skirt. (Too much? Customize at will!:-) It took awhile, but it’s done! Tutorial coming soon soon soon once I sit down and write the silly thing.
 DIY half-scoop gloves tutorial here. I love them to death! To death I say! (And in this photo, you can see the band-aid on my flu shot that I got that very morning; how very chic.)
 The lace pumps really don’t match but I felt like pairing something lacy with the outfit to offset the vinyl leggings.
 I am totally feeling plaid for Fall. (By now it’s a little cold, so it will go over a black mesh long-sleeved top, and maybe on its own for parties.)
xoxo
Carly
Leave Comment
Nov 6, 2009 | Fashion
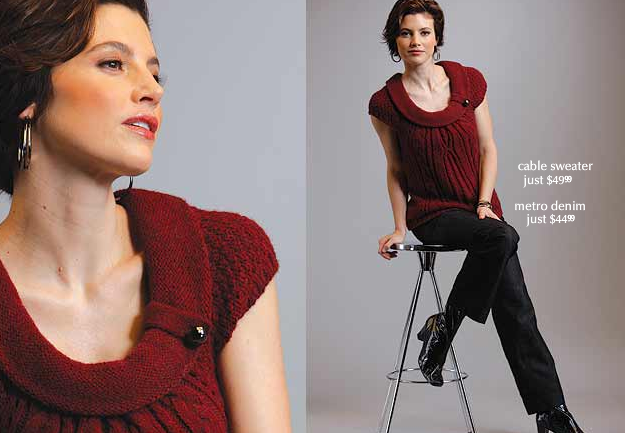 I’m always on the hunt for affordable clothing – and will pass up no store in search of something affordable and chic. You can find great deals practically everywhere, from the hardware store to thrift stores like Goodwill and the Salvation Army, to even the kids’ section at Target, maternity wear at a little boutique, or the sale rack at Barney’s.
So in my quest to find budget-friendly pieces I can’t believe I haven’t checked out dressbarn before – a contemporary clothing chain with more than 800 stores in the U.S., offering both misses’ and women’s clothing, jewelry, and accessories.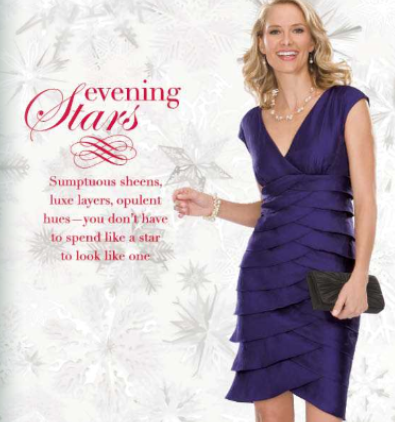 If you’re looking for classic clothing – that which will defy the trends and look just as good today as it will years hence – look no further. (And at a great price point – a big plus in my book!)
 I love their selection of sweaters – pieces that may seem bland at first glance actually boasts tiny details that make them all the more special. Cable knitting that goes sideways instead of vertically, rectangular box closures, ombre-dyeing, foldover button-detail at the neck – all this elevates the typical into that signature piece around which you can build an entire outfit.
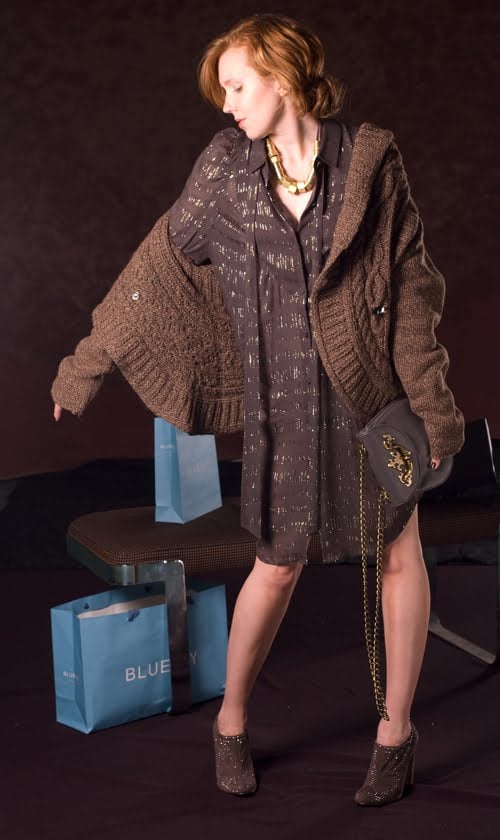 For this week’s challenge in America’s Most Stylish Blogger Competition, I paired a cocoa-colored wrap cable-knit sweater from dressbarn with a silk chiffon dress and Prada studded pumps. The sweater was a fabulous textural counterpoint to the crinkle-silk of the dress and the velvet of the boots, and kept the look romantic and feminine.
 Check out the dressbarn website, which has weekly specials (like a free evening clutch with $100 purchase!) and browse through their online lookbook to get a jumpstart on your holiday shopping list. And def if you have the chance, stop in, browse around – you might just be pleasantly surprised and find something fabulous you never knew was there.
-Carly J. Cais
Leave Comment

 (handmade IKEA fabric dress, Mossimo Long Leather Gloves, H&M belt, Metro7 snakeskin print platform pumps)
 The fabric is stiff and 100% cotton, so it doesn’t lend itself well to anything but structured clothing, IMHO. I had to line the dress in poly satin since the fabric is really too rough to sit against the skin.

 I had a little Marilyn Monroe moment there with the elbow-length gloves…from Target, can you believe it?!