Oct 10, 2009 | Fashion
 (Forever21 shirt, DIY chain harness, DIY zipper cuff bracelet, Hot Topic watch, leggings from Japan,
Sam Edelman Zoe Platform Booties, Icing by Claire’s “Dream” knuckle duster ring,
Cartier and Tiffany rings, jumpring opening ring tool)Woohoo! Post #250 already!
Day #3 of Portland Fashion Week saw me in this – since I was only going to be covering a few designers for the shows that night, I decided to finally try out my brand-spanking-new Sam Edelman’s, from Amazon.com (and thanks to that gift card I’d been holding onto for 3 months!).

It was already getting pretty dark out while we were shooting…in retrospect, we should have upped the ISO since everything turned out slightly blurry. Anyway, you get the picture.
What to say? I got tons of compliments on the boots, but my metatarsal bones were hating me after just an hour. 5 3/4″ heels really put alot of strain on the foot. Anyway.
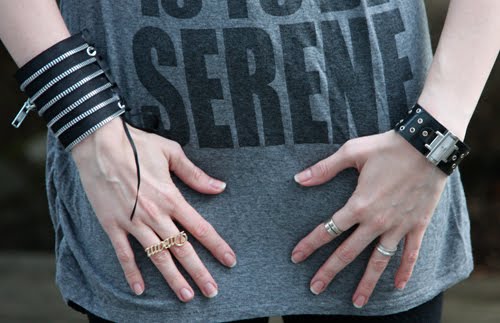
Zipper cuff is my DIY version of the Kate Cusack cuff that’s been out there for awhile…I left the zipper pull on the teeth for interest. You can buy the original for $110 at her Etsy store.
I fell in love with this two-finger ring from Icing by Claire’s the moment I saw it…they also had “Love” and “Peace” versions, both silver and gold. I love that it’s a knuckle duster that says “Dream.” How ridiculous is that??
And I was making jewelry that morning and forgot to remove my jumpring tool! It’s just a little ring [on left index finger] with slits in it for anchoring jumprings as you pry the other end open with pliers…and I realized, hey this is jewelry too! So I just left it on. Wearing some of my wedding rings which I rarely wear since they get scratched super-easily by coming in contact with just about anything. Who knew platinum was such a soft metal??? My $5 nickel jumpring tool is still shiny and perfect, whereas my platinum Cartier ring is a mess of scratches. What gives?

It’s Portland! I figured the tee slogan was particularly appropriate. [“To be Green is to Be Serene.” Made by Forever21, likely using non-green, non-ethical manufacturing practices. Super-irony.]
Chain harness is a copy of the one Norwegian Wood makes…I have the zipper and chains laying around, so I just DIY’ed my own. I am so in love with everything from that brand…and I’m saving up for a little bustle suspender set and feather-shoulder harness.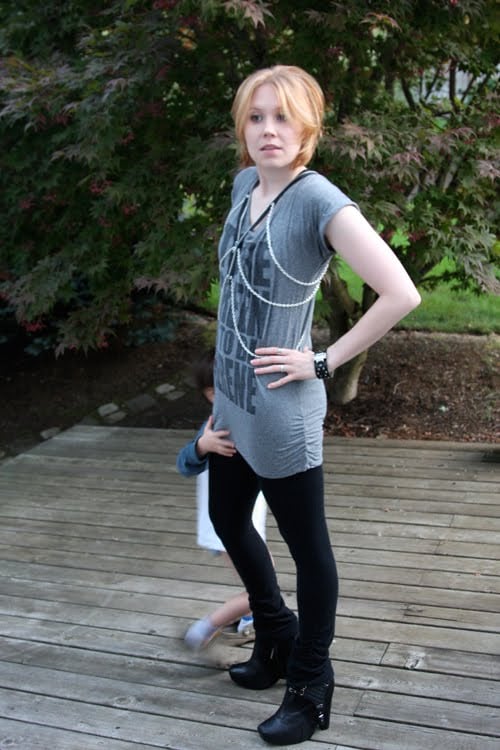
And then my son decided to take off his pants and get his picture taken too.
Mommy’s trying to look pretty, ok? Just…can you move over to this side…please…?
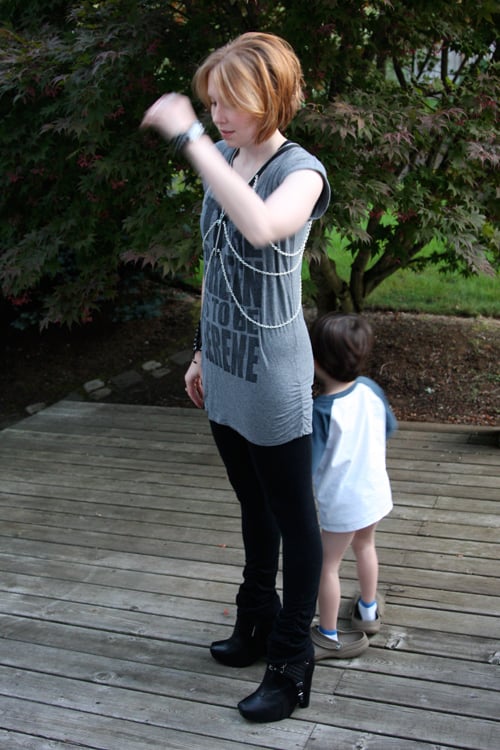 Oh, for goodness’ sakes.
Portland Fashion Week is…so far, interesting…somewhat of a letdown in the quality and innovation of the designs…a lot of it seems RTW straight off the Macy’s racks…
But that’s for another post…
Hope everyone’s enjoying their weekends!
xoxox
Carly
Leave Comment
Oct 9, 2009 | DIY
(Jacket from Japan; scarf from I forget; Claire’s wristbands, necklace, and armwarmers; handmade studded ring; DIY Chanel tee; Paris Blues Jeans; DIY’d GoJane boots)
It’s that time of year again when the leaves change color, Fall activities are well underway, and Portland Fashion Week presents 5 days of local and sustainable collections, presented in some warehouse practically off the map in a NW corner of the city. I skipped out on attending Day 1, so here I am on Day 2 of the Collections, as I like to say, since it sounds more frou-frou and New-York-wannabe.
I made this shirt the morning before the madness started – with a fabric pen. Because life definitely needs more cavorting! (The real version says “Cavour Roma” in case you were wondering – here’s a piccy below:)
 (sorry I don’t remember the site I saw this on)
 Actually it was on KnightCat, I remembered, and a reader mentioned it was originally from Lookbook.nu. Thanks Danni!
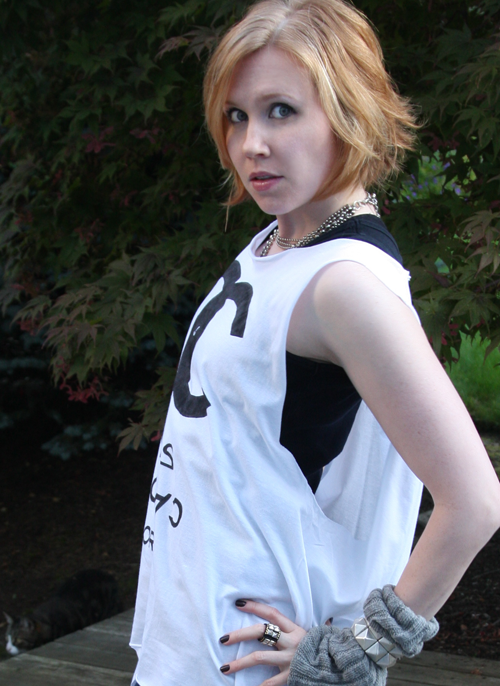
I know armwarmers went out of style (or never came into style) like a decade ago, but my hands get cold easily and I often add them to an outfit. Yes, inside of me is a fashion-challenged 12-year old. With warm hands.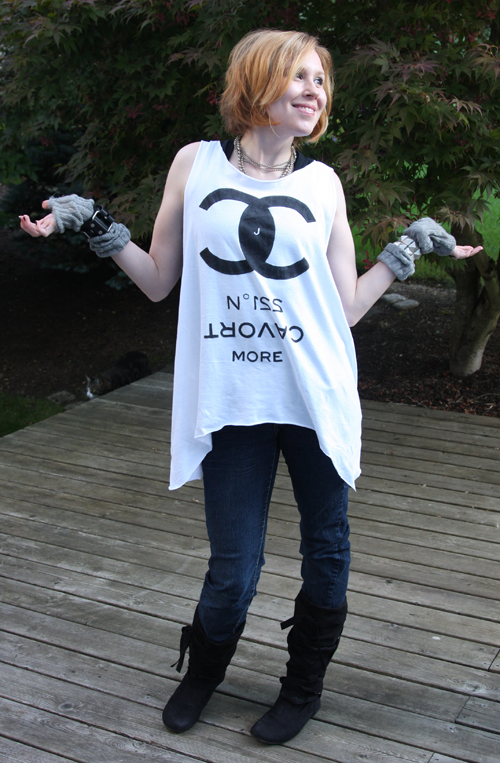
Even though it’s Fashion Week, when you’re covering the shows my best piece of advice is:
Wear comfortable shoes!
I wrapped a long strip of ultrasuede around these flat, scrunchy boots from GoJane and tied the ends. I’m all tied up!
Fashion Show coverage coming soon!
Have a lovely Friday!
xoxo
Carly
DIY Update: For those of you who were wondering how to make the shirt…
1. Take a white Men’s XL t-shirt and a black fabric pen (I used a FabricMate Chisel Tip ). Place your shirt over a piece of cardboard and apply a liberal spraying of Spray Laundry Starch
 to make it literally “flat as a board.”
2. I used Photoshop to create the lettering (and added my initials as the double-C logo in the middle, haha), printed out the image, and placed the paper underneath my t-shirt on top of the board. Then I simply traced the letters and filled them in with the fabric marker (took awhile).
3. I cut off the hem a little higher in the front and lower at the sides so it makes “side-tails,” cut off the neck ribbing and the sleeves, and stretched the cut edges until they rolled slightly.
4. Then I washed it on the delicate cycle in the wash and laid flat to dry, to get rid of the starch and “set” the fabric marker paint.
So super-easy to make! I’d love to see everyone’s DIY versions!
Leave Comment
Oct 8, 2009 | Score!

Entry #11 (Deb) who wrote:
Cool pumps.
But Deb! Hello!!!!
You did not leave us an email address for us to contact you!!!
What to do??? Deb, you have 72 hours to contact me (that is…by SUNDAY OCT 11; and my email is on the “contact me” section of this blog)…or else I’ll be drawing another winner! I’m drawing another winner! See my next post for who won…
Thank you all so much for entering, for following on Twitter, and for blogging about this giveaway! (We’ll be doing another one real soon – maybe even sooner if I don’t hear from the elusive Deb!)
xoxox
Carly
Leave Comment
Oct 7, 2009 | Fashion
 In case you were wondering what happened to that chick with the flirty dresses and bad posture from “The Fashion Show” (that aired in late Spring 2009 on Bravo; admit it! You were watching since “Project Runway” was still a couple months off and there was nothing to watch except that horrible Isaac-Mizrahi-fueled train wreck)…
Anna McCraney, winner of “The Fashion Show” on Bravo, launches her Spring 2010 collection under the label Annabelle, inspired by the photographs Sally Mann took of her children, published in her book Immediate Family. According to critics, the photos “captured the confusing emotions and developing identities of adolescent girls” and created “a place that looked like Eden, then casting upon it the subdued and shifting light of nostalgia, sexuality and death.” For Anna, they evoke memories of her own childhood, growing up in the South, the good, the bad, and the ugly, seen through the eyes of a child.


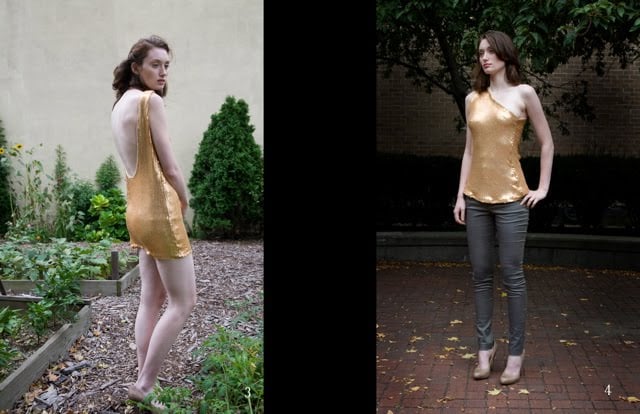 Sorry, but the one on the left cannot possibly be a dress. Didn’t she watch Project Runway Season 2 and remember Zulema’s barely-butt-covering gold disaster?
Some of Sally Mann’s photographs:
 This one truly disturbed me until I found out it was a candy cigarette. It’s still disturbing. Yeesh.



Visit
her website to learn more.
(I could do without the photo of her on the toilet, just FYI.)
What do we all think of her collection?
In the infamous words of the many idiot judges that passed through those chairs on the show….
I’d buy it.
-Carly J. Cais
Leave Comment
Oct 7, 2009 | Score!
It’s til midnight TONIGHT chickadees!
Don’t forget to enter (following the instructions
HERE)!
Leave Comment
Oct 6, 2009 | DIY
Get This Tutorial As a PDF
This tutorial has been updated, and is now available as a full step-by-step with photos in my new book 8 No-Sew DIY Shirt Scrap Makeovers, a bonus available with purchase of the DIY Men’s Shirt Makeovers System.

I made a ruffle-front cute summer shirtdress from a men’s shirt a couple months ago…(tutorial here)…and I still wanted to use up more of the shirt fabric, rather than let all the scraps go to waste. (I’m thrifty like that!! Okay, usually not – usually my scraps will sit around in the recesses of my closet until I forget about them, and then re-emerge years later when I am desperately pawing back there looking for something else. But I digress.)
How to Make a Gossip Girl Blair Waldorf-Style Double Bow Headband from a Men’s Shirt Collar
Inspiration:
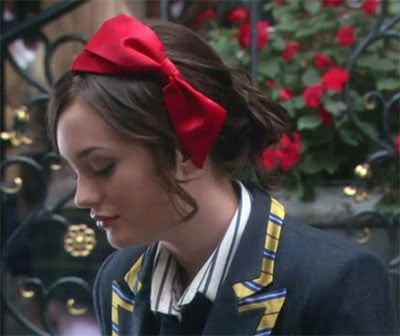
(photo from CWTV.com)
Materials:
one men’s button-down shirt [collar piece and a bit of the shirt fabric) / thin headband (I used a Goody headband from the supermarket – $3.99 for a pack of three!)
Tools:
fabric scissors / hand-sewing needle / machine needle for medium-weight wovens / thread matching topstitching thread in collar / seam ripper (optional) / fabric glue (optional)
How To:
Cut the Pieces
1) Cut the collar off the shirt. Cut each end off the collar (app. 4″ from bound point), so you now have 3 pieces total.
2) Using scissors (or a seam ripper), open the topstitched seam from the cut edges of your collar pieces, along the side about 3/8″. This is to allow the tucking under of the fabric so we can create a perfectly-bound and topstitched bow, rather than a bow with one raw-edged, messy side.
3) Cut a long, thin strip of fabric from some part of your shirt that is wide enough to go all the way around the thickness of your headband PLUS 3/4″. The strip must be single-layered, non-interfaced, and the length of your headband PLUS 1″ at least. This will be the covering for your headband. (see above photo from Step 1)
4) Cut a small rectangular piece from your shirt fabric (single-layered, non-interfaced), about 1.25″ wide by 3″ long. This will be the center to your bow. (see above photo from Step 1)
Topstitch the Collar Pieces
5) Fold the bottom fabric layer of one of your collar pieces to the inside – curling interfacing in on itself about 1/4″ ~ 3/8″. Stitch along edge (spreading top layer of fabric away from the needle as you sew) to secure your fold.
6) Fold under top layer of fabric about 1/4″ ~ 3/8″. (Don’t forget to tuck under the side edges that we opened up in Step 2)!) Topstitch all the way around to secure the edges. (We will be leaving one raw edge that will be concealed in the bow center.)
7) Repeat for remaining collar pointed piece.
8) Using the same method, finish the bottom raw edge of the collar center piece.
Sew Fabric Ractangles
9) Turn under about 1/4″ on long edges of small rectangle of fabric. Sew along long edges.
10) Sew along long edge of long strip of fabric. Turn right side out to create a long tube.
Create Double-Bow
11) Flip one pointed collar piece over, and overlap it on the other piece about 3/8″. Hand-stitch in place.
12) Loop collar center piece over on itself, matching raw edges, and stitch in place directly above the loop you just made in the previous step. Stitch a few times through all layers in the center to secure.
Cover Headband
13) Slip headband into tube you made in Step 10). Fold ends over about 1/2″, and stitch ends in place to close the tube. (I used fabric glue to secure the ends first, since the lightweight fabric was fraying for me.)
Attach Bow to Headband
14) Using the small fabric rectangle from Step 9), stitch one end to center of bow on the underside. Wrap around top of bow and secure under headband. Stitch a few times in the center on the underside in order to squeeze the strip tight and shape your bow properly; but not too tight since we still want the bow to be slideable along the headband.
Voila! A menswear-inspired Gossip Girl Headband!
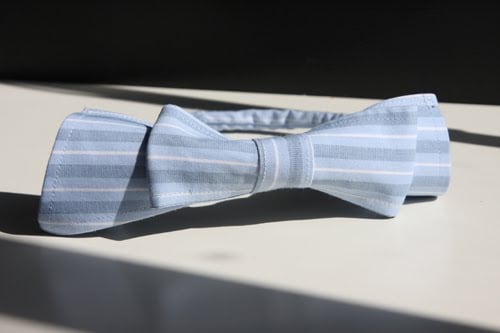
Happy DIY’ing!
xo
Carly
Get This Tutorial As a PDF
This tutorial has been updated, and is now available as a full step-by-step with photos in my new book 8 No-Sew DIY Shirt Scrap Makeovers, a bonus available with purchase of the DIY Men’s Shirt Makeovers System.
Leave Comment
Oct 4, 2009 | DIY
 Adapted from the book Cut-Up Couture: Edgy Upcycled Garments to Sew
 [though mine is the Japanese version; I’m not sure if the translated version I’ve linked to is the same]
I’ve written about this book a little while ago in this post on how to make a Convertible Blouson Tunic from 3 Men’s Sweatshirts). To me, this sweet little cape seems slightly Chanel-ish, two-toned, sleek…anything but sweatshirt-like.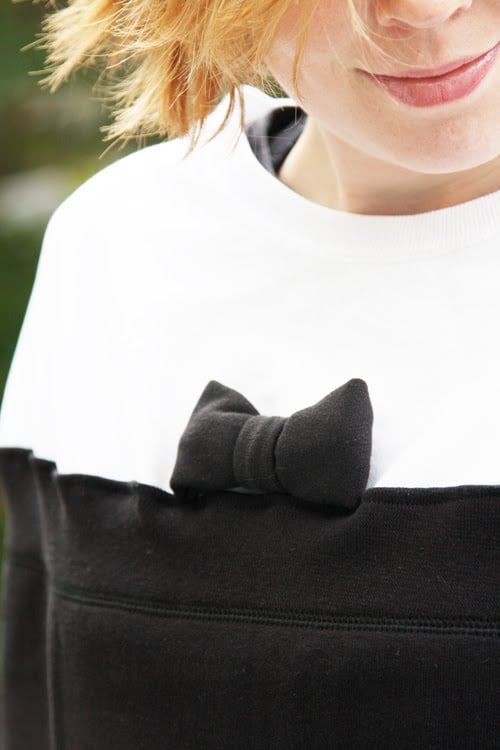
(And if you made the tunic following that tutorial, you will have found yourself left with the top half of 3 sweatshirts. In this project we’ll use the top half of 1 for our cape, and as to what to do with the remaining 2 sweatshirts…stay tuned!)
How to Make a Chanel-Style Black-and-White Cape With Bow
You Will Need:
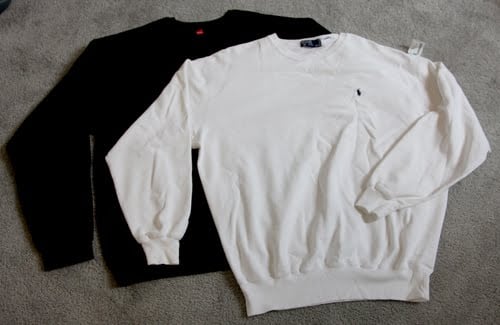
*2 sweatshirts (Men’s XL work best), in two different colors
*scissors
*sewing needle for knits
*thread matching one sweatshirt
*hand-sewing needle
How-To
Measure and Cut
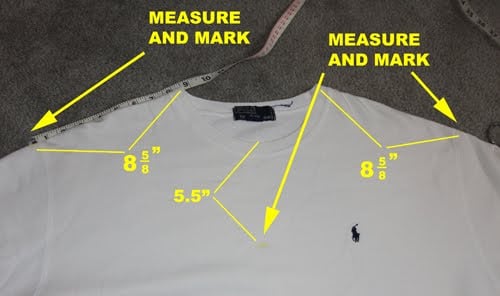
1. Measure and mark 5.5″ down from the neck opening on your first sweatshirt, on the center front. Measure and mark 8 5/8″ on each side of neck opening on the shoulder seams.  Connect the marks you made in a semicircle around the neck portion of your sweatshirt.
 2. Cut out the neck along the line you made, cutting through both front and back of the sweatshirt.
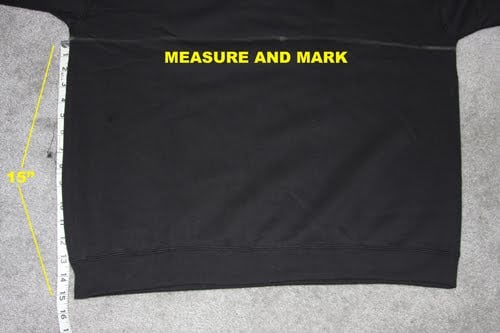
3. Mark and measure 15″ up from the ribbed hem of your second sweatshirt. Draw a line straight across the shirt from side to side (it should be very close to right under the arms).
 4. Cut along the line, through both front and back of your sweatshirt.
 5. Draw a rectangle 4″ high by 8″ long on the remaining fabric of the sweatshirt from Step 4). Cut it out.
6. Draw another, smaller rectangle measuring 2″ high x 2.75″ long on the same sweatshirt and cut it out.
Your cut pieces should look like this:

Pin
 7. Turn the 15″-high bottom half you cut out in Step 4) upside down, and pin on top of the cut edge of the neck piece from Step 2). Overlap the ribbed edge about 1/2″ onto the cut edge of the neck piece, following the curved edge. Pin along edge.
8. Fold both the smaller rectangles you cut in half lengthwise, right sides together, and pin edges.
Machine Sew
9. Sew both smaller rectangle along their longer edges, about 1/8″ from cut edge. Turn each right side out again – this will create two tubes. (not pictured)
 10. Sew the cape main parts together, stitching on top of the ribbing in a matching thread, about 3/8″ from edge. If both your sweatshirts are exactly the same size, the neck piece should not be gathering despite the stretch from the ribbing. (Mine is b/c I used an L sweatshirt for the neck and an XL sweatshirt for the bottom…my bad!)
 11. Hem your cape, turning over about 1/2″ at the bottom and stitching a 3/8″ hem.
Hand-Sew
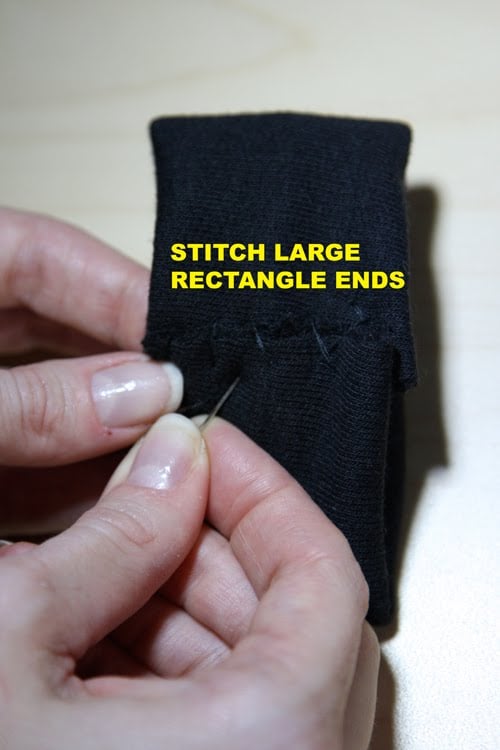
12. Flatten the larger rectangle tube you made in Step 9), roll the seam to the center, and fold each end over to meet in the middle. Hand-stitch ends together to make a bow.
 13. Flatten the smaller rectangle tube, roll the seam to the center, and stitch one end to your stitching in the center of your bow from Step 11).
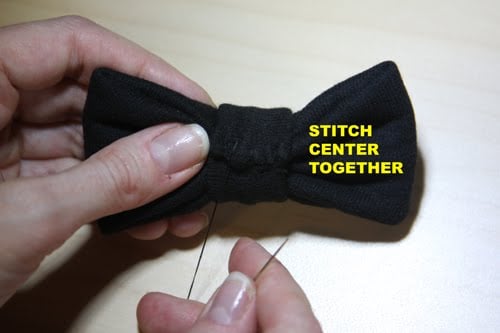 14. Roll the strip around your bow, pull tight to the back to make your bow “poufy,” and secure in the back again with more stitches.
15. Stitch bow onto the center of your cape, slightly above the ribbing seam. (not pictured)
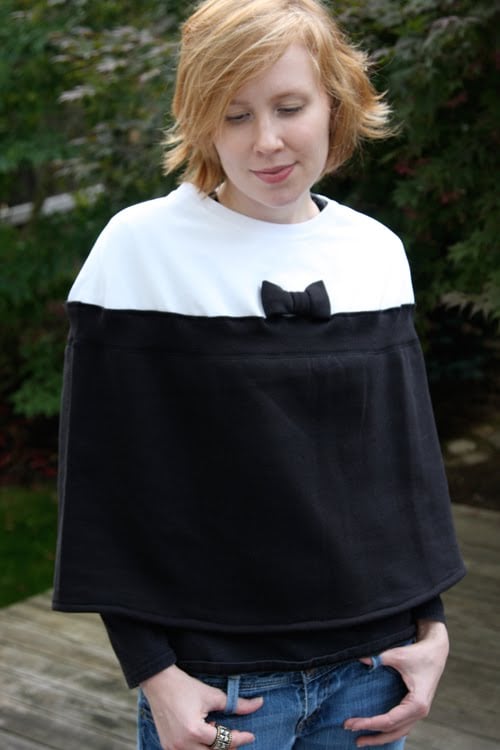 You’re done! A lovely cape – just in time for cold weather.
And don’t forget to cut the remaining parts of your sweatshirts in the same fashion – and just reverse the colors – and you can make a second cape to give to someone this holiday season! Brrrr! I feel the winter chills coming on!:-)
 Happy DIY’ing!
xoxo
Carly
Leave Comment
Oct 4, 2009 | Fashion
 Viktor & Rolf is one of my favorite big-name designers; with each successive collection they always push the envelope; their clothes border on the theatrical, the jaw-dropping…but always feature amazing details that separate them from the pack.
They say: “We are attracted and inspired by what we call mega-women: strong women who follow their own path and are uncompromisingly themselves.
 “[Irish singer-songwriter] Roisin Murphy is a source of inspiration for us. We share with her the need for theatricality and performance in our work. Roisin personifies a power of transformation. On-stage she easily morphs into a beautifully fierce character, while off-stage she is the counterpart of her theatrical self: soft-spoken, modest, even quiet.
“Apart from the innovative and terrific music she makes, she has a unique sense of style that is fearless and uncompromising. She wears theatrical pieces with the ease of a t-shirt, making them her own. It is an honour for us that Roisin will be performing live at our show! “For us, fashion is more than the trend of the season. A fashion show is a way to communicate with a bigger audience, not just the inner fashion circle. Music plays a powerful part in this communication as does the internet. To exemplify this, our show, including Roisin’s performance, will be available on our website the very same evening”.
Roisin says: “I am a huge fan of Viktor & Rolf, their designs encapsulate futuristic techniques and wry surrealism, the clothes are literally a thrill to wear. I have been known to go to some extremes in my fashion choices but the Viktor & Rolf dress that I wore for my ‘Overpowered’ promotion had it’s own sound and lighting rig incorporated which tops them all.
 “I find levels of story and concept in their work and have road tested many of their designs on stage. For my performances I am looking for clothing to amplify the often conflicting emotions in my own work. I want nothing to box me in as a performer , any notions of “chic” must be counterbalanced with humour and wit, intelligence comes with fearlessness and joy comes with the memory of pain. Being human is a complex business and that is exactly what I wish to reflect, even in the way I dress. These ideas are timeless and so are Viktor & Rolf”.
At the moment of the show, Roisin is highly pregnant, which gives an extra symbolic layer to her performance. It expresses a feeling of hope and positivity for the future, starting right now and with the Spring/Summer 2010 Collection.
Viktor & Rolf have posted the live performance to their website- viewable below.
Leave Comment
Oct 3, 2009 | DIY

So apparently I’ve missed the few screenings of Coco Avant Chanel here in Portland that happened earlier this month. *sigh* I soooo wanted to see it, but looks like I’ll have to wait for it to come out on DVD (whenever that will be). Inspired by the sheer idea of the film (since I haven’t seen it), I crafted a few things Chanel-inspired:
Double-C Sequined Perfume-Bottle Brooch
 Gold sequins glued onto black fabric in the shape of the iconic Chanel No. 5 perfume bottle, then bordered by silver bugle beads stitched around the edge. I glued on some rhinestone chain that I salvaged from a broken necklace in the shape of two interlocking C’s. Counterfeit couture. (Though I’m using the word “couture” loosely, since I used glue to attach the sequins.) I made this at least 5 years ago now…the bugle beads look absurdly crooked upon closer inspection; a mere shadow of the real thing.
Black & White Bow Shoe Clips
Made from frilly white chiffon ribbon and black satin wired ribbon wrapped around, and then stitched onto shoe clips.
Black & White Bow-Detail Cape
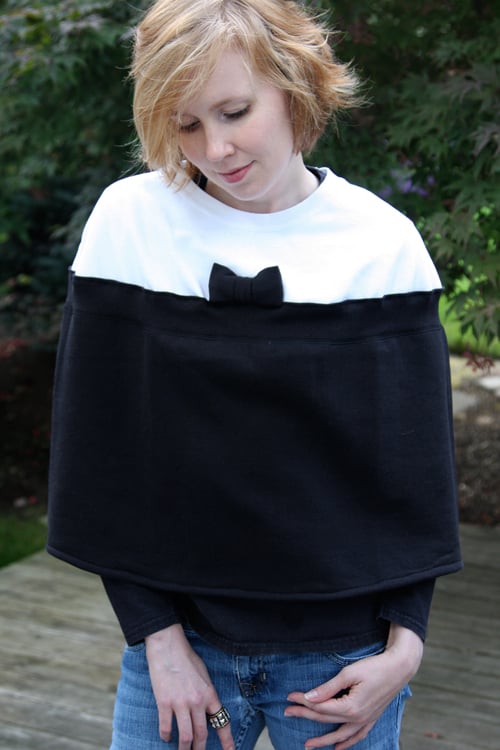

Made from two men’s sweatshirts. I’m posting the tutorial next, so stay tuned! I’ve posted the tutorial here, so check it out!!
Pirate Triple Pearl Necklace

The messy hair is on purpose. That’s the only way it can be explained.

I know this is a little bit of a deviation from the standard Chanel pearls, but I liked the pirate-esque nature of them. I made them from some cheap pearl rope I had laying about – and I added some little charms and this cool carved nut I found at a bead show. I know they would be much better if they were real – or even faux! – pearls and not these pearls fused to the string like this…but this would seriously take so many pearls and so much knotting in order to make I got tired of the idea before even attempting it.
Chanel-Style Camellia Brooch
This is the photo from the book; I didn’t actually make the brooch, sorry.
Adapted from the book “Ima Sugu Tsukuritai Co-saju” [“Corsages I Want to Make Right Now” Bunka Publishing, 2006]. Here’s the scanned, translated-by-me instructions below – just omit the instructions for the stem and attach the brooch back to the back of the flower for a Chanel-style piece. See here for more DIY corsage patterns, by the way!
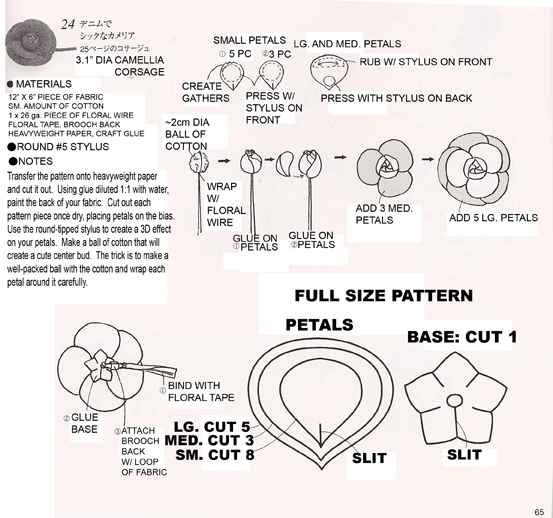
Click above for full size.
The book page is 8 1/8″ wide by 7 7/8″ high if you want to print it out, in order to make sure the petal pattern is sized correctly. The pattern requires the use of a round-headed stylus in order to create the rounded, 3D-effect to the petals. Not completely necessary, but it helps create a finished, professional look to your corsage. I haven’t sprung for the $30 heated stylus tool specifically for this purpose; I just use a metal muddler that has a small ball on the end. You could probably find a paint mixer or similar stylus tool at a crafts store. [And if you’re wondering where I found the muddler, it’s actually for mixing cel paints, courtesy of animation school in Japan. I don’t think you’ll find anything similar stateside.:-)
Hope this helps to get you into a Chanel-style mood – and hankering after black and white, stark contrasts, tweedy fabrics, pearls, and girly flowers. Have a lovely Chanel day!
xoxox
Carly
Save
Leave Comment
Oct 2, 2009 | Fashion
 So I’m sure all of you already know about RueLala, the online destination for designer sample sales where fabulous merchandise is often marked down to 30-80% off retail…
But if you haven’t and/or are not a member yet, they’re running a promotion now where all new members who sign up get their account immediately credited with $10! (They usually don’t do random account credits, so definitely take advantage of it while you can!
The promotion runs until Oct. 10 so click and join – there’s no obligation, and you get an instant account credit!
(I’m a member under my legal married name…you don’t be surprised when you click through and see a different name at the top of the page…it’s still me!:-)
xoxo
Carly
Leave Comment