Sep 19, 2009 | DIY
 So we probably all saw this on Rumi of FashionToast a little while back – and pretty much all of us probably thought “How ingenious! How clever! How fabulous! Me want!” (I’m guilty too, I’m afraid.)
But it was a little difficult to figure out exactly how Rumi had converted the piece from the Forever21 necklace she had bought, since she didn’t share her DIY instructions. A couple other intrepid bloggers made similar pieces and posted them, namely here and you can buy one on Etsy for $89 here. But since some of you may still be wondering how to make the piece, here’s the step-by-step DIY below. It’s not particularly difficult to make, it’s just fiddly and time-consuming. My first try I was just holding the necklace in my hand and looping and unlooping jumprings, and I got pretty confused. Laying the necklace flat to work and securing with pins is, I found, the easiest way to figuring out what you’re doing and keeping everything neat and untwisted.
(more…)
Leave Comment
Sep 19, 2009 | DIY
I know the studded Burberry Prorsum Harlech Studded Warrior Belt has been around for awhile (since Spring 2008, to be exact…and in fact, I wrote an article about how to DIY your own for FashionTribes.com here). But the fruits of my DIY labors were never posted to FT’s blog, so I decided to post the finished photos and my tute here.
The studded stretchy belt is still so on-trend for Fall ’09…and the edgy, punky look is both bold and glamorous.
Now it’s the unique studs that make this piece – and since despite searching high and low I could not find anything even slightly similar to the diamond-shaped beauties, I settled to create a diamond pattern with 1/4″ pyramid studs procured from Studsandspikes.com. ($3.03 for 100 studs is a fricckin’ fabulous deal.)
A trip to Jo-Ann Fabrics and I picked up 1/5 yds (30″) of 1″ wide vinyl belting (sold by the yard on a roll in the trims section), a black plastic parachute buckle, and Loctite glue (for vinyl, plastic, and leather). At Michael’s I found a mixed bag of buttons that had these oversize faux-Grecian faux-silver coin buttons in the pack.
And that’s all you need!
How-to:
1. Fold one end of the vinyl belting over the parachute buckle connection tab, secure with Loctite glue (I folded under about 1/2″, and used a clothespin to keep the belting pressed together until the glue had dried).
2. Wrap the belting around your waist or where you want to wear your belt, fold around the other connection tab of the parachute buckle. Open up the buckle, trim your belting to have 1/2″ underlap, and glue the underlap together.
3. Now stud! Using an awl, open a hole in the center of your belting on either side of your buckle. (I used sharp scissors when I did this project…and believe me, they are the worst thing to use to open holes to push your studs through!! I figured since the studs’ prongs were flat points, then I should make a slit in the vinyl. WRONG! Use an awl or something to make a ROUND HOLE – and s-t-r-e-t-c-h that vinyl around the prong as you force the stud into the material. Once you fold the prongs over on the wrong side of your belt, the stud will sit properly on the material…whereas if you opened a slit and not a hole in the vinyl, the stud will be loose and the vinyl will “pull” away from the stud resulting in a visible gap. Very bad.) Spread glue on the back of 2 buttons, and push a button through each hole on either side of the buckle.
4. Now estimate the spacing of your embellishments all the way around your belt. (You may have to mark where you want them with chalk or a pen.) Set your stud groupings next to your buttons and keep alternating between embellishments until you’ve covered the whole outside of the belt.
5. To make sure your buttons are DOUBLY secure, thread a jumpring (as large as you got, doesn’t matter what color) through each shank on the wrong side of the belting. Now they should not be able to pull back through their holes, and, like mine, rain down in a trail upon 6th avenue as I hurried to the Bryant Park Tents last Fashion Week.
6. BONUS POINTS: If you’re worried about all the studs’ prongs and button shanks catching on your finer garments on the inside of the belt, glue a strip of fabric (I used poly satin lining) on the inside.
Now I know the original belt is a stretch belt covered in super-thin leather…but who wants to source the leather, sew it into a tube, and thread elastic through it? Especially when there is this el-cheapo belting to be found! The final product is not adjustable, so a little bit of a letdown there.
 My sweet little boy.
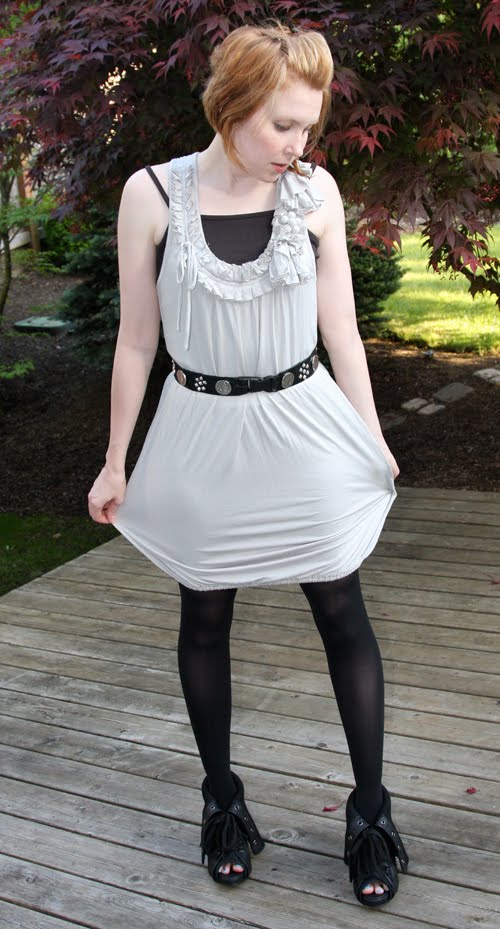
(Know.Label dress [DIY’ed into a bubble hem], camisole from I forgot, DIY belt, Hue tights,
Maison Gilfy [Japanese brand] shoes)
I love the detail on this dress! (It was only $43 – but it’s not available anymore…but Know.Label has some awesome, incredibly affordable pieces – so check it out if you have time!)
Happy DIY’ing!
xoxo
Carly
Leave Comment
Sep 19, 2009 | Fashion
This is probably all over the internet by now, but just in case you wanted a looky-looky….
Prices range from $90 to $310 (for the grommeted body-con dress).
I’m not falling all over myself, though the mirrored dress design is fab, and the grommeted hoodie is a cool idea, def. DIY’able. The prices are a bit gag-inducing, but right now CK is in, in, in. I was wanting the crocodile dress/tee, but when I look at the placement of the image on the tee…unfortunately your eyes go right to the wearer’s lady bits. Not exactly where I’m wanting strangers’ attention.
Yes? No? Yes?
Have you already plunked down the plastic for a Chris Kane for Topshop piece?
Leave Comment
Sep 18, 2009 | DIY
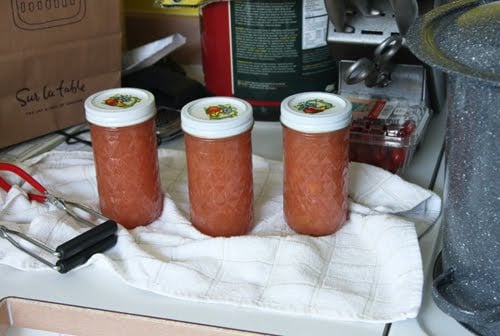 The aftermath.
Or perhaps, more accurately, I jarred. Doesn’t quite have that same ring to it.
Yes, in order to prove to all of you how utterly boring my life is, I actually am admitting to my first-ever canning experiement with homemade pear preserves.
I am living the dream to have a garden that produces fruit here: a pear tree (that has a large root strangling its root ball), a sour cherry tree (that had an infestation of moth worms after I returned from Japan and continues its losing battle with shothole fungus), and a plum tree in front that produced nothing last year and this year dropped rotting plums all over the sidewalk for 3 months. There was the tree that I had a landscaper put in that they assured me was a plum, but which turned out to be a Japanese maple. I also put in a thornless red raspberry and a Bluet blueberry in my yard, both of which are on their last legs. And we have wild Everbearing strawberries on a hill in the back, which I didn’t know prior to springing for a strawberry pot which I planted with Ozarks. Hopefully I’ll be able to make a fruit salad from my garden at some point. But I digress.
The pear tree produced only about 40 pears last year, but this year, because I drove fertilizer stakes into the ground in Spring, it produced about 200 small pears (even after dropping a third of its fruit while we were abroad). I foisted as much as I could off on the unsuspecting neighbors and made a pear pie (my yearly tradition now…the pear pie, not the foisting LOL), but this still left me with about 130,920 pears to do something with. So I decided to make jam/preserves (I’m not really sure of the difference), using this recipe (I don’t remember what site I saw it on):
DIY Lower Sugar No Pectin Pear Preserves Recipe
*1.5 cups sugar
*3 c water
*8 med. pears, peeled & cored
*1.5 cups sugar
*sliced lemon (optional)
1.Combine first measure of sugar + water in a pot and cook rapidly for 2 min.
2.Add diced pears and boil slowly for 15 min.
3. Add remaining sugar and lemon (I used a couple squirts of lemon juice instead), stir until dissolved.
4. Cook rapidly til fruit is clear (about 25 min).
5. Cover & let stand 12 – 24 hours in a cool place.
It was the recipe with the smallest amount of sugar I could find. Even the Sure-Jell recipes required way more sugar. (I’m not sure if by reducing the sugar it would interfere with the jelling properties of the fruit…it may be that additional pectin would have to be added in order to create a jam-like consistency.)
It’s waaaaay too sweet.
But! The rest of the jam must be preserved and foisted off on unsuspecting relatives (rellies) for Christmas!
So I tried my hand at canning – using the boil-water method, which seemed to be the easiest. (and no, you don’t a canning kit! Just a very deep non-aluminum stockpot with a lid (a pot deep enough to hold enough water to cover your jars completely, with an added 1″ of water over their tops), a pair or canning tongs (not absolutely necessary but they were a big help), a colander/steam plate/smaller flat lid that will fit down inside your pot, and a couple of glass jars with canning lids.)
How to Preserve Jams/Jellies Using the Boil-Water Canning Method:
1. Sterilize your jars and the lid rings (NOT THE JAR LIDS): Place colander/flat lid/steam plate into bottom of stockpot. Place jars, standing upright, on top of colander (this prevents bottom of jars from directly touching the bottom of your pot, which can cause breakage of the glass due to the high heat). Fill stockpot with water (enough to just barely cover your jars when they are standing upright) and fill jars with water. Weigh down the tops of the jars with a lid, or hold them down with tongs. Heat until the water is a rolling boil, and keep it at the boil for 10 minutes.
2. Remove your first jar and lid ring with tongs, pouring the hot water back into the pot. Stand jar on a towel (you can probably touch the jar with your hands after a few minutes). Spoon your preserves or jelly into the jar (preserves/jelly must be at least room-temperature, if not warm), leaving 1/4″ between the preserves and the top of your jar. Wipe off the outside of the jar, the jar lip, and the threads with a damp cloth/paper towel. Place the jar lid centered securely on the jar, and screw down the ring until it is finger-tight. Repeat until you have used up all your preserves.
3. Remove air bubbles by laying jars on their sides and rolling back and forth a few times, then standing upright once more.
4. Using canning tongs (aha! Didn’t think you were going to need them, didja?!), place your filled jars back into the hot water in your stockpot. Add more hot water (if necessary) until the jars are covered by 1″ of water. Clamp on the lid to the pot, and boil for 10 minutes.
5. Once boiling time is done, remove jars from pot using canning tongs. (Again! Extremely helpful at this point.) Set on a towel on the counter to cool. As they cool, you should hear “plink!” “plink!” as the center button on the lids is sucked down to pressure inside the jars increasing. Leave for 12-24 hours without touching. Once time is up, if you are not sure if the jars are sealed, tap the center of the lids with a spoon – they should produce a ringing sound, and the button in the center should be depressed. If you can press down the button or tapping results in a “clunk”, then your jars are not sealed and you have to repeat the process.
Who the heck eats this much jam??? Methinks my jars are a little too big.
Okay, now I’ve certified that I am indeed 100 years old – let me ask you guys: have you ever canned/preserved anything?
xo
Carly
Leave Comment
Sep 18, 2009 | Fashion

(Top row: Cecilia, $477 (sale), Elaine, $695, Andre, $567. Middle Row: Fancy, $945, Danika, $895, Artist, $695, Bottom Row: Cole, $438 (sale), Drew, $398 (sale), Dillon, $348 (sale), Fiona, $825)
So these shoes really fall into the “Chic, Not Exactly Cheap” category since they retail for about $400-$1000 a pair… (Though you can snag a couple of the styles on sale on the website right now…)
Omelle? You ask. Well, you’ve probably seen them on Gossip Girl, gracing the feet of Blake Lively, or on Vogue.com, Marie Claire, Style Bubble, WhoWhatWear, and so forth…
From the Omelle Shoes website:
“It started with a spark, something akin to the perfect pair of boots. Amidst illustrations, scrap fabrics and inspiration boards at LA’s prestigious Fashion Institute of Design and Merchandising, two shoe-obsessed designers discovered a common interest—luxury footwear with a distinct and imaginative voice. Combining a singular vision with years of experience, Cherise Angelle and Nicole LaFave have created a partnership dedicated to serving the sophisticated shopper, a lady who not only speaks in style but continually lives in it.
With a background rich in style, business and design—Angelle has worked in luxury product placement, while LaFave has honed her talents in graphic and knitwear design, working as an art director and self-employed designer—each woman offers a unique and varied background which helps to guide their direction. While Angelle appeals to the high-end sophisticate with a penchant for pumps and pearls, LaFave draws from her artistic roots, setting a new pace in fashion. When mixed and melded, the outcome is Omelle, or (ähm’ elle), a new voice and vision within the luxury footwear industry.”
Available to buy on the Omelle Shoes website and Shopbop.com.
I’m loving the unusual stacked, gold-edged heel, flaps, architectural cutouts, and nude colors.
What do we all think?
Leave Comment
Sep 17, 2009 | DIY, Fashion
(Hilfiger glasses, LB-03 [Japanese brand] Mongolian fur vest, DIY’ed studded Old Navy vest, Victoria’s Secret top, jigsaw puzzle necklace from Japan, DIY’ed Alloy Truck Skinny Jeans, Venti Anni [Japanese Brand] Shoes, Claire’s wristband, YKK zipper necklace [worn as a bracelet], wallet from Honolulu)
After seeing tons and tons of double-layering vests for Fall in Japanese magazines, I decided to try my own. (They showed fur + denim, denim +lace, fur+lace, tailored+lace…such a great idea and a wonderful play of textures.)
(more…)
Leave Comment
Sep 16, 2009 | Media
My tutorial on how to turn 3 XL Men’s Sweatshirts into a Blouson Tunic was featured on FaveCrafts.com! They’ve prefaced it with: “Take a few frumpy and boxy men’s sweatshirts and turn them into a cute one-size-fits-all convertible tunic. This tutorial shows you how to turn 3 XL sweatshirts, elastic and buttons into an adorable tunic with basic sewing tools.” Thank you, FaveCrafts editors, for allowing me as a guest feature on the site!
Happy DIY’ing!
xoxox
Carly
Leave Comment
Sep 16, 2009 | DIY
I love to take seemingly unfashionable, frumpy-looking garments and give them a makeover – and boxy men’s sweatshirts are in dire need of some redo! The following tutorial I have adapted from the incredible book “Kakkoii Kuchu-ru Rimeeku” (“Cool Couture Remake”) by Hiroko Yamase (Bunka Publishing, 2009).
 Unfortunately there is no English translation available (able translator right here, Bunka Pub.!! *hint hint*) and I would not recommend buying it unless you read Japanese very fluently or are able to make incredible leaps in logic while following the directions [in which not all steps are illustrated]. (There are also some mistakes in the Japanese, missing directions, and mistaken diagrams…something a better editor should have caught.) The first half of the book is devoted to refashioning men’s sweatshirts and tees into feminine, draped garments, featuring the incomparable supermodel Ai Tominaga modeling, and the latter half deals with men’s button-down shirts into…um, slightly less-fashionable, more girly pieces. (We won’t mention the last third where scarves and neckties are used to create clothing – a section best left forgotten.) But the first half of the book is stellar, and has some great ideas in it…The original “Button Blouse” in the book is now my “Convertible Blouson Tunic,” and I’ve adjusted measurements for our sizing system, Western bodies, sewing notions, and I’ve changed the methodology here and there.
To Make a MISSES’ One-Size-Fits-All CONVERTIBLE BLOUSON TUNIC
Read how to after the jump…
Materials List
3 Men’s XL Sweatshirts (we will call them Sweatshirts A, B, and C)**
10 buttons 3/4″ diameter (shanked, not the kind with holes on the face)
104″ of round cord elastic, any color (will be trimmed to around 54″ in Step 8)
3/8″ wide elastic, any color (see Step 11) for length)
**Notes regarding sweatshirts:
*A Men’s XL sweatshirt measures approximately 26″ from side to side, and 30″ long from side of neck to hem.
*Do not use sweatshirts with front kangaroo pocket – this will have to be removed. Style of neck does not matter (crewneck, v-neck).
*Medium-weight fleeced sweatshirts are used for this project.
*Sweatshirts can be printed on the front/back as long as you can salvage a piece of fabric 15″ high, measured from hem upwards. Therefore, if there is writing on the chest or sleeves, it won’t matter because we won’t be using those parts. Or, if the design extends below that 15″ high measurement, you will have to incorporate it into the finished project.
*Sweatshirts A and B must be exactly the same size, shape, style, and color – or else the front and back of your finished tunic will be different – which could be an interesting harlequin effect, if you will.
*Sweatshirt A MUST have no side seams unless you want a seam running down the center front of your finished tunic.
*Sweatshirt C may be smaller than XL
*You can use women’s sweatshirts instead of men’s for all 3 as long as you have garments that are approximately the same measurements as the men’s sweatshirts below…and the sides of the sweatshirts are not tapered or “fitted” to the body. The sweatshirts need to be boxy in order to create the ruching in the finished garment.
*This is a “one-size-fits all” loose garment – on Misses’ small or petite sizes it will appear oversized (so you may want to use L sweatshirts instead), and on Misses’ L sizes it will appear closer to body measurements (there will still be at least several inches of ease). Women’s sizes – use XXL or larger – and adjust required elastic lengths accordingly (you may want to add two or more extra buttons and buttonholes for stability at the neck).
Tools List:
Sewing Machine
Sewing Machine Needle (Med. Weight Knits)
All-Purpose thread matching your sweatshirts
Zigzag foot
Straight Stitch foot
Buttonhole foot (optional)
Fabric Scissors
Hand sewing needle
Safety Pin/Bodkin
Iron & Ironing Board (optional)
How-to:
1.
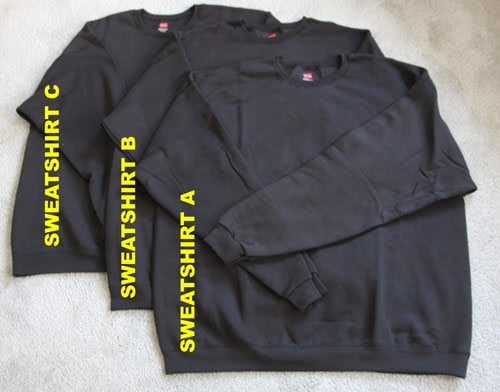

Cut Sweatshirts A, B, and C as above, straight across under the arms. Set aside the neck/sleeve areas (we won’t be using them).
Now we will call each piece we just cut Piece A, Piece B, and Piece C.
2.
Cut down one side of Piece A and Piece B, and open each piece flat. These will be both the front and the back of your garment. (Piece C we’ll deal with later.)
3. (Optional: You may want to iron Piece A and Piece B at this point in order to flatten any creases that occurred along their sides – we want the center front of the garment to be as crease-free as possible.)
Locate the center of Piece A (Center Front – referred to as CF from here on). At 4″ on EITHER side Piece A’s CF, mark two vertical buttonholes (large enough to accommodate your buttons), centered vertically in the ribbing area. Mark more buttonholes further outwards, spacing them 2″ apart, until you have marked 10 buttonholes (5 on either side of CF). Mark Piece B in exactly the same manner for your buttons.
4.

Sew the buttonholes on Piece A using your sewing machine (you will not need stabilizer on the wrong side of the fabric as long as you choose a wide enough setting for stitch width). You can determine the length of your buttonholes by measuring the diameter of your button, adding the height of your shank, and adding 1/8″. (Tip: Make a practice buttonhole on some scrap fabr
ic – or in the sleeve ribbing of one of the sweatshirts you cut up in Step 1). Test to see if your button will go through the hole and sit properly; if not, adjust accordingly.) Cut buttonholes open. (tutorial for making buttonholes on your machine here )
5.
Hand-sew on your buttons onto Piece B at the marks you made in Step 3). Sew on all 10 buttons, and shank them by winding the thread around your stitches several times.
5.
Place Piece A and Piece B right sides together, and sew side seams together with a 3/8″ seam allowance. We will call this Piece A/B from here.
6. Make a double knot in the end of your round cord elastic. Place on top of the side seam on the wrong side of Piece A/B, approximately 3/8″ from cut edge of the Piece.
Using a zigzag stitch on your machine, zigzag over the cord elastic, sewing it all the way around the cut edge of Piece A/B. (Start sewing just below the knot you made in the elastic, and backstitch several times to secure.) DO NOT SEW THROUGH THE CORD ELASTIC; the elastic must remain moveable underneath the zigzagging stitches.
7. When you get all the way around the edge of Piece A/B, backstitch a few times over the cord elastic, and remove from your machine. Trim thread ends.
Pull on the elastic firmly and pull the fabric in the opposite direction – this will create a gathered effect. Keep gathering your fabric by pulling on the cord elastic until cut edge of Piece A/B is the same size as cut edge of Piece C.
8.
Double-knot cord elastic and trim end.
9.
Insert Piece C inside Piece A/B, matching cut edges, right sides together. Pin together.
Sew top of C to gathered bottom of A/B, sewing to the left of the line of zigzag stitches so that none will be visible on the right side of the garment.
10. Determine length of bottom elastic. Button all buttons on your garment, and try it on. Wrap a measuring tape around your body at the point where the bottom ribbing hits on you. Add 1″ – this will be your 3/8″ wide elastic length, so cut elastic accordingly.
11.
Cut a small hole in bottom ribbing of Piece C on the wrong side of the garment. Attach a bodkin or safety pin to the end of the 3/8″ wide elastic, and thread it through the ribbing, all the way around. Pull the other end all out the hole- and stitch the ends together overlapping about 1/2″. Feed back into the hole you made – and if you’re a perfectionist, hand-stitch that hole closed.
You’re finished!
This is a convertible piece – you can wear as a blouson tunic (shown above), or in the configurations below:
Button-Waisted Skirt
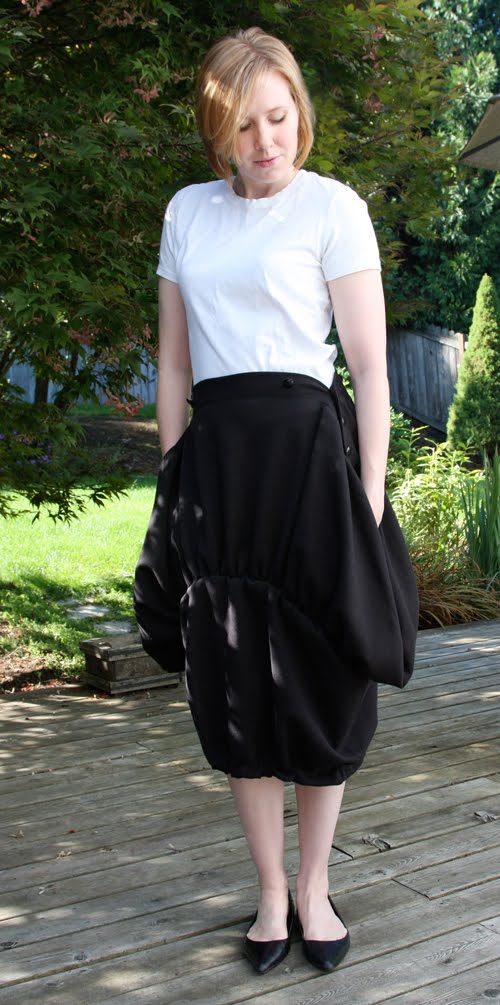
Undo one or two buttons on either side of the neckhole of your tunic, step into the neckhole and pull up to your waist, fastening buttons as necessary to keep it from falling down. Tuck each sleeve into itself to create drippy pockets (though you won’t want to put anything in them since the sleeves are still open!). If you like, safety-pin the sleeves closed on the insides so you you don’t have gaping holes in your skirt.
Ruffle-Bottom Skirt
Turn tunic upside-down and undo all buttons. Wear with bottom elastic as a waistband.
It seems a huge waste of 3 sweatshirts, but if your SO has extra unworn ones or you score at the Goodwill, it gives them another great life. Can you imagine this done in cream, with gold anchor-embossed buttons for a sailor look? Or seafoam green, with pearl buttons? Or two-toned: heather gray on top with black at the waist? The options are endless…and only limited by your imagination!
Plus-don’t throw away the top parts of your sweatshirts..more tutorials on what to do with those are on the way!
For reference purposes: I am a Misses’ Small/Medium, 4/6 – I am 5’6″ tall and my measurements are 33.5 – 27 – 34.5. I used two Men’s XL sweatshirts for Part A/B – and for Part C I used an Men’s L sweatshirt.<
br />
Happy DIY’ing!
xoxox
Carly
Leave Comment
Sep 16, 2009 | Fashion

From the PR peeps:
Rocker Avril Lavigne officially joined the ranks of iconic New York Fashion Week designers following the presentation of her Abbey Dawn, by Avril Lavigne Fall/Holiday 2009 Collection, available exclusively at Kohl’s yesterday [Carly says sorry guys, there’s nothing up on the Kohl’s site yet], with a high-energy runway fashion show. Serving as an alternative destination for New York Fashion Week, this is STYLE360’s 6th annual series of fashion and society events. STYLE360 is a production of A-List Communications. Nicky Hilton, Tommy Hilfiger came out to support, among others….








I’m not sure about you guys, but to me this pretty much looks like stuff you can buy at Hot Topic, or Alloy, or Delia’s… It doesn’t look fresh; it looks dated (though it does look like something Avril would wear, I have to say). Updates could have been done in the styling but the few ensembles look very run-of-the-mill, punky, 90’s straight-up mall clothes. Now I know Avril was not aiming for high-fashion couture, but….it’s just….seen it, done it. But they’ll definitely sell.
What do all of you think?
(And I’m sure this will be the last time the Abbey Dawn PR people send me anything.;-)
Nicky Hilton’s expression is priceless.
And sorry about the watermark in the middle of the photos…me poor, cannot afford hi-res, no watermark image membership on WireImage…:-(
Photos by Steven A. Henry, WireImage.com
Leave Comment
Sep 15, 2009 | Score!
Buckle is giving away a $5,000 grand prize towards education and over 160 Buckle gift cards (totaling $8000)!
HOW TO ENTER: There are four (4) ways to enter:
(1) Earn one entry by opening a Buckle Credit Card account via the Internet at www.buckle.com or at any Buckle store by close of business on September 27, 2009. Subject to credit approval. Normal Internet access, phone/usage charges imposed by your online/phone service will apply.
(2) You will earn one entry for each purchase transaction made on your Buckle Credit Card.
(3) You will earn one entry by registering your Buckle Credit Card account for account management via the Internet at www.buckle.com. Normal Internet access, phone/usage charges imposed by your online/phone service will apply.
(4) To enter without making a purchase, hand print your name, complete mailing address, telephone number and date of birth on a plain 3″x5″ piece of paper and mail in a hand–addressed stamped envelope to: The Buckle Card Back to School Sweepstakes, P.O. Box 7893, Melville, NY 11775– 7893. Mailed entries must be postmarked by September 28, 2009 and received by October 5, 2009. Limit one mailed entry per envelope. Mechanically reproduced mailed entries are automatically void.
4. PRIZES: Grand Prize (1): $5,000, awarded in the form of a check. First Prizes (3): A $500 Buckle Gift Card. Second Prizes (20): A $100 Buckle Gift Card. Third Prizes (40): A $50 Buckle Gift Card. Fourth Prizes (100): A $25 Buckle Gift Card. Second, Third and Fourth Prizes will be delivered to winners within 4–6 weeks after winner determination. Limit one prize per person. Gift Card subject to additional restrictions/expiration dates. The total retail value of all prizes is $13,000.
Enter the Colbie Caillat Breakthrough Sweepstakes (through October 6) to win a VIP concert experience!
1 Grand Prize: a trip to West Hollywood, House of Blues concert, tickets to see Colbie Caillat, backstage passes, luxury boutique Mondrian hotel and a $500 Buckle gift card. 3 First Prizes: $100 Buckle gift cards; 50 Second Prizes: $25 Buckle gift cards.
ABOUT BUCKLE: The Buckle, Inc. (NYSE: BKE) is a leading retailer of medium to better–priced casual apparel, footwear and accessories for fashion–conscious young men and women. The Company currently operates over 400 stores in 41 states, under the names Buckle and The Buckle.
Buckle markets a wide selection of brand names and private label casual apparel, including denims, other casual bottoms, tops, sportswear, outerwear, accessories and footwear. The company emphasizes personalized attention to its guests (customers) and provides individual customer services such as free alterations, layaways, and a frequent shopper program.
DISCLAIMER: Open only to legal residents of the continental United States who as of 9/14/09, are 13 years of age or older (18 years or older for residents of the state of Maine). Employees of The Buckle, Inc. (“Buckle”), their affiliates, subsidiaries, advertising, promotion and inherent agencies, and their immediate family members and/or those living in the same household of such family members are not eligible. All U.S. federal, state and local laws apply. Void where prohibited.
NO PURCHASE IS NECESSARY TO ENTER OR TO WIN.
Leave Comment











