Jul 29, 2014 | Fashion

Multicolor Crystal Ear Cuff: from Japan, similar
here
.
Striped Short Sleeve Top: JOA.
Striped Skirt: JOA. Mixed Media Bib Necklace:
DIY (
tutorial here), similar for sale
here.
Skinny Railroad Spike Bangle: Giles & Brother. Hard-Sided Blue Clutch: ASOS, similar
here. Silver Sequin Wrap Sandals: Old Navy (old, similar
here and get free shipping with
JUSTBECAUSE)
 I just couldn’t stop thinking about stripes for Summer after posting my first Chic for the Week installment 2 weeks ago, especially when rendered in that gorgeous ballroom-length full skirt. So of course I snapped up a low-cost steal to fuel my stripe-lust: this JOA skirt from Shopbop. (more…)
Leave Comment
Jul 28, 2014 | Fashion
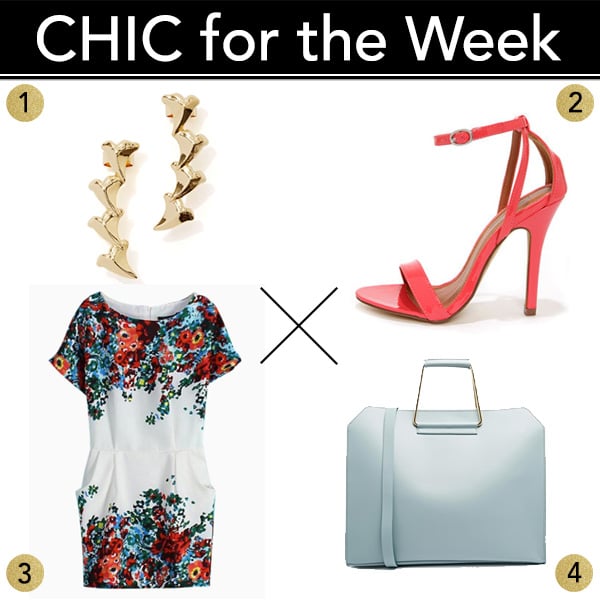
Welcome to another installment of Chic for the Week, where I share a couple shopping picks that have been on my mind lately.
Did everyone have a good weekend?
I had a blast at the Portland Bloggers’ Annual Picnic, and then took Lil Tot to a screening of Despicable Me 2 out on the Commons after dusk, eating buttery popcorn are laughing at Steve Carrell’s accent. It was a surprisingly fun movie!
And can you believe July is almost over??! This Summer is just flying by! Here are a couple items on my wishlist for the week:
1. Lately it’s all been about the juxtaposition between ladylike and edgy. These shark tooth-shaped ear cuffs from Nasty Gal are just what the surfer babe in you ordered.
2. These Lola Coral Patent Ankle Strap Sandals would be a fab pop of color at the feet. (Wouldn’t they just sing paired with some trousers in a neutral color like black or tan?)
3. This Choies flowered sheath dress is so prim and proper – and I think it would look just as lovely paired with some flat and casual sandals.
4. I can’t stop thinking about this ASOS Leather Bag ; the shape is so fashion-forward, I love the handles…and it’s the perfect size for my laptop when traveling. GORGE!
Hope everyone’s having a great start to the week!
xo
Carly
Leave Comment
Jul 27, 2014 | DIY
 Hello friends! Here’s an ombre nail art idea for you today to try out the next time you’re painting your nails.
 I was wanting to update my pedi with something reminiscent of warm, starry night skies – which are so much more gorgeous in Summer. While everyone else is doing pastels or neons this season, I went dark and spangled, just like late July evenings with the sky dotted with fireflies and stars.
 After prepping my feet according to this DIY Pedicure Guide (and using my favorite Spongeables Ped-Scrub Foot Buffer to scrub away any rough patches), I painted a clear base coat, and then:
- Painted one coat of a dark cobalt blue that had a small amount of micro glitter in it, and let dry. (The polish I used I bought like 10+ years ago, so if you’re looking for something similar now, this one is a close match.)
- Then I painted half of my nails close to the cuticle with the blue
- While the polish was still wet, I painted the ends with Estelle (black multi-glitter), mixing the polish where it met the blue. I let dry.
- Finally I applied another coat of Estelle at the tips to darken into black. One topcoat to smooth the surface and it was all done!

 I love the dark and mysterious look to this pedi, and how it sparkles in the sunlight (and against my favorite silver sandals).
What other colors do you think it would be fun to mix into an ombre mani?  (I tried sorbet blue and lavender in this DIY Ombre Sherbet Nail Art last year!)
 Happy Summer DIY pedis!
xo
Carly
Save
Leave Comment
Jul 25, 2014 | DIY
 Summer is wedding season – and there’s no better way to save some $$$ than by DIY’ing certain aspects of your ceremony (plus it adds an oh-so-important personal touch to everything!) Here are some great ideas for some DIY Summer nuptials (many of which can be used instead for any fancy party or get-together on your calendar!):
 Beautiful wedding invitations can be yours just by customizing this Kraft Paper printable from TheKnot.
 Make your own gorgeous flowery wedding program with this free downloadable template from TheKnot.
 A bouquet to hold (and eventually toss!) can be completely non-traditional, as evidenced by this beautiful succulent version featured on The DIY Network.
 Personalized dcorations are a must, and this pretty DIY Tassel Bunting from Rae Ann Kelly can be customized with a special saying, your names, or your own newlywed monogram.
 Make a custom banner with Martha Stewart‘s template that is the perfect backdrop to the reception, ceremony, or even on-the-fly candid shots.
 Speaking of candid shots, it’s always great to set aside an area for beautiful couple photos to commemorate the occasion. This DIY Cloud Backdrop from A Practical Wedding is both unique and gorgeous.
 Table numbers can be chic, sophisticated, cute, pretty, rustic, or just about anything else your heart desires. Here’s a gilded hand-painted version from Wedding Chicks.
 A blooming monogram for the table adds a personal note of pretty. From Urbanic Paper Parcel Post‘s blog.
 For napkin rings, these DIY Origami Diamond Napkin Rings from Brooklyn Bride add a touch of whimsy to your table.
 Personalize the seats where the bride and groom will sit with these printable banners from Lia Griffith.
 Another must-have decoration for a wedding: BALLOONS. This LOVE balloon backdrop is super-easy and totally gorgeous. By Jenny Van Summers, found here.
 Create a DIY Aisle Runner with a special message to your beloved, found on Bridal Musings via Belle Amour.
 2 large wooden puzzle pieces can be painted and used as your special bride and groom cake topper. Photo from Lover.ly by Captured Photography by Jenny.
 Make your own Edible Photo Lollipops with a photo of the bride and groom as wedding favors. Tutorial from PhotoJojo.
 For the final send-off for the new couple, Style Me Pretty has some great DIY Push Pop Confetti.
Hope your event is special, lovely, memorable, and DIY!
xo
Carly
Leave Comment
Jul 23, 2014 | Life
 Hello friends! Long time no see! I’ve had a ton going on, and am dealing with some really difficult personal things. Perhaps I’ll be sharing soon – but not quite yet. I’m still soldiering through, though I still see no light at the end of this very long, immeasurably dark tunnel.
For now though, I’m back here on this blog again, sharing ideas and inspiration for affordable fashion and DIY.
Here’s a little quote for everyone out there who has ever had to deal with something that threatens to destroy everything, pull down the walls around them, and change life as you knew it forever:
Our greatest glory is not in never falling but in rising every time we fall.
-Confucious
Photo by Fré Sonneveld. Layout by me.
xo
Carly
Link, share & pin as much as you like! Share and share alike 
Leave Comment
Jul 12, 2014 | DIY, Score!
 The brand-new Canadian line, TRENDiY Art, was recently kind enough to send me one of their fun DIY kits to review.
TRENDiY Art is a new line of art and craft activities for tweens and teens, and is all about making cool jewelry and fashionable accessories. They provide not only all the materials to make these projects in the kits, but also a full-length fashion magazine with styling ideas and DIY possibilities. 


 I decided to open up the Mexican Bracelets kit and try my hand at some embroidery thread-wrapped bracelets.
  They were super-easy to make and a cute, colorful addition to my stack of arm adornment. Here’s how to make them:
You Need:
 TRENDiY Art Mexican Bracelets Kit / scissors
How To:

 1. Start by double-knotting one thread around your bangle.
2. Wrap the thread around multiple times.
 3. Change color by tying a new thread to the old one with a double knot, then cutting off the old thread.
4. Wrap the second color around, covering up the end of the old color and the end of the new color.
5. Continue all the way around, until you reach the beginning of your wrapping.
6. Add a third contrasting color wrapped around your base colors for texture.
7. When done, tie your final thread to the tail of the thread you tied on in the beginning, and snip all extra ends.
 You can use 2 or 3 different colors rolled together for different looks, switch up the colors frequently, or tie many colors loosely around (even finishing your bracelet with a handmade tassel!) Plus you can hand-sew on some crystals, or even thread on some beads as you wrap for a totally different look.
 Make it your own, make it colorful, and make it fun!

These kits make it very easy to create your own DIY projects since they come pre-stocked with everything you need. Totally on-trend and fun, TRENDiY Art kits are a great gift or engaging activity for any avid DIY’er in your life.
Currently only available in the UK, you can get your hands on 3 of these exclusive kits by entering the giveaway below!
Giveaway
One lucky reader will win 3 TRENDiY Art Kits! Enter using the Rafflecopter widget below:
a Rafflecopter giveaway
Good luck!
xo
Carly
FTC Disclosure: I was sent 4 DIY kits to review from TRENDiY Art. I have received no other compensation for this post. The above opinions are my own. To read my full Disclosure Policy, click here.
Save
Leave Comment
Jul 9, 2014 | Life

Comparison is an act of violence against the self.
-Iyanla Vanzant
Jennifer Jones, the blogger behind IHeartOrganizing, one of my favorite blogs that I stalk almost daily, recently shared some thoughts on perfection that appears throughout the blogosphere in beautiful, styled photos, amazing layouts, boundless creativity, and an often daunting body of work that some can feel is not reflective of reality. If you’ve ever felt inadequate, left out, or overwhelmed with the seemingly “perfect” lives put out there on social media or blogs, you’re not alone. Don’t be overwhelmed by the careful construction of reality.
Read her post. It will help.
In her post she quotes Iyanla Vanzant, which is a particularly favorite quote of mine, and one I knew was just perfect for my digital typography poster this week.
Photo by Chris Brignola. Layout by me.
xo
Carly
Link, share & pin as much as you like! Share and share alike 
Leave Comment
Jul 8, 2014 | Fashion
 How was everyone’s holiday weekend?
Mine was filled with firsts: my neighborhood’s first-ever block party on Friday with a huge July 4th celebration and amaaazing fireworks (they’ve never had one before in all the 6 years we’ve lived here)…and Lil Tot’s first-ever sleepover at a friend’s house. (He’s only ever had a friend sleep over here before, so it was a huge milestone for my little boy! Can’t believe he’s now EIGHT…I started this blog when he was TWO so it’s been quite a journey. *wipes away tear*)
We decorated our bamboo stalk with paper decorations and wishes for Tanabata (Japanese Star Festival) yesterday, and now the week has begun.
And so has a new series of mine: Chic for the Week. A couple items I’m crushing on this week…
1. In Summer you have to go breezy and easy with your choice of tops. This Choies Crop Top may be a play on words, but is also a chic option.
2. LOVE these bold and chunky Shoe Cult Cross the Line Flatforms . Wear with #3 and you have yourself an outfit!
3. A striped skirt is an essential Summer piece and when the shape is billowy and ballroom it’s so now. This ASOS woven midi skirt looks super-cute with a crop or tank top – can’t wait for mine to arrive so I can rock it out!
4. The Limited Pearl Collar Choker is so minimalist and modern – and totally affordable too. I think this would be an easy and quick DIY once you can source the main metal choker part.
Hope everyone’s having a great start to the week!
xo
Carly
Leave Comment
Jul 3, 2014 | DIY
 Tassels, tassels, everywhere! I officially declare 2014 the Year of the Tassel. They’ve been having a HUGE moment again, and I love their undone, boho-chic feel. Casual and cool at the same time. It’s very easy to make your own tassels – or even better yet, make your own fun colorblocked tassel NECKLACE (just like this $128 Anthro Fanned Botanique Necklace [no longer available]). Here’s how:
You Need:
 embroidery thread in 4 colors (I chose cobalt blue, navy blue, goldenrod, and metallic gold) / 3/8″ diameter natural rope, 1 yard long / 1 1/4″ goldtone D-ring / scissors / tape / glue / toothpick (optional)
How To:  1. Start wrapping the embroidery thread around the bottom of the D-ring, using 2 fingers to create the right length. Wrap around many times until you get a thick bundle.
2. Slide your fingers out from the bundle.
3. Snip a short piece of thread and tie around the bundle, close to the D-ring.
 4. Wrap both ends of the thread multiple times around where you tied, and tie the ends together with a double knot. Leave the ends loose for now.
5. Use scissors to trim the bottom of the tassel flat.
 6. Fluff out the threads in the bottom of the tassel.
7. Repeat Steps 1-6 for 2 more tassels in your first color. Repeat for 3 tassels in your second color. Repeat for 3 tassels in your third color. For the third tassel in that color, I made it using half metallic threads (since the metallic thread frays easily but isn’t as “fluffy” as the regular embroidery thread).
8. Use a dab of glue on each double knot you made in Step 4.
 9. Snip off the ends of the threads close to those knots once dry.
10. Place the D-ring with the tassels in the center of your rope piece.
11. Use the metallic thread to wrap around each side of the straight part of the D-ring, many times, to secure the ring to the rope.
 12. Finish each wrap by double-knotting the thread at the back. Dab with glue, and snip off the ends.
13. Try on the necklace and decide how long you want it. Use a piece of tape wrapped around the rope pieces to secure it to the length you like.
14. Cut off the excess rope.
15. Use a contrasting thread color to wrap around the rope ends and completely conceal them. End using a double knot, dab on glue, and cut the threads.
 You’re done! A bright, bold accessory for breezy tops and easy dresses this season is only a couple wraps and snips away. You can you any combination of fun colors, and totally switch up the look of the piece by adding pompons, charms, or other accoutrements to make it all your own!


How will YOU wear your Colorful Tassel Necklace?
 Happy DIY’ing!
xo
Carly
Save
Leave Comment
Jun 29, 2014 | Fashion
 It seems clip-on earrings are having a moment again – and rightly deserved, since they are more versatile than one would think! Not just limited to earlobe decoration, clip-on earrings can be incorporated into your wardrobe in a variety of surprisingly chic ways.
  Emitations.com sent me a pair of sparkly clip-on earrings to style, and here are a couple ways I came up with to let their beauty shine:
CHIGNON DECORATION
 One of my favorite ways to wear clip-on earrings is to use them to adorn my hairstyle – and they look especially fabulous in an updo. Perfect for graduations, evening soirees, and dressy events, a little bling in your hair can go a long way.
COLLAR ACCENTS
 Taking a page from Michelle Obama’s playbook, using a piece of sparkly jewelry in an unexpected place – like the collar of a coat or dress – lends your ensemble a major dose of refinement. Adding a pair of clip-on earrings right at the front opening of a coat creates focus on the face and ups the glam factor.
SHOE CLIPS
 Adorn those plain pumps with a sweet pair of clip-ons! Having a small amount of sparkle at your feet can make you feel like a true Cinderella. Unlike true “shoe clips,” clip-on earrings don’t have the teeth on the underside of the snap, which means these won’t ruin your shoes like shoe clips can.
There are a ton of great clip-on earrings to be found at thrift stores, flea markets, and Ebay – as well as brand-new, gorgeous options available at Emitations.com (they look just like the real thing it’s almost impossible to tell!)
 Do you have any ideas about how to style your clip-on earrings?
xo
Carly
FTC Disclosure: I received a pair of clip-on earrings from Emitations.com to review and style in a post. I have received no compensation for this post and the above opinions are my own. To read my full Disclosure Policy, click here.
Leave Comment











