Feb 19, 2013 | DIY
 I picked up this iron-on decal set last Spring when I visited Japan.
Japan is such a treasure trove of nonsensical English. I find it summarily hilarious.
 So of course I could NOT pass up this “Beau Chat” iron-on decal. I am a crazy cat lady at heart (who happens to unfortunately currently reside with this crazy Ewok-lookalike dog instead of a big pile of cats, which is my someday personal goal).
So I can only surround myself with cat-themed items and try to be consoled in the meantime. A stern-looking tabby sporting the crown jewels is an excellent addition to my collection.
I figured the title of this iron-on image was French. “Good Cat,” I believe, unless my French is really terrible (which, okay, it is…a kind reader told me it is “Handsome Cat.” Whoops.). “Since 1902” it also proclaims in English (making it one very OLD handsome cat, apparently).
 And then follows a chopped-up paragraph in German. I don’t speak German, but the online translator says it is something about being outdoorsy, wine, and making a blunder over a duration of time. Maybe.
 But the back of the bag is the best.
My cat is only active at night.
YOU ARE BLOWING MY MIND
I mean seriously, who could resist a bag that accuses people of blowing the owner’s mind??!? I always feel that my mind is blown by the amazing-ness (and sometimes craziness) of other people. I think this accusation is excellent in a proactive sort of way.
 I made the bag following a pattern from a Japanese pattern-book I have; you could also use this pattern here and come up with a similar result.
  The faux leather handles were also from Japan; you can buy similar ones here. The grey Essex linen I used for the outside I bought from this Etsy shop (I LOVE this stuff!), and the toile-print lining I bought from the fabric store.
  The iron-on is of course uniquely Japanese, but you can find something similar here and add some crazy paragraphs in a variety of languages on the computer if necessary.
This little, crazy tote is the perfect size for a quick run out, or just a wonderful conversation-starter.
 From one crazy cat lady to all of you~
xo
Carly
Save
Feb 12, 2013 | DIY
 Lately double-ended spike bangles are trending all over Pinterest and street-style photos: stacked with DIY friendship bracelets, pretty watches, stretchy beaded bracelets, and other metal bangles. You could spend hundreds of dollars on even just one at Sarah Chloe or CC Skye
 , for example. But they’re super-easy to DIY, and the results are amazing! Try your hand at making your own with 3 different versions in these tutorials: (more…)
Feb 8, 2013 | DIY
 I love taking little scraps of things – whether they be paper, lace, or fabrics – and turning them into pretty accessories. Plus I also have an obsession with teeny, tiny things…like mini-books, which can hold all your secrets and ideas, stored away on your person. And what better way to create a personalized gift for a loved one this February? I dreamed up this DIY for Valentine’s Day – which will use up a very tiny amount of little bits of fabric, leather (or pleather, vinyl, or other fabrics), and cardstock you may have lying around. Here’s how:
You Need: (more…)
Feb 3, 2013 | DIY, Media

Image source
I’ve been embroiled in a room makeover that seems to be taking up all my spare time lately – and though I’m re-decorating my home office (at long last!) I can’t help but be inspired by any DIY decorations and ideas around. One particularly inspirational source I’ve found is The Land of Nod – and though I’ve never bought anything from the company, each issue of the magazine transports me away to a lovely, whimsical location, filled with bright, fun things that any child (or even adult!) would be thrilled to lose themselves in. Here are some great, inexpensive ideas for your child’s room – easily adaptable to other rooms in your home:

Add a lacy texture to a wall with doilies (some painted with silver glitter) – which could also be a stand-in for a headboard. Christmas lights can become a makeshift curtain, and drawers in a side table can be replaced with glitter-sprayed cardboard boxes.

A fabric bunting is a colorful and easy way to add some whimsy to a room – as well as your favorite fabric filling up a large frame on the wall instead of a standard picture. Add some colored paper cutouts to a lampshade for a fun and personalized light.

A sweet little woodland vignette can be made in the corner of a room with some painted corrugated cardboard mushrooms and grass.
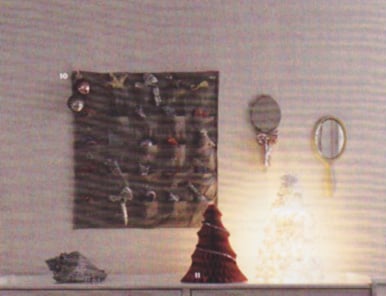
Instead of a large mirror on the wall, mount smaller gilt hand mirrors.

A wall can be made unique with a number of mirrors of varying sizes and shapes.
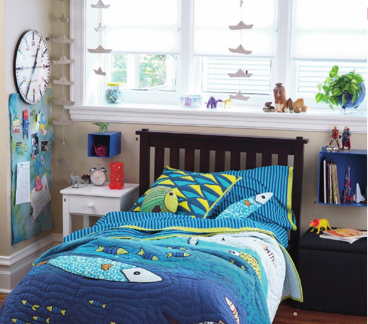
A room can be made lively with origami sailboats (or something else!) strung from the ceiling. Also: colored boxes mounted to the wall to hold trinkets and treasures.

An ingenious use for old skateboards: strung together to made a ladder bookshelf.

Make a unique and playful wall shelf using just a tree branch…and a handful of colored sticky dots and paper trees.

When painting you don’t have to do the whole wall: masking off large stripes and leaving areas unpainted can look really modern too.

Speaking of not painting walls, you can also do a unique decoration by painting Contact Paper, cutting out circles, and adhering to the wall. (I did this for Lil Tot’s nursery/bedroom in our old condo – and everyone who visited asked me where I bought the beautiful blue dots that were on the wall! …Which I just peeled off once we moved – and was left with the unharmed white wall beneath.)

Make a faux chandelier swag with colored paper cut into triangles and circles, strung across the room.

I think someone enterprising could DIY this twig mirror with a few branches, some strong glue or nails, and some gold paint…for a lot less than $219, don’t you think?

And likely an intermediate knitter could knit a cover for a lampshade…or anyone could repurpose a sweater to the same effect!
Happy DIY’ing!
xoxo
Carly
Images scanned by me from Land of Nod Holiday Collection 2012 catalog, and online from the February 2013 catalog.
Jan 24, 2013 | DIY
 For my second DIY post for the e-tailer London Times, I’ve created a DIY Beaded Collar to one of their pretty color-block dresses. Click through to find out how to easily add a beaded embellishment to a piece you may already own…
 Happy DIY’ing!
xo
Carly
Save
Jan 21, 2013 | DIY
 Hi everyone! Happy Martin Luther King Jr. Day!
I’ve teamed up with the dress e-tailer London Times to do 2 DIYs featuring their dresses. The first of two is up on their blog today: a DIY Metallic Envelope Clutch (made from a plastic file folder, some felt…and a surprising metallic material!) Click through to find out what it is and how to make one yourself…

Happy DIY’ing!
xo
Carly
Save
Save











