Dec 15, 2010 | DIY, Fashion
How goeth the holiday shopping? I am terribly behind and having mini panic-attacks in-between braving the crowds at the mall and waiting in a line that stretches 3 times around the Post Office just to use the Automatic Mailing Machine. Hopefully everyone else has it under control – but if not and you’d like some ideas for that person who prefers to do everything themselves – and who has more than just a little craftiness up their sleeves – look no further and check out these DIY-themed gifts, all available online: (all under $50* – except for one* very important gift!!)
1. The Big-Ass Book of Crafts, $19.95
2. Beginner Studding Kit, $23
3. Wood DIY Gnome, $4.99 (sale)
4. Charmed Knits: Projects for Fans of Harry Potter , $10.19
5. Kenmore Drop-In Bobbin Sewing Machine, $141.99*
(This is, BTW, the exact same machine I use – Hub gave it to me for my birthday 3 years ago. It is by far the best machine I have ever used – glides through EVERYTHING, even leather up to 3/4″ thick (six layers of sueded split top leather at 1/8″ thick a layer), and it’s never broken or given me any grief. It has 90 stitches on it (not that And I’ve never sent it in for maintenance, oiling, or anything. It’s pretty fabulous and I can’t say enough good things about it!)
6. Gingerbread Train Kit , $19.95
7. Mayan Magic Chocolate-Making Kit, $24.99
8. Urawaza: Tips & Tricks from Japan, $15.95
9. Felt Whole Cakes Pattern Set, $5
10. Black & Decker 14V Drill with Stud Finder, $34.99 (sale)
If you know anyone who wants to get into studding their clothing, shoes, handbags, and accessories, the studding kit will set them on their way to spiky fabulousness – or for the DIY gourmet, make-your-own-chocolate or a sweet gingerbread train that will have to be safeguarded against prying little fingers until after the holidays.;-) And no serious DIY’er should ever be without a power drill – I use mine to drill holes in pendants, sand and buff metal jewelry, distress denim…and of course, make holes in walls! (and your drill doesn’t have to be pink for it to be perfect for you, despite what the hardware store guys may think:-)
xoxox
Carly
~If you liked this post, please share it!~
Leave Comment
Dec 13, 2010 | DIY
My tutorial for this sparkly, holiday-style jeweled DIY cardigan clip was featured in the Nov/Dec 2010 issue of Style Sample Magazine (see pg. 20!). It’s super-easy to make – with just a glue gun, some sparkly buttons, and some trim scraps you too can make one in no time.
As the holidays approach, we’re all looking for that perfect accessory to elevate a blah outfit into FABulous; office-wear into party attire; the everyday into elegant. And what better than a functional closure to your sweater (or jacket, or scarf) that can double as a statement brooch? Clip it on, bling it out – however you wear it, it’s sure to be the focal point of any outfit!
Materials:
*stiff felt, cut into 2 circles (each about 1.5″ diameter)
*scrap of lacy ribbon
*assorted jeweled buttons
*2 shoe clips
*short length of chain (about 3″)
*Optional: 2 jump rings
*Optional: 2 brooch pinbacks
Tools:
*scissors
*glue gun & gluesticks
*pliers
*needle &thread
How-To:
1. Start by stitching the lace around the edge of each felt piece, in a spiral. (Although you can use the hot glue for this, the stitches look neater.)
2. Hot-glue the buttons on top of the lace.
3. Turn each felt piece over, and hot-glue a shoe clip onto its back. Keep in mind that in order to wear at the front of a jacket or cardigan, each clip has to open outwards, so make sure they face the right way before you glue them down.
4. Add the chain to the bottom of the felt pieces. I attached it using jump rings, but if you like you can just use hot glue to affix it, hiding the ends underneath the lace.
5. Optional: If you’d like to wear this piece as a brooch, also glue a pinback to the back of each felt piece.
You can try a number of configurations, using ribbons, soutache braid, fancy trims, different chains, studs, vintage findings, or even stick-on jewels (form the scrapbooking section of the craft store!) The sky’s the limit!
And make sure the very next time you rock it out – you tell everyone that you didn’t buy it…you DIY’d it!
I love how it looks like a little smiley face! (Once you see it..you can’t UNsee it!:-/)
And if you’re interested in the other features in this issue (like an interview with Project Runway Season 6 finalist Althea Harper and the how-to on making your own badge for your blog)…
Read the full issue online here
Thanks so much to Tamia and the team at Style Sample! I truly appreciate the inclusion and am honored to be a part of this great publication.
[And since they are the only magazine currently dedicated to bloggers and the art of style blogging, please help support this great publication by reading, contributing, or even purchasing the print version online. Thanks so much!]
xoxox
Carly
~If you liked this post, please share it!~
Save
Save
Save
Leave Comment
Dec 10, 2010 | DIY
Feathered things are experiencing a revival lately – and I’ve been hankering after a maribou feather clutch for awhile. But I’m not going to buy when I can DIY for much cheaper! It’s sooooo easy too…
DIY Marabou Feather Clutch
Difficulty: (Easy/Beginner)
You Need:
*old clutch-style purse
*tacky glue
*marabou boa
*scissors
How-To:
1. Lay your clutch flat and visually estimate how far apart the pieces of your boa need to be to get the kind of coverage you want.
2. Spread the tacky glue in vertical lines down the front of your clutch, and across the top below the clasp.
3. Starting from one side, lay one end of the boa onto the glue at the bottom of the clutch.
4. Fold the boa piece over at the top of the clutch, and then loop it down towards the bottom. Snip at the bottom of the clutch.
5. Repeat for all the lines of glue until the front of your clutch is completely covered. Allow to dry and then trim the ends so they’re all one length.
Pretty easy, right? To cover both the front AND the back using this method, you’ll probably need two boas. And you could use any type of feathers that suit your fancy…they don’t have to be marabou, and they don’t have to be in boa-form, either.
Did You Know?
“Marabou” is a term for fluffy feathers – and most “marabou” feathers available for crafting, fishing lures, garment trims, or millinery supply are actually turkey or chicken feathers, not feathers from the Marabou Stork (which are extremely expensive). Feather supply companies may obtain their feathers from birds that are killed by the meat industry, or the down may be plucked from the bird as the seasons transition and it has no need of it anymore (termed “live-plucking”). Feathers also may be collected as they naturally molt (like peacock feathers), or from birds’ nests (like eider down).
So finally, welcome to DIY Roundup 8! If you’re unsure how to link up your tutorial (or finished project), here’s how:
Just click the light blue “Add Your Link” button that appears to the bottom left below. Follow the instructions in the Inlinkz window, pasting in the URL of your project or tutorial (from your own blog, Facebook page, Flickr account, Craftster.org, CutOutandKeep.net, etc). Don’t forget to write the NAME/DESCRIPTION of your project – like “Bow T-Shirt” or “DIY Lanvin Necklace” – not your own name or your blog’s name!!! You can link up any piece you’ve made or tutorial you’ve written from any time, not just in the last two weeks (though it would be nice if it’s a recent project, just to keep the content fresh). It’s all about sharing and bringing in more like-minded visitors to your site!
So now you get to share your own DIY’s! If you have a DIY project or tutorial that you’d like to share, please feel free to link below! (However you can only link YOUR OWN PROJECT. Please do not link others’ projects!)
If you’ve linked up your project to the Roundup, feel free to grab the button below.
Can’t wait to see everyone’s projects!
xoxox
Carly
~If you liked this post, please share it!~
Leave Comment
Dec 8, 2010 | DIY
Again, 2 weeks condensed into one cuz I’ve been lazy.
The Ongoing Project DIY’ed Tom Binns’ rhinestone, pearl, and safety pin necklace. I love her version and can’t believe it wasn’t on my radar before!
Faux fur bootie covers – so lovely! Required2BeInspired DIY’s her own version, inspired by a pair of Dune boots she saw on ASOS.
Speaking of ASOS…Love the idea of Minx nails but the $50+ price tag + salon appointment hassle is scaring you off? Try the $12 DIY version – Nail Rocks, available at ASOS.com. I just ordered meself the gold metallic, but they also have animal print, lace print, and designer graphic prints…and I’m dying to try them all.
Ever wanted to DIY your own knitwear? (*Guilty!) Trendy Workshop allows users to create their own sweaters, scarves, dresses, and more in cashmere or cotton. Based in France, the company has an online editor where you can choose from different silhouettes, colors, sleeve styles, text, and detailing for each piece. Once finished you can have them produce and ship you the finish piece, and/or add it to your own webstore on their platform.
And – more nails again – sometimes glittery polishes just aren’t…glittery enough, ya know? Kate from This is What I Do DIY’ed her own version of the glitter manicure…with real glitter, and it looks just perfect. (found via A Pair and a Spare)
Nixxi’s No-Sew DIY dress tutorial on Ecouterre is amazingly simple…and stylish, and multifunctional! Got 5 minutes? Give it a try!
The 34 Great Homemade Gifts You Can Make list from Get Rich Slowly is an oldie but a goodie – and a great list to turn to for inspiration when it’s well into the holiday season and you’re in need of creative gifting inspiration.
And BurdaStyle is having an amazing Holiday Giveaway a DAY (until December 30th)- just leave a comment on each giveaway post on their blog, and you’ll be entered!
Hope all of you had a lovely two weeks filled with DIY!
All imgs from their respective sites except the cookie jar mix, which was from here.
xoxox
Carly
~If you liked this post, please share it!~
Leave Comment
Dec 4, 2010 | DIY, Fashion
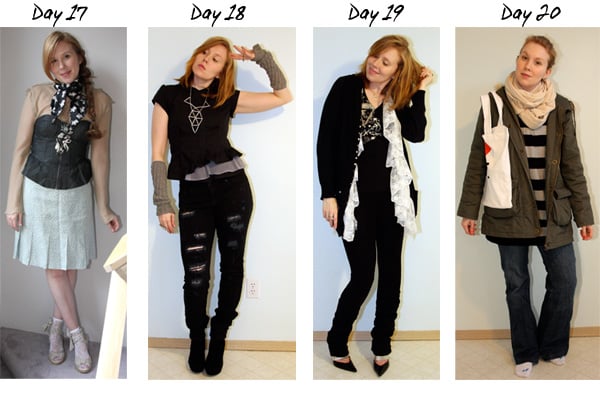
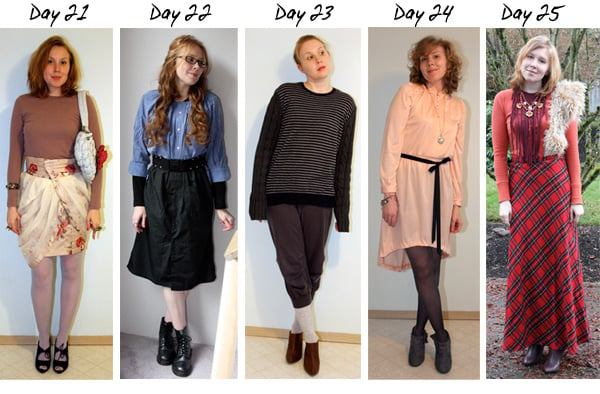
So, my 30 Days of Outfits Challenge is over…where I challenged myself to wear something from the recesses of my closet (that I had pretty much forgotten) every day, always incorporating something handmade or DIY into the outfit. I had a lot of fun with playing with my closet, which really reminded me that I need to do that more often. And to wear things I’ve made. Oftentimes I’ve make something and then forget to wear it, or I just enjoyed the process of making it so much, I never realized it wasn’t really my style. But that’s good – it’s helped me clean out a lot of items in my closet that aren’t “my style.”
So what is my style? And how many DIY items did I incorporate into my outfits?
Well, let’s take a look back…(handmade and DIY items are listed and linked where appropriate, from left to right)
Day 1: DIY legwarmer cuffs / handmade Rock Candy ring
Day 2: handmade reversible zip dress / handmade studded ring band
Day 3: handmade reversible studded dress
Day 9: handmade convertible jacket / handmade goldstone necklace
Day 13: DIY Band Jacket / handmade leggings / handmade whipped cream heart pendant
Day 15: handmade crocheted chain necklace / DIY Convertible Button Skirt (tute coming soon)
Day 16: DIY studded beret / DIY pearl-detail gloves
Day 21: DIY pierced rose brooch / handmade pyrite and spike rings / DIY Wrap Curtain Skirt (tute coming soon)
Day 22: DIY Smock Dress (tute coming soon) / handmade Vinyl & Snaptape Belt
Day 23: DIY Hybrid Sweater (tute coming soon) / DIY Alexander Wang Stirrup Socks (tute coming soon)
Day 24: DIY pocket watch necklace / handmade bracelet / DIY ribbon belt / altered dress
Day 26: DIY Ring-Detail Hat / DIY Shirt Collar & Cuffs
Day 27: handmade chain earcuff / DIY WORD! Velcro Tee (tute coming soon) / DIY Distressed Cutoff Shorts (tute coming soon)
Day 28: DIY mesh-and-rhinestone earrings (will be in next issue of
Snippets) /
DIY Bow Tunic Dress / DIY Maribou Feather Clutch (tute coming soon)
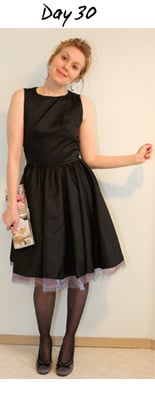
Day 30: DIY crystal stud earrings / DIY magazine clutch purse / handmade Swarovski rhinestone cut-out back dress
It’s interesting to see every day laid out like that…It’s also amusing to see my garden and the Fall leaves in full time-elapse glory…and to see me relegated to my kitchen as the weather got progressively worse throughout the month.;-)
So what’s my style? I sure love black, and patterns that are variations on stripes…gray, white, pink, and blue are some other fave colors…I prefer separates to dresses, I love lots of crazy accessories, high heels, and posing with my legs crossed, staring off to the right…;-)
What does your daily fashion say about YOU?
Though it’s been surprisingly easy to style my outfits (and fun!), the sheer work of the photographing, editing, uploading, and posting an outfit each day was staggering. Total props to Jessica of WhatIWore or some of the people on Lookbook.nu – because to do this daily is such a huge time commitment!!
Because of doing this daily, this meant I couldn’t do any DIY’ing, and barely had the time or stamina to post any other content on this blog during November. Plus a lot of my other projects languished during this month, so now I have to put my nose to the grindstone and dive back into them. And there’s still a pile of DIY’s and projects I’m dying to get to!
So now back to prioritizing…
I hope you guys enjoyed this 30 Days of Outfits and inspired you to pull out some things in your closet you rarely wear and see how you can mix things up! (Plus add a little DIY to your life…;-)
Thanks for following along!
xoxox
Carly
P.S. I know some of you really liked this…I may attempt this again in the future…when the holidays *gulp* are completely over with;-)
~If you liked this post, please share it!~
Leave Comment
Dec 2, 2010 | DIY, Fashion, Life
Rhinestone Dangle Earrings: Forever 21. Small Crystal Studs: handmade by me. Dress with Cut-Out Back and Swarovski Crystal Detailing: handmade by me. Magazine Clutch: DIY. Pleated Satin Shoes: Charlotte Russe.
Day 30 in my 30 Days of Outfits Challenge: November 30.
Boy, these 30 days have flown by!
I felt it appropriate to end these 30 days in the Dress That Began It All, also known as the Bacardi Limon dress.
No, it didn’t mark the start of my DIY’ing! (I’ve been making my own stuff since I was 9.)
This dress was officially the start of my Fashion Career.
Rewind to Winter of 2006…I was a stay-at-home mom to a baby just over a year old, and my days were filled from morning to night with bottlesdiaperslaundrycleaningplayingwithbaby / bottlesdiaperslaundrycleaningreadingtobaby / bottlesdiaperslaundrycleaningmakingdinnerforeveryone / bottlesdiaperslaundrycleaningcomfortingbaby etc. I did have a Mom’s Club meeting once a week, but otherwise that was my life. It had been so long since I had done anything creative. It was a very difficult time for me.
I began to have more stamina to stay awake after Lil Tot had gone down for the night, so I would try to catch up on email and surf the web a little. One night I happened upon a posting about a design competition, sponsored by FashionTribes.com and The Daily – where entrants had to sketch a dress inspired by the flavor of Bacardi Limon.
Now, being a nondrinker, I had no idea what Bacardi Limon even was, but I read the press releases about the new flavor and over the course of 2 evenings or so I sketched 6 designs, inked and watercolored them, scanned them, and then sent them in to the contest. It was right before Christmas and I had been staying up late trying to get all my Christmas cards written, and instead for two evenings I just immersed myself in what I loved: designing and drawing.
And then I completely forgot about them and the contest and everything. I just figured I didn’t win. Life went on, pretty much unchanged.
And then in February I heard the phone ring while I was lying down next to Lil Tot trying to lull him into taking his morning nap (which he refused to do unless I was lying down with him). I couldn’t answer it and it went to the answering machine. After Lil Tot finally fell asleep despite the interruption, I went to check on the message.
And was utterly stumped by its contents. I had to play it a few times to understand it. Someone who I didn’t know, from some number in a New York area code, calling from a something-Group, wanted me to call her immediately about some competition. And then I realized what it was, called, and was told
I was one of the 5 finalists they had picked from more than 300 entries around the United States in that Bacardi Limon design competition!
The dress design that was chosen as a finalist.
A whirlwind ensued. It turned out that the PR group had picked the dress I had designed that had a cut-out in the back, like a lemon slice, as the finalist entry. I had to make the dress I designed. I was being flown to New York to compete in a live “Cut-and-Sew” competition “just like Project Runway” that would be televised and everything. I made another dress in black to take with me to New York and wear while there. I went in March 2007. It was the first time I had been away from Lil Tot so long (I’d only been away from him at the most for 3 hours up until then, since he had born 15 months prior). I met the other finalists in the competition, some who’ve remained my friends to this day. I did the live Cut-and-Sew, where I made yet another version of the yellow dress.
At the live cut-and-sew competition, where we had just about 7 hours to make our dresses again.
At the event after-party. Photo by FashionWireImage’s Dmitris Kambouris.
I didn’t win, but I returned home determined to make my 15 minutes of fame into something worthwhile. I parlayed that press coverage and local interest into a great story for me founding a misses’ line of clothing and jewelry. I hired a party planner and PR whiz who helped me plan a launch party for the line, inviting the who’s who of the fashion elite and helping me with press releases, gift bags, branding, the works. I hired a patternmaker to make and grade the patterns, a samplemaker to make the samples. I bought fabric and had it shipped from LA to Hawaii, where I lived at the time. I produced a line, had a runway show, trotted it to local boutiques trying to sell it. A few pieces ended up in a few places.
The models from the launch party and runway show, myself, my patternmaker, and samplemaker. Photo by Elliot Takane.
Hub believed in me and allowed me to use our savings for this venture. I began to produce a Winter Collection and then began to run out of money. The previous pieces weren’t selling well, there were fit and sewing issues. Much of it was returned. I couldn’t pay anyone else to help me and couldn’t do it all myself anymore. We moved to Oregon in late Fall and I officially closed the line down. And I also reached out to FashionTribes.com to see if they wanted someone to write content for them, so I could at least stay connected to the world of fashion even if I couldn’t design.
So I wrote for them. And wrote for them. And started my own blog. And wrote for it. And wrote and contributed to other blogs and websites. And started to design things again, on a small scale, to sell in my Etsy shop.
And here I am today.
Now all that was a bit of a tangent.:-) I guess the point of all this is that sometimes the path from A to B is not in a straight line, and what seems tangential is actually useful experience that sets us up for something better.
I still want to design; I love designing but I HATE the manufacturing of clothing, and being financially responsible for all of it. It’s very scary for a small, struggling family to take on ourselves. Not a very good idea. And it’s too much work for a single person to run an entire line by themselves, even with a patternmaker helping out. Plus I enjoy more working within parameters – maybe not pushing boundaries so much, but working within someone else’s aesthetic or color story or mood board or whatever.
I’m glad I found that out about myself! Who knows if I ever will get the opportunity to design for someone else…but it’s been a great journey, and I’ve learned a ton along the way.
That’s why this dress is so special: it truly marks the beginning. (The other yellow dresses I made for the competition were kept by the PR company as far as I know.)
The dress I designed was a boatneck 50’s style flared party dress that I drafted the pattern to. (For the yellow, I turned the yellow satin inside-out since I liked the matte side better:-) I added a double-layer of iridescent chiffon to the hem. The back was a complicated citrus-shaped cut-out with floating bands attached to a central ring, and Swarovski crystal “seeds” suspended in the bands.
I am a much better sewer and patternmaker now than I was then – and the back of the dress was extremely complicated. I knew exactly what I wanted for securing the Swarovski rhinestones into the cutout, but I couldn’t find elasticized crochet cord sold by the yard. The back was very difficult to fit properly.
The clutch was made by gluing a magazine cover onto a small clutch from Target with E-5000 glue. Any flexible glue would work here, though.
30 Days of Outfits – ALL DIY! What fun it’s been!
Also, if you’re curious to see how others fared, please check out Katarina from She sells sea shells, who’s been doing this Challenge along with me – you can see her last couple outfits here, here, and here.
xoxox
Carly
~If you liked this post, please share it!~
Leave Comment