Nov 22, 2010 | DIY, Fashion
Square Nailhead-Embellished Cardigan: DIY. Lacy Dress (worn as vest): DIY. Tiffany-Style Silver Bean Pendant: handmade by me. V-Neck T-shirt: Roxy. Legwarmer leggings: My Honey Bee [Japan]. Pointy-Toe Pumps: Colin Stuart [Victoria’s Secret]. Silver Shoe Elastics: DIY. Silver Pyramid Ring: unknown [Macy’s]. Brushed Silver Angular Ring: unknown [Pineapple County, Honolulu].
Day 19 in my 30 Days of Outfits Challenge: November 19.
Falling behind again!
Today I was at home, finishing up the graphics, posters, and props for the shoot on Saturday. I wanted to be comfortable but warm, considering the temperature is dropping fast around here.;-)
I love the Elsa Peretti-designed Bean Necklace for Tiffany’s…but I am, above all, a cheapskate, so I made my own version. Using Art Clay Silver was really fun and I was amazed at the versatility of it, though it was definitely a learning experience! Real silver pieces that you first mold like clay…then fire with an open flame? It sounds bizarre but once you try, you’ll be hooked! (And if you’re a PolyClay junkie, you’ll probably love ACS too!)
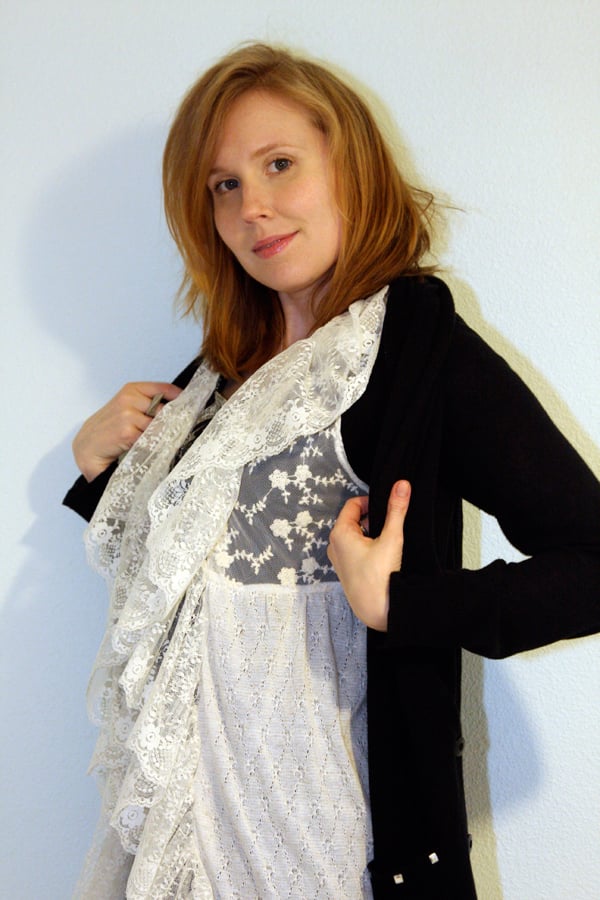
I love layering lacy pieces under cardigans, sweaters, and jackets. It adds a surprising level of warmth, and a dose of femininity. This piece is actually a dress I found in Harajuku, and added a flounce of lace trim from Jo-Ann Fabrics. I hand-gathered it first with basting, and the machine-stitched it around the front opening of the dress. You really can’t tell that the lace was not a part of the original! (Which is the intention of DIY in a nutshell:-)
The cardigan I embellished with heat-set square nailheads from i-Kandi.com. The how-to is here.
I adore my legwarmer leggings! I have never found any here in the US; I always have to go to Japan to find them. This pair I have practically worn to pieces (which is what I did with my last pair). They are so warm, and the legwarmer part at the calves really balances out my legs visually. Love does not even begin to describe how I feel about these leggings!
I added some silver shoe elastics to play off the silver in the necklace, rings, and cardigan embellishment. My DIY Shoe Elastics tutorial is here.
I’m feeling like Peppermint Patty with this hair. Grow hair, GROW!
Hope everyone’s having a great weekend!
xoxox
Carly
~If you liked this post, please share it!~
Leave Comment
Nov 20, 2010 | DIY, Fashion
Chiffon-Inset Top: handmade by me. Knit armwarmers: Claire’s. Silver Geometric Necklace: handmade by me. Two-finger rings: Forever 21. Ripped Beanpole Jeans: Insight. Sia Wedge Booties; Alloy.com
Day 18 in my 30 Days of Outfits Challenge: November 18. Still at home while Lil Tot recuperates.
The top is an original design of mine – if I were to make more, the pattern definitely needs some tweaks, but I love that it’s businesslike but feminine at the same time. It’s made of lightweight suiting with a chiffon inset at the waist.
The necklace I also made, following the tutorial here by ddlai from Fatlace, who was DIY’ing a necklace she saw at Eryn Birnie. Made from a whole bunch of sterling silver beads from the bead store – super-fun and a very striking result.
Of course, it’s November, so I need some arm-warmers to brave the temperatures.;-)
I love these jeans – I just don’t wear them enough. I won them in a giveaway from Ladylike x Fatlace last year. The denim is incredibly high-quality and truly keeps its shape.
I hope everybody has some fantastic plans for the weekend! Our shoot for the pilot for this new web series is on Saturday!! (I’m doing set dressing and production design – and I made a Shakespearean hat!)
xoxox
Carly
~If you liked this post, please share it!~
Leave Comment
Nov 19, 2010 | DIY, Fashion
Scottie-print scarf: DIY. Chiffon ruffle blouse: Victoria’s Secret. Denim bustier: Forever 21. Assorted pins: vintage; from Japan; Lamb Tac Pin: Girlprops.com; kilt pin handmade by me. Pebble-print silk skirt: Banana Republic. Dainty Lace Ankle Socks: SockTheory.com. Striped espadrille wedges: Old Navy.
Day 17 in my 30 Days of Outfits Challenge: November 17.
Can you tell what runway show I was inspired by?
photos by Marcio Madeira, Style.com
Yup! Miu Miu S/S 2010. It was such an amazing collection with so many fabulous pieces…you could really take each look apart, bit by bit, and find yourself with so many versatile and chic accessories, jewelry items, and unique clothing.
I felt somewhat springy today (even though the weather was anything but)…and so wanted to try mixing patterns and colors and just going crazy with my outfit.
Can you guess what I made my scarf from?
…A pair of little girl’s pajama pants!!!
Yes, I found the pants at the Goodwill Outlet in Spring. The print reminded me of the Miu Miu collection, they felt satiny, and were still in great condition.
So I washed them and then did the following:
1. Separate the legs into two separate pieces by cutting all the seams apart.
2. Sew the legs together at the waist, so you have one long piece. Cut the ends on an angle so they look more “scarf”-like.
3. With right sides together, stitch around the edges, leaving about 2″ free.
4. Turn right-side-out and press.
5. Stitch remaining hole closed.
Very, very simple! I had been searching in fabric stores for a silky print similar to the ones in the Miu Miu show, but the fabric stores here aren’t progressive to carry anything similar. Silky pajamas have a number of great, fun prints – that are definitely very Miu-Miu-esque and look fabulous as an accent piece!
I bought this blouse something like 15 years ago and have not worn it once. Not once! The tag is still on it, I’m ashamed to say. Well, now I’ve worn it!;-)
A great way to jazz up a top is to pin on a variety of brooches and pins. I chose to do so smack-dab in the middle, which is a bit unusual, but (I think) it works. I made the bottom brooch from a kilt pin and bits of rhinestone jewelry, beads, and findings I had lying around.
And espadrille wedges are so not confined to summer! You can certainly wear them all year round (though you may have to switch up your leg-coverings;-)
What do you think? Is anyone going to try embellishing with brooches differently…or start searching for that perfect pair of pajama pants to repurpose into a scarf?;-)
Oh, and Katarina from She sells sea shells has posted more of her outfits in this Challenge. Have you checked out her blog yet? Please visit and say hi!
xoxox
Carly
~If you liked this post, please share it!~
Leave Comment
Nov 19, 2010 | DIY, Fashion
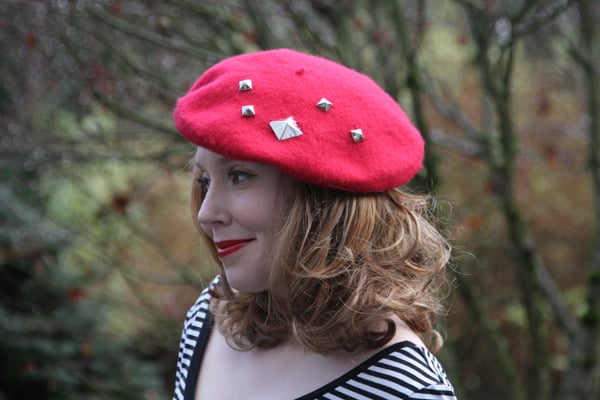
Studded Beret: DIY. Striped LS Tee: Mossimo (Target). Beige embroidered bustier dress: Twenty8Twelve. White Pearl-Button Gloves: DIY. Polka-dot belt: vintage. Polka-dot tights: unknown. Velvet open-toe heels: DbDk Fashion.
Day 16 of my 30 Days of Outfits Challenge: November 16.
I’m getting behind in posting these! Double time, double time!
After a couple days at home with Lil Tot (who is on the mend, by the way – thank you all so much for your well-wishes and thoughts!)…I’ve gotten a little tired of the schlumping-round-the-house uniform I’ve been in lately.
So I went all out (and maybe went a little Parisian in the process?? Or at least what I think of when I hear the phrase “Parisian”)!
I’ve always felt that hats just don’t suit me…but sometimes I just want to wear them regardless! I bought the beret at Target, and added a variety of sizes of pyramid studs (from Studsandspikes.com) to add a little bit of edge.
I also love wearing tube dresses or bustier dresses over tops. It takes a summery piece into winter, and transforms a cocktail dress into a more casual outfit.
The shoes I found at the Buffalo Exchange recently, and I’m still going back on forth on whether to rip off the bows or not. Maybe I will and add shoe clips to them so I can clip them onto any part of the shoe…a great little trick to make something that’s embellished more versatile!
The gloves I bought in Japan – they’re UV-protectant gloves that Hub said make me look like Michael Jackson – and I didn’t like the bracelet-length style, so I shortened them and added 2 little pearl buttons to make them look like a little vintage 40’s pair that the Portland vintage stores will charge $25 for.
Lil Tot’s fever has now gone down to around 99 – 100 degrees, and his sinus infection seems to be draining slowly, so hopefully a couple more days at home will have him back to normal!
xoxox
Carly
~If you liked this post, please share it!~
Leave Comment
Nov 18, 2010 | DIY
This post contains affiliate links – and I receive a small commission on sales from readers clicking through these links. My full
Disclosure Policy is here.
So to break up the monotony of my 30 days of outfits…I thought to share with all of you this cute and easy DIY.
I first saw this on Ramblings from the Sunshine State, where Wendy shared her how-to for a 6 Scoop T-Shirt for her daughter’s ice-cream-themed 6th birthday party.
I loved the idea of adding brightly-colored quilting fabric to a t-shirt!
I’m always dreaming of screenprinting designs into tees…The colors! The vibrant blacks! The limitless designs!…But face it, screenprinting ONE t-shirt (even with a Yudu) is a huge time commitment. There isn’t much point if you’re just going to make one.
Fabric paint I don’t like very much, as even the “soft” fabric paint adds stiffness to the shirt, and you can’t get very crisp lines.
The iron-on transfers they sell at the sewing store also leave a distinct and ugly “sheen” to them…it’s obvious you’ve stuck something on your shirt. No thanks.
But applique?! Never thought of that!
Now the world is my oyster…or at least, the design possibilities are limitless when you start to think of re-creating your favorite screened t-shirt design with cutouts of bright fabric and patterns. The edges to the appliques are crisp, and the applying is so easy! (Plus it’s a great way to experiment with color and pattern…and use up the scraps of fabric you may have laying around in your scrap bag.)
You Need:
a t-shirt (I originally was going to use the white one above, and changed my mind after I took the photo) / brightly-colored fabric for your design (I picked out some quilter’s fat quarters at my local Jo-Ann Fabrics, paying attention to the coordination of the patterns and prints) / black fabric for your details (mine is a woven lightweight cotton suiting)
double-sided fusible web for applique / (optional) black embroidery thread
Tools
scissors / iron & ironing board / pen / paper to make your pattern
How-To:
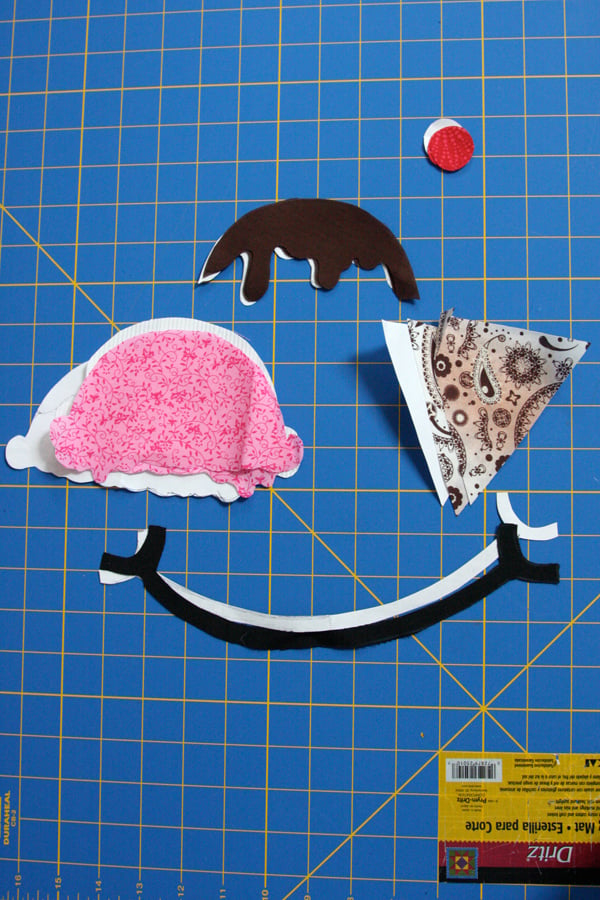
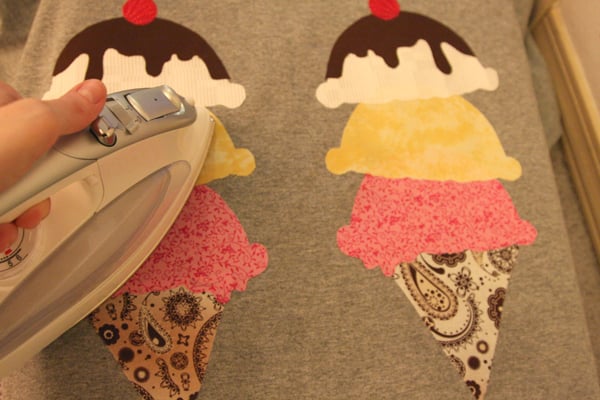
1. Make a pattern for your ice cream cones. I made one that I used for each scoop, one for the cherry, one for the chocolate sauce, one for the ice cream cone, and one for the smile.
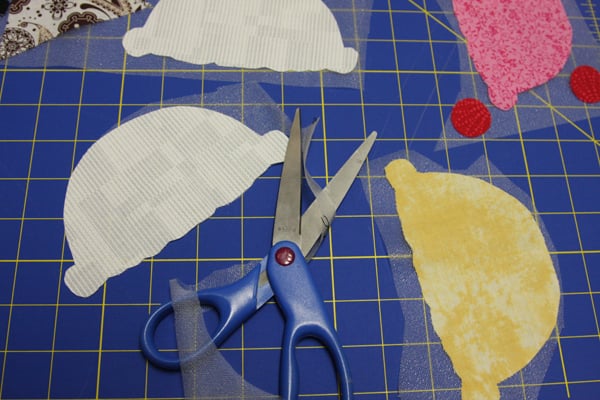
2. Place your pattern on your fabric (folded over). Trace and cut 2 pieces for each part of the ice creams, and one piece for the smile.
3. Follow the instructions for fusing the pieces to the front of your shirt. (Usually sticking the applique onto the sticky front, peeling off the back, pressing to the shirt, and ironing for 15 – 30 seconds, applying pressure and making a few passes. The instructions said to stick the entire piece of fabric onto the sticky front of the web and cutting through both layers just once…I don’t think it really matters how you do it.)
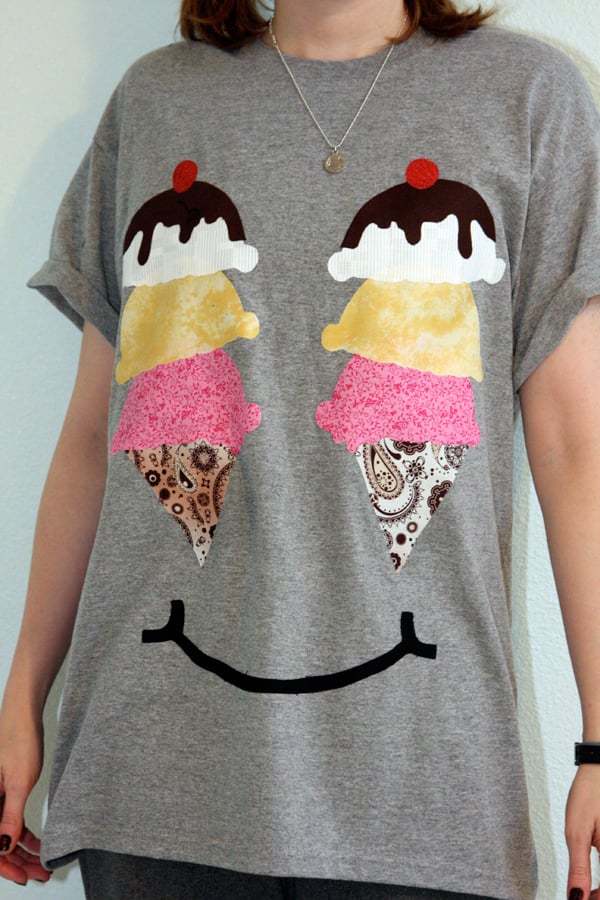
4. (Optional) To make your creation more “polished,” you could go over the edges of each fabric piece in a satin stitch (closely-spaced zigzag stitch on your machine), in black embroidery thread. (I didn’t because I was feeling lazy.) This will make your tee look (from a distance) like a cartoony ice cream face, without all the hassle of the screenprinting!
But even without the outlining, it looks pretty cute as is!
Cool down on a hot summer’s day quickly in this…or just have a sweet sense of humor while relaxing at home.
Happy DIY’ing!
xo
Carly
Leave Comment
Nov 16, 2010 | DIY, Fashion
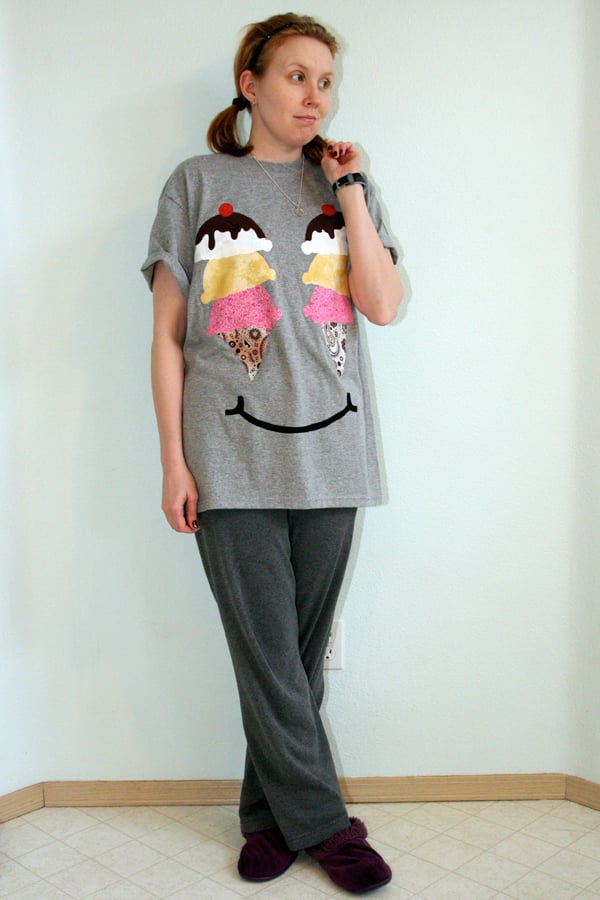
Silver Horseshoe Necklace: won in a sweepstakes from Lucky Magazine. Ice-Cream Applique T-shirt: DIY. Sweatpants: Victoria’s Secret. Slippers: Who cares?
Day 14 in my 30 Days of Outfits Challenge: November 14. Yes, I am adhering to this challenge so faithfully that I’m even posting my lolling-around-at-home-in-sweatpants outfit!
Lil Tot is very sick.
He suddenly woke this morning at 4:30 AM with a temp of 101.7. I gave him some ibuprofen and he went back to sleep. By 8 AM his temp was around 102. Throughout the day, though I kept giving him ibuprofen every 6 hours, put him in a lukewarm bath, placed a compress on his forehead and an ice-wrap around his neck, his temperature kept rising and the medicine wasn’t bringing it down.
He finally fell asleep at 6 PM with a temp. of 103.9 degrees Farenheit. He woke up 45 minutes later and puked up the few grapes he’d eaten during the day, along with most of the juice he’d drank that afternoon and the Bendryl I’d just given him to ease his dribbly nose from his sinus infection (which he’s had for 6 weeks!!). Of course.
He spent most of the afternoon prior to this lying in a heap, crying and unresponsive. Of course he always gets sick on Sunday, when the doctors’ aren’t open!!
I know I may look relaxed here, but believe me, this day was anything but relaxing.
So when your child is sick, all bets are off when it comes to fashion.
The shirt was a fun DIY using fusible web and quilting fabric. It’s actually a similar design to a Wildfox Couture t-shirt I saw awhile back and for the life of me can’t locate the inspiration photo. (If anyone’s seen it before, please let me know!! I think they manufactured both a yellow and a pink version.) Ohwell. You’ll have to trust me on that one.;-) Tutorial coming soon!
And yes, my hair is in pigtails. I never wore it in pigtails as a kid. I figure I better do it before I’m like 80 and I’m officially not allowed to by The Fashion Police (or other Concerned Citizens).
Hope all of you enjoyed a better Sunday than we did! (Especially poor Lil Tot) 🙁
xoxox
Carly
~If you liked this post, please share it!~
Leave Comment