Oct 11, 2009 | DIY, Fashion
 (DIY flowered neckpiece, Kenneth Cole new york shirt, J. Crew boxers,
Hudson shorts, unknown tights, Spiral Girl shoes)
As soon as I saw the J. Crew catalog featuring the quirky model below wearing that flower necklace, I knew I had to DIY my own.

Just a combination of silk flowers from the craft store, pearl-edged lace ribbon, a pom-pon, and rolled fabric roses – all hot-glued onto a strip of peach satin voile, and finished with cream satin ribbons. I could wear it as a belt too.
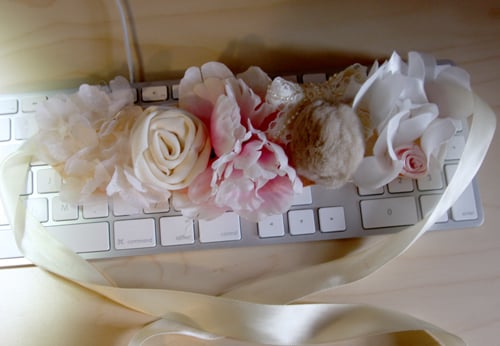 I like my version a lot better than the J. Crew one, which isn’t even available to buy from them anyway.
 I also took another cue from the catalog and layered a pair of Hub’s boxers under my shorts. I think white with thin stripes may look better; the blue blends in too much with the denim. I know it’s weird, but I also felt the shirt looked better tucked in to the boxers.

 (Claire’s stretch rhinestone bracelets and ring, jumpring tool, and Cartier and Tiffany wedding rings)

My $20 freakin-awesome Spiral Girl studded cone-heel pumps. Full disclosure: I switched these out to the flat boots I wore on Day 2 since I was shooting my own photos this night.

I also went for a little bit of an Edward Scissorhands-look to my hair. It didn’t stay as wet-looking as I wanted it though.
Hope you’re all having a great weekend!
xoxo
Carly
Leave Comment
Oct 9, 2009 | DIY
(Jacket from Japan; scarf from I forget; Claire’s wristbands, necklace, and armwarmers; handmade studded ring; DIY Chanel tee; Paris Blues Jeans; DIY’d GoJane boots)
It’s that time of year again when the leaves change color, Fall activities are well underway, and Portland Fashion Week presents 5 days of local and sustainable collections, presented in some warehouse practically off the map in a NW corner of the city. I skipped out on attending Day 1, so here I am on Day 2 of the Collections, as I like to say, since it sounds more frou-frou and New-York-wannabe.
I made this shirt the morning before the madness started – with a fabric pen. Because life definitely needs more cavorting! (The real version says “Cavour Roma” in case you were wondering – here’s a piccy below:)
 (sorry I don’t remember the site I saw this on)
 Actually it was on KnightCat, I remembered, and a reader mentioned it was originally from Lookbook.nu. Thanks Danni!
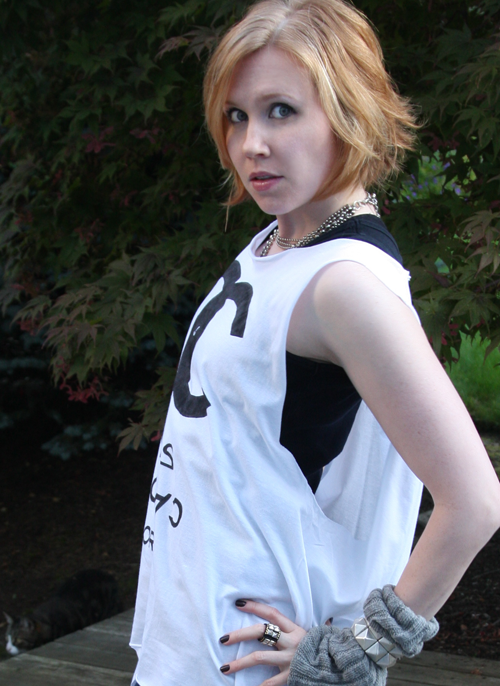
I know armwarmers went out of style (or never came into style) like a decade ago, but my hands get cold easily and I often add them to an outfit. Yes, inside of me is a fashion-challenged 12-year old. With warm hands.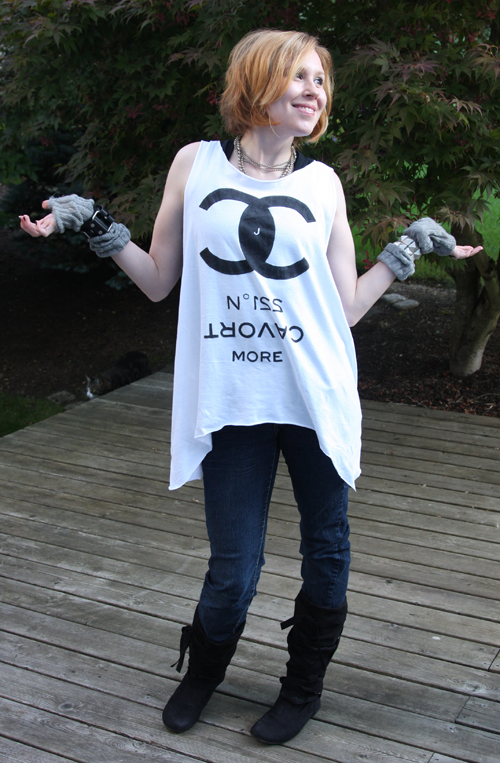
Even though it’s Fashion Week, when you’re covering the shows my best piece of advice is:
Wear comfortable shoes!
I wrapped a long strip of ultrasuede around these flat, scrunchy boots from GoJane and tied the ends. I’m all tied up!
Fashion Show coverage coming soon!
Have a lovely Friday!
xoxo
Carly
DIY Update: For those of you who were wondering how to make the shirt…
1. Take a white Men’s XL t-shirt and a black fabric pen (I used a FabricMate Chisel Tip ). Place your shirt over a piece of cardboard and apply a liberal spraying of Spray Laundry Starch
 to make it literally “flat as a board.”
2. I used Photoshop to create the lettering (and added my initials as the double-C logo in the middle, haha), printed out the image, and placed the paper underneath my t-shirt on top of the board. Then I simply traced the letters and filled them in with the fabric marker (took awhile).
3. I cut off the hem a little higher in the front and lower at the sides so it makes “side-tails,” cut off the neck ribbing and the sleeves, and stretched the cut edges until they rolled slightly.
4. Then I washed it on the delicate cycle in the wash and laid flat to dry, to get rid of the starch and “set” the fabric marker paint.
So super-easy to make! I’d love to see everyone’s DIY versions!
Leave Comment
Oct 6, 2009 | DIY
Get This Tutorial As a PDF
This tutorial has been updated, and is now available as a full step-by-step with photos in my new book 8 No-Sew DIY Shirt Scrap Makeovers, a bonus available with purchase of the DIY Men’s Shirt Makeovers System.

I made a ruffle-front cute summer shirtdress from a men’s shirt a couple months ago…(tutorial here)…and I still wanted to use up more of the shirt fabric, rather than let all the scraps go to waste. (I’m thrifty like that!! Okay, usually not – usually my scraps will sit around in the recesses of my closet until I forget about them, and then re-emerge years later when I am desperately pawing back there looking for something else. But I digress.)
How to Make a Gossip Girl Blair Waldorf-Style Double Bow Headband from a Men’s Shirt Collar
Inspiration:

(photo from CWTV.com)
Materials:
one men’s button-down shirt [collar piece and a bit of the shirt fabric) / thin headband (I used a Goody headband from the supermarket – $3.99 for a pack of three!)
Tools:
fabric scissors / hand-sewing needle / machine needle for medium-weight wovens / thread matching topstitching thread in collar / seam ripper (optional) / fabric glue (optional)
How To:
Cut the Pieces
1) Cut the collar off the shirt. Cut each end off the collar (app. 4″ from bound point), so you now have 3 pieces total.
2) Using scissors (or a seam ripper), open the topstitched seam from the cut edges of your collar pieces, along the side about 3/8″. This is to allow the tucking under of the fabric so we can create a perfectly-bound and topstitched bow, rather than a bow with one raw-edged, messy side.
3) Cut a long, thin strip of fabric from some part of your shirt that is wide enough to go all the way around the thickness of your headband PLUS 3/4″. The strip must be single-layered, non-interfaced, and the length of your headband PLUS 1″ at least. This will be the covering for your headband. (see above photo from Step 1)
4) Cut a small rectangular piece from your shirt fabric (single-layered, non-interfaced), about 1.25″ wide by 3″ long. This will be the center to your bow. (see above photo from Step 1)
Topstitch the Collar Pieces
5) Fold the bottom fabric layer of one of your collar pieces to the inside – curling interfacing in on itself about 1/4″ ~ 3/8″. Stitch along edge (spreading top layer of fabric away from the needle as you sew) to secure your fold.
6) Fold under top layer of fabric about 1/4″ ~ 3/8″. (Don’t forget to tuck under the side edges that we opened up in Step 2)!) Topstitch all the way around to secure the edges. (We will be leaving one raw edge that will be concealed in the bow center.)
7) Repeat for remaining collar pointed piece.
8) Using the same method, finish the bottom raw edge of the collar center piece.
Sew Fabric Ractangles
9) Turn under about 1/4″ on long edges of small rectangle of fabric. Sew along long edges.
10) Sew along long edge of long strip of fabric. Turn right side out to create a long tube.
Create Double-Bow
11) Flip one pointed collar piece over, and overlap it on the other piece about 3/8″. Hand-stitch in place.
12) Loop collar center piece over on itself, matching raw edges, and stitch in place directly above the loop you just made in the previous step. Stitch a few times through all layers in the center to secure.
Cover Headband
13) Slip headband into tube you made in Step 10). Fold ends over about 1/2″, and stitch ends in place to close the tube. (I used fabric glue to secure the ends first, since the lightweight fabric was fraying for me.)
Attach Bow to Headband
14) Using the small fabric rectangle from Step 9), stitch one end to center of bow on the underside. Wrap around top of bow and secure under headband. Stitch a few times in the center on the underside in order to squeeze the strip tight and shape your bow properly; but not too tight since we still want the bow to be slideable along the headband.
Voila! A menswear-inspired Gossip Girl Headband!
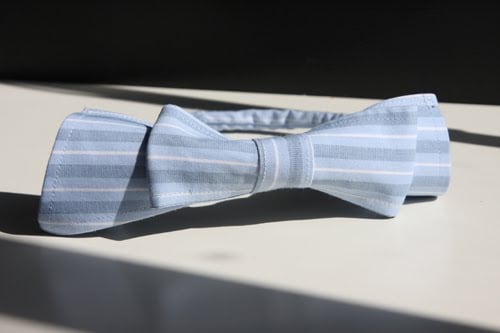
Happy DIY’ing!
xo
Carly
Get This Tutorial As a PDF
This tutorial has been updated, and is now available as a full step-by-step with photos in my new book 8 No-Sew DIY Shirt Scrap Makeovers, a bonus available with purchase of the DIY Men’s Shirt Makeovers System.
Leave Comment
Oct 4, 2009 | DIY
 Adapted from the book Cut-Up Couture: Edgy Upcycled Garments to Sew
 [though mine is the Japanese version; I’m not sure if the translated version I’ve linked to is the same]
I’ve written about this book a little while ago in this post on how to make a Convertible Blouson Tunic from 3 Men’s Sweatshirts). To me, this sweet little cape seems slightly Chanel-ish, two-toned, sleek…anything but sweatshirt-like.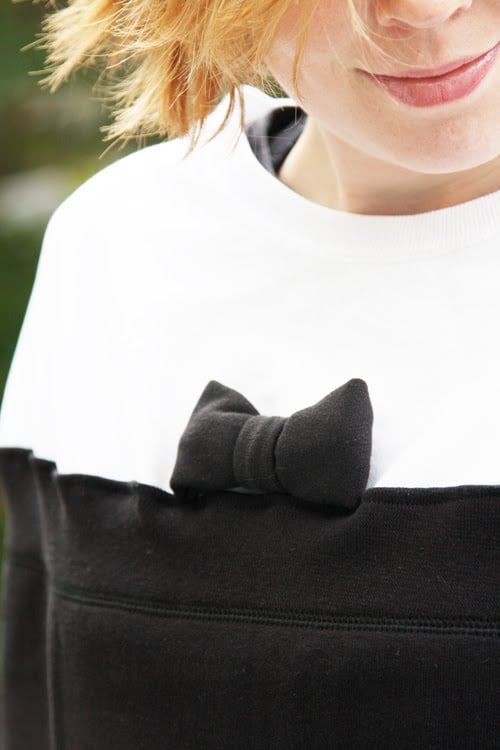
(And if you made the tunic following that tutorial, you will have found yourself left with the top half of 3 sweatshirts. In this project we’ll use the top half of 1 for our cape, and as to what to do with the remaining 2 sweatshirts…stay tuned!)
How to Make a Chanel-Style Black-and-White Cape With Bow
You Will Need:
*2 sweatshirts (Men’s XL work best), in two different colors
*scissors
*sewing needle for knits
*thread matching one sweatshirt
*hand-sewing needle
How-To
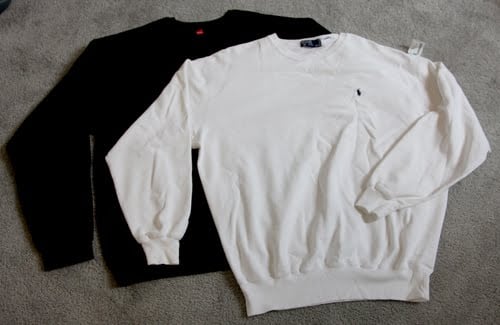
Measure and Cut
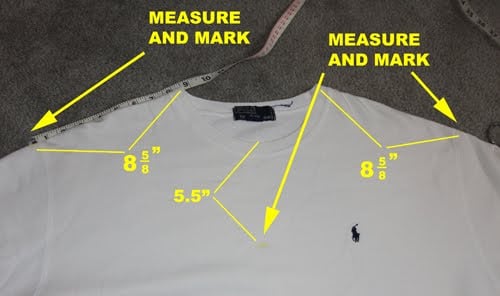
1. Measure and mark 5.5″ down from the neck opening on your first sweatshirt, on the center front. Measure and mark 8 5/8″ on each side of neck opening on the shoulder seams.  Connect the marks you made in a semicircle around the neck portion of your sweatshirt.
 2. Cut out the neck along the line you made, cutting through both front and back of the sweatshirt.
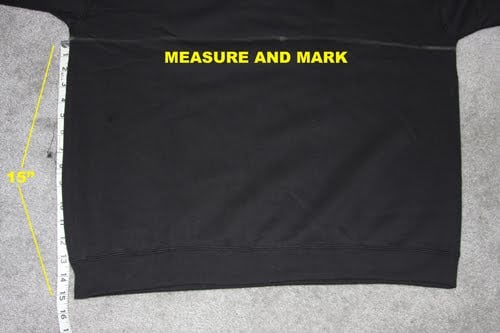
3. Mark and measure 15″ up from the ribbed hem of your second sweatshirt. Draw a line straight across the shirt from side to side (it should be very close to right under the arms).
 4. Cut along the line, through both front and back of your sweatshirt.
 5. Draw a rectangle 4″ high by 8″ long on the remaining fabric of the sweatshirt from Step 4). Cut it out.
6. Draw another, smaller rectangle measuring 2″ high x 2.75″ long on the same sweatshirt and cut it out.
Your cut pieces should look like this:

Pin
 7. Turn the 15″-high bottom half you cut out in Step 4) upside down, and pin on top of the cut edge of the neck piece from Step 2). Overlap the ribbed edge about 1/2″ onto the cut edge of the neck piece, following the curved edge. Pin along edge.
8. Fold both the smaller rectangles you cut in half lengthwise, right sides together, and pin edges.
Machine Sew
9. Sew both smaller rectangle along their longer edges, about 1/8″ from cut edge. Turn each right side out again – this will create two tubes. (not pictured)
 10. Sew the cape main parts together, stitching on top of the ribbing in a matching thread, about 3/8″ from edge. If both your sweatshirts are exactly the same size, the neck piece should not be gathering despite the stretch from the ribbing. (Mine is b/c I used an L sweatshirt for the neck and an XL sweatshirt for the bottom…my bad!)
 11. Hem your cape, turning over about 1/2″ at the bottom and stitching a 3/8″ hem.
Hand-Sew
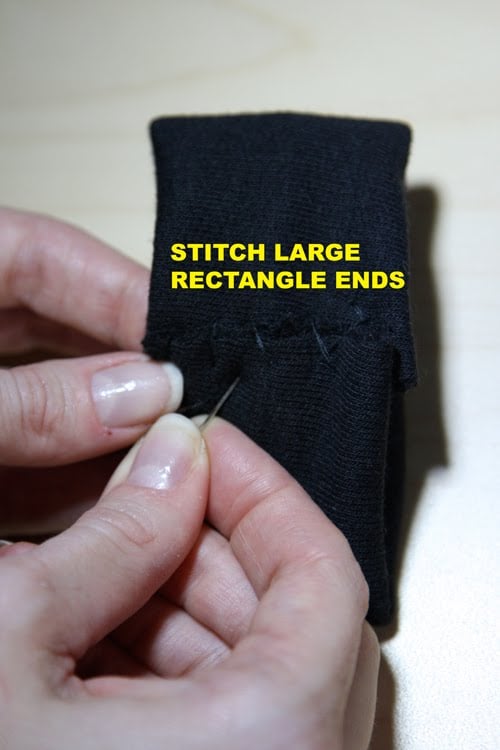
12. Flatten the larger rectangle tube you made in Step 9), roll the seam to the center, and fold each end over to meet in the middle. Hand-stitch ends together to make a bow.
 13. Flatten the smaller rectangle tube, roll the seam to the center, and stitch one end to your stitching in the center of your bow from Step 11).
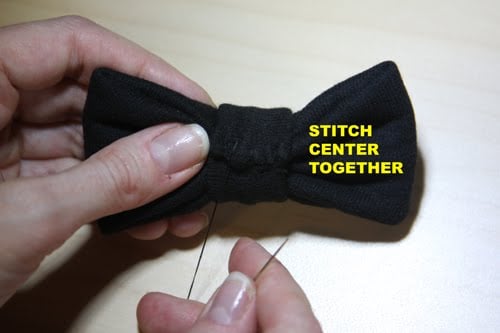 14. Roll the strip around your bow, pull tight to the back to make your bow “poufy,” and secure in the back again with more stitches.
15. Stitch bow onto the center of your cape, slightly above the ribbing seam. (not pictured)
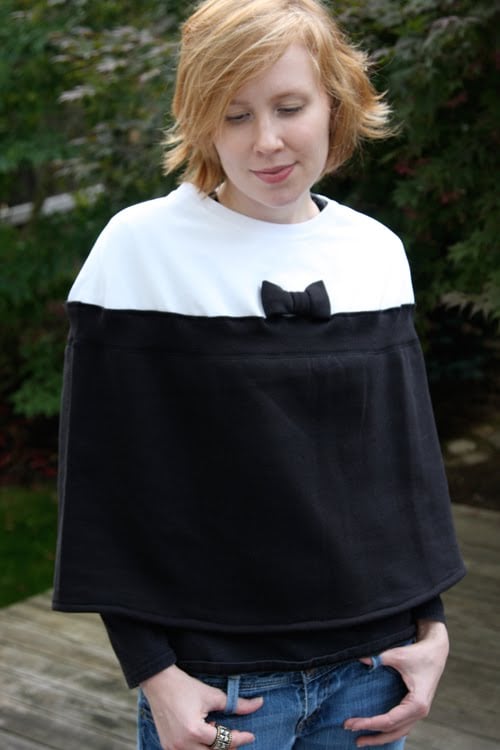 You’re done! A lovely cape – just in time for cold weather.
And don’t forget to cut the remaining parts of your sweatshirts in the same fashion – and just reverse the colors – and you can make a second cape to give to someone this holiday season! Brrrr! I feel the winter chills coming on!:-)
 Happy DIY’ing!
xoxo
Carly
Leave Comment
Oct 3, 2009 | DIY

So apparently I’ve missed the few screenings of Coco Avant Chanel here in Portland that happened earlier this month. *sigh* I soooo wanted to see it, but looks like I’ll have to wait for it to come out on DVD (whenever that will be). Inspired by the sheer idea of the film (since I haven’t seen it), I crafted a few things Chanel-inspired:
Double-C Sequined Perfume-Bottle Brooch
 Gold sequins glued onto black fabric in the shape of the iconic Chanel No. 5 perfume bottle, then bordered by silver bugle beads stitched around the edge. I glued on some rhinestone chain that I salvaged from a broken necklace in the shape of two interlocking C’s. Counterfeit couture. (Though I’m using the word “couture” loosely, since I used glue to attach the sequins.) I made this at least 5 years ago now…the bugle beads look absurdly crooked upon closer inspection; a mere shadow of the real thing.
Black & White Bow Shoe Clips
Made from frilly white chiffon ribbon and black satin wired ribbon wrapped around, and then stitched onto shoe clips.
Black & White Bow-Detail Cape
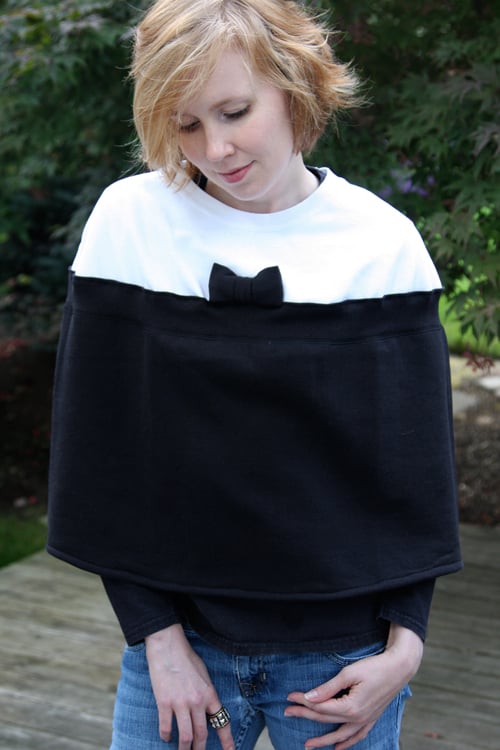

Made from two men’s sweatshirts. I’m posting the tutorial next, so stay tuned! I’ve posted the tutorial here, so check it out!!
Pirate Triple Pearl Necklace

The messy hair is on purpose. That’s the only way it can be explained.

I know this is a little bit of a deviation from the standard Chanel pearls, but I liked the pirate-esque nature of them. I made them from some cheap pearl rope I had laying about – and I added some little charms and this cool carved nut I found at a bead show. I know they would be much better if they were real – or even faux! – pearls and not these pearls fused to the string like this…but this would seriously take so many pearls and so much knotting in order to make I got tired of the idea before even attempting it.
Chanel-Style Camellia Brooch
This is the photo from the book; I didn’t actually make the brooch, sorry.
Adapted from the book “Ima Sugu Tsukuritai Co-saju” [“Corsages I Want to Make Right Now” Bunka Publishing, 2006]. Here’s the scanned, translated-by-me instructions below – just omit the instructions for the stem and attach the brooch back to the back of the flower for a Chanel-style piece. See here for more DIY corsage patterns, by the way!
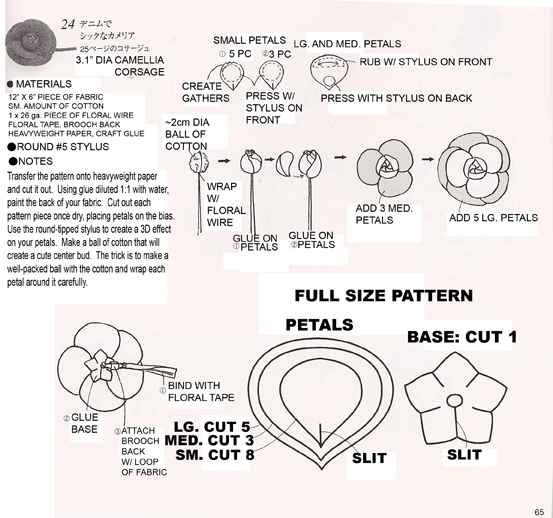
Click above for full size.
The book page is 8 1/8″ wide by 7 7/8″ high if you want to print it out, in order to make sure the petal pattern is sized correctly. The pattern requires the use of a round-headed stylus in order to create the rounded, 3D-effect to the petals. Not completely necessary, but it helps create a finished, professional look to your corsage. I haven’t sprung for the $30 heated stylus tool specifically for this purpose; I just use a metal muddler that has a small ball on the end. You could probably find a paint mixer or similar stylus tool at a crafts store. [And if you’re wondering where I found the muddler, it’s actually for mixing cel paints, courtesy of animation school in Japan. I don’t think you’ll find anything similar stateside.:-)
Hope this helps to get you into a Chanel-style mood – and hankering after black and white, stark contrasts, tweedy fabrics, pearls, and girly flowers. Have a lovely Chanel day!
xoxox
Carly
Save
Leave Comment
Sep 19, 2009 | DIY
I know the studded Burberry Prorsum Harlech Studded Warrior Belt has been around for awhile (since Spring 2008, to be exact…and in fact, I wrote an article about how to DIY your own for FashionTribes.com here). But the fruits of my DIY labors were never posted to FT’s blog, so I decided to post the finished photos and my tute here.
The studded stretchy belt is still so on-trend for Fall ’09…and the edgy, punky look is both bold and glamorous.
Now it’s the unique studs that make this piece – and since despite searching high and low I could not find anything even slightly similar to the diamond-shaped beauties, I settled to create a diamond pattern with 1/4″ pyramid studs procured from Studsandspikes.com. ($3.03 for 100 studs is a fricckin’ fabulous deal.)
A trip to Jo-Ann Fabrics and I picked up 1/5 yds (30″) of 1″ wide vinyl belting (sold by the yard on a roll in the trims section), a black plastic parachute buckle, and Loctite glue (for vinyl, plastic, and leather). At Michael’s I found a mixed bag of buttons that had these oversize faux-Grecian faux-silver coin buttons in the pack.
And that’s all you need!
How-to:
1. Fold one end of the vinyl belting over the parachute buckle connection tab, secure with Loctite glue (I folded under about 1/2″, and used a clothespin to keep the belting pressed together until the glue had dried).
2. Wrap the belting around your waist or where you want to wear your belt, fold around the other connection tab of the parachute buckle. Open up the buckle, trim your belting to have 1/2″ underlap, and glue the underlap together.
3. Now stud! Using an awl, open a hole in the center of your belting on either side of your buckle. (I used sharp scissors when I did this project…and believe me, they are the worst thing to use to open holes to push your studs through!! I figured since the studs’ prongs were flat points, then I should make a slit in the vinyl. WRONG! Use an awl or something to make a ROUND HOLE – and s-t-r-e-t-c-h that vinyl around the prong as you force the stud into the material. Once you fold the prongs over on the wrong side of your belt, the stud will sit properly on the material…whereas if you opened a slit and not a hole in the vinyl, the stud will be loose and the vinyl will “pull” away from the stud resulting in a visible gap. Very bad.) Spread glue on the back of 2 buttons, and push a button through each hole on either side of the buckle.
4. Now estimate the spacing of your embellishments all the way around your belt. (You may have to mark where you want them with chalk or a pen.) Set your stud groupings next to your buttons and keep alternating between embellishments until you’ve covered the whole outside of the belt.
5. To make sure your buttons are DOUBLY secure, thread a jumpring (as large as you got, doesn’t matter what color) through each shank on the wrong side of the belting. Now they should not be able to pull back through their holes, and, like mine, rain down in a trail upon 6th avenue as I hurried to the Bryant Park Tents last Fashion Week.
6. BONUS POINTS: If you’re worried about all the studs’ prongs and button shanks catching on your finer garments on the inside of the belt, glue a strip of fabric (I used poly satin lining) on the inside.
Now I know the original belt is a stretch belt covered in super-thin leather…but who wants to source the leather, sew it into a tube, and thread elastic through it? Especially when there is this el-cheapo belting to be found! The final product is not adjustable, so a little bit of a letdown there.
 My sweet little boy.
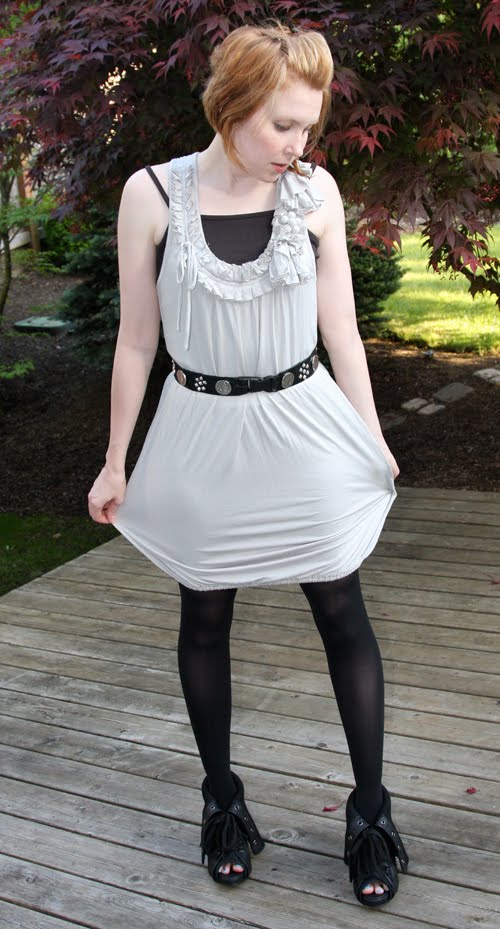
(Know.Label dress [DIY’ed into a bubble hem], camisole from I forgot, DIY belt, Hue tights,
Maison Gilfy [Japanese brand] shoes)
I love the detail on this dress! (It was only $43 – but it’s not available anymore…but Know.Label has some awesome, incredibly affordable pieces – so check it out if you have time!)
Happy DIY’ing!
xoxo
Carly
Leave Comment


 (Claire’s stretch rhinestone bracelets and ring, jumpring tool, and Cartier and Tiffany wedding rings)











