Dec 15, 2010 | DIY, Fashion
How goeth the holiday shopping? I am terribly behind and having mini panic-attacks in-between braving the crowds at the mall and waiting in a line that stretches 3 times around the Post Office just to use the Automatic Mailing Machine. Hopefully everyone else has it under control – but if not and you’d like some ideas for that person who prefers to do everything themselves – and who has more than just a little craftiness up their sleeves – look no further and check out these DIY-themed gifts, all available online: (all under $50* – except for one* very important gift!!)
1. The Big-Ass Book of Crafts, $19.95
2. Beginner Studding Kit, $23
3. Wood DIY Gnome, $4.99 (sale)
4. Charmed Knits: Projects for Fans of Harry Potter , $10.19
5. Kenmore Drop-In Bobbin Sewing Machine, $141.99*
(This is, BTW, the exact same machine I use – Hub gave it to me for my birthday 3 years ago. It is by far the best machine I have ever used – glides through EVERYTHING, even leather up to 3/4″ thick (six layers of sueded split top leather at 1/8″ thick a layer), and it’s never broken or given me any grief. It has 90 stitches on it (not that And I’ve never sent it in for maintenance, oiling, or anything. It’s pretty fabulous and I can’t say enough good things about it!)
6. Gingerbread Train Kit , $19.95
7. Mayan Magic Chocolate-Making Kit, $24.99
8. Urawaza: Tips & Tricks from Japan, $15.95
9. Felt Whole Cakes Pattern Set, $5
10. Black & Decker 14V Drill with Stud Finder, $34.99 (sale)
If you know anyone who wants to get into studding their clothing, shoes, handbags, and accessories, the studding kit will set them on their way to spiky fabulousness – or for the DIY gourmet, make-your-own-chocolate or a sweet gingerbread train that will have to be safeguarded against prying little fingers until after the holidays.;-) And no serious DIY’er should ever be without a power drill – I use mine to drill holes in pendants, sand and buff metal jewelry, distress denim…and of course, make holes in walls! (and your drill doesn’t have to be pink for it to be perfect for you, despite what the hardware store guys may think:-)
xoxox
Carly
~If you liked this post, please share it!~
Leave Comment
Dec 7, 2010 | Fashion
Oh the weather outside is frightful…but I’ve got a shopping list chock-full of comforting picks for the holidays. A veritable shopping stew, if you will, with offerings that will thaw even the most frigid Scrooge’s heart. A little bit utilitarian, a little bit vintage/outdoorsy, here’s a grouping of gifts with a hefty dose of tongue-in-chic humor. (And everything’s under $80!)
1. Sweep Me Off My Feet Sweater Cardi, $54.99
2. Crystal Garden Wish Flower, $14
3. Kimchi Blue Cummerbund Short, $34.99
4. Triple Thrill Belt, $69.99
5. Cupcake Beanie, $30
6. Puckered Salutation Scarf, $32
7. Alternative Apparel Large Collar Jacket, $80
8. Jeweler’s Bronze Whitetail Deer Antler Ring, $55
9. Nostalgic Fireplace Decoration , $16.99
10. Blowfish Jasper Boots in Taupe, $79
xoxox
Carly
~If you liked this post, please share it!~
Leave Comment
Dec 6, 2010 | Fashion
If you’re anything like me, you probably have a number of gently-used clothing, shoes, and accessories in need of a good home. And if you’ve tried to sell them online before, pretty much the only option was Ebay. But was it really worth the hassle? You’re hit with a listing fee, a Gallery fee, a Reserve Price fee, a final price fee if your item does sell, a Buy It Now fee…and if your item doesn’t sell, you don’t get your money back. (Sure you can relist it for free, but if it still doesn’t sell?? You’re outta luck, my friend.:-( And if your item does finally sell, usually what it ends up selling for isn’t really worth all that listing hassle and fee upon fee upon fee. There’s a reason many people call it FEEBAY!
I have tried many times to sell clothing from my closet (that I’ve hardly worn, mind you!) on Ebay with frustrating results. Sometimes I ended up paying Ebay more money than I actually make from the sale!!
That’s why I was so excited to hear about Smashion, a no-fees online online fashion marketplace and community that connects buyers and sellers with a passion for budget fashion.
Yes – NO FEES! At all. Sell for free, buy for free. A virtual free-for-all, if you will.;-) Launched in October of 2009, Smashion enables users to buy or sell lightly-worn or NWT (new with tag) apparel and accessories in the Marketplace, and also acts as a social networking platform for users to express their unique style and converse with each other on fashion topics.
Got something to sell? Whether it is a piece of jewelry you’ve designed, a pair of new shoes that have been sitting idly in your closet, or that dress you wore only a couple of times (but still looks great), you can sell it on Smashion. They charge no listing or transaction fees, nor do they have any hidden fees.
But Smashion isn’t just limited to buying and selling. It’s also a social networking and sharing platform, where you can:
* Get inspired and inspire others in the Gallery, where you can upload pictures of your own unique looks or the styles you’ve captured on the street.
* Talk with other users in the Forums on anything that’s fashion-related, from the latest trends and your favorite designers to a fashion crisis you’re facing. Start by introducing yourself and learn why the Smashion Forums are unique.
* Read up on recent fashion news or opinions on the Smashion blog.
* Find your friends on Smashion or invite your friends to join in on the fun.
Smashion was originally founded in response to the growing trend of wearing second-hand clothing and the lack of a community-based, fashion-focused online marketplace. They showcase everyone, from closet recyclers and wardrobe refreshers to vintage treasure hunters and budget-conscious fashionistas, providing a service for the community that is fee-free. Since launching they also have included independent designers who are tired of high fees on other sites, and business owners who are looking to sell excess inventory in their Marketplace, so there is always something for everyone.
And if you like finding buried treasure, how about Diane von Furstenberg, Tommy Hilfiger, Vera Wang, Sam Edelman, Anthropologie, Escada, and Michael Kors? Just click around and go hunting…
Click on through using my invite link below, and see what it’s all about…
Edit 12/7: By the way, they also are currently having a Holiday User Referral program going on where you could win $100 cash for inviting your friends to join. Check out this page for more details!
xoxox
Carly
FTC Disclosure: Smashion is now a sponsor of Chic Steals with a paid advertisement in my left sidebar. However, I was not paid for or compensated for this post in any way. To read my full disclosure policy, see here.
~If you liked this post, please share it!~
Leave Comment
Dec 4, 2010 | DIY, Fashion
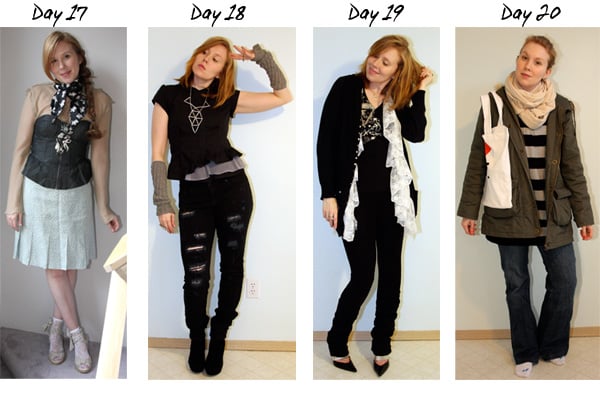
So, my 30 Days of Outfits Challenge is over…where I challenged myself to wear something from the recesses of my closet (that I had pretty much forgotten) every day, always incorporating something handmade or DIY into the outfit. I had a lot of fun with playing with my closet, which really reminded me that I need to do that more often. And to wear things I’ve made. Oftentimes I’ve make something and then forget to wear it, or I just enjoyed the process of making it so much, I never realized it wasn’t really my style. But that’s good – it’s helped me clean out a lot of items in my closet that aren’t “my style.”
So what is my style? And how many DIY items did I incorporate into my outfits?
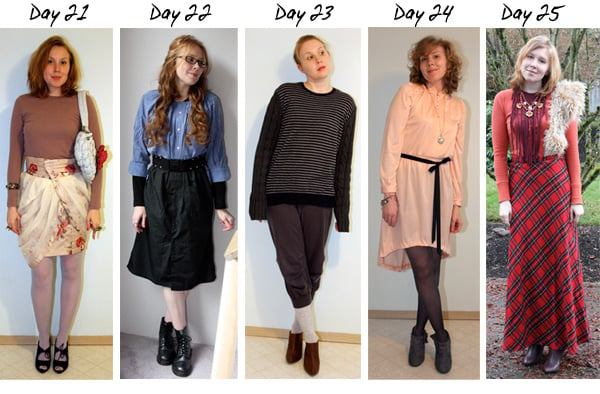
Well, let’s take a look back…(handmade and DIY items are listed and linked where appropriate, from left to right)
Day 1: DIY legwarmer cuffs / handmade Rock Candy ring
Day 2: handmade reversible zip dress / handmade studded ring band
Day 3: handmade reversible studded dress
Day 9: handmade convertible jacket / handmade goldstone necklace
Day 13: DIY Band Jacket / handmade leggings / handmade whipped cream heart pendant
Day 15: handmade crocheted chain necklace / DIY Convertible Button Skirt (tute coming soon)
Day 16: DIY studded beret / DIY pearl-detail gloves
Day 21: DIY pierced rose brooch / handmade pyrite and spike rings / DIY Wrap Curtain Skirt (tute coming soon)
Day 22: DIY Smock Dress (tute coming soon) / handmade Vinyl & Snaptape Belt
Day 23: DIY Hybrid Sweater (tute coming soon) / DIY Alexander Wang Stirrup Socks (tute coming soon)
Day 24: DIY pocket watch necklace / handmade bracelet / DIY ribbon belt / altered dress
Day 26: DIY Ring-Detail Hat / DIY Shirt Collar & Cuffs
Day 27: handmade chain earcuff / DIY WORD! Velcro Tee (tute coming soon) / DIY Distressed Cutoff Shorts (tute coming soon)
Day 28: DIY mesh-and-rhinestone earrings (will be in next issue of
Snippets) /
DIY Bow Tunic Dress / DIY Maribou Feather Clutch (tute coming soon)
Day 30: DIY crystal stud earrings / DIY magazine clutch purse / handmade Swarovski rhinestone cut-out back dress
It’s interesting to see every day laid out like that…It’s also amusing to see my garden and the Fall leaves in full time-elapse glory…and to see me relegated to my kitchen as the weather got progressively worse throughout the month.;-)
So what’s my style? I sure love black, and patterns that are variations on stripes…gray, white, pink, and blue are some other fave colors…I prefer separates to dresses, I love lots of crazy accessories, high heels, and posing with my legs crossed, staring off to the right…;-)
What does your daily fashion say about YOU?
Though it’s been surprisingly easy to style my outfits (and fun!), the sheer work of the photographing, editing, uploading, and posting an outfit each day was staggering. Total props to Jessica of WhatIWore or some of the people on Lookbook.nu – because to do this daily is such a huge time commitment!!
Because of doing this daily, this meant I couldn’t do any DIY’ing, and barely had the time or stamina to post any other content on this blog during November. Plus a lot of my other projects languished during this month, so now I have to put my nose to the grindstone and dive back into them. And there’s still a pile of DIY’s and projects I’m dying to get to!
So now back to prioritizing…
I hope you guys enjoyed this 30 Days of Outfits and inspired you to pull out some things in your closet you rarely wear and see how you can mix things up! (Plus add a little DIY to your life…;-)
Thanks for following along!
xoxox
Carly
P.S. I know some of you really liked this…I may attempt this again in the future…when the holidays *gulp* are completely over with;-)
~If you liked this post, please share it!~
Leave Comment
Dec 2, 2010 | DIY, Fashion, Life
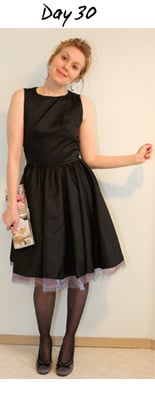
Rhinestone Dangle Earrings: Forever 21. Small Crystal Studs: handmade by me. Dress with Cut-Out Back and Swarovski Crystal Detailing: handmade by me. Magazine Clutch: DIY. Pleated Satin Shoes: Charlotte Russe.
Day 30 in my 30 Days of Outfits Challenge: November 30.
Boy, these 30 days have flown by!
I felt it appropriate to end these 30 days in the Dress That Began It All, also known as the Bacardi Limon dress.
No, it didn’t mark the start of my DIY’ing! (I’ve been making my own stuff since I was 9.)
This dress was officially the start of my Fashion Career.
Rewind to Winter of 2006…I was a stay-at-home mom to a baby just over a year old, and my days were filled from morning to night with bottlesdiaperslaundrycleaningplayingwithbaby / bottlesdiaperslaundrycleaningreadingtobaby / bottlesdiaperslaundrycleaningmakingdinnerforeveryone / bottlesdiaperslaundrycleaningcomfortingbaby etc. I did have a Mom’s Club meeting once a week, but otherwise that was my life. It had been so long since I had done anything creative. It was a very difficult time for me.
I began to have more stamina to stay awake after Lil Tot had gone down for the night, so I would try to catch up on email and surf the web a little. One night I happened upon a posting about a design competition, sponsored by FashionTribes.com and The Daily – where entrants had to sketch a dress inspired by the flavor of Bacardi Limon.
Now, being a nondrinker, I had no idea what Bacardi Limon even was, but I read the press releases about the new flavor and over the course of 2 evenings or so I sketched 6 designs, inked and watercolored them, scanned them, and then sent them in to the contest. It was right before Christmas and I had been staying up late trying to get all my Christmas cards written, and instead for two evenings I just immersed myself in what I loved: designing and drawing.
And then I completely forgot about them and the contest and everything. I just figured I didn’t win. Life went on, pretty much unchanged.
And then in February I heard the phone ring while I was lying down next to Lil Tot trying to lull him into taking his morning nap (which he refused to do unless I was lying down with him). I couldn’t answer it and it went to the answering machine. After Lil Tot finally fell asleep despite the interruption, I went to check on the message.
And was utterly stumped by its contents. I had to play it a few times to understand it. Someone who I didn’t know, from some number in a New York area code, calling from a something-Group, wanted me to call her immediately about some competition. And then I realized what it was, called, and was told
I was one of the 5 finalists they had picked from more than 300 entries around the United States in that Bacardi Limon design competition!
The dress design that was chosen as a finalist.
A whirlwind ensued. It turned out that the PR group had picked the dress I had designed that had a cut-out in the back, like a lemon slice, as the finalist entry. I had to make the dress I designed. I was being flown to New York to compete in a live “Cut-and-Sew” competition “just like Project Runway” that would be televised and everything. I made another dress in black to take with me to New York and wear while there. I went in March 2007. It was the first time I had been away from Lil Tot so long (I’d only been away from him at the most for 3 hours up until then, since he had born 15 months prior). I met the other finalists in the competition, some who’ve remained my friends to this day. I did the live Cut-and-Sew, where I made yet another version of the yellow dress.
At the live cut-and-sew competition, where we had just about 7 hours to make our dresses again.
At the event after-party. Photo by FashionWireImage’s Dmitris Kambouris.
I didn’t win, but I returned home determined to make my 15 minutes of fame into something worthwhile. I parlayed that press coverage and local interest into a great story for me founding a misses’ line of clothing and jewelry. I hired a party planner and PR whiz who helped me plan a launch party for the line, inviting the who’s who of the fashion elite and helping me with press releases, gift bags, branding, the works. I hired a patternmaker to make and grade the patterns, a samplemaker to make the samples. I bought fabric and had it shipped from LA to Hawaii, where I lived at the time. I produced a line, had a runway show, trotted it to local boutiques trying to sell it. A few pieces ended up in a few places.
The models from the launch party and runway show, myself, my patternmaker, and samplemaker. Photo by Elliot Takane.
Hub believed in me and allowed me to use our savings for this venture. I began to produce a Winter Collection and then began to run out of money. The previous pieces weren’t selling well, there were fit and sewing issues. Much of it was returned. I couldn’t pay anyone else to help me and couldn’t do it all myself anymore. We moved to Oregon in late Fall and I officially closed the line down. And I also reached out to FashionTribes.com to see if they wanted someone to write content for them, so I could at least stay connected to the world of fashion even if I couldn’t design.
So I wrote for them. And wrote for them. And started my own blog. And wrote for it. And wrote and contributed to other blogs and websites. And started to design things again, on a small scale, to sell in my Etsy shop.
And here I am today.
Now all that was a bit of a tangent.:-) I guess the point of all this is that sometimes the path from A to B is not in a straight line, and what seems tangential is actually useful experience that sets us up for something better.
I still want to design; I love designing but I HATE the manufacturing of clothing, and being financially responsible for all of it. It’s very scary for a small, struggling family to take on ourselves. Not a very good idea. And it’s too much work for a single person to run an entire line by themselves, even with a patternmaker helping out. Plus I enjoy more working within parameters – maybe not pushing boundaries so much, but working within someone else’s aesthetic or color story or mood board or whatever.
I’m glad I found that out about myself! Who knows if I ever will get the opportunity to design for someone else…but it’s been a great journey, and I’ve learned a ton along the way.
That’s why this dress is so special: it truly marks the beginning. (The other yellow dresses I made for the competition were kept by the PR company as far as I know.)
The dress I designed was a boatneck 50’s style flared party dress that I drafted the pattern to. (For the yellow, I turned the yellow satin inside-out since I liked the matte side better:-) I added a double-layer of iridescent chiffon to the hem. The back was a complicated citrus-shaped cut-out with floating bands attached to a central ring, and Swarovski crystal “seeds” suspended in the bands.
I am a much better sewer and patternmaker now than I was then – and the back of the dress was extremely complicated. I knew exactly what I wanted for securing the Swarovski rhinestones into the cutout, but I couldn’t find elasticized crochet cord sold by the yard. The back was very difficult to fit properly.
The clutch was made by gluing a magazine cover onto a small clutch from Target with E-5000 glue. Any flexible glue would work here, though.
30 Days of Outfits – ALL DIY! What fun it’s been!
Also, if you’re curious to see how others fared, please check out Katarina from She sells sea shells, who’s been doing this Challenge along with me – you can see her last couple outfits here, here, and here.
xoxox
Carly
~If you liked this post, please share it!~
Leave Comment
Dec 1, 2010 | DIY, Fashion
Scarf Bow (on head): DIY. Denim Shirt: DIY. Pinafore Top and Flower Ring: Marc Jacobs. Feather Bangles: DIY. Tiered Silk Zipper Skirt: DIY (Forever 21 oiginally). Tights: Express. Suedette Booties: Forever 21.
Day 29 in my 30 Days of Outfits Challenge: November 29.
I’ve got to rush out the door, so here it is quick…
DIY IDEAS:
Tie a printed silk scarf into a bow and clip into hair, or secure to a headband.
Add feathers to some metal bangles to jazz them up (my rough how-to is here).
Re-fit an oversized button-down shirt to your size using my tutorial here.
Drill a hole in a metal mailbox number (from the hardware store – I chose #7!) and make into a pendant necklace.
Tutorial coming soon!
Add some stretch jersey to the waistband of a skirt and a zipper down the center to make it into a statement piece. (My original idea was here.)
Oh, man – I am late! Better run now….
xoxox
Carly
~If you liked this post, please share it!~
Leave Comment