Nov 25, 2012 | Life
Hope everyone had a wonderful Thanksgiving!

A silly photo from work last week; I’m just playing on the photography cyc. Man, does it need to be re-painted!!
I have had a completely perfect holiday – and all because Lil Tot has been sick with a cold since last Sunday. Which sounds completely horrible to write.
I’m not rejoicing that he’s been sick; but because he’s had to stay inside I’ve canceled all the birthday parties and events we’ve RSVP’ed to, and spent a wonderful 4 days cooped up at home.
I can’t remember the last time I did that!
I felt like I really needed this indulgence, because the next 2 weeks are going to be utterly crazy for me. I’m not sure how I’ll survive until Dec. 8, since I have about 5 HUGE things happening Dec. 5-Dec 7. If I can only get through the next two weeks in one piece…
But over this Thanksgiving break I’ve gotten a solid 9-10 hours of sleep a night, cuddling with poor Lil Tot as he hacks away. Thanks to all the rest I’ve been able to avoid getting what he got (though Hub got it instead of me; a rarity). While being at home I’ve gotten a head-start on holiday DIY’ing, holiday baking, holiday decorating, and we even took a family photo for our Christmas card. 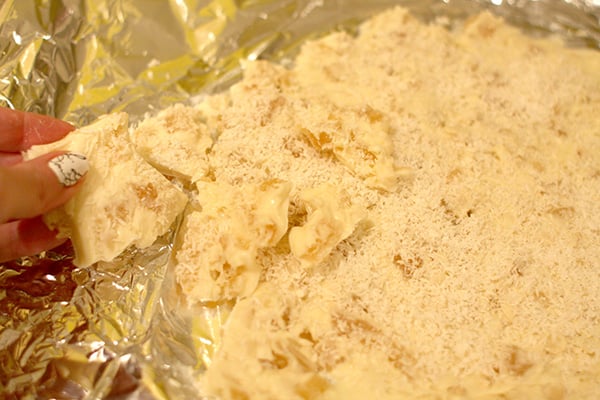
My latest DIY recipe for a delicious holiday treat…will be sharing soon!
I’ve read some piled-up magazines and even got halfway through a favorite book of mine (and I haven’t read a book in ages!) I cleaned up all the dead debris in the garden. I’ve declared a moratorium on my computer and used it as little as possible these past couple days…and in fact, today I just opened it 10 minutes ago. I’ve stayed away from browsing on the Internet and kept mindless TV programs off.
Getting back to crafting – yay!
Instead, I’ve played a ton of board games with my son, taught him some new card games (and gotten a little too hooked on Klondike solitaire, unfortunately;-), played Wii party with him, read him stories, and even done some kiddie crafts with him (we made a prince marionette based on instructions here!). With the whole family home (and 2 members sick), we’ve all been taking it easy and re-connecting. I’m also on cloud 9 because I FINALLY cleaned out my DIY supply drawers that I have not gone through in FIVE.YEARS. It was a huge mess, and I feel so much calmer for tackling it.
Lil Tot is finally almost completely better so will be heading back to school tomorrow, and Hub and I go back to the daily grindstone. But all in all, I couldn’t have wished for a better Thanksgiving holiday.
Do any of you “re-charge” by un-plugging and spending time with family? What’s your secret to finding that balance?
xoxox
Carly
Leave Comment
Nov 13, 2012 | Fashion, Life
 So the $10 million dollar question is…are you going to wait in line for the Maison Martin Margiela collection at H&M?
I’m debating whether to swing by the mall on Thursday and check out a couple pieces, though probably not buy. It’s not like I need them after all.
What do I need want are the color variations of the perfect metallic hair-ring…I picked up gold the other day, and now I’m kicking myself for not picking up silver and copper.  Similar to what was seen on the Dries Van Noten runways for S/S 2012, H&M has put out their version (which looks similar to a couple plastic ones with metallic foil on them I’ve had since the 80’s…I think they were Goody, originally.) Deliciously minimalist, problem-solving construction so your hair isn’t falling out of your DIY napkin ring/copper plumbing piece you’re making do with. Sometimes DIY is not always the answer to a basic construction problem…and buying at retail price will save you a lot of time and frustration.
  I have fine hair and find that anything metal and heavy will slip right out of it. The H&M piece has an inner ring that secures the hair elastic, and a snap closure that’s easy to apply, and is only $4.98.
By strange coincidence, all the metal I was wearing today was H&M…gold metal hair-ring and copper choker bought Sunday, and gold elongated pyramid earrings purchased back in June or so. Nails are suede-finish Amber by Julep, a perfectly-matte, velvety-finish dull gold.
As for the Margiela collection, I’m thinking possible DIYs for that hitched-up turtleneck (safety-pins applied under the hem to hitch things up)…that trompe l’oeil bodysuit (just tack on a black bra to a nude long-sleeved leotard)…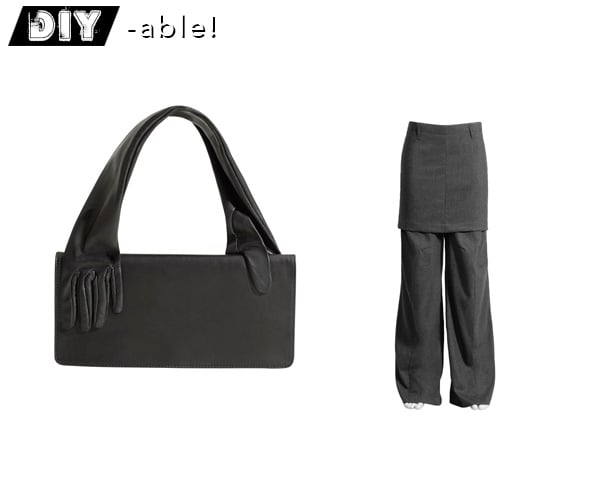 …that glove clutch (attach gloves to your clutch bag with some leather glue
 )…those skirted trousers (throw a similar-colored skirt over a pair of wide-leg trousers)…
 …those hand-painted loafers (paint your black loafers with some white latex [not acrylic, and not leather] paint)…that pieced-together coat (2 different coats, stitched together into one)…
…and those plexi wedge pumps…though I’m questioning whether time and effort is better spent just buying those heels as-is. Sometimes just plunking down the $4.98…or in the case of the plexiglass heels, $299…is an actual cost-savings when it comes to something that needs to bear weight and be flexed multiple times in a day, like shoes…
Also, the $20 million dollar question: Will you buy something knowing that it is extremely recognizable [and may remain so for years] in the collective conscious as from a certain collection, store, or designer?
xoxox
Carly
Margiela for H&M Collection photos from Refinery29.com. See the whole collection here.
Leave Comment
Nov 11, 2012 | Life
So I finally got an iPhone (an early birthday present from Hub), and I’m loving it! The only thing I miss from my Crackberry was the physical keyboard…but everything else is way better on the iPhone.
I also got sick of waiting for Instagram to come out for the Blackberry…and now I’m finally on this fun photo-sharing platform (albeit a little late to the game) I’m still getting the hang of it, but I’m posting photos of Portland, Fall snaps, my latest manicures, DIY stuff I’m working on, and recipes. Hope to see you there – I follow back!
Photos, from left to right, top to bottom:
1. My last super-healthy indulgence: stove-popped popcorn with lemon-flavored Nutra Sea [Omega-3 oil supplement], Mrs. Dash lemon herbs, and sea salt / 2. Latest mani: 3 coats of Piggy Polish Teal It Like It Us, from the Ulta store / 3. Yummy zucchini spaghetti: shredded zucchini, simmered in butter and olive oil, tossed with spaghetti and parmesan
4. The finished result of said pasta / 5. Sun motif embedded in the pavement at NE Everett St., Portland / 6. Lil Tot’s first English composition
7. My backyard covered in red Japanese maple leaves / 8. Mushrooms I spotted at Lil Tot’s school, growing in the soccer field / 9. Fall leaves piled up at his school
10. I finally learned to solder properly, and made some hammered sterling silver links / 11. Nails Inc. in Trafalgar Square magnetic mani / 12. Portland leaves just beginning to turn yellow for Fall
xoxox
Carly
Leave Comment
Nov 10, 2012 | Fashion, Life
 Knit Cat Hat Beanie: freebie from Shibuya 109 Book Vol. 6 (similar here)
Mecha-Rake Ekusute in Long Curl (TGMX color): Priscila
Chain-and-rhinestone necklace: Forever 21 (similar here, or just DIY it by wrapping a bunch of different chain chokers around themselves, and hooking in a couple rhinestone links or beads)
Pyramid stud spiky necklace: DIY
Upside-down sweatshirt: Kai-aakmann (similar here)
Reversible vinyl clutch: freebie from Vivi magazine December 2012 issue
Leggings with attached legwarmers: My Honey Bee
Scrunchy velour boots: GoJane (old)
I’ve had a horrible cold for the last week or so, and Hub went to the Japanese market and brought home a present to make me feel better: the latest issue of my favorite magazine Vivi, and the latest issue of Shibuya-109 Book with included Cat Hat Beanie freebie! (more…)
Leave Comment
Oct 18, 2012 | DIY, Life
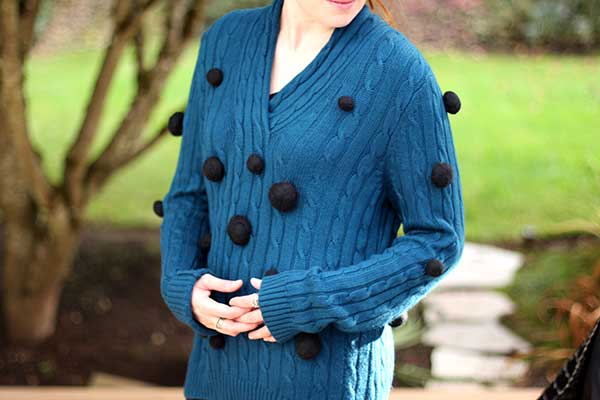 As some of you may recall, in early Spring this year I attempted to DIY a puffball sweater I saw in Vivi Magazine.
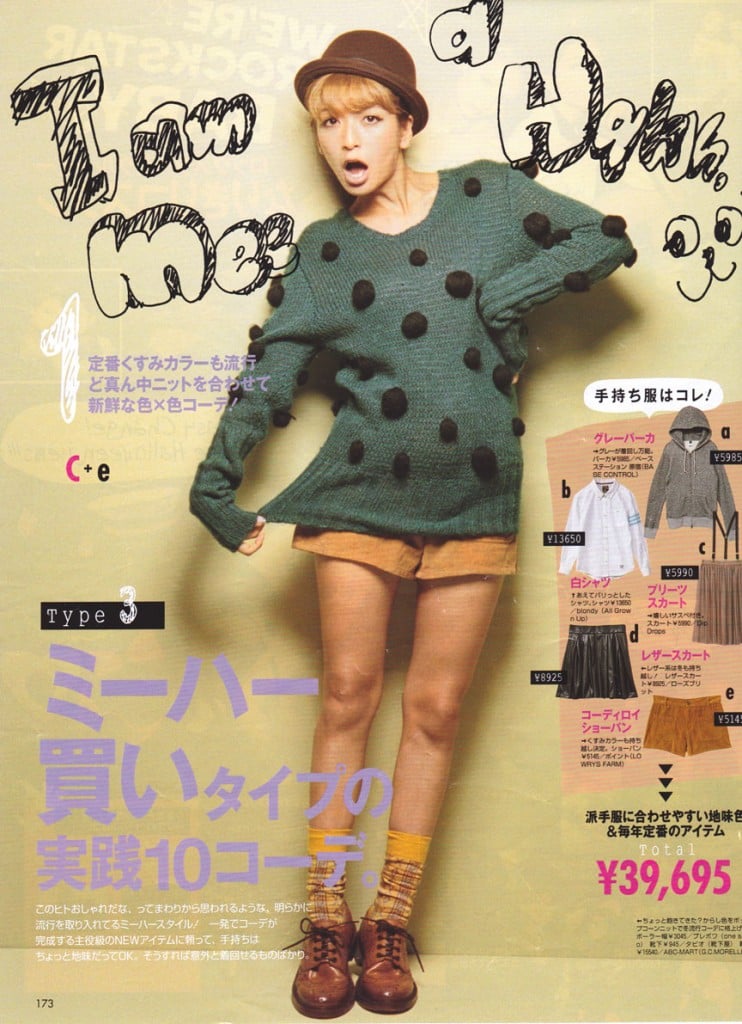
This is what I was trying to dupe.

This is what I ended up with.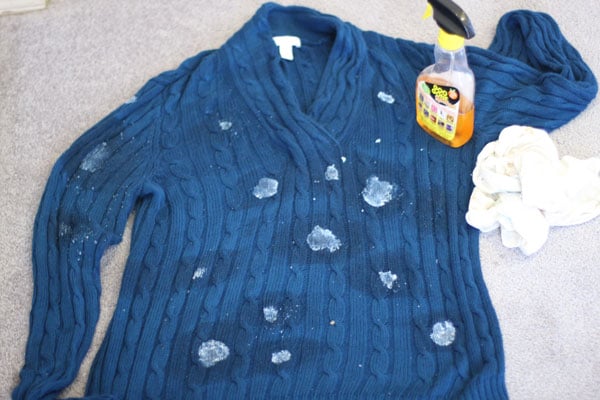
Why did it happen?
Well, I chose my materials badly. I figured this was just a pompon sweater, so I used acrylic pompons out of a bag I bought at Jo-Ann’s, in the doll-making and felt section.
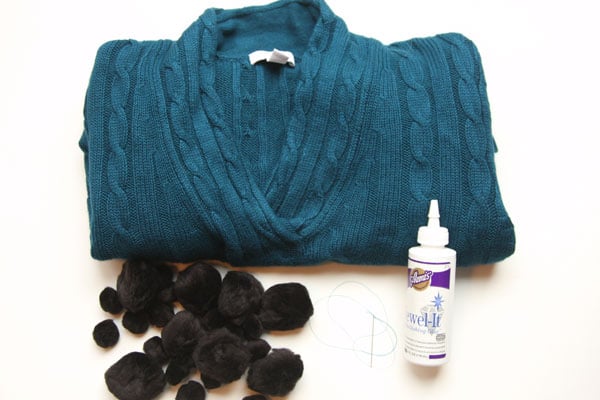
BIG mistake. If you look closely at my inspiration photo, the balls are actually felted wool balls, all a little rough-looking and slightly different in size. I thought the sweater was super-cute with those pompons on it…but failed to realize that it was the material of the pompons that took it from a kid’s craft project to something a grownup could wear. (Okay, I know some people might debate me on that, but still!!)
AND I chose the wrong method for the job. As I was gluing down the pompons, I was feeling that it wasn’t looking as cool as in the picture. The pompons weren’t attached properly, and the glue was seeping and soaking in all over the place. It was visible even around my pompons, leaving a ring of WHITE hardened glue. I did the front of the sweater and one sleeve, then let it dry overnight to see if I felt any better about it in the morning.
I didn’t. I then ripped all the pompons off, out of the hardened glue, and tried to peel off the glue. After pulling and peeling and ripping for over an hour, I had a blistered thumb and only managed to remove the outer layer of a couple glue blobs. I was frantic. I really liked the sweater; it was soft, the color was perfect, and it was an amazing bargain at my local Goodwill for only $4.99. I didn’t want to let it go!! So I soaked the sweater in water and delicates to detergent to see if the glue would soften up. More pilling and crumbling glue ensued, but I still couldn’t get it off. The next day I called the Customer Service line for the glue product and asked how to get it out of my sweater. There was a pause. “Well, it’s permanent. You can’t really ‘get it out.'” I finally got a “well, you could try Goo Gone on it, some of our customers have said they’ve had some success with that.” So I sprayed Goo Gone on all the spots (which you can see in the above photo). Oh my. Petrochemicals all over my sweater. It smelled like GASOLINE. The fumes were heinous. I had to lock it in the laundry closet to sit or else I would have gotten high from it. I let the Goo Gone soak in overnight and found that it had hardly done anything. I was back to pulling and peeling and ripping – though now everything was slimy and smelly from the Goo Gone and the glue spots were exceedingly difficult to grasp. I managed to get one spot off completely after pulling at it for 45 minutes. Some of the others I was able to remove 30-60% of the glue. But at that point, after 4 hours of working on it, I threw in the towel (figuratively) and threw the sweater in (literally) to the wash. I had to launder it twice to get the stench out. And I was still left with a sweater with hardened spots of glue all over it. Oh what a tragic story!!
So why do DIY FAILS happen? Here are the 3 main reasons:
FAIL REASON #1:
You choose materials that look too cheap.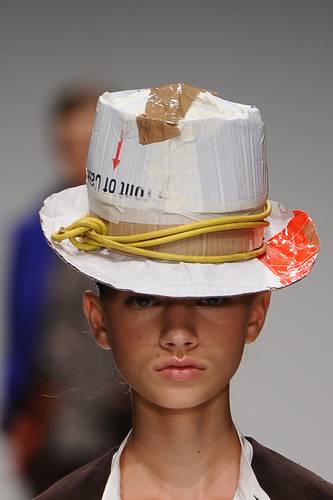
Materials that are cheap are a totally different story. There are so many ways to get your hands on affordable raw materials – from shopping Goodwill for pristine-condition clothing to use as your starting point, using online coupons to shop M&J Trimming or Jo-Ann Fabrics, sourcing embellishments and trims from pieces you have in your closet already, swapping with a friend, or buying wholesale and in bulk. The great thing about DIY’ing is that so many of the raw materials are so affordable, much more so than the finished product. However, if you choose materials that look cheap, no matter what their actual price point, your entire project will be dragged down. Tip: Don’t ever choose materials that you’ve seen on kids’ accessories (no plastic rhinestones, EVER!), or in Halloween costumes. The only thing that can save latex, lame, spandex, and medium-weight poly/cotton jersey is the cutting and the silhouette…and unless you’re fairly adept at those things, best to stay away (unless it actually is Halloween!)
FAIL REASON #2:
You chose the wrong [or too cheap] tool for the job.
There are so many different ways of getting from point A to point B in a DIY project, and sometimes our decisions on what method or tool to use are based solely on “what will be fastest?” Sometimes you’re guessing, saying “I think I can do this and get the same result as my inspiration.” Both methods are certainly legit and are ways of evaluating your project and how to do it. It all depends on what you’re going for – and if quick and easy are what you want then by all means choose the quickest way and the tools you have at your disposal. But sometimes the best method isn’t necessarily the fastest, and sometimes using a certain tool can absolutely NOT replicate using the right tool for the job. Sometimes you do have to study up on how similar pieces are made, like checking out what’s on the shelves at stores or on websites instructing industry professionals how to make that piece. Sometimes you do have to be the expert in order to get your finished piece to look professional, polished, long-lasting, and rivaling anything you see on the market. In my Spore Sweater FAIL I thought gluing the pompons on would be fastest; the glue was too messy, and was IMPOSSIBLE to remove fully from the sweater when I wanted a do-over. Even though sewing the balls on took way longer, that’s probably how the original sweater was made…and that technique makes my re-do look a heck of a lot more finished than by gluing. Tip: Brush up on your techniques so you know what to do, and actively learn about the different tools you can use for the job. (E6000 glue vs. 2-part Devcon epoxy, overlocker vs. regular sewing machine, awl vs. X-acto blade.) Check out what other people use to do the job, and mimic their techniques. And definitely get the best tools you can afford; this is not the place to skimp on quality!
FAIL REASON #3:
You actually, truly messed up.
Whether it be sewing a line crooked, cutting off part of a skirt unintentionally, or painting acrylic paint globby, sometimes it can be lack of a skillset or just a plain ol’ mistake that creates disaster. You can always improve your skills by mere practice, or by taking classes (locally or even online). However, if you have enough ability to fix your mistake , fix it immediately, while still in the process. And know how to fix it – always have a Plan B just in case!! If fixing it is beyond your abilities, try camouflaging it or changing your design a bit to make it look intentional. Remember, the greatest art comes from the worst mistakes. And DIY’ing definitely is an art! Tip: Take every opportunity to improve your skills in order to not mess up again. Pick an expert’s brain, take a class, practice creative problem-solving to transform a bummer project into a stunner project.
Needless to say, I re-evaluated my materials, hand-made better, more organic-looking pompons, and attached them to my sweater more professionally.
Plus the new felted wool balls cover up all the spots of glue I couldn’t get off the sweater…camouflaging my mistake!
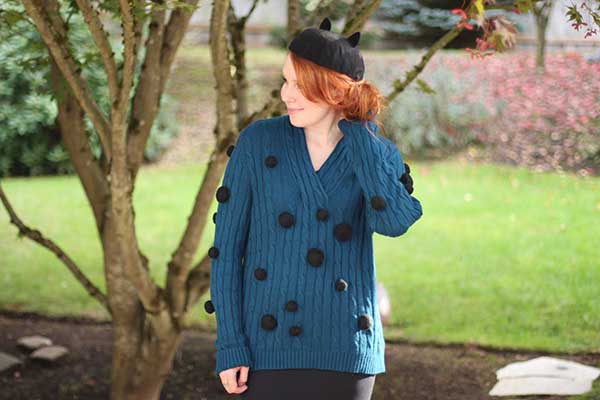
Hope that helps you guys proactively prevent DIY FAILs before they happen…and make every project you do something you’re proud of!
xoxox
Carly
P.S. DIY tutorials for Hand-Felted Wool Balls and Cute Kitty Beret coming soon!
Photo sources: 1 (and for the record these hats were made by Stephen Jones for the Kinder Aggugini S/S 2011 show as runway statement pieces, and I do think they work pretty well in that very specific context; however they are indeed made of cheap materials and duct tape looks like duct tape no matter what you do.), 2, 3
Leave Comment
Sep 5, 2012 | Blogging, DIY, Life

The art of DIY is something I believe, to be enjoyed for oneself, shared with others as means of inspiration and encouragement, but not something that should be applied to creating exact replicas or knockoffs to make a profit on sales of such items. Inspired by, but not replicated if there are sales involved.  I get so many requests (even now!) for me to make a custom knockoff pair of those Christian Louboutin for Rodarte Super-Spiked Heels I DIY’d nearly 3 years ago, that sometimes I feel my intentions in sharing these how-tos and ideas on my blog are being misconstrued entirely.
Sometimes I wonder if I should only be sharing tutorials for items quite different from, but still inspired by, designer pieces. It’s a tough call.
But for all of us out there who craft, who create, and who produce art, there is always the question of inspiration vs. imitation. Though in her eloquent post designer Jessica Hische is writing about art in general, I believe her great analysis of the art of copying (and how to avoid straight-out mimicry) is a great read and utterly applicable to everything creative in life (including DIY!).
And especially DIY, and making your own projects for yourself, as well as to share with others. Ideas are everywhere, and what you choose to appropriate, re-appropriate, and re-mix becomes art the further away it gets from its original inspiration. I re-read this blog post all the time because it’s such a great one (and Ms. Hische is an amazing logotype and branding designer too!)
Just some food for thought on this late, late evening.:-)
xoxox
Carly
Leave Comment











