Dec 24, 2010 | DIY, From You, Life
Hi! I just stumbled on your blog a few months and I really dig it. I’ve been “diy’ing” my own stuff years, but shoes always get me! Is there any way that you know of to turn a pair of regular heels into platform wedge heels? Or is that for the pro’s only?
Short answer: Sure you can do it yourself, but if you don’t have a lot of time & money for this, aren’t willing to possibly sacrifice your shoes during the learning curve, or are super-picky about the finished product looking like you bought it in a store (and wasn’t cobbled together in your living room), leave it to the pros.
Long answer: If you’re up to the challenge, or want to do this on a regular basis, then go for it. To turn a pair of regular heels into platform wedges is a three-step process: removing the old heels, building the wedge and platform, and then shaping and finishing the wedge and platform.
Step 1: Rip off the heels on your original shoes. This is usually accomplished by a lot of pushing and pulling, angling a screwdriver in-between the heel and the sole, and prying the heel off (assuming your heels are nailed on and not glued). If they have been glued on (which sometimes heels are; and sometimes they are both glued AND nailed), you can pry them off using force (have fun;-) or utilize Barge Cement Thinner to dissolve the shoemaker’s glue, which will make the task a little easier. I’d recommend testing the thinner in an area of the shoe where it won’t be too obvious before spreading it into the heel seams – some solvents can discolor or melt components, and you don’t want to ruin any visible parts of the shoes by spreading chemicals on them that destroy them, right?
You may have to also remove the entire soles, depending on the shape of what’s left once you’ve removed the heels. If the soling leather has not been skivved down too aggressively at the heels (or hasn’t been cut away), then you can leave it in place and build your wedge & platform under the old soles. (Though your new shoes will look like they’ve just had the wedge + platform glued onto them, which they will be.) If the sole does not completely cover the heel of your shoes, then you’ll have to remove it entirely, which will collapse the shape of your uppers if you don’t bolster them prior to doing this. (By putting your lasts in them. You don’t have lasts? Uh oh. You need something that will double for your feet, something hard and heavy that fills out the uppers completely. Ideas? Double layers of pantyhose, wrapped in a layer of saran wrap, filled with Plaster of Paris *may* work in a pinch. Though if plaster gets on your shoes game’s over.)
SO…once you’ve filled out the shoes you’ll need to rip the soles off (again, via dissolving the glue and prizing them off the shoe uppers.)
Step 2: Building the wedges & platform. For ease of wear and walkability you’ll need to build your wedges out of layers of 1″ foam crepe (also called “cloud foam” – about $36 a sheet at shoemaker’s supply shops) – using a single layer for the platform part of the shoe, and using 2 (or more) smaller pieces in the heel area. (I’ve seen some how-tos floating around on the internet that advise you making the wedges out of wood – certainly possible, but unless you’re a woodworker I’d recommend going with the foam since it’s softer, more sculptable, and easier to walk on. But you can always try wood if you enjoy carving it!!) It’s fun if you enjoy the process, but you do have to be a very exact sculptor when making your wedges – otherwise the finished pieces will become works of art and ultimately unwearable. Even a 2 mm difference in height or shape to the wedges will throw your balance off and give your back aches. Once the glue is set up between the layers (secure with long screws), then you need to shave the foam to shape your wedge heels – the curvature on the top has to exactly match the pitch of your original shoes or you will be continually off-balance – and you need to make sure right and left are exactly the same!
Step 3: Attaching the wedge platform & finishing. Use Barge cement  to attach the platform wedges.
Once everything is dry, then trace the wedge bottoms and cut your soles out of soling leather. Skive the raw edges down. Glue to the wedge bottom and apply Edge Kote and shoe polish to the sole edges.
And if you’re really lucky, you might find a pair of plastic wedges at a shoemaker’s supply store, that somebody really kind might sell to you. And if you’re really, really, really lucky, said wedges might actually be in the same shoe size, shape, and heel height as your original shoes. Then you wouldn’t have to build the wedge from scratch in the foam crepe – which wedges usually aren’t built from (unless they’re single-piece foam sandals)…foam crepe is usually only used for platforms in shoes, and the wedge part is usually a solid plastic piece.
So no, you don’t HAVE to be a professional to convert regular heels to wedge heels, but it’s a very fiddly and time-consuming job, with a large financial investment, and giving results that are not necessarily the same as shoes you’d find on a store shelf.
See Luxirare’s blog for a pair of platform wedges she made entirely from cloud foam to illustrate what I mean.
Good luck!
I have a pair of ankle boots that come up to the middle of my shin and I wanted to make them into booties. I looked around online and saw that I should just take them to a shoe repair shop. Can’t I just do it at home?
Sure, if you don’t mind the raw edge on the top that will be left after you cut them down. (The shoe repair shop *may* be able to re-seal the edge and make it look like the shoes were designed that way in the first place, rather than a pair that looks like you chopped them down.) It just depends what you can live with or how you can disguise the top edge otherwise. If they’re manmade leather, you could squeeze a thin strip of vinyl-look puffy paint in a similar color around the cut edge of the boot, so the inside material does not fray. If they’re leather, they need to be properly burnished, colored, sealed, and stitched for them to look professional.
I want to recreate these Vivienne Westwood shoes in another colorway but I’m not sure how to make the hearts. Any thoughts? http://l3.zassets.com/images/z/1/1/1/1118434-p-DETAILED.jpg I love you blog btw!
Thanks! Um, do the hearts have to be flexible plastic? You can try Shrink plastic in black (though it is not flexible once it’s baked) to recreate the shape, thickness, and plastic-y look of these hearts. (For the warped shape, I’d recommend doing it with your hands the instant you take the pieces out of the oven, while they’re still hot..wear gloves!!) If you like experimentation, you can also try applying heat (like from a blow dryer or heat-gun) to black plastic from objects that are normally trashed (like take-out containers, plastic molded packaging, or even old vinyl LPs) to see if any shrink and condense into something malleable and similar in look to those hearts. Then cut out the heart shape, sand the edges, and you might have a good copy.
Can you tell some DIY ideas for cut t-shirts or DIY staple things?
If you’re looking for ideas for what to do with a t-shirt simply by cutting it, I’d highly recommend the Generation T books: Generation T: 108 Ways to Transform a T-Shirt , and Generation T: Beyond Fashion: 120 New Ways to Transform a T-Shirt
 . They have projects in them that run the gamut from very basic to more involved, and they have a ton of ideas for cutting up t-shirts. Also, T-Shirt Makeovers: 20 Transformations for Fabulous Fashions
 is a little more “fashiony” if that’s what you’re looking for. As for “DIY staple things” I’m not sure whether you mean basic projects, or must-have tools, or stapled creations (or something else and I’m misunderstanding). I’m working on a post on a basic DIY toolkit (coming soon) if that’s what you were interested in.
What’s the simplest way to turn an old dress/top into a one shoulder dress/top.
Cut off one of the sleeves?;-) I’m not sure of the style of your original piece, but I would just put the dress or top on, and looking in the mirror, draw a line in chalk where I wanted to cut. Then add 3/8″ to the outside of the line you drew, and cut. Fold the 3/8″ under and sew a 1/4″ seam. If your piece is made out of knit jersey, you could probably even get away with cutting on the line and not adding any seam allowance. Or, if you prefer, you could not add the seam allowance and instead zigzag or overcast the raw edge. But something has to be done about that raw edge unless you want the “I just chopped off one of the arms”-look to your one-shouldered piece, and you should ch
oose the method that fits in with the style of your finished piece best.
Hey Carly, I love your blog! I can’t wait to try the swallow heels and I’ve already tried a few other tutorials. I was wondering- have you ever done a tut on jazzing up a fabric tote bag? The kind you get free from a store, i.e http://bit.ly/dvExIe in cream
Hi HollyMacF!
I’m so sorry it’s taken me awhile to respond. I feel that there’s so many possibilities for making over a tote bag that the sky’s the limit! I haven’t shared a tutorial here for doing so, specifically because there are so many options to personalize those natural cotton totes.
You could:
The Non-Self-Important Canvas Tote that I have printed with and sell in my shop on CafePress.com
*get a design printed directly on the bag, like at CafePress.com or Zazzle.com
*distress it using a drill, razor blades, and scissors
*add a silk flower and a string of pearls or beads for a ladylike vibe
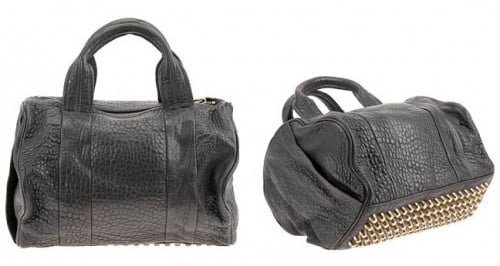
*stud it (maybe studs to the bottom like that A. Wang Coco Duffel bag, but with a tongue-in-cheek take on it?)
*wrap chains around each handle
*drip, splatter, and splash paint onto it
*replace the handles with chain handles, rope handles, or sew contrasting fabric onto them
*sew fabric onto the bag, like an applique, cut-out shape, or do fabric patches in a quilting pattern
*make bows out of satin and add them to the bag
*cut the bag and sew it back together in a different shape (like a wedge-shaped tote? or make the sides shorter and the bag into more of a duffel shape?)
*sew faux “quilted” lines over the outside
*glue deco mirror pieces onto the outside (could be painful?!)
*knit large “chain links” around the bag (like a designer bag that I spotted the other day and for the life of me can’t remember what brand it was)
*spray paint stencils
*use stamps and fabric paint to decorate it

*take your favorite designer bag and “draw” its details trompe l’oeil style on the tote
*add scraps of lace and cascading pompons for a feminine feel to it
*roughly paint a saying or phrase onto it
*place it inside a net bag
and, my kitschy favorite…
*buy a lot of tiny stuffed bears and cover the entire bag with them! (I’ve actually seen a bag like this:-)
Everyone else, weigh in with your ideas! What do you think would be a great way to make over a boring tote?
Ask me anything
xoxox
Carly
~If you liked this post, please share it!~
Leave Comment
Dec 17, 2010 | DIY
So sorry for the slowdown in posts as of late. I have been consumed by doing the Christmas shopping, putting together boxes of gifts, making goodies and cookies, writing Christmas and New Year’s cards, and standing around at the Post Office that this holiday brings. I think I have things a little more under control now, but there’s still an overwhelming amount of things to do and get and wrap before next Saturday.
In the meantime, if anyone has any free time and would like to make some jewelry and accessory pieces (maybe as a last-minute gift?), here are some Free Projects from Michael’s:
And some Free Project Downloads from Interweave (require E-mail mailing list signup, but just unsubscribe after you’ve received your freebies if you’re not interested):
Also: Free E-Book on the power of making things by hand to get you inspired:
You can never have enough techniques for DIY’ing in your trick-bag…and the more you know, the more you can apply that knowledge to problem-solving in many different areas.
Enjoy!
xoxox
Carly
~If you liked this post, please share it!~
Leave Comment
Sep 19, 2010 | From You, Life
Have you ever worked with faux leather? If so do you know any ways to soften it up so its not so stiff? thank you! love your blog
Leave Comment


 , Amazon.com

 , Amazon.com


 , which may soften up the piece, at least on the outer side.










