Dec 11, 2012 | Fashion, Life
There is this dress that I can’t wait for ModCloth to get back in stock…that I see in my dreams…

It’s a Wonderful Life Dress by Bernie Dexter, $155.99
Bernie Dexter has the most amazing photo-print dresses on ModCloth, but all around the same price point. Somewhat of an investment.
….Alternatively, one could bypass the wait (and the cost) by ordering something like this fabric from Spoonflower (or getting your own favorite snowy cottage scene printed with them!). I’d advise getting your print from them in cotton sateen, maybe about 2 yards (depending on your waist size and the way the pattern lies on the fabric). This is also another lovely alternative photo print on Spoonflower.
Then just choose a coordinating fabric for the top of your dress from the fabric store, do a rub-off of a dress you own (or try using a retro-style pattern, like this one from BurdaStyle)…and there’s a perfectly beautiful photo-print retro dress…for a whole lot less.;-)
Stay chic~
Carly
Leave Comment
Nov 10, 2012 | Fashion, Life
 Knit Cat Hat Beanie: freebie from Shibuya 109 Book Vol. 6 (similar here)
Mecha-Rake Ekusute in Long Curl (TGMX color): Priscila
Chain-and-rhinestone necklace: Forever 21 (similar here, or just DIY it by wrapping a bunch of different chain chokers around themselves, and hooking in a couple rhinestone links or beads)
Pyramid stud spiky necklace: DIY
Upside-down sweatshirt: Kai-aakmann (similar here)
Reversible vinyl clutch: freebie from Vivi magazine December 2012 issue
Leggings with attached legwarmers: My Honey Bee
Scrunchy velour boots: GoJane (old)
I’ve had a horrible cold for the last week or so, and Hub went to the Japanese market and brought home a present to make me feel better: the latest issue of my favorite magazine Vivi, and the latest issue of Shibuya-109 Book with included Cat Hat Beanie freebie! (more…)
Leave Comment
Oct 18, 2012 | DIY, Life
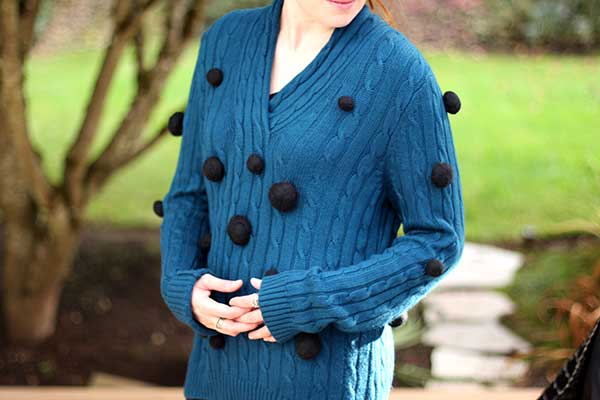 As some of you may recall, in early Spring this year I attempted to DIY a puffball sweater I saw in Vivi Magazine.
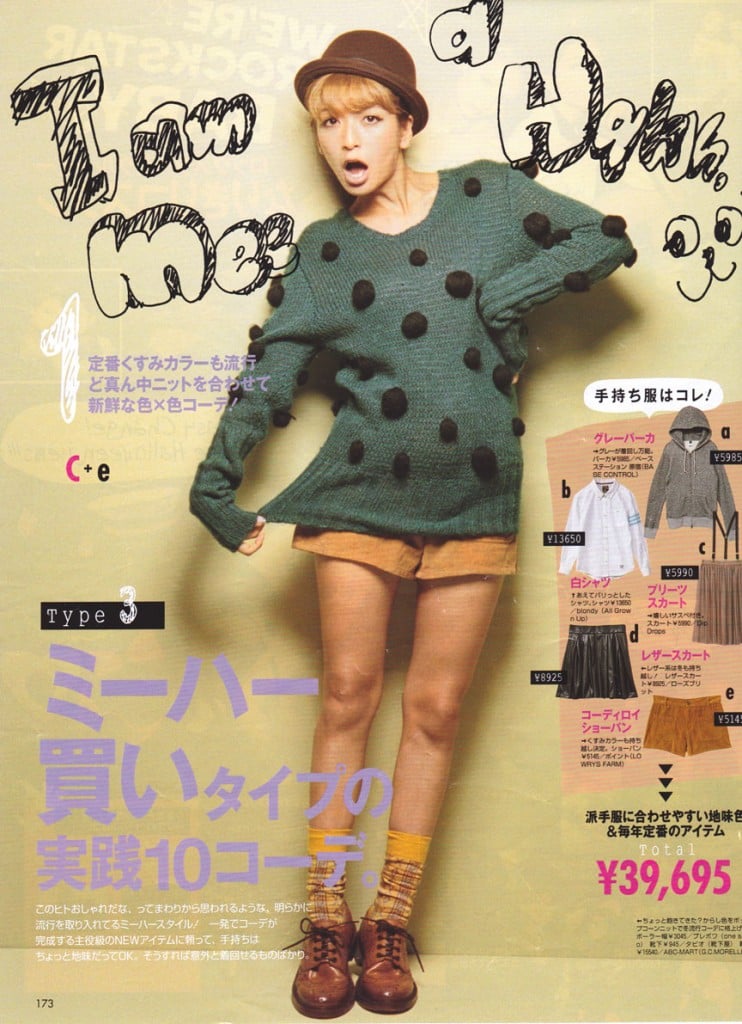
This is what I was trying to dupe.

This is what I ended up with.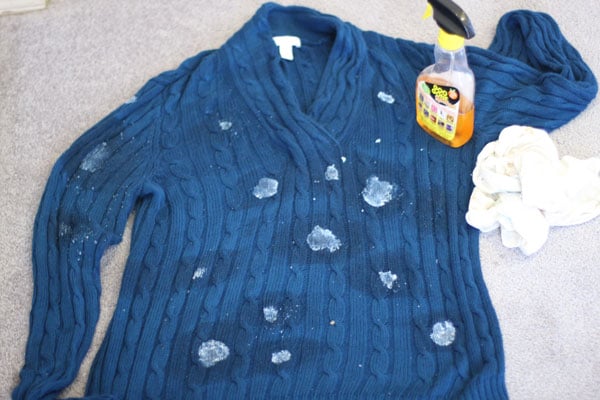
Why did it happen?
Well, I chose my materials badly. I figured this was just a pompon sweater, so I used acrylic pompons out of a bag I bought at Jo-Ann’s, in the doll-making and felt section.
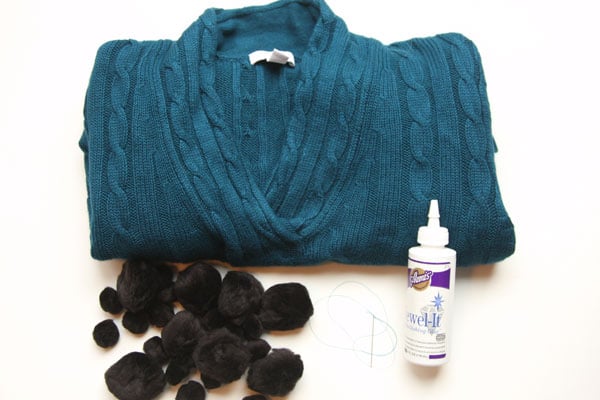
BIG mistake. If you look closely at my inspiration photo, the balls are actually felted wool balls, all a little rough-looking and slightly different in size. I thought the sweater was super-cute with those pompons on it…but failed to realize that it was the material of the pompons that took it from a kid’s craft project to something a grownup could wear. (Okay, I know some people might debate me on that, but still!!)
AND I chose the wrong method for the job. As I was gluing down the pompons, I was feeling that it wasn’t looking as cool as in the picture. The pompons weren’t attached properly, and the glue was seeping and soaking in all over the place. It was visible even around my pompons, leaving a ring of WHITE hardened glue. I did the front of the sweater and one sleeve, then let it dry overnight to see if I felt any better about it in the morning.
I didn’t. I then ripped all the pompons off, out of the hardened glue, and tried to peel off the glue. After pulling and peeling and ripping for over an hour, I had a blistered thumb and only managed to remove the outer layer of a couple glue blobs. I was frantic. I really liked the sweater; it was soft, the color was perfect, and it was an amazing bargain at my local Goodwill for only $4.99. I didn’t want to let it go!! So I soaked the sweater in water and delicates to detergent to see if the glue would soften up. More pilling and crumbling glue ensued, but I still couldn’t get it off. The next day I called the Customer Service line for the glue product and asked how to get it out of my sweater. There was a pause. “Well, it’s permanent. You can’t really ‘get it out.'” I finally got a “well, you could try Goo Gone on it, some of our customers have said they’ve had some success with that.” So I sprayed Goo Gone on all the spots (which you can see in the above photo). Oh my. Petrochemicals all over my sweater. It smelled like GASOLINE. The fumes were heinous. I had to lock it in the laundry closet to sit or else I would have gotten high from it. I let the Goo Gone soak in overnight and found that it had hardly done anything. I was back to pulling and peeling and ripping – though now everything was slimy and smelly from the Goo Gone and the glue spots were exceedingly difficult to grasp. I managed to get one spot off completely after pulling at it for 45 minutes. Some of the others I was able to remove 30-60% of the glue. But at that point, after 4 hours of working on it, I threw in the towel (figuratively) and threw the sweater in (literally) to the wash. I had to launder it twice to get the stench out. And I was still left with a sweater with hardened spots of glue all over it. Oh what a tragic story!!
So why do DIY FAILS happen? Here are the 3 main reasons:
FAIL REASON #1:
You choose materials that look too cheap.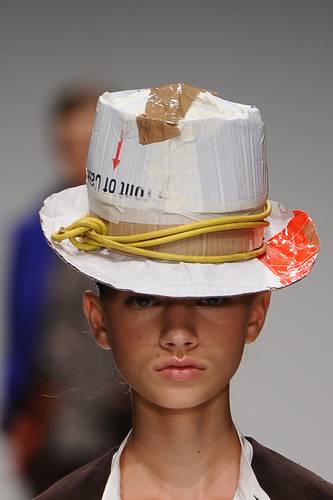
Materials that are cheap are a totally different story. There are so many ways to get your hands on affordable raw materials – from shopping Goodwill for pristine-condition clothing to use as your starting point, using online coupons to shop M&J Trimming or Jo-Ann Fabrics, sourcing embellishments and trims from pieces you have in your closet already, swapping with a friend, or buying wholesale and in bulk. The great thing about DIY’ing is that so many of the raw materials are so affordable, much more so than the finished product. However, if you choose materials that look cheap, no matter what their actual price point, your entire project will be dragged down. Tip: Don’t ever choose materials that you’ve seen on kids’ accessories (no plastic rhinestones, EVER!), or in Halloween costumes. The only thing that can save latex, lame, spandex, and medium-weight poly/cotton jersey is the cutting and the silhouette…and unless you’re fairly adept at those things, best to stay away (unless it actually is Halloween!)
FAIL REASON #2:
You chose the wrong [or too cheap] tool for the job.
There are so many different ways of getting from point A to point B in a DIY project, and sometimes our decisions on what method or tool to use are based solely on “what will be fastest?” Sometimes you’re guessing, saying “I think I can do this and get the same result as my inspiration.” Both methods are certainly legit and are ways of evaluating your project and how to do it. It all depends on what you’re going for – and if quick and easy are what you want then by all means choose the quickest way and the tools you have at your disposal. But sometimes the best method isn’t necessarily the fastest, and sometimes using a certain tool can absolutely NOT replicate using the right tool for the job. Sometimes you do have to study up on how similar pieces are made, like checking out what’s on the shelves at stores or on websites instructing industry professionals how to make that piece. Sometimes you do have to be the expert in order to get your finished piece to look professional, polished, long-lasting, and rivaling anything you see on the market. In my Spore Sweater FAIL I thought gluing the pompons on would be fastest; the glue was too messy, and was IMPOSSIBLE to remove fully from the sweater when I wanted a do-over. Even though sewing the balls on took way longer, that’s probably how the original sweater was made…and that technique makes my re-do look a heck of a lot more finished than by gluing. Tip: Brush up on your techniques so you know what to do, and actively learn about the different tools you can use for the job. (E6000 glue vs. 2-part Devcon epoxy, overlocker vs. regular sewing machine, awl vs. X-acto blade.) Check out what other people use to do the job, and mimic their techniques. And definitely get the best tools you can afford; this is not the place to skimp on quality!
FAIL REASON #3:
You actually, truly messed up.
Whether it be sewing a line crooked, cutting off part of a skirt unintentionally, or painting acrylic paint globby, sometimes it can be lack of a skillset or just a plain ol’ mistake that creates disaster. You can always improve your skills by mere practice, or by taking classes (locally or even online). However, if you have enough ability to fix your mistake , fix it immediately, while still in the process. And know how to fix it – always have a Plan B just in case!! If fixing it is beyond your abilities, try camouflaging it or changing your design a bit to make it look intentional. Remember, the greatest art comes from the worst mistakes. And DIY’ing definitely is an art! Tip: Take every opportunity to improve your skills in order to not mess up again. Pick an expert’s brain, take a class, practice creative problem-solving to transform a bummer project into a stunner project.
Needless to say, I re-evaluated my materials, hand-made better, more organic-looking pompons, and attached them to my sweater more professionally.
Plus the new felted wool balls cover up all the spots of glue I couldn’t get off the sweater…camouflaging my mistake!
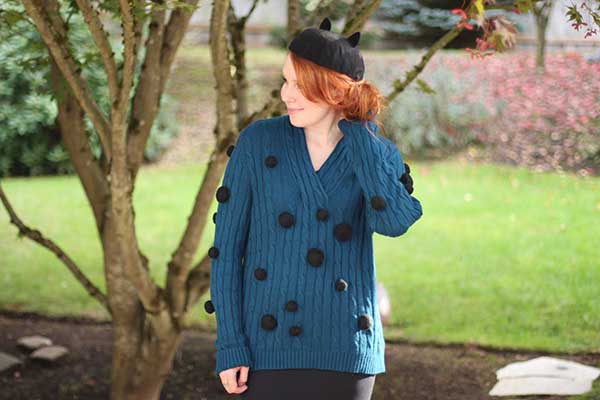
Hope that helps you guys proactively prevent DIY FAILs before they happen…and make every project you do something you’re proud of!
xoxox
Carly
P.S. DIY tutorials for Hand-Felted Wool Balls and Cute Kitty Beret coming soon!
Photo sources: 1 (and for the record these hats were made by Stephen Jones for the Kinder Aggugini S/S 2011 show as runway statement pieces, and I do think they work pretty well in that very specific context; however they are indeed made of cheap materials and duct tape looks like duct tape no matter what you do.), 2, 3
Leave Comment
Dec 28, 2011 | Life

From a recent Container Store flyer. Click on any photo to enlarge.
As the year draws to close, I attempt what I always do every year-end…a major closet cleanout.
 From the same flyer…and no, this isn’t my closet!!! I wish!
This year I’m being particularly ruthless about it, and really taking a long and hard look at what takes up my most precious closet real-estate, and getting rid of things that I don’t wear, will not wear, and that just aren’t who I am anymore.

From a Spring 2011 Spiegel catalog.
 From Lucky Magazine April (I think?) 2011.
I’m almost embarrassed to admit to the sheer amount of stuff that I’ve been hoarding for years, and never once wore. I have to finally come to terms with the fact that these pieces were never really “me,” and I was trying to embrace a trend I could never figure out how to style properly in any other way. My Keep It or Toss It Rules?
Keep It or Toss It? 7 Ways to Create a Curated Closet
{And when I write TOSS, I mean sell, exchange, or donate! Or upcycle with some DIY only if you will wear it after its makeover…}
1. Keep only ONE item that is a certain shape, style and color, unless this one item is your signature piece.** (More on “signature pieces” below.) If you never wear capes, how many gray capes do you need? KEEP one, TOSS the others.
2. TOSS all your “skinny clothes” except for ONE or TWO pieces that you love and you want to keep as a goal. (If you end up getting down to that size again in the future, you’ll want to buy all new things then in order to show the new you off!!) In the same vein, TOSS all your fat clothes, except ONE to remind you of how far you’ve come. Put both the fat and the skinny clothes in a box, out of sight…unless you want a daily reminder hitting you in the face every time you open your closet. (Could be useful for inspiration…?)
3. TOSS all the clothes that are more than 2 sizes bigger or smaller than what you are now. Or have them altered so you can still wear them.
4. KEEP basics, as long as they aren’t ripped or stained. Ripped – TOSS! Stained – re-purpose as workout clothes, DIY, or TOSS. Try to pare down your basics to ONE or TWO of each kind (TWO white tight-fitting t-shirts, ONE white loose-fitting t-shirt etc.)
5. For every single piece in your closet, you must be able to visualize at least 3 different ways to style it (that you would actually wear!) If you’re having trouble coming up with different ways to wear it, then you should probably TOSS it.
6. Make sure that every piece you KEEP is special in some way…either it has a little detail, or a pretty print, or color that looks fabulous on you. The stuff that you don’t love to death but has a special story behind it and you just can’t bear to part with it? …Box it with your skinny clothes.
7. Stand back often and assess what’s left in your wardrobe. Sometimes it helps to pull everything out and only put back items you love…but for me, there was just too much stuff! Standing back from everything gives me a little perspective.


**And finally, to create your own identity within a mass of clothes and other items…
Develop your signature: a piece of clothing, jewelry, or accessory that is something you love and is uniquely YOU. Though I have a ton of earrings, I always wear a bunch of mismatched gemstone studs in different colors and sizes. It’s just something I’ve been doing this year that I’ve really begun to like, and if I lose one…hey! I have a whole bunch more that I can replace it with.
Also: a valet bar is a must! Some people call them an “edit bar,” but even a hook will suffice. Just somewhere you can stick clothes to put together outfits before putting everything on. It seriously saves time!
Since I have limited space, I actually hang vests and button-front shirts on the same hangers as dresses and blouses! Each item on a shirt hanger in my closet also gets a necklace, because I have a huge necklace collection and always forget what I own. I have to see it or I will forget about it completely.
I’m currently being inspired by well-organized closets (cue Ikea and The Container Store catalogs), and beautiful photos of airy, dreamy spaces to house all one’s accoutrements.

From the Ikea.com US website.
A Pair and a Spare has a great series on paring down (see what I did there?;-) your own wardrobe to pieces that you love, and maybe, as FashionISing wrote, the current covetable closet is a well-edited and curated one?
I’m still working on that, but I’ll be at least a couple steps closer come this New Year.
xoxox
Carly
~If you liked this post, please share it!~
Leave Comment
Sep 12, 2011 | DIY
 70’s-style colorblocking is a hot trend for Fall 2011, seen on the runways and now beginning to trickle down into street style and retailers. I was hankering after a colorblocked purse, but didn’t want to pay a lot for it. Thankfully, thrift stores are a wonderful source of older handbags, and I found an adorable cross-body bag for a mere $4.99. But it was rather beat-up and needed a little makeover, so I figured it was time to break out the brushes and do some leather painting! Though technically when you paint leather, what is most recommended is to use paint that is specifically formulated for use on leather, like Angelus.
However, if you are feeling squeamish about buying an unfamiliar product online, or they don’t ship to your country, or you want to use some acrylic craft paint that you already have on hand, fear not! Leather and suede can actually be painted with acrylic paint, with fairly good results if you take the time to prep the piece properly. So here’s how to add some vibrant color-blocking to some leather or suede pieces you already own:
How to Add Some DIY Colorblocking to a Leather Bag
You Need: (more…)
Leave Comment











