Dec 10, 2010 | DIY
Feathered things are experiencing a revival lately – and I’ve been hankering after a maribou feather clutch for awhile. But I’m not going to buy when I can DIY for much cheaper! It’s sooooo easy too…
DIY Marabou Feather Clutch
Difficulty: (Easy/Beginner)
You Need:
*old clutch-style purse
*tacky glue
*marabou boa
*scissors
How-To:
1. Lay your clutch flat and visually estimate how far apart the pieces of your boa need to be to get the kind of coverage you want.
2. Spread the tacky glue in vertical lines down the front of your clutch, and across the top below the clasp.
3. Starting from one side, lay one end of the boa onto the glue at the bottom of the clutch.
4. Fold the boa piece over at the top of the clutch, and then loop it down towards the bottom. Snip at the bottom of the clutch.
5. Repeat for all the lines of glue until the front of your clutch is completely covered. Allow to dry and then trim the ends so they’re all one length.
Pretty easy, right? To cover both the front AND the back using this method, you’ll probably need two boas. And you could use any type of feathers that suit your fancy…they don’t have to be marabou, and they don’t have to be in boa-form, either.
Did You Know?
“Marabou” is a term for fluffy feathers – and most “marabou” feathers available for crafting, fishing lures, garment trims, or millinery supply are actually turkey or chicken feathers, not feathers from the Marabou Stork (which are extremely expensive). Feather supply companies may obtain their feathers from birds that are killed by the meat industry, or the down may be plucked from the bird as the seasons transition and it has no need of it anymore (termed “live-plucking”). Feathers also may be collected as they naturally molt (like peacock feathers), or from birds’ nests (like eider down).
So finally, welcome to DIY Roundup 8! If you’re unsure how to link up your tutorial (or finished project), here’s how:
Just click the light blue “Add Your Link” button that appears to the bottom left below. Follow the instructions in the Inlinkz window, pasting in the URL of your project or tutorial (from your own blog, Facebook page, Flickr account, Craftster.org, CutOutandKeep.net, etc). Don’t forget to write the NAME/DESCRIPTION of your project – like “Bow T-Shirt” or “DIY Lanvin Necklace” – not your own name or your blog’s name!!! You can link up any piece you’ve made or tutorial you’ve written from any time, not just in the last two weeks (though it would be nice if it’s a recent project, just to keep the content fresh). It’s all about sharing and bringing in more like-minded visitors to your site!
So now you get to share your own DIY’s! If you have a DIY project or tutorial that you’d like to share, please feel free to link below! (However you can only link YOUR OWN PROJECT. Please do not link others’ projects!)
If you’ve linked up your project to the Roundup, feel free to grab the button below.
Can’t wait to see everyone’s projects!
xoxox
Carly
~If you liked this post, please share it!~
Leave Comment
Sep 21, 2010 | DIY
Another one of my submissions for Style Sample Magazine and New York Design Shop’s Create Couture Challenge back in early August – this time, a bag makeover!
Materials:
*Pink Ethnic Stripe Sash
*Brown Ethnic Stripe Sash
*pin back
*Cream Gardenia
Additional Tools/Materials:
*ugly old clutch handbag
*scissors
*fabric glue
*hot-glue gun
*small piece of scrap fabric
How-to:
1. Squeeze out a generous amount of glue onto the flap of the clutch, and press the Pink Stripe Sash onto it. Allow about a 1/2″ overhang on each side, and cut.
2. Add more pieces of stripe sash, overlapping the edges slightly as you go all around the clutch.
3. For the back add the contrasting color stripe for interest.
4. Fold under the overhang of the Sash, securing with the glue gun.
5. Hot-glue the pin onto the back of the Cream Gardenia, and glue a small piece of fabric over the pin back to secure it.
6. Cut two ribbons (like prize ribbons) from the leftover Sash.
Glue together with fabric glue.
7. Pin Cream Gardenia over prize ribbons, and pin to front of clutch.
What do you think? Does it look better now?
Everyone deserves a makeover!
xoxox
Carly
~If you liked this post, please share it!~
Leave Comment
Sep 14, 2010 | DIY
Another project -this time a bag project- I submitted for Style Sample Magazine and New York Design Shop’s Create Couture Challenge back in early August. It’s a little bohemian and a whole lotta fun!
Materials:
*Rust Suedette Fringe
*Gold Circle Studs
*Leather Flower Appliques
Additional Tools/Materials:
*faux suede handbag
*scissors
*pliers
*leather glue
*awl (optional)
[prep: remove embellishments on bag…I also cut the shoulder strap off and braided it, reattaching it to the bag]
How-to:
1. Cut Suedette Fringe in half.
2. Apply leather glue to underside of fringe, and place just under the top edge of the bag.
3. Allow to dry.
4. Lift fringe up, and glue second layer of fringe underneath so the top fringe just barely overlaps it.
5. Push a Circle Stud through the center of each Leather Flower.
6. Apply flowers to bag, pushing the prongs of the studs through the bag, and using pliers to fold the prongs over on the inside. If the material of the bag is very thick, an awl can be helpful to poke hole first.
7. If you prefer more security, add a thin layer of glue between the leather flowers and the bag in order to glue them down.
Let the 70’s come alive again!
Happy DIY’ing!
xoxox
Carly
~If you liked this post, please share it!~
Leave Comment
Jun 27, 2010 | DIY
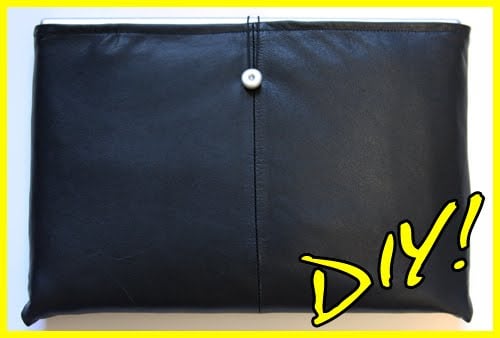
As you may recall from a previous project I posted, we still have the rest of the thrifted leather jacket leftover to something fantastic with! So with my Hubby’s birthday quickly approaching, I decided to make him a homemade sleeve for his laptop computer. Sure you can buy one from the store – and I did scrounge up a tutorial for using some neoprene from an old wetsuit [and here, too!] (like I have many of those laying around!)…but I wanted to try a different material. Leather is cushioning and sleek – but if you prefer manmade leather or vinyl (or even fabric, corderuoy, or denim!) this project will work just as well. I was inspired by those wraparound manila envelopes – but you can always use a strip of material and velcro as a closure, or fashion a long strip with a parachute buckle around the entire laptop, or extend one side of the outer material and use it as a closure flap, or even add a couple inches to each end and use a zipper as closure, turning this sleeve into a simple zippered bag. The possibilities are endless!
You Need:
*leather jacket with lining (or leather/other material + lining fabric, if you are not repurposing a jacket)
*quilt batting (I used Low-Loft crib-sized batting, and had quite a bit left over)
*1 button
*black elastic cord
and…
*marking chalk
*leather shears
*fabric scissors
*matching All Purpose thread
*sewing machine needle for leather
*sewing machine needle for wovens
*hand-sewing needle (not needed if your button is not shanked)
*leather/vinyl glue
*tape
Optional
*matching upholstery thread
*walking foot or Teflon foot for sewing machine
*clothespins or binder clips
How To:
Prep Your Parts
1. Place laptop on your sleeve material, right side up, front edge facing away from you. Trace around laptop on all sides, adding 1″.
2. Lift and rotate laptop up on its back edge towards you, then wrong side up on top of the material. (Front edge will be facing towards you.) Keep drawing 1″ around all edges. (I know this sounds somewhat confusing, so I included the diagram above to show how the material was measured.)
3. Cut the rectangle out of the material (cutting through both outer and lining if you are using a jacket), using leather shears. If you do not have a lining, place this rectangle on top of your lining material, trace around, and cut using fabric scissors.
4. Cut a small piece of leather about 1″ square.
5. Unroll batting from package, and leave it doubled up as you flatten it out. Place rectangle of material on top of the batting. Cut a piece of batting the same size as the lining, then trim batting about 1/2″ on the sides only.
Time to Sew!
6. Fold material rectangle in half, and machine-stitch the edges together, using a needle for leather and upholstery thread. (Upholstery thread is not a must-have…but it is a lot stronger that regular cotton/poly mercenized, and is more suited to sewing leather and taking the stress of repeat usage. Also, f you have a walking foot or Teflon foot for your machine, it can help the leather from sticking.)
Clip corners and turn right side out.
7. Fold lining rectangle in half, and machine-stitch the edges together, using a needle for wovens and regular thread. This will make the lining into a “pouch.” Do not turn right side out; the right side needs to remain on the inside.
8. Wrap batting around the outside of the lining pouch. Fold upper edges of lining pouch down and overlap batting piece at top edges. (Trim batting top edges if they are too bulky or long.)
Machine-stitch the lining edges down over the batting, at about a 3/8″ hem.
Closing It Up
9. Sew button to the material pouch you made in Step 6), about 2″ down from the top edge on the front of the pouch.
10. Slide the lining into the material pouch, and slip the laptop inside to check for sizing. On the back side of the material pouch, tape one end of the elastic cord to the center, about 2″ down from the top edge.
11. Wrap elastic cord around button, and bring the other end to the back, cutting it and gluing it down next to the other end. Make sure the cord is taut around the button and will keep the laptop from falling out.
12. Trim the cord to meet the taped-down end.
13. Re-tape cords down with the ends free. Place a dab of glue under the ends and press them into it.
13. Remove tape and glue the small square over the ends of the cords.
14. Remove laptop and lining from the material pouch, and machine-sew the square over the elastic cord ends, first sewing a square around the edge, then an “X” shape in the center.
Finishing
14. Spread glue on the inside of the outer pouch, close to the top edge. Turn down top edge about 3/8″; clamp until dry.
15. Slip the lining back inside the outer pouch, pushing the corners all the way in.
Stitch around upper edge of laptop sleeve to secure the lining to the outer material, using a needle for leather and upholstery thread.
Et voila!
Finally, a homemade FUNCTIONAL accessory that my husband will actually use! (And it’s unisex, so can be a great gift for a man or woman!)
Happy DIY’ing and Happy Birthday, Hub!
xoxox
Carly
This is my last post for Threadbanger – wish I could do more! Hasta la vista, TB!
Save
Leave Comment
Jun 16, 2010 | DIY
While I am still distressing over our lost family pet (now missing for over a week), the only thing I have been able to do besides put up posters, hand out flyers, and spend hours staring outside and waiting for the phone to ring…has been to watch reruns of Law & Order. They always find the missing person in the end.

And blog-land wise, the only thing I have been able to do on the computer is indulge myself in a blog I cam across called Tea Rose Home. The writer of it, Sachiko, is a stay-at-home mom with 3 children, and she blogs about beautiful items: ruffles, quilts, t-shirt makeovers, children’s clothing, and home decoration projects that add beauty and happiness to her life. I’m amazed at the number of creations she makes, and the feminine quality to each one. Plus her attitude (in the face of 3 rare disorders that have had her in and out of the hospital her whole life) is inspiring and uplifting. Reading her words about how much she loves her family, the happiness she finds in crafting, and her positive attitude has really helped lend me strength in this dark time. Plus, her projects are just beautiful – and she loves forming baskets into handbags – something I love as well!
I made this basket after seeing something similar in a Japanese magazine awhile back. It is real fur, sadly – a rabbit fur that I had bought a long, long time ago and had put in my materials bag to try and figure out what to do with it. In the years after I began to feel disgusted about using real fur, and so couldn’t bring myself to use it in anything. But I also couldn’t bring myself to throw it away, which would be so disrespectful to the life of the animal.
Muffin [our lost cat] loved it, and often pulled it out of my bag, playing with it, stroking it, and sometimes sleeping with it. So I put it on a basket, kind of like a good-luck charm. It’s removable for when Muffin comes back, and now sits on my desk so I can stroke it and remember how much she loved it, while I am willing her quick return.
A cheap basket from Michael’s which didn’t have a lid was transformed into this by cutting two pieces of foamcore that would become a hinged lid inside. I added hinges and a latch from the hardware store, securing the screws I drilled into the foamcore with hot glue. The latch I secured onto the basket with thin wire from the jewelry-making section.
I then hot-glued a layer of lace around the edge of the lid from a lace table runner I found at Goodwill for $1. (Come to think of it, Goodwill had TONS of baskets there too – I should have bought there instead of spending $6.99 at Michael’s. Next time.)
Finally, I wound a lace ribbon around the handle, and added some lace bows on either side. I then added a muslin liner, and my pretty bag was done!
Once Muffin returns and wants her fur back, I will probably replace it with a layer of pretty fabric, or some faux fur on top instead.
Have any of you ever remade a basket before? Hope this gives you some ideas – and for more great ideas for basket makeovers, check out Tea Rose Home and all the beautiful basket handbags Sachiko creates there.
xoxox
Carly
linking to Tea Rose Home link party No. 12 and Avid Accents Make My Style Monday #6
Leave Comment