May 22, 2014 | DIY, Fashion, Life
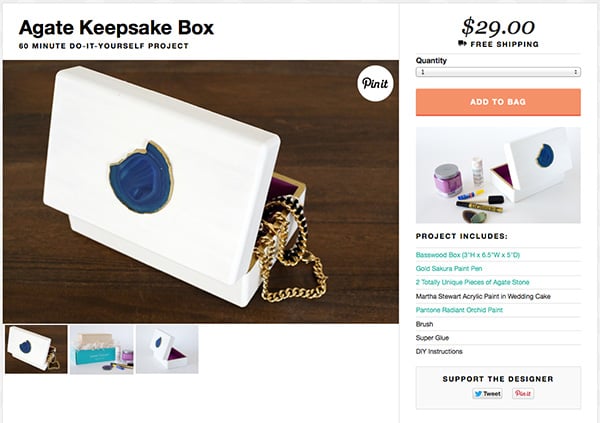
 Hello friends! I am back from my trip to Arizona to see my Dad, and am so pleased to announce that my recent DIY project for Darby Smart has launched! Woohoo! I’m officially a Darby Smart Designer!
Inspired by all those chic lacquer boxes I’m seeing everywhere lately like on Joss & Main (and that just so happen to cost a fortune), I crafted this with some great supplies from Darby Smart. And the kit is now available for everyone to buy – only $29! This would be an amazing graduation gift for someone special, a wonderful birthday present, or a cute addition to a bookshelf or vanity.
Check out their version! Which one do you like better – blue agate or purple??!
Thanks so much to Darby Smart for the collab!
xo
Carly
P.S. Oh, and if you end up making this DIY, please share your version with hashtags #DARBYSMART and #MADEBYME on Twitter and Instagram!
Leave Comment
May 14, 2014 | DIY
 Now I’m sure you guys have heard of that amazing crafting supply that does practically everything: Mod Podge. There are major devotees to this glue/decoupage medium/finisher, and for good reason! Because it’s nontoxic, cheap, provides a variety of finishes, and it just plain flat-out works!
Amy Amderson, the amazing and multi-talented blogger brand representative of Mod Podge (and the brainchild behind the cool blog Mod Podge Rocks!) sent me a package from her brand-new Mod Podge Peel & Stick Stencils line, designed exclusively for PLAID Enterprises. I had a blast playing with the stencil, and I fashioned this chic patterned update to an old photo frame I had. Check out how I did it:
You Need:
photo frame / Mod Podge Peel & Stick stencil (mine is in Tangier) / foam pouncer / Mod Podge (matte) / silver leaf / gloss spray acrylic sealer / paintbrush (not pictured)
How To:
1. Place your stencil onto your photo frame. (If your photo frame is very smooth, you may need to rub it with fine grit sandpaper to give it some surface to the Mod Podge to stick evenly on to.)
2. Pour out some Mod Podge and dip the foam pouncer into it, wiping off excess.
3. Dab the pouncer on top of the stencil.
4. Peel off the stencil and allow the Mod Podge to sit for a few minutes to become tacky.
5. Place some silver leaf onto where the Mod Podge was applied.
6. Use a soft, dry paintbrush to remove the excess silver leaf.
7. Once one side is fully leafed, repeat placing the stencil, applying the Mod Podge, and applying the silver leaf in sections across the photo frame.
8. Finish wish a spray of acrylic sealant to keep that silver leaf looking gorgeous!

And that’s it! I love how designer-y and high-end the photo frame now looks…even though it was a super-cheap piece from IKEA. I also love the worn look of the silver leaf and the great pattern that emerged as I applied it. The stencil was super-easy to work with, and sticky enough that I could wipe it off each time and re-use it on different parts of the frame, no problem. The perfect addition to this frame was a photo of Lil Tot practicing his best flying ninja stab jump with my rake. Stab that leaf pile!!
You can find Mod Podge Rocks! Peel & Stick Stencils in craft stores such as Jo-Ann Fabrics and Michael’s, or at the PLAID store online here. I guarantee, they will take your Mod Podge projects to the next level!
 Thanks Amy and the team at PLAID! It was so fun to make this little project 🙂
Happy DIY’ing!
xo
Carly
FTC Disclosure: I was sent a Mod Podge stencil, 2 small tubes of glitter, and 2 foam pouncers courtesy of PLAID Enterprises. I have received no compensation for this post. The above opinions are my own. To read my full Disclosure Policy, click here.
Save
Leave Comment
Nov 21, 2013 | DIY
 So next week is the big turkey day – and if you’re spending it at someone else’s home sometimes you want to bring along something to thank your hosts. Since you’ll be saving all that time not having to make the dinner itself, why not create a lovely gift that shows both your creativity and your appreciation for the holiday? Here are some ideas for some great DIY gifts to bring with you to the Thanksgiving dinner:
DIY DECORATED STORAGE BOXES

Everyone could always use more storage, and beautifully-decorated boxes show your thoughtfulness. Left to right, clockwise: Decorative Boxes, Fabric-Covered Boxes, Faux Malachite Boxes
DIY SUCCULENTS AND PLANTERS

Succulents are a low-maintenance plant that look adorable presented in groups. Left to right, clockwise: Tiny Pinch Pots for Kids, DIY Terrarium, Gold Succulents in Origami Geometric Planters
DIY MINI CANDLES
 Candles are a welcome addition to any home, especially ones that smell delicious or look beautiful. Left to right, clockwise: DIY Mini Pumpkin Candles, Modern DIY Candle Votives, DIY Satsuma Candle
DIY TABLE LINENS

Handmade table linens are a unique representation of one’s unique style – and you can use a variety of objects as stamps. Left to right, clockwise: Potato Stamped Napkins, Stamped Table Runner, Apple Stamped Napkins
DIY DRINK COASTERS

To add to a festive table, you could make some coasters – adding paint or decoupaged photographs for a personal touch. Left to right, clockwise: DIY Photo Coasters, Personalized Coasters, DIY Leather & Cork Coasters
DIY SERVING TRAYS

For a perfect presentation, a serving tray is just the ticket. Touches of gold or punched cork make these look especially chic. Left to right, clockwise: DIY Painted Tray, Punched Cork Serving Tray, DIY Metallic Gold Leaf Tray
DIY DRY BAKING MIXES

Any cook would love a starter mix for some favorite recipes, and these are all fabulous ideas to add to a well-stocked kitchen. Left to right, clockwise: DIY Whole Food Dry Mix Recipes, DIY Spice Mixes, DIY Hot Cocoa Mix and Homemade Marshmallows
DIY PAINTED UTENSILS

Painting plain wooden utensils and bowls is so hot right now – and it adds a pop of pretty color to the table and kitchen. Left to right, clockwise: Painted Neon Utensils, Neon Spoons, Dipped Bowls
DIY FLAVORED ALCOHOL

If your hosts enjoy a little drink from time to time, it might be superb to gift them with a delicious flavor of homemade spirits. Left to right, clockwise: DIY Rhubarb Liqueur, Infused Vodkas, DIY Coffee Liqueur
DIY WINE BAGS

To present your thoughtful bottle of homemade alcohol (or high-end wine!) to your hosts, package it in your own homemade wine bag. Left to right: No Sew Felt Wine Bag Tutorial, Recycled Jean Wine Bag, C Wonder DIY Kit
Also! Use the many lovely labels from Lia Griffith for your packaging and tagging for all your gifts – and watch your hostesses’ faces light up with joy upon receiving your gifts!
Do you have any go-to hostess gifts that you always give during the holidays? Please share in the comments below!
xo
Carly
Leave Comment
Oct 22, 2013 | DIY
 For the final DIY in my 1 Week of Halloween DIY series, I’m sharing one of my favorite things ever. I LOVE cheese, and always serve it at any get-together or party. Therefore, a cute cheese serving board was in order (and though this can work for Halloween it can work for pretty much any day of the year!) This addition to your Halloween party decor is actually quite easy to make, but it rounds out your table decorations perfectly. Here’s how to make it: (more…)
Leave Comment
Oct 21, 2013 | DIY
 Saturday I made some DIY Spooky Pictures for the wall, today I want to finish up my mantelpiece decorations with a Owl Picture in the center with its own DIY Spiderwebby Frame. Use some glow-in-the-dark decoupage to add a spooky glowing touch! Here’s how:
You Need: (more…)
Leave Comment

 DIY Agate Keepsake Box on Darby Smart










