Don’t Buy – DIY! A Fabulously Faux Fur Wrap. I Die.
 Blame it on Rachel Zoe and that fabulous vintage fox fur hip-length vest. The F/W 2010 runways followed suit, and fur – both real & faux – abounded. Designers such as Barbara Bui, Antonio Berardi, and Christian Dior made faux fur a must-have, while the release of Spike Jonze’s “Where the Wild Things Are” in October 2009 put all things furry front & center. But why buy when you can easily DIY? This stole is a quick and easy project – very Marilyn Monroe-fabulous, and totally guilt-free. Here’s how:
You Need:
*a piece of faux fur, at least 45″ wide by 12″ tall (this Tissavel faux fur is high quality, has a plush feel and super-luxurious hand)
*piece of satin or poly acetate for the lining, same size
*matching thread
*large sew-on snap set
*brooch (optional)
*24″ of satin ribbon cut into two 12″ pieces for a ribbon-tie (optional)
TOOLS:
*box cutter or razor blade
*scissors
*pins
*sewing machine
*needle for wovens
*skewer or knitting needle
*hand-sewing needle
CUT OUT THE FABRIC PIECES: 1.Cut the faux fur. First, though, a tip about cutting any kind of fur, both real & fake: never ever use scissors, or cut from the front (fur) side. Why not? Because you’ll chop right through the fur itself, giving it a weird-looking “haircut” that will make your finished piece look anything but. (Nobody, not even a fur stole, wants to wear a fur mullet. 😉 To cut like a pro, turn the fur over so the underside is facing upward; this is also the time to make sure the nap is laying down (ie. all the fur hairs are pointing down toward the bottom of your stole). Then use the box cutter or razor blade to delicately cut out a rectangle that is at least 12″ wide and 45″ long. By making it 10-15″ longer, you can wrap your stole scrunchie-style around your neck, belt it, or even rock it halter-style vest, cinched together with a fabulous statement belt.
2. Use the box cutter or razor to round off the corners.
3. Cut the lining: The cut-fur piece will act as your template when you cut out the satin lining. First place the cut-fur piece onto the satin, fur side down against the back side of the satin. Then carefully cut out the satin lining, taking care to not accidentally trim off any of the fur.
 SEW IT TOGETHER:
4. Place fur and lining right-sides together (ie. fur side next to the shiny side of the satin), and match up the corners. Pin together. Tip: Satin is slippery when you sew it, so be sure to pin in more places than you think you will need…you can’t overpin!
Optional: Add a ribbon-tie using a 12″ piece of ribbon attached to each side of the faux fur, the end of each ribbon piece sandwiched between the lining and the fur. (The long end of the ribbon needs to sit inside the pinned stole pieces.) Pin the ends of the ribbon down to the edges.
5. Sew the fur to the lining, Starting about 3/8″ to 1/2″ in from the edge (your seam allowance), sew the fur to the lining – but not all the way around. Along the bottom, leave about 6″ unsewn.
6. Around the sewn edge, trim away the excess fur.
7. To turn the piece right side out, pull it through the 6″ gap you left unsewn (in Step 5). Optional: If you added a ribbon tie (Step 4), the ribbons will now be on the outside of your stole and serve as closure ties.
8. Finish the remaining 6″ unsewn edge by gently tucking the excess 3/8″-1/2″ faux fur and the lining fabric into the hole. Close the hole by topstitching as close to the finished edge as you can.
ADD CLOSURE & FINISH:
9. Use a skewer, pencil, or knitting needle to pick the fur hairs out of the edge seams.
10. Try on the stole and decide where you want to place the closure. Mark it with a pin.
11. Hand-sew a large snap onto your piece. (If you made a ribbon-tie, this won’t be necessary.)
Optional: Decorate the front with a large, eye-catching brooch.
You’re done!
For a “I’m headed to the opera” look, wear your stole draped glamorously around your shoulders; to look more Russian-Anastasia, scrunch up closer to your neck. Mix it up with other faux furs in gray, leopard, or even multicolored – PreFurs.com sells high quality faux fur yardage, while Cornelia James and Charly Calder both sell chic finished items – and enjoy a fashionable walk on the wild side.
And yes, you look bananas in it!
Happy DIY’ing!
-Carly J. Cais, Contributing Editor
(as contributed to FashionTribes.com)
A note about this piece: I actually started out doing a DIY for a faux-fur vest, and then discovered a tute at P.S. I Made This – which I thought was so fantastic I lost the will to do mine. So if you want to do a vest – try those instructions out – can’t go wrong with just cutting and wearing!:-)
Have fun any way you try your flirt with the faux!
Leave Comment
 1. Cut the sleeves off your top carefully so you leave the finished armhole seams on the shirt. Cut straight down the center of the shirt. (If your shirt didn’t have a V-neck before, cut the neck into a V-shape.)

 5. Cut the sleeve edges into a scalloped pattern – you can follow the pattern of your lace – or cut in a vertical zigzag – or scalloped – it’s up to you. It may take a couple tries of cutting and then trying the piece on to see how the fabric falls – and adjusting after that.
 You’re done!


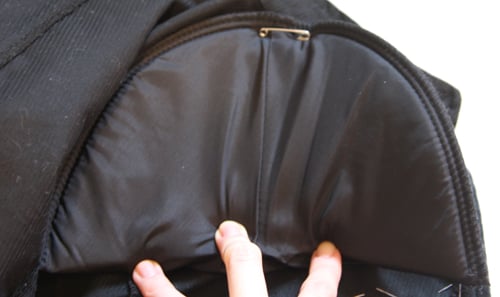 3. Pin shoulder pads inside the shoulders, using safety pins. (I used foam Dritz ones in Large that I got at my local Jo-Anns. Alternatively, you can rip them out of a jacket you already have – but you need them