May 14, 2010 | DIY
I’ve been on the fence regarding these boots for awhile because to me, they fall into what I call the “split personality” category: where something looks totally different from the front as it does from the back or the side. These shoes look so chic from the front – but from the side I always felt the heel was a bit too low and clunky-chunky. I just wasn’t into the shape of it – but still wanted a pair of open-front booties for the warmer months of summer.
I was planning on doing a DIY of this style by just buying a pair of boots which had the pieces anchoring the laces separated a bit, with a single piece of material as the toe-box and tongue. (All you would need to do is cut out the tongue and toe box, leaving the sides and laces intact.) But even I’m a sucker for a cheat – if there’s an easier way to do something, I’m all for it!

Enter Forever 21‘s Lace-Up Sandal Heels. As soon as I saw them, I knew they would be perfect – as the only DIY’ing that needs to be done is eyelet punching. Yay for simplicity! I bought them and then set them on my “DIY’s to Do” desk and left them there for a bit while I was too sick to really bother about making things. In the meantime, The Look 4 Less answered a reader question who was searching for an alternative to those Ann D’s with a recommend for the exact same Forever 21’s I had snagged. (Cripes, I’ve searched for over an hour on their site to find the post, but can’t. Sorry!) Well, I’ve been beat to the punch but it finally provided the kick in the pants I needed to do the DIY for these iconic shoes. Very simple (but your hands will hurt afterwards!)
You Need:
*Forever 21 Lace-Up Sandal Heels
*rotary leather punch
*a pack of small silver-tone 1/4″ eyelets (if you can get 2-part grommets, so much the better! I couldn’t find them at my local Jo-Ann’s…Jo-Ann’s = argggggh!)
*eyelet/grommet setter (I used setting pliers)
*small scissors
*pliers
How-To:
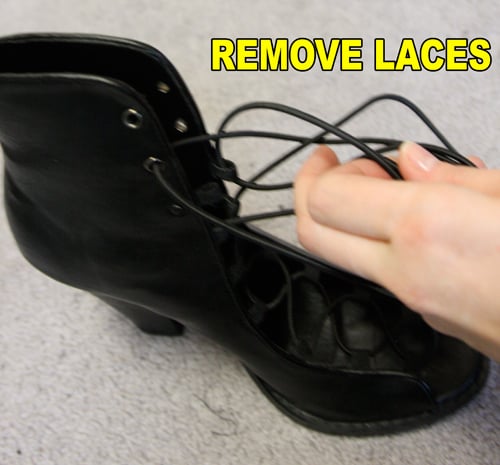
1. Remove laces from the shoes.
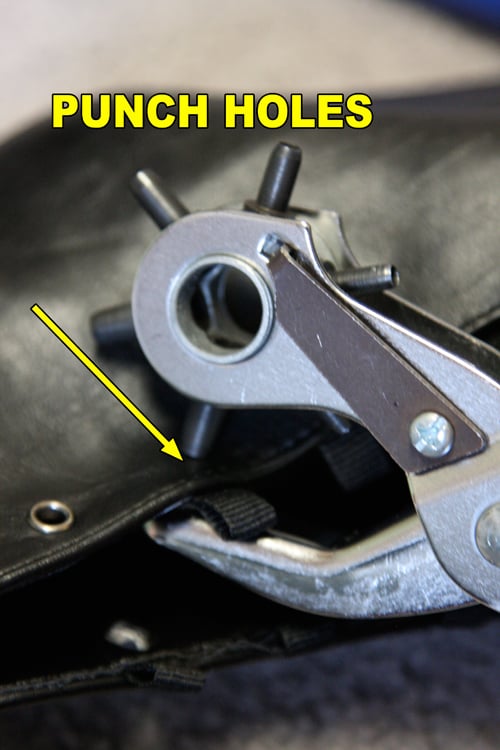
Using the rotary leather punch, punch holes in the shoe leather about 1/4″ from the edge, where each ribbon lacing anchor is located. I used the second-largest punch on the rotary.
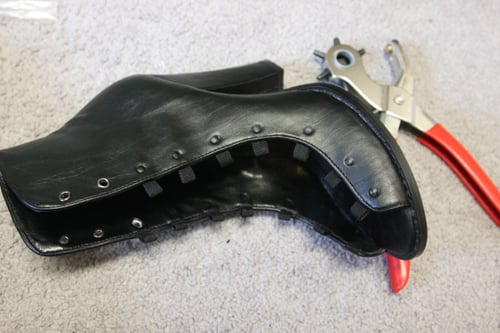
As you can see, the punch doesn’t go all the way through the leather in most cases. (I also then applied the punch from the inside of the shoe for each hole.)
2. Use the small scissors to cut out all the extraneous material that wasn’t punched out of the holes by your pliers – there’s a couple layers to go through, including the outer vinyl, inner lining vinyl, ribbon ends, glue, and in some cases, the inner buckram stiffener, and usually, the pliers can’t handle it.
3. Use the scissors like an awl, and twist them back and forth in the holes to stretch the holes a little larger.
4. Use the scissors to cut off the protruding ribbon ends – what the Forever 21 boots used as lacing anchors for their laces.
5. Set the eyelets (or grommets!) in each hole. Since the eyelet plier setter is a sucky piece of equipment, and the eyelets are equally sucky, I had to go back in with pliers and press down the backs where the eyelets split, leaving jagged metal edges. If you’re using better-quality tools and eyelets (i.e., not Dritz brand) you probably won’t have this problem.
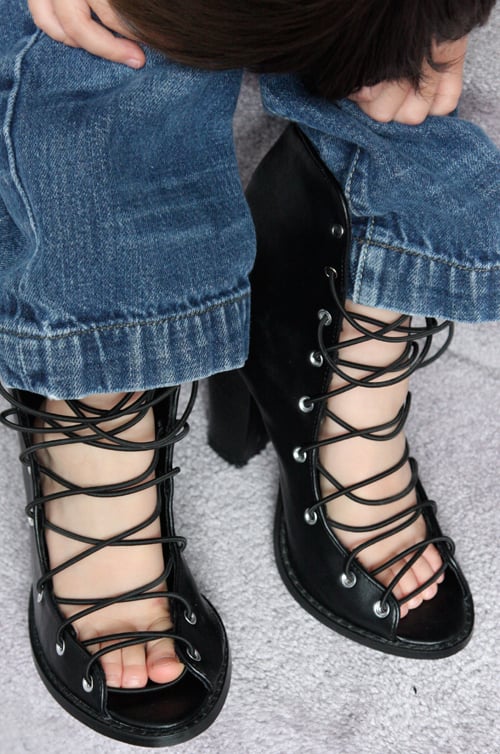
6. Thread the laces through the eyelets in a zig-zag pattern.
Wear proudly! They’re pretty darn good doppelgangers, and the heel is now a little more tapered and chic.
Love!
Not feeling very photogenic today.
And Lil Tot was so enamored with them that he wanted to pose wearing them as well.
Not sure why his pants are undone. He doesn’t seem to like pants much, considering that the few times I’ve shared his photo on this blog he’s pantless.
Appeals to all ages!
xoxoxo
Carly
P.S. And if I never have to spell “Demeulemeester” again, I will be one happy lady.;-) That, and if I could just get Lil Tot to wear pants done-up for a photo op.
Save
Leave Comment
May 9, 2010 | DIY
Like I wrote in an earlier post, I’ve had flowers on the brain. (Thus all those fabric flower patterns in that post, and in my Threadbanger roundup.) I was going to do these as a DIY tutorial for my Tuesday Threadbanger post, but then realized they weren’t really worthy of a full-fledged tutorial. I got the idea from a lovely pair of furfur flowered ballet flats I spotted online recently. (I do love furfur!) To make them was almost embarrassingly easy, but here’s the how-to if you guys are interested:
You Need: (more…)
Leave Comment
Apr 28, 2010 | DIY
 After spotting this editorial in Lucky Magazine back in winter, I decided I wanted a foldover-style boot too!
  So chic – and it visually slims up your legs, working in both casual and more edgy ensembles. But since I always make instead of buying new unless I absolutely must, I’m not going to plonk down $199 on a boot…especially when I already have a whole bunch of shorter boots that will work perfectly as the base (see below).
 Here’s how to make your own version, using an old beat-up leather jacket: (more…)
Leave Comment
Nov 28, 2009 | DIY

This was a lo-o–ooooong time in coming. Hope you guys didn’t get bored waiting!:-)

The highly, highly coveted Christian Louboutin for Rodarte spike heels – only sold for a short time at Christian Louboutin boutiques in Fall of ’08, never showing up at Net-a-Porter, not ever appearing on eBay. Victoria Beckham even stepped out in the gorgeous gold ones below. But how to get a pair for oneself?
 Source: StyleFrizz.com
 The RedSole version.
Of course, you could always fork over $188 for the black knockoffs over at RedSole (or here for the gold ones, pictured above). They’ve changed that texturized (Swarovski-encrusted?) area on the toe to snakeskin, and the heel isn’t as high or as skinny, but it’s a fairly good knockoff…if you want to pay $188.
(source: Fashion Mongers)
You could always DIY your own following the instructions at Fashion Mongers
here for a similar style also in the Rodarte line.
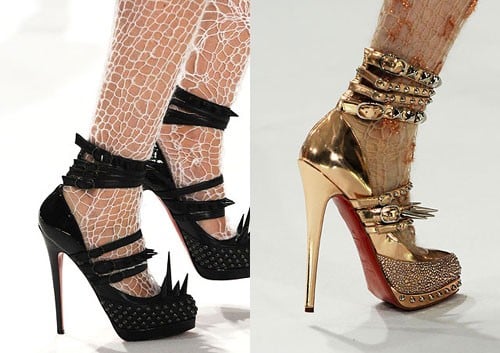
But I wanted the exact same style as the shoes above on the right, butin black- and I haven’t found
any DIY tutes out there on the Internet yet (correct me if I’m wrong!:-) So here ya go – step by step!
I have to break the process into multiple steps, since this is quite long though not excessively complicated. So, in 4 Parts:
To DIY Your Own Pair of Rodarte Spiked Heels You Will Need: (after the jump)
(more…)
Leave Comment
Nov 23, 2009 | DIY
 Note: Though this is a somewhat long and rambling post about shoe adornment, I do include a quick-and-easy DIY for the shoe elastics above. Scroll down for the tutorial!

As evidenced by the above Polyvore I made, elastic-banded pumps are in, in, in! I love how the black stretchy part over the upper contrasts so sharply with a shiny patent.
But I get the weird feeling that these will also be passe in a couple seasons. What to do??? I love that in Japan they’ve taken the idea of shoe-adornment to a whole ‘nother level with shoes that feature removable bands so you can change up your look whenever you get bored.
 Even though the above shoes were in a magazine a couple years ago (!), you can buy the bands separately, in red, holographic silver, white, brown, gold, or black, for about $9 a pair here. If I started making sets – like a set of 3 pairs – and sold them for $12, do you think they would catch on in the States?
  The concept of shoe bands is kinda similar to shoe clips, but just…bands. If you opt to adorn the top of your boot, then maybe Bandits are for you! They carry a number of different styles, not just the Southwestern-inspired motif pictured above.
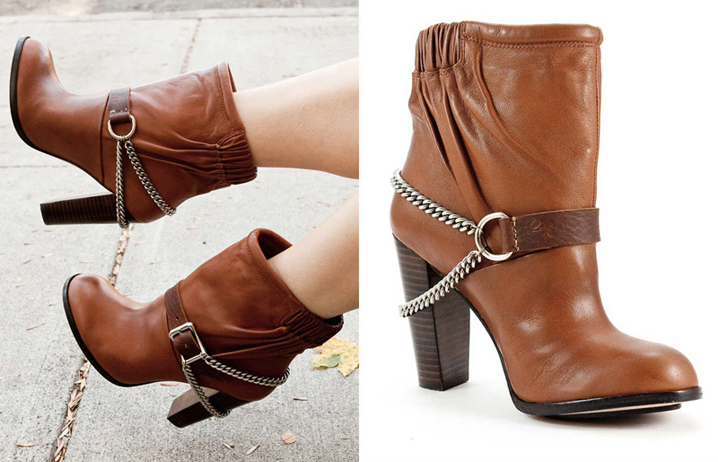 Bandit boot chains above. Adding to DIY list pronto.
Their boot chains are completely covetable, and a lookalike of
LitterSF‘s boot chains, only about $20 cheaper. But I digress.
Shoe bands! Right. So why buy when you can…
You guessed it!
DIY!
D.I.Y. Removable Shoe Elastics…Cause Why Not??!
(This is soooo simple!)
I have the skinniest, boniest feet ever. I know.
 You need:
*your favorite pair of heeled shoes
*about 8″ elastic
*sewing machine
*thread matching elastic color
(sorry, no photos…but you can definitely figure it out!!)
1. Start by puting on the pair of shoes you want to adorn with elastics. Wrap a piece of thick elastic around the upper part of your foot (halfway onto your arch). The band needs to go all the way around the pump and overlap about a 1/2″ on the underside, in front of the heel. Make sure it’s tight so it won’t slip down (just not too tight since we don’t want to crush our foot bones!).
2. Cut elastic to correct length.
3. Sew on a sewing machine – just reinforcing the overlap area on the elastic.
 See? The meeting of the two ends is at an angle – NOT straight on.
I’ve found they work best when the elastic overlaps at an angle – NOT one side meeting the other side exactly – to accommodate the curve of your foot. Repeat for other elastic.
Only really necessary for 1.5″ wide elastic like this; for the thinner types of elastic it doesn’t really matter.
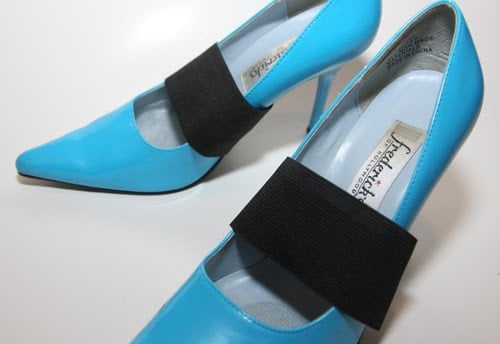 Presto! It’s like you have a whole new pair of shoes!
 And I also tried adding thinner elastic to the ends of silver vinyl belting for a different look…and sparkly silver ribbon for yet a third look. Both have thinner pieces of elastic sewn onto the ends of the contrasting ribbons. (The elastic is only about 1.5″ long in-between, for the underlay part and to allow the band to slide over the widest part of the shoe at the toe.)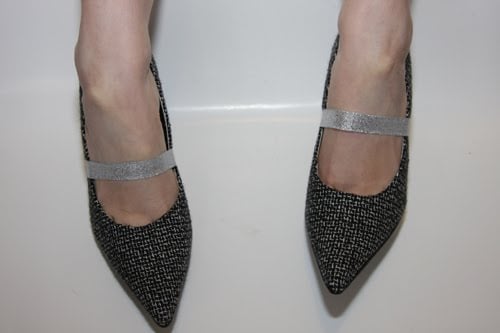
You could do virtually anything! Chain overlaid onto ribbon…frilly ribbon with grosgrain in the center…a line of sequins…anything at all!
Happy DIY’ing!
xoxox
Carly
Leave Comment