Apr 22, 2011 | DIY
I’ve shared so many tutorials on this blog about remaking items you may already have in your closet, I just wanted to share them again! (Re-use of an idea – haha! Totally green!😉 ) So here are some of my favorite past projects from the last year or so, that give new life to old items!
And also, some of my recent projects:
I made this pyramid-studded zip clutch following the same directions for my DIY Laptop Sleeve from a Leather Jacket tutorial from last year – except this time I added a gigantic pyramid stud (1″ wide!) to the front, and a zipper as the closure.
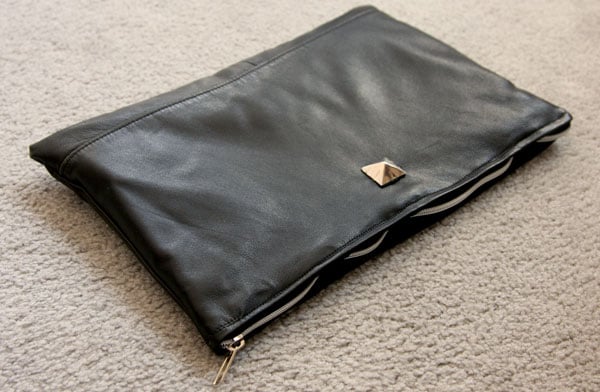 You could of course make this zippered pouch out of any material you want – including fabric, a pillowcase, an old towel, vinyl, or even from a Dollar Store faux leather placemat!!
 I also found a pair of leather pants at the Goodwill, and hacked off the legs, glued and sewed the hems, and hemmed the lining to create the perfect pair of leather shorts (for a mere $14.99 – which was the cost of the pants! And now I have all that extra leather I cut off to make other projects…)
(I know, it seems sort of hypocritical to highlight projects for Earth Day that use leather – considering most conventionally-made leather is tanned and finished with environmentally-unfriendly chemicals…to say nothing of the environmental impact that a single cow raised on a factory farm makes…but at least it’s an option for what to do with leather items that are sitting at thrift stores or languishing in your closet or just being thrown away…)
What will you do this Earth Day? Make something, recycle something, plant something, use less electricity or water, cook a vegetarian meal?
Do tell! And have a Happy Earth Day!
xoxox
Carly
~If you liked this post, please share it!~
Leave Comment
Dec 25, 2010 | DIY
Have a couple bows left over after the wrapping-extravaganza? Have a whole bunch ripped off of presents in the aftermath? Craft a smaller, point-ier wreath as a counterpoint to a larger piece…as your final Christmas handmade project. I got all my materials at the Dollar Tree, so it only cost me $5 to make – but it’s also a great way to recycle those bows from presents if you don’t want to re-use them next year. Here’s how:
You Need:
*2 packages of small stick-on pointed bows
*one larger stick-on bow
*1 small wreath base (styrofoam)
*red ribbon
And…
*glue gun & gluesticks
*scissors
How-To:
1. Cut a length of ribbon long enough to hang the wreath. Wrap it around the top of the wreath base and secure with glue.
2. Glue the small present bows onto the base, filling the base up completely and staggering them to cover any gaps.
3. Glue the largest bow top center onto the red ribbon.
4. Tie the ribbon to a wreath-hanger or hook to display.
DIY Tutorial for my
Super-Easy $8 Holiday Wreath (the larger wreath, pictured above)
is here.
Happy DIY’ing…and Merry Christmas! Hope it is wonderful!
xoxox
Carly
~If you liked this post, please share it!~
Leave Comment
Dec 20, 2010 | DIY
Since I’ve posted a how-to for a cheap n easy Easter Wreath and a similar one for a Fall Wreath, I thought a Winter Holiday Wreath was in order. Though you don’t have to buy your bits and bobs at the Dollar Tree per se, I found that they had such a variety of items I could just mix and match add-ons to their pre-fab wreaths…which alone, looked a little sad and like you bought it at the Dollar Store. And we want something a little more fabulous, no?
(Everything except the tiny ornaments I bought at the Dollar Tree…and the ornaments were in the $1 bin at Target near the entrance of the store!) Though the method is a little self-explanatory, I figured why not do something easy when everything’s all caught up in that last-minute countdown to Christmas?
You Need:
*evergreen wreath base
*4 assorted decor sprays (mine had pine needle sprays, pinecones, tiny horns, wrapped packages, and plastic fruit, already affixed!)
*large red velour bow
*pack of tiny ornament balls
And…
*hot glue gun & gluesticks
*wire cutters
How-To:
1. Trim the ends of the decor sprays so they won’t stick out from your wreath. Also: Fluff out the pieces of “evergreen” towards the outside so the wreath looks a little fuller – we’ll be angling all the stuff we’re sticking on towards the inside to create the illusion of a nice, full wreath.
2. Attach the bow at the bottom of the wreath base – mine had a pipe cleaner attached to the back for easy-affixment.
3. Hot-glue the decor sprays around the wreath.
4. Add the tiny ornaments, hot-glued in-between. (I chose ones that were within the same color scheme of my other decorations: red/gold.)
Done!
Okay, that took 5 minutes. Now on to the million batches of cookies I still have to bake!
Did You Know? The familiar stick-on 8-point ribbon bows that so many of us use on our holiday gifts are actually called “German Christmas Stars” (among many other names). There is a great step-by-step illustrated tutorial here for those of you who want to try folding your own (just don’t flatten down the points to get that “present bow” look).
Happy DIY’ing! (And if you’re looking to jazz up this wreath a little bit, do so with my Super-Easy $5 Holiday Wreath Tutorial…coming up shortly!)
xoxox
Carly
~If you liked this post, please share it!~
Leave Comment
Dec 15, 2010 | DIY, Fashion
How goeth the holiday shopping? I am terribly behind and having mini panic-attacks in-between braving the crowds at the mall and waiting in a line that stretches 3 times around the Post Office just to use the Automatic Mailing Machine. Hopefully everyone else has it under control – but if not and you’d like some ideas for that person who prefers to do everything themselves – and who has more than just a little craftiness up their sleeves – look no further and check out these DIY-themed gifts, all available online: (all under $50* – except for one* very important gift!!)
1. The Big-Ass Book of Crafts, $19.95
2. Beginner Studding Kit, $23
3. Wood DIY Gnome, $4.99 (sale)
4. Charmed Knits: Projects for Fans of Harry Potter , $10.19
5. Kenmore Drop-In Bobbin Sewing Machine, $141.99*
(This is, BTW, the exact same machine I use – Hub gave it to me for my birthday 3 years ago. It is by far the best machine I have ever used – glides through EVERYTHING, even leather up to 3/4″ thick (six layers of sueded split top leather at 1/8″ thick a layer), and it’s never broken or given me any grief. It has 90 stitches on it (not that And I’ve never sent it in for maintenance, oiling, or anything. It’s pretty fabulous and I can’t say enough good things about it!)
6. Gingerbread Train Kit , $19.95
7. Mayan Magic Chocolate-Making Kit, $24.99
8. Urawaza: Tips & Tricks from Japan, $15.95
9. Felt Whole Cakes Pattern Set, $5
10. Black & Decker 14V Drill with Stud Finder, $34.99 (sale)
If you know anyone who wants to get into studding their clothing, shoes, handbags, and accessories, the studding kit will set them on their way to spiky fabulousness – or for the DIY gourmet, make-your-own-chocolate or a sweet gingerbread train that will have to be safeguarded against prying little fingers until after the holidays.;-) And no serious DIY’er should ever be without a power drill – I use mine to drill holes in pendants, sand and buff metal jewelry, distress denim…and of course, make holes in walls! (and your drill doesn’t have to be pink for it to be perfect for you, despite what the hardware store guys may think:-)
xoxox
Carly
~If you liked this post, please share it!~
Leave Comment
Nov 26, 2010 | Life
If you celebrate the Thanksgiving holiday today, hope everyone’s was a lovely and warm feast with friends and family galore. We have so much to be thankful for this year…on my list are my family, my friends, our health, burgeoning careers, roof over our heads, enough food to eat, and each and every one of YOU!
Thank you for making every day so special and paying my blog a visit.
Happy Thanksgiving to all of you!
xoxox
Carly
~If you liked this post, please share it!~
Leave Comment