DIY Holiday Chocolate Bark: 4 Recipes to Gift Last-Minute
 So it’s only two days before Christmas and time is running out. You want to give something thoughtful and handmade…but just can’t deal with cookies or fudge. How about Holiday Chocolate Bark? It’s super-easy (just melt chocolate chips and add mix-ins!), takes about 20 minutes to set in the fridge, and is totally customizable to your (or the recipient’s!) tastes.
  Here are 4 delicious and easy recipes I whipped up in a flash, all built upon a single basic recipe.
Basic Recipe:
1. Cover a baking sheet with foil or wax paper (a spray of cooking spray will help hold the paper or foil down).
2. Add 1/2 T canola oil to a 12 oz bag of chocolate chips in a microwave-safe bowl. This is your Base.
3. Microwave on high about 1 minute; stir. Microwave for 30-second increments a few more times, stirring in-between, until the chocolate chips are completely melted. (Be careful not to over-heat! Your chocolate will seize up – and the remedy for this is to add more oil and gently heat in 10-second increments until you can get the chocolate liquidy again.)
4. Working quickly, stir in the Flavoring (if the recipe calls for it), then stir in the Mix-Ins.
5. Pour out onto the baking sheet and use a spatula to spread out. Sprinkle with Topping if the recipe calls for it.
6. Place the sheet in the fridge about 20 minutes until firm.
7. Break into small pieces with your hands. Enjoy!
So here’s how to customize: just choose your recipe and follow the how-to above. Easy as…pie bark!
{ Coconut Pineapple Macadamia Nut Bark }

A creamy taste of the tropics. White chocolate has a pretty distinct taste, so to cover it up and make it taste more “tropical” I added some coconut flavoring.
Base: 12 oz bag of white chocolate chips + 1/2 T canola oil (I needed a little more since my white chocolate seized)
Flavoring: 1 tsp coconut flavoring (optional)
Mix-ins: 1 cup chopped dried pineapple rings, 1/2 cup chopped macadamia nuts
Topping: 1/3 cup shredded sweetened coconut
{ Double Peppermint Bark }
The perfect holiday recipe. Use the same brand of chocolate for the Base and the Top Layer for maximal adhesion between the two (I’ve used two different brands before, and had the Top Layer separate from the Base when I cracked it into pieces).
Base: 12 oz bag of milk chocolate chips + 1/2 T canola oil
Flavoring: 1 tsp peppermint flavoring
*Top Layer: 12 oz bag of white chocolate chips + 1/2 T canola oil
Mix-ins: crushed candy canes
Topping: crushed candy canes
*For this recipe, spread out the bottom flavored base layer first onto the pan, and cool in the fridge. When hard, then melt the top layer chips, add the mix-ins, and spread on top of the Base layer. Sprinkle with the topping, then place in the fridge again to harden completely.
{ Salted Caramel Cashew Bark }
 This is the at-home DIY version of my FAVORITE Godiva chocolate bark…which is a whopping $12 a bar at the store.

Base: 12 oz bag of milk chocolate chips + 1/2 T canola oil
Mix-ins: 12 chopped soft caramels (Werther’s makes a soft version of their famous caramels which works really well in this recipe…and Lil Tot ate one just before I took the above photo), 1/2 cup chopped raw cashew nuts
Topping: 1.5 tsp chunky Maldon sea salt
{ Dark Chocolate Cherry Almond Bark }
A grown-up version of chocolate-covered cherries, packed with antioxidants.
Base: 12 oz bag of dark chocolate chips + 1/2 T canola oil
Mix-ins: 1 cup whole dried sweetened cherries, 1/2 cup chopped slivered blanched almonds
Topping: fine salt sprinkles (optional)


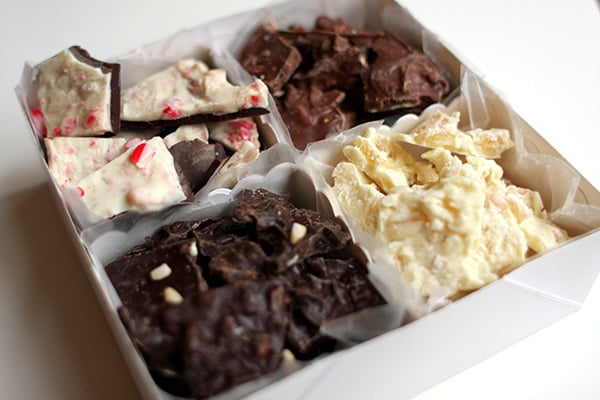
 For gift-giving, drop broken bark bits into colored cellophane bags, or package in a beautiful gift box like this above from a gift box kit by Martha Stewart (available at Michael’s in the Scrapbooking section). And don’t forget to enjoy some chocolate bark yourself!!
Happy Holidays to one and all~
Carly
Leave Comment

 and Romwe’s