Feb 18, 2012 | DIY
 counter-clockwise from top right: Free People Vintage Bolo Necklace ($298), Elliot Atkinson Runway (photo by Morgan O’Donovan for DazedDigital), Egoist Cross Stone Bow-Tie NC (1,995 yen), DIY by me
I am such a necklace person; I always feel naked if I’m not wearing a strand (or two or three) of something metal and glittering at my neck. But sometimes I want to break away from the something-pendantlike-strung-on-a-chain rut…and the bolo tie necklace is the perfect piece to do that. Whimsical and retro, this style of adornment has been seen lately in the offerings at Free People and the runway at Elliot Atkinson (and was in countless shops when I visited Tokyo last Summer). Of course you can find bolo ties on Ebay or thrift shops…but you can also make one that’s all your own quite easily – and from stuff you probably already have in your craft drawer! Here’s how:
Materials: (more…)
Leave Comment
Jan 26, 2012 | DIY
 A super-easy addition to any outfit, this sweet little gathered peplum is reminiscent of the Jil Sander S/S 2011 collection (the one with all the bright-colored gathered maxi-skirts evoking tulips and flowers). You can wear it with the coordinating maxi-skirt, or alone over jeans, a pencil skirt, or an LBD. It’s also super-easy to make! Here’s how:
You Need:
(more…)
Leave Comment
Jan 5, 2012 | DIY
 From time to time I get “how do I DIY this…?” questions from my readers, and I’m always glad to help out! Though I may not be able to actually make the item in question (due to time or materials constraints), hopefully I can at least offer up some advice to put you on the right path to making it yourself. I received this question on one of my posts from last week:
I have a request, since you are the best of the best, could you maybe make one of these?
Well I don’t know about the best of the best <*blushes*> but I do know how to translate high-priced into DIY-able!! And for $518, that Marcus Lupfer sweater is just begging for it!!;-)
The absolute easiest way to DIY this? Find a sequined handbag and sew it onto your sweater. Seriously! This would give you a working purse attached to your clothing – how neat. Also, since it’s after the holiday season, many sequined evening bags are on sale. Ebay is also a great source for the sequined, vintage-style pouches that this one looks like.
If you don’t want to literally sew a bag onto your sweater…when it comes to sequined and beaded stuff, there often isn’t a way to do-it-yourself with sequins…unless you want to sew all those little sequins on yourself. (I did this for a top I wanted to DIY, and it took forever.) The results are indistinguishable from the original because of the handiwork, but I think it’s a contradiction of the idea of quick-and-easy DIY.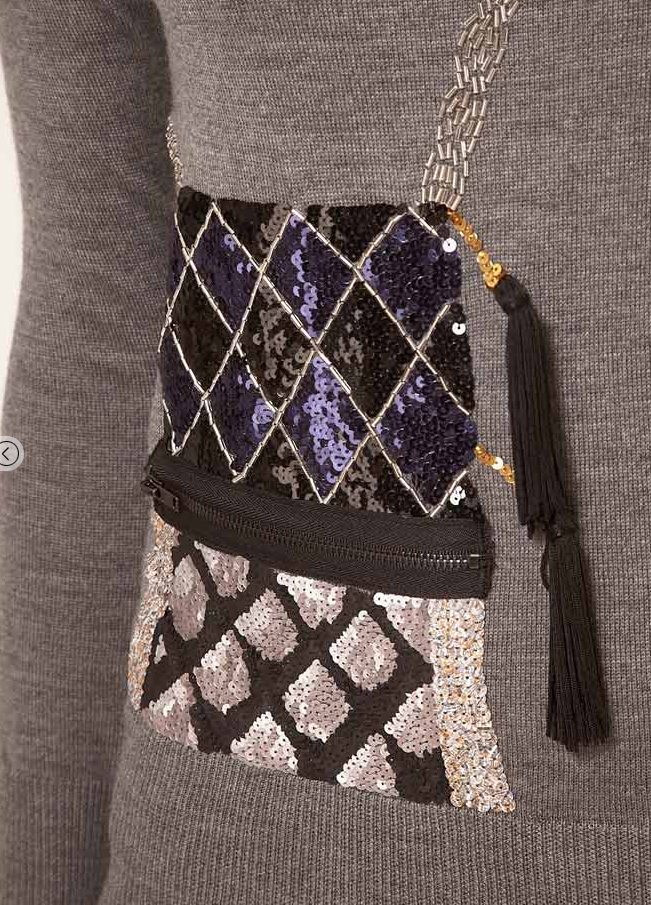
So to DIY this relatively quickly, but still as faithfully as possible to the original, you’ll have to compromise a bit. There’s still a lot of hand-sewing involved…and you potentially could stick a lot of this on using Jewel It! Embellishing Glue…but I’d really recommend sewing as much of it as you possibly can, unless you want stuff peeling off your sweater as your wearing it. Also, because of all the beaded and sequin trims involved, collecting all the materials for this could get pretty expensive. Here’s my list of recommended materials and how to:
Materials:
*gray sweater
*2 black tassels
*1 short plastic-tooth black zipper
*stretchy sequin trim in black, silver, and purple (I’ve used this before in my Sequin Bow Belt Tutorial)
*lightweight gold curb chain
*silver beaded trim (I think this trim from M&J Trimming is a pretty good match!)
*pre-strung silver bugle beads (not the kind loose in the bag; to save you some trouble)
*black acrylic paint

How-To:
1. Use marking chalk to sketch out the size and shape of your bag on the sweater, and mark where the zipper would go.
2. Hand-sew the silver beaded trim from the top of the bag diagonally towards the shoulder, and also on the other side of the bag under the arm.
3. Hand-sew the silver sequin trim to the area below where the zipper will be. Cut short strips and place them vertically, slightly overlapping.
4. Use the acrylic paint to color in some of the sequins in a quilting pattern. Allow to dry.
5. Take strips of the black and the purple sequin trim and weave them together (like a basket-weave) to make an interlocking diamond pattern. Hand-stitch at the overlapping areas to secure.
6. Hand-stitch this interlocked rectangle to the top part of the bag area on the sweater.
7. Cut the top of the zipper accordingly, and hand-stitch the shortened zipper to the sweater, covering up the edges of both areas of sequins.
8. Attach a tassel to each end of the gold chain, cut the chain in half, and-stitch to one side of the bag.
9. Hand-stitch strings of bugle beads in-between the colors in the top part of the bag.
If anybody else out there has a “How do I DIY…?” let me know in the comments, or ask away on Formspring.me! (leave the URL of the inspiration piece, please!)
Thanks for your question – hope that helped!
xoxox
Carly
~If you liked this post, please share it!~
Leave Comment
Dec 29, 2011 | DIY
 I hate settling for something in a different color when the color I want is sold out. Take these faux-suede shoes, for example. I could only find them in a tan color (from UrbanOg.com, sold out now), but I wanted them in a dusky rose color. I already have a pair of tan suede heels, for goodness’ sakes!! And I wanted that pinkish color desperately. With leather, you can paint it…but with [faux] suede?
If you want to do it the right way, there are actual suede and nubuck dyes out there, but I wanted a faded , vintage-style look. This was accomplished easily and quickly with a marker.
Ideally I probably should have used a fabric marker, but I didn’t have one in this exact hue…and I did have a COPIC marker. So I filled in the parts I wanted pink, and paused every so often to rub the excess color off and massage it into the fabric fibers further.
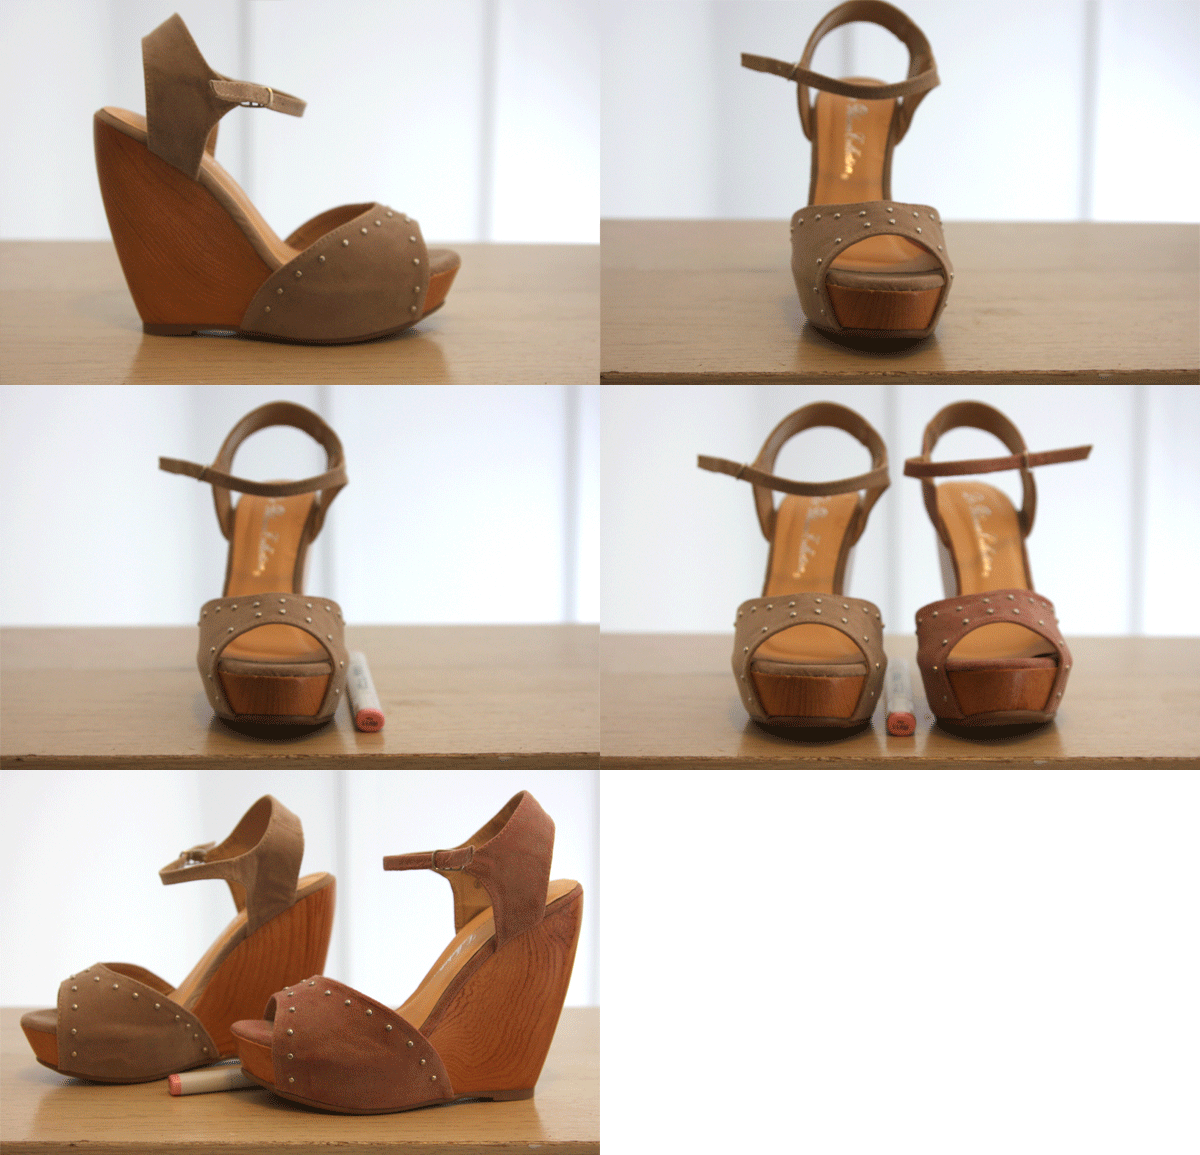 And now I have pink shoes…until it rains the next time, I suppose!
xoxox
Carly
~If you liked this post, please share it!~
Save
Leave Comment
Dec 14, 2011 | DIY
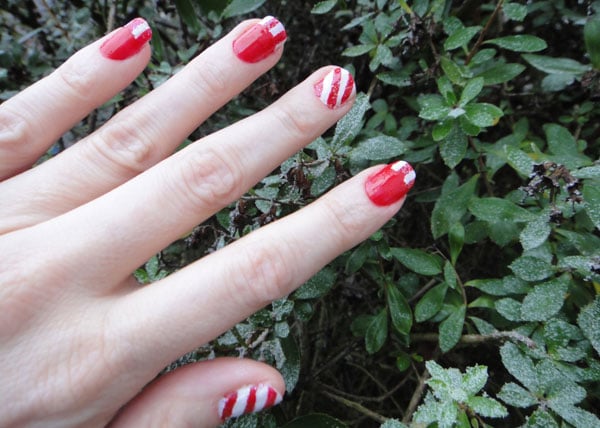
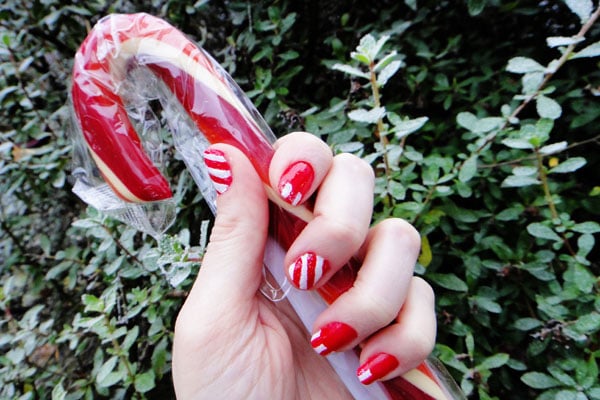
 I don’t know about you, but I have a lot of trouble drawing straight lines with my non-dominant hand. Whenever I attempt some nail art with straight lines, my efforts on one hand turn out perfect, and the other hand looks all wonky and wiggly. I figured a template or stencil would be the best way to combat this – so I thought why not DIY? These candy cane striped nails are actually a cinch to do, and if you’re using sticky color dots (found at any office supply store), they’re also cheap! No striper brushes or special nail polish required. Here’s how:
You Need: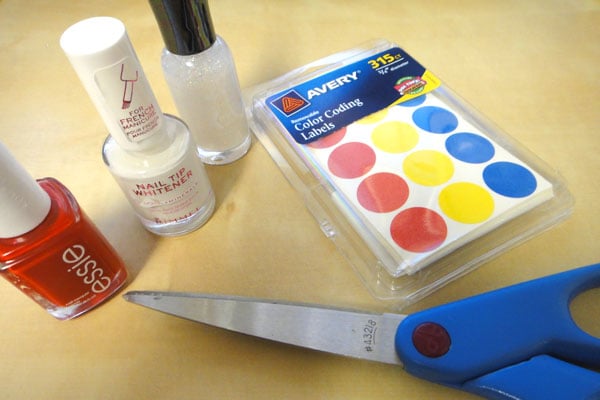
*sticky dots (or you can using sticky labels, or even tape…anything that will stick to your nails will work)
*base nail polish color (I’m using Essie’s Russian Roulette from my Secret Santa Miranda from the Portland Blogger Meetup)
*contrast nail polish color (I’m using white, from a Rimmel French Nail Polish Set)
*glitter nail polish/topcoat (I’m using Sally Hansen Hard as Nails in Disco Ball , which contains little holographic flecks)
And…
*scissors
How-To: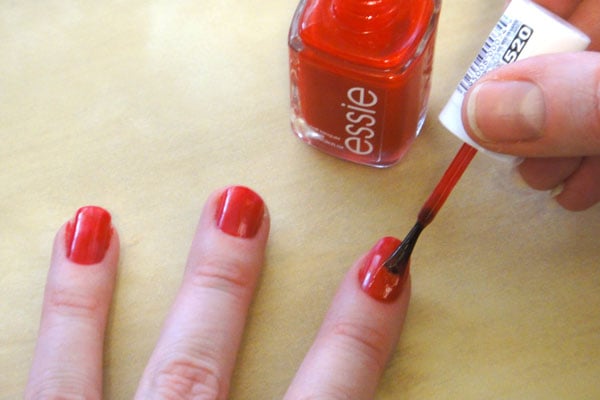
1. Paint the base color onto your nails. I had to do two coats to achieve uniform coverage. Allow to dry completely before going on to Step 3). (I couldn’t wait, so ended up making things a bit messy.)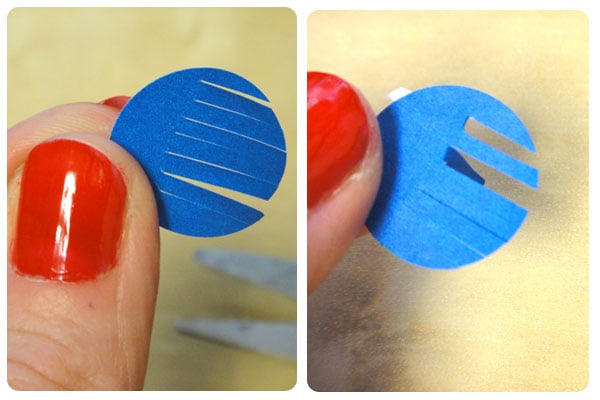
2. Remove 5 dot stickers from the package. Cut each of them into a fringe, stopping the cuts before the edge of the circle. 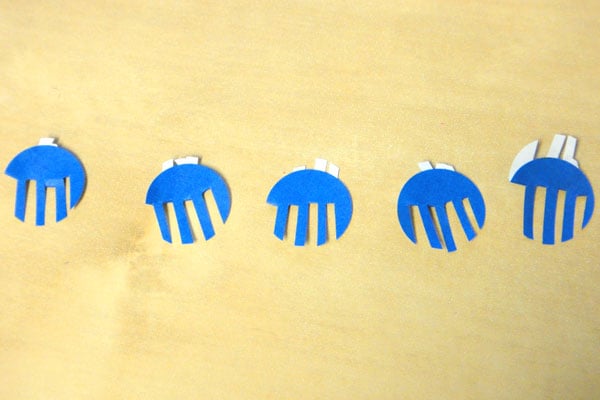 Fold every other fringe strip under itself…this will become the stripe stencil for your nails.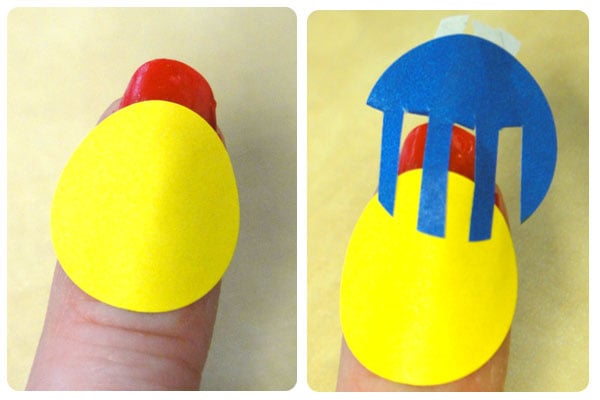
3. After your base color is completely dry, place the dots onto your nails, positioning the stripes how you like. For my shorter nails I made my stripes diagonal, like a candy cane, and for my longer nails I used an uncut dot to create the curve of the tip, and then placed the cut dot with the stripes going up-and-down on the tips only. Have fun with it and mix it up!
4. Use your contrasting color of nail polish to paint the stripes. You may have to do two coats for complete coverage. Make sure the stripes are strongly stuck onto your nails or else you’ll get leakage around the edges!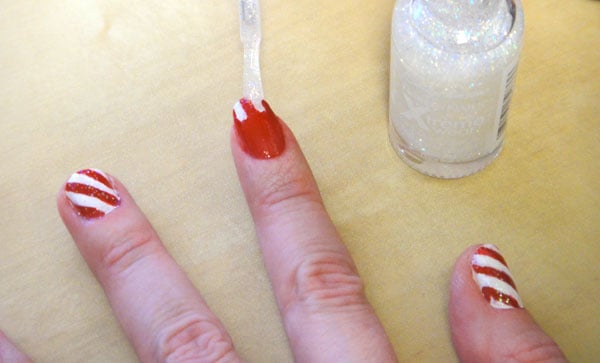
5. After the polish is dry, remove the stencils and finish with a swipe of glitter.
Now if only I had peppermint-scented nail polish…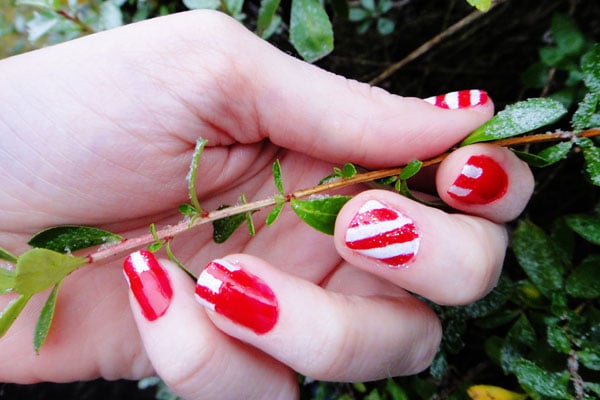
 Happy Holidays, everyone!
xoxox
Carly
~If you liked this post, please share it!~
Save
Leave Comment











