
DIY: 2 Men’s Shirts to Cute Babydoll Dress
Get This Tutorial As a PDF

This tutorial has been updated, and is now available as a full step-by-step with photos in my new book 7 DIY Men’s Shirt Makeovers, part of the DIY Men’s Shirt Makeovers System.


(Sorry for the super-dark photos – my sewing room is lit only by a firefly, various glow-in-the-dark toys, and a sputtering birthday candle.)
You Will Need:

2 men’s button-down shirts in coordinating colors (I used size 16 – I think that’s an L, but I recommend using an XL if you are a S/M Misses’…an XXL if you are L/XL Misses.’) / thread matching topstitching thread in shirts / 23″ of 3/4″ wide flat elastic (white) / 3 m elastic cord (white)…we’ll be gathering fabric so only about 1m will be used eventually, but you need a longer length to do the gathering properly.
Tools:
sewing machine / needle for wovens / fabric scissors / seam ripper / iron (optional) / 1 safety pin
How To:
PREP YOUR PARTS
1. Cut Shirt #1: the sleeves off the shirt and straight across the top just under the second button.
This will serve as the body for your dress.
MAKE THE FRONT INSERT & DRESS BODY
2. To make the front insert, first cut the cuffs off both sleeves and discard. Pin the sleeves together on the long side closest to the sleeve opening placket. Sew together with a 3/8″ seam allowance, open up the piece you just sewed, and lay flat.
3. Turn insert upside-down and pin both sides of it to the underside of the opened shirt front we cut in Step 1), matching bottom hemline. (Underlap about 3/8 – 1/2″ on button placket.)
Sew to shirt front vertically along button plackets.
4. Close top button. On underside, create pleats in front insert, and pin to underside of front.
5. Sew a line straight across the top of the insert, through all layers, catching all the pleats. (This will result in a visible line of stitching through the front of your dress.) Then sew button placket closed above the line you just sewed, going through all layers.
MAKE THE BOTTOM RUFFLE
7. Using the bottom of the shirt as a guide, hem the upper strip in a similar fashion (note the center front and center back of the shirt is lower than both sides). I just traced the shape of the bottom hem, added 3/8″, turned under, and stitched a 1/4″ hemline. (I know, technically the top strip needs to be 7 and 7/8″ tall, not 7.5″…but we won’t tell anyone.;-) It’s easier to explain this way.)
8. Cut Shirt #2 according to the photo above: cut the sleeves off, and cut the yoke off the back (we’ll use the yoke later on).
As to the sleeves, mark 7.5″ down from the top of each sleeve, and 7.5″ down below that. Cut sleeves straight across at those marks. (We won’t be using the cuff pieces.)
Pin each sleeve piece together at sides to make one long continuous piece. (In this order: Sleeve cap + bottom piece + sleeve cap + bottom piece. If you’re totally anal about this piece matching the hemmed pieces from Step 7), cut one of the bottom pieces in half widthwise – and pin each half to the outside edges of this joined piece. I.e., bottom piece half + sleeve cap + bottom piece + sleeve cap + bottom piece half.)
Sew sleeve pieces together. Hem the edge that has the rounded part of the sleeve caps in a similar fashion to the piece you hemmed in Step 7), cutting off the extra to create a similar hemline.
9. Connect all 3 ruffle pieces together by sewing them at their sides with a 3/8″ seam allowance. (Connect all so you’ve made a continuous piece.)
10. Make a double knot in the end of your elastic cord. Place it on the wrong side, along the top of the ruffle piece you just sewed (about 3/8″ from the edge). Using a loose zigzag stitch on your sewing machine, zigzag over the elastic cord all the way around the ruffle piece. Do not stitch through the cord – it must remain free and moveable under your stitches. Backstitch a couple times at the beginning and end of your stitching to strengthen it.
11. Pull on the un-knotted end of the cord, gathering the fabric underneath it. Gather the ruffle piece until it is basically the same circumference as the bottom of your dress.
12. Pin the gathered ruffle to the bottom of the dress, right sides together. The bottom of the dress is already a curvy hem – pin the straight side of your ruffle around these curves. This will create a beautiful wavy hem when finished. Double-knot the elastic cording again once you have verified the pinned length of the ruffle – then cut off the extra cord.
13. Stitch ruffle to bottom of dress, stitching below the elastic cording.
GATHER THE DRESS TOP
14. Fold under top of dress about 1″+. Stitch straight across bottom of folded edge to create a casing.
15. Attach safety pin to one end of your flat elastic. Thread through the casing and out the other side.
16. Match end of elastic to edge of dress; stitch down the edge to secure.
17. Hold the elastic firmly and gather the front fabric – the finished width of your dress front needs to be 11.5″.
18. Once at the correct width, stitch down the other end of the elastic, and trim so nothing is visible from the front.
19. Repeat for the back of the dress – the finished length for the back of the dress needs to be 10.5.”
MAKE THE SHOULDER-STRAPS
20. Cut back yoke off Shirt #1 as well as from Shirt #2…which we did in Step 8). (The yoke is usually double-sided; if yours isn’t, you have to scavenge fabric from somewhere else on your shirt. I think the ties look best when the stripe pattern is going up and down the length of the tie, not across, so I chose an area where I can get a piece of fabric 17.5″ long with the stripes going up and down.)
21. Sketch out the following shape onto both pieces: a tall trapezoid, with the top side 1.25″ wide, the bottom 2.5″ wide, and the entire piece 17.5″ tall. Cut shape out, separate the front and the back, and remove any labels with a seam ripper.
22. Fold each piece over, right sides together, and sew along longest edge, pivot, and along shortest edge. Turn piece right side out, and topstitch along unstitched edge to flatten it. (You can also iron it at this point to flatten it out further.)
23. Pin each piece under the top of the dress, at both front and back, about 1/2″ down from top hem, on either side. I positioned the pieces matching the dress body at the front, and the pieces matching the ruffle at the back.
24. Stitch across strap through all layers using a zigzag stitch for strength.
25. Tie bows tightly to prevent slippage.
You’re done!

You now have a super-cute dress perfect for lounging about, a sweet babydoll nightie appropriate for the boudoir – or even, under a blazer and over jeans or leggings, a chic piece to add into any day ensemble. Or you can wear it out as is during warmer months – rocking it with some lace-up sandals, a little metallic clutch, and a rhinestone clip in your hair.
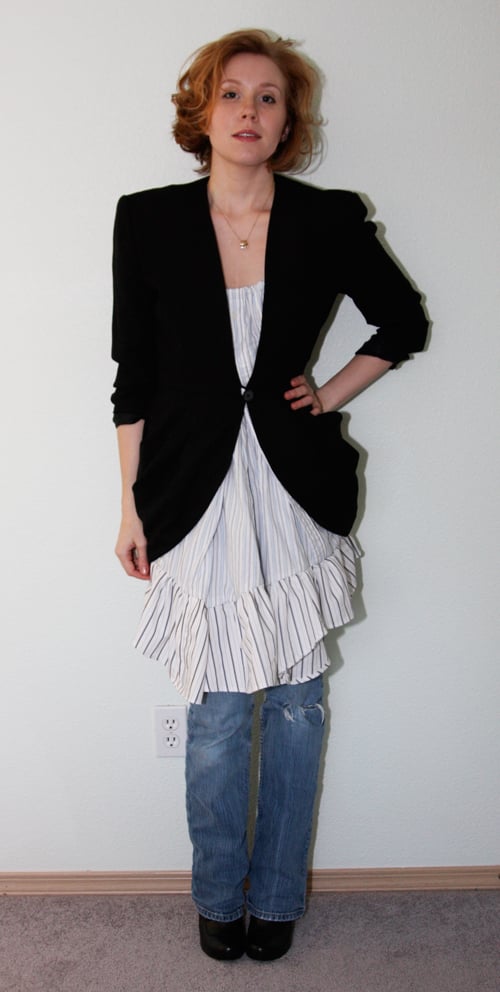
Notes:
When I created the front of the dress, I sewed 2 sleeves together – resulting in a wide pleat at the front which can, in profile, make the wearer look preggers.:-P If you prefer a less generous A-line, create use a single sleeve instead for the front insert. This dress, because of the generous front pleat, would also be great maternity wear! (It’s kind of cute-sexy, so I think it would work great!)
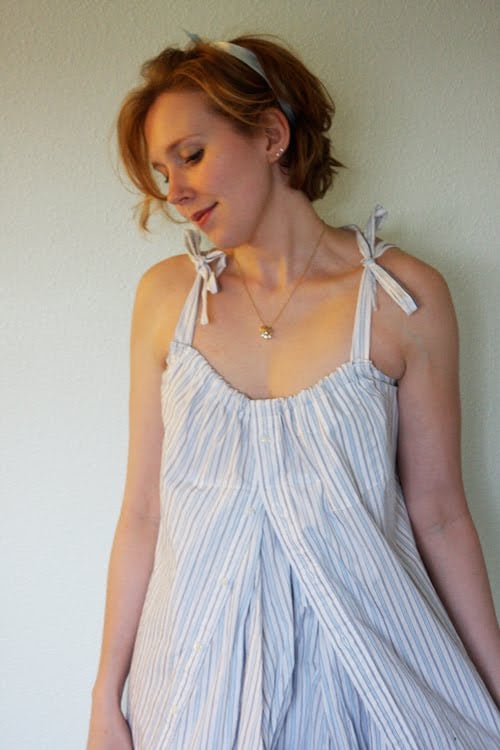
I would recommend if you wanted fuller bows – to either use fabric from other parts of the shirt and double the width of the cut parts…or cut the pieces as I wrote above and instead of folding them in half, just fold under the raw edges about 1/4″ and topstitch to keep in place (eliminating Step 22)- thus leaving you with single-layer fabric bows instead of double layer.
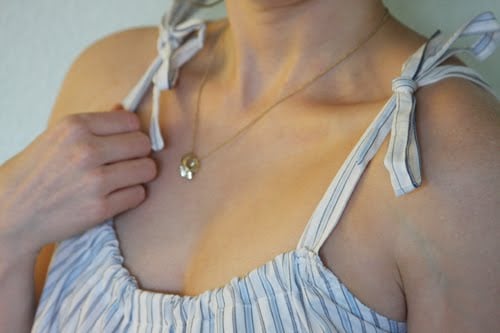
The finished dress may be somewhat short for some people -I’ve thus recommended an XL men’s shirt to hopefully deal with the length problem. Making the ruffle 8″ or 8.5″ high before you cut it out may also help with this if you’re concerned about the length – I am 5’6″.
I’d also recommend ironing your shirts first! My blue-striped shirt was a little rumply – which is reflected in the finished piece. The dress is now extremely difficult to iron due to all the ruffles – so make sure your shirts are free of wrinkles first!


Happy DIY’ing!
xo
Carly
Get This Tutorial As a PDF
This tutorial has been updated, and is now available as a full step-by-step with photos in my new book 7 DIY Men’s Shirt Makeovers, part of the DIY Men’s Shirt Makeovers System.
Don’t Buy, DIY: Christian Louboutin for Rodarte Super-Spiked Heels

This was a lo-o–ooooong time in coming. Hope you guys didn’t get bored waiting!:-)

The highly, highly coveted Christian Louboutin for Rodarte spike heels – only sold for a short time at Christian Louboutin boutiques in Fall of ’08, never showing up at Net-a-Porter, not ever appearing on eBay. Victoria Beckham even stepped out in the gorgeous gold ones below. But how to get a pair for oneself?
 Source: StyleFrizz.com
 The RedSole version.
Of course, you could always fork over $188 for the black knockoffs over at RedSole (or here for the gold ones, pictured above). They’ve changed that texturized (Swarovski-encrusted?) area on the toe to snakeskin, and the heel isn’t as high or as skinny, but it’s a fairly good knockoff…if you want to pay $188.

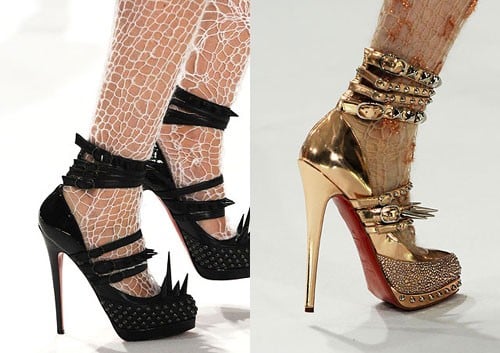 But I wanted the exact same style as the shoes above on the right, butin black- and I haven’t found any DIY tutes out there on the Internet yet (correct me if I’m wrong!:-) So here ya go – step by step!
I have to break the process into multiple steps, since this is quite long though not excessively complicated. So, in 4 Parts:
To DIY Your Own Pair of Rodarte Spiked Heels You Will Need: (after the jump)
Don’t Buy – D.I.Y.! A Fantastic ShinkyDink Plastic Necklace

This is what you’ll need:
*shrink plastic (found at the craft store or online at ShrinkyDinks.com; we chose the pack of Ultra Thick Misty White shrink plastic for about $7)
*sheet of cuttable mirrored plastic (craft store or online at Scrapbook.com)
*glue (like GOOP)
*jump rings
*chain necklace
*scissors
*sheet of cardboard (if using an oven to bake the shrink plastic), or a heat gun
*pen
*awl, thick needle, or other sharp instrument
*pliers

MAKE THE PENDANT SHAPES
1. Cut the shrink plastic into your desired shapes (such as randomly-sized triangles) to make pendant backings. Remember: Your plastic will shrink to about 45% of its original size – so cut almost twice as large as you want the finished piece to be!
2. Bake pieces in oven (or using heat gun) according to package directions.
3. Allow to cool. When cool, trace pendant shapes onto wrong side of a sheet of mirrored plastic.
4. Cut out mirrored plastic and glue onto shrunk plastic pendant backings.

ATTACH TO NECKLACE
5. Using an awl, thick needle, or other sharp tool (it works best when heated), poke a hole at the top of each of your pendant pieces.
6. Add jumprings and attach to chain necklace.
VOILA! A girl can never have too many shiny, mirrored things in her life! Pair over a white tee and some dark skinny jeans for a rocker, glam-girl vibe; layer under tangled chains and rhinestones for a Renaissance revival; or let it stand on its own as a statement necklace with a gorge printed wrap dress.
Rather not do all the cutting and baking yourself? Order your pendant pieces ready-made at Ponoko.com, where you can get your own sheets of mirrored plastic, acrylic, vinyl, or balsa wood lasercut to your specifications. String onto a necklace or earrings and enjoy your creation – or even sell your finished products through their marketplace.
TIP: Don’t be afraid to experiment further with shrink plastic! Besides making pendants, you can also form bracelets and rings, make tags and charms, craft buttons, curl it over while warm to create 3D shapes…the possibilities are only limited by your imagination. You can stamp it, paint it, airbrush it, lacquer it, decoupage it, marble it, or add crystals or heat-fix studs. It’s a really interesting medium that lends itself superbly to a variety of different designs – and allows you to mimic the look of designer accessories for very little investment.
Happy DIY’ing!
-Carly J. Cais, Contributing Editor
(as posted on FashionTribes)
Leave Comment
Don’t Buy…D.I.Y.: Elastic-Banded Pumps
 Note: Though this is a somewhat long and rambling post about shoe adornment, I do include a quick-and-easy DIY for the shoe elastics above. Scroll down for the tutorial!

As evidenced by the above Polyvore I made, elastic-banded pumps are in, in, in! I love how the black stretchy part over the upper contrasts so sharply with a shiny patent.
But I get the weird feeling that these will also be passe in a couple seasons. What to do??? I love that in Japan they’ve taken the idea of shoe-adornment to a whole ‘nother level with shoes that feature removable bands so you can change up your look whenever you get bored.
 Even though the above shoes were in a magazine a couple years ago (!), you can buy the bands separately, in red, holographic silver, white, brown, gold, or black, for about $9 a pair here. If I started making sets – like a set of 3 pairs – and sold them for $12, do you think they would catch on in the States?
  The concept of shoe bands is kinda similar to shoe clips, but just…bands. If you opt to adorn the top of your boot, then maybe Bandits are for you! They carry a number of different styles, not just the Southwestern-inspired motif pictured above.
 Bandit boot chains above. Adding to DIY list pronto.
Shoe bands! Right. So why buy when you can…
You guessed it!
DIY!
(This is soooo simple!)

 You need:
*your favorite pair of heeled shoes
*about 8″ elastic
*sewing machine
*thread matching elastic color
(sorry, no photos…but you can definitely figure it out!!)
1. Start by puting on the pair of shoes you want to adorn with elastics. Wrap a piece of thick elastic around the upper part of your foot (halfway onto your arch). The band needs to go all the way around the pump and overlap about a 1/2″ on the underside, in front of the heel. Make sure it’s tight so it won’t slip down (just not too tight since we don’t want to crush our foot bones!).
2. Cut elastic to correct length.
3. Sew on a sewing machine – just reinforcing the overlap area on the elastic.
 See? The meeting of the two ends is at an angle – NOT straight on.
I’ve found they work best when the elastic overlaps at an angle – NOT one side meeting the other side exactly – to accommodate the curve of your foot. Repeat for other elastic.
 Presto! It’s like you have a whole new pair of shoes!
 And I also tried adding thinner elastic to the ends of silver vinyl belting for a different look…and sparkly silver ribbon for yet a third look. Both have thinner pieces of elastic sewn onto the ends of the contrasting ribbons. (The elastic is only about 1.5″ long in-between, for the underlay part and to allow the band to slide over the widest part of the shoe at the toe.)
You could do virtually anything! Chain overlaid onto ribbon…frilly ribbon with grosgrain in the center…a line of sequins…anything at all!
Happy DIY’ing!
xoxox
Carly
DIY: Panja, or Back-of-the-Hand Jewelry

 I became obsessed with making myself a Panja [i.e., back-of-the-hand jewelry piece] since seeing the above in Vogue October 2009. For all it’s highbrow designer, impossible-to-make-yourself fashion spreads, once in awhile the magazine showcases an idea that’s just mindblowingly awesome. How cool is this rhinestone-and-chain Alyssa Norton piece that the model above is wearing? (All her jewelry is really eclectic and covetable…to sum it up to its lowest common denominator, she likes wrapping silk thread around rhinestone chains; making rhinestones “cast” in metal and set into jewelry as if precious stones; barettes with dangling cords and rhinestones; and chain mail. Def. check out her site if you get a chance!)

But I’ve had Panjas on the brain since about 2005, when I saw the above Hahn An Su (sp?) design in a Vivi Magazine. I didn’t know what they were called then, but I definitely wanted one!

And then recently I saw this photo posted at Maverick Malone. She’s such a cool girl – and has great style – she just wrapped this broken necklace around her hand and wrist and called it a day. Love.
I don’t really know much about Panjas, so I am unable to educate anyone about them (and if they have religious significance I’m very sorry for my desecration and sacrilege) but….
Perhaps you can feel a DIY coming on?? LOL
I’m not paying $805 for the Alyssa Norton piece! So here’s the DIY:

You Need:*1 post rhinestone earring, pictured above (I used these earrings I got from Forever21 for $9.80)
*2″ flat silver curb chain
*1 small silver jumpring
*1.5″ wide x 8″ long piece of black fusible stretch mesh interfacing
*1 pair sew-on snaps
*needle + black thread (doesn’t have to be silk but can be if you like)
*pliers
*sewing machine
*iron
How-To:
1. Push the earring post through the center link in your chain piece. Using pliers, bend down and around the chain so the earring is secured and there’s no scratchy post end sticking out.
2. Wrap the chain around your index finger – cut to size. Secure with a jumpring.
3. Fold both long sides of mesh interfacing in towards center. Fold again in the center so you have a long rectangular strip with all raw edges enclosed. Iron flat – the heat of the iron will fuse the mesh together.
4. Sew along long edge of mesh to secure the folds you made.
5. Fold each shorter end over and secure with hand-stitching.
6. Place earring flat and stitch bottom rhinestone dangle to center of black mesh. This is the tricky part – you just need to weave in and out of the rhinestones with your needle, securing them both together and down. You don’t want the rhinestone dangles to move too freely across the back of your hand – so sew together inbetween the settings, and be carefuly of the thread catching on the rhinestone prongs.
7. Wrap the thread around the black mesh for a textural effect. (Here, to make it exactly like the Alyssa Norton piece, you can smudge silver fabric paint at intervals onto the black mesh, and decorate with rhinestones. I chose not to because I wanted more simplicity.
8. Hand-stitch a snap and its counterpart to each end of the black mesh.
You’re done! Super-easy, right???

Feeling the backs of my hands are sad and naked now without my Panja….

Happy DIY’ing!
xoxo
Carly
Leave Comment
Who I Am

Carly J. Cais I am a DIY’er, designer, sewist, maker, and marketer. Chic Creative Life is where I share what I do, and help others bring their unique style into their own lives.








Just Pinned



