Oct 29, 2009 | DIY


So, were you watching the last Sex and the City movie close enough to notice those adorable half-gloves Carrie was wearing while using a pay phone in one scene?
Such a subtle difference to the regular wrist-length leather glove…but oh so cute. The gloves were actually from Ines Gloves, available for $147.
Ines gloves…so cute…but oh so expensive too. Why does this hand model lady have such hairy arms? This confuses me…and dissuades me from wanting to spend that $147 for some reason.
But we wouldn’t think of paying that much for such a simple accessory, now would we?
So why buy when you can D.I.Y.?!
 Enter a typical pair of wrist-length leather gloves (mine I got at the Buffalo Exchange for $8). Wish that they were gray or brown…but c’est la vie. (I didn’t want to go through the whole rigmarole of painting them with leather paint…or worse yet, attempting to dye them. I don’t even know if that would be possible with black gloves. In any case.)
By using the photos on the website as reference, I sketched the scoop shape using an eraseable fabric pen onto the gloves. 
You can see the white lines on the gloves…I tried a couple variations before deciding on the shape. Always make sure your pencil comes off of leather BEFORE you draw all over your gloves!
Add 1/4″ seam allowance below the line, and cut with a pair of sharp shears. Behold the scoop shape! Cut with a pair of sharp shears. I don’t have leather scissors, for some insane reason. Oh yes, because they’re ridiculously expensive and I just squandered my available funds on some new sewing scissors.
Using Loctite Vinyl, Fabric, and Plastic Glue, turn under that 1/4″ seam allowance and secure it to the underside of the glove. (Barge cement is a be-otch to work with since you have to wait 15 minutes after applying it before sticking your surfaces together…a total hang-up for a DIY’er in a rush like me…) ‘Tis necessary to glue the seam allowance since leather gloves are usually made from a thin and soft lambskin…which rolls and shifts uncontrollably as you sew it on a home sewing machine…unless you’re an all-star with sewing lightweight leathers, I’d recommend gluing it down to get that clean seam first!
The seam allowance glued (for the most part) down to the inside.
Then, using a leather needle (medium-weight leather, since we’re going through two thicknesses + two thicknesses of the lining), edge-stitch about 1/8″ from the edge of your gloves to secure that hem. (sorry no photo of the stitching…couldn’t work with the sewing of something black, with black thread, in a might-as-well-be-pitch-black poorly-lit sewing room.)
You’re done! Step back and admire.

LEATHER-SEWING TIPS:
Use a longer stitch than you normally would when it comes to leather…and a good tip when sewing leather is to crank the needle forward manually so that it has pierced the leather completely…BEFORE pressing with the presser foot of the machine to sew your line of stitching. Start sewing with the needle already in the leather to say it another way. Also, you can’t go super-fast or super-slow…there’s a happy medium where your machine’s feed dogs advance the leather at the right speed, the needle punches through the leather without jarring and hitting the needle plate, and the needle goes in vertically and doesn’t hit the bobbin case. Too fast and the aforementioned problems will crop up; too slow and the needle won’t punch through the leather. It’s different for every machine – just something you need to experiment with. (Of course, if you’re using a heavy-duty/industrial machine for sewing leather, you can completely ignore what I’ve just written.:-)
When starting your line of sewing, DO NOT BACKSTITCH. Go all the way around the edge, then back into the first ONE or TWO stitches you did at the beginning of the line. Backstitch ONCE. This will create a nice, professional look to your stitching.
Also, do not start stitching directly on a seamline. This will usually cause the needle to jar and hit your presser foot/needle plate/bobbin case. Sewing machine needles for leather (for the home sewing machine) are pieces of s$#@. They will snap willfully at ANY irregularity of thicknesses in your material; or bend and not punch the leather vertically at certain speeds…ugh. Buy more needles than you think you need!
Can’t wait to work these in a new outfit…the leather glove is THE must-have accessory this Fall, so rock it while you can!
Happy DIY’ing!
xoxo
Carly
Save
Leave Comment
Oct 29, 2009 | DIY
 Few things add edge to a look like bits of metal leering out from an unexpected angle; in combination with swingy fringe, the trend has continued to stomp down many a runway.
Adding a touch of tough to pieces you already have in your wardrobe is a fun way to freshen up your look. But be careful: there is a wrong way to stud and fringe your basics, so we’ve put together this helpful little primer on Badass Embellishment Skills 101.
To sex up a boring black leather tote, this is what you’ll need:
Leave Comment
Oct 9, 2009 | DIY
(Jacket from Japan; scarf from I forget; Claire’s wristbands, necklace, and armwarmers; handmade studded ring; DIY Chanel tee; Paris Blues Jeans; DIY’d GoJane boots)
It’s that time of year again when the leaves change color, Fall activities are well underway, and Portland Fashion Week presents 5 days of local and sustainable collections, presented in some warehouse practically off the map in a NW corner of the city. I skipped out on attending Day 1, so here I am on Day 2 of the Collections, as I like to say, since it sounds more frou-frou and New-York-wannabe.
I made this shirt the morning before the madness started – with a fabric pen. Because life definitely needs more cavorting! (The real version says “Cavour Roma” in case you were wondering – here’s a piccy below:)
 (sorry I don’t remember the site I saw this on)
 Actually it was on KnightCat, I remembered, and a reader mentioned it was originally from Lookbook.nu. Thanks Danni!

I know armwarmers went out of style (or never came into style) like a decade ago, but my hands get cold easily and I often add them to an outfit. Yes, inside of me is a fashion-challenged 12-year old. With warm hands.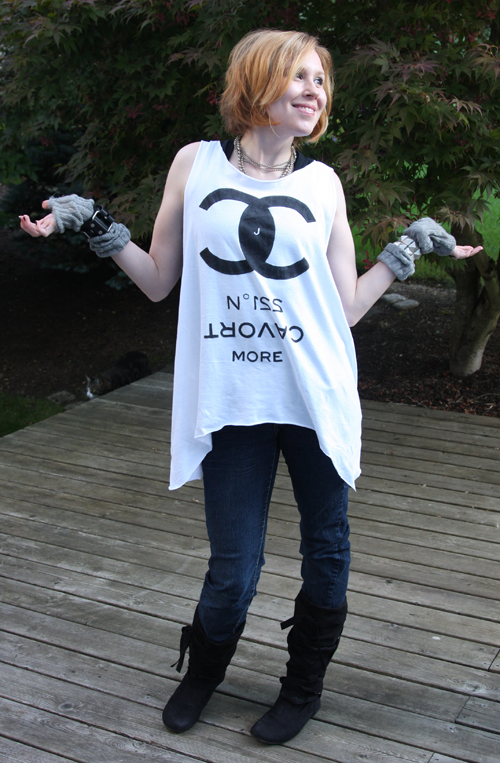
Even though it’s Fashion Week, when you’re covering the shows my best piece of advice is:
Wear comfortable shoes!
I wrapped a long strip of ultrasuede around these flat, scrunchy boots from GoJane and tied the ends. I’m all tied up!
Fashion Show coverage coming soon!
Have a lovely Friday!
xoxo
Carly
DIY Update: For those of you who were wondering how to make the shirt…
1. Take a white Men’s XL t-shirt and a black fabric pen (I used a FabricMate Chisel Tip ). Place your shirt over a piece of cardboard and apply a liberal spraying of Spray Laundry Starch
 to make it literally “flat as a board.”
2. I used Photoshop to create the lettering (and added my initials as the double-C logo in the middle, haha), printed out the image, and placed the paper underneath my t-shirt on top of the board. Then I simply traced the letters and filled them in with the fabric marker (took awhile).
3. I cut off the hem a little higher in the front and lower at the sides so it makes “side-tails,” cut off the neck ribbing and the sleeves, and stretched the cut edges until they rolled slightly.
4. Then I washed it on the delicate cycle in the wash and laid flat to dry, to get rid of the starch and “set” the fabric marker paint.
So super-easy to make! I’d love to see everyone’s DIY versions!
Leave Comment
Oct 4, 2009 | DIY
 Adapted from the book Cut-Up Couture: Edgy Upcycled Garments to Sew
 [though mine is the Japanese version; I’m not sure if the translated version I’ve linked to is the same]
I’ve written about this book a little while ago in this post on how to make a Convertible Blouson Tunic from 3 Men’s Sweatshirts). To me, this sweet little cape seems slightly Chanel-ish, two-toned, sleek…anything but sweatshirt-like.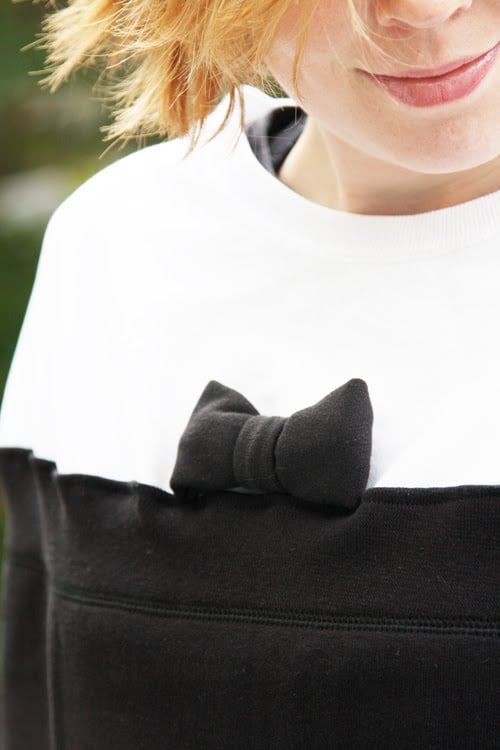
(And if you made the tunic following that tutorial, you will have found yourself left with the top half of 3 sweatshirts. In this project we’ll use the top half of 1 for our cape, and as to what to do with the remaining 2 sweatshirts…stay tuned!)
How to Make a Chanel-Style Black-and-White Cape With Bow
You Will Need:
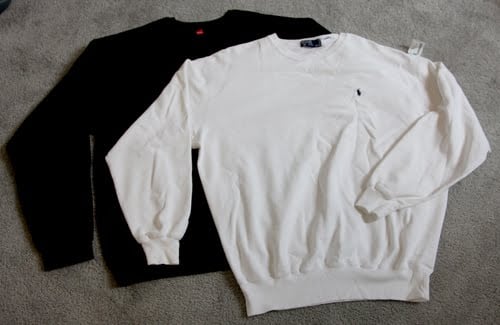
*2 sweatshirts (Men’s XL work best), in two different colors
*scissors
*sewing needle for knits
*thread matching one sweatshirt
*hand-sewing needle
How-To
Measure and Cut
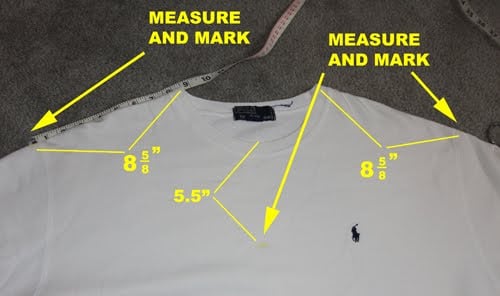
1. Measure and mark 5.5″ down from the neck opening on your first sweatshirt, on the center front. Measure and mark 8 5/8″ on each side of neck opening on the shoulder seams.  Connect the marks you made in a semicircle around the neck portion of your sweatshirt.
 2. Cut out the neck along the line you made, cutting through both front and back of the sweatshirt.
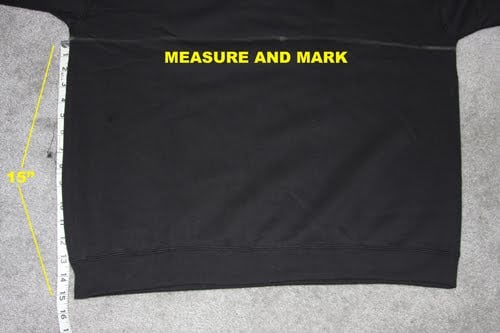
3. Mark and measure 15″ up from the ribbed hem of your second sweatshirt. Draw a line straight across the shirt from side to side (it should be very close to right under the arms).
 4. Cut along the line, through both front and back of your sweatshirt.
 5. Draw a rectangle 4″ high by 8″ long on the remaining fabric of the sweatshirt from Step 4). Cut it out.
6. Draw another, smaller rectangle measuring 2″ high x 2.75″ long on the same sweatshirt and cut it out.
Your cut pieces should look like this:

Pin
 7. Turn the 15″-high bottom half you cut out in Step 4) upside down, and pin on top of the cut edge of the neck piece from Step 2). Overlap the ribbed edge about 1/2″ onto the cut edge of the neck piece, following the curved edge. Pin along edge.
8. Fold both the smaller rectangles you cut in half lengthwise, right sides together, and pin edges.
Machine Sew
9. Sew both smaller rectangle along their longer edges, about 1/8″ from cut edge. Turn each right side out again – this will create two tubes. (not pictured)
 10. Sew the cape main parts together, stitching on top of the ribbing in a matching thread, about 3/8″ from edge. If both your sweatshirts are exactly the same size, the neck piece should not be gathering despite the stretch from the ribbing. (Mine is b/c I used an L sweatshirt for the neck and an XL sweatshirt for the bottom…my bad!)
 11. Hem your cape, turning over about 1/2″ at the bottom and stitching a 3/8″ hem.
Hand-Sew
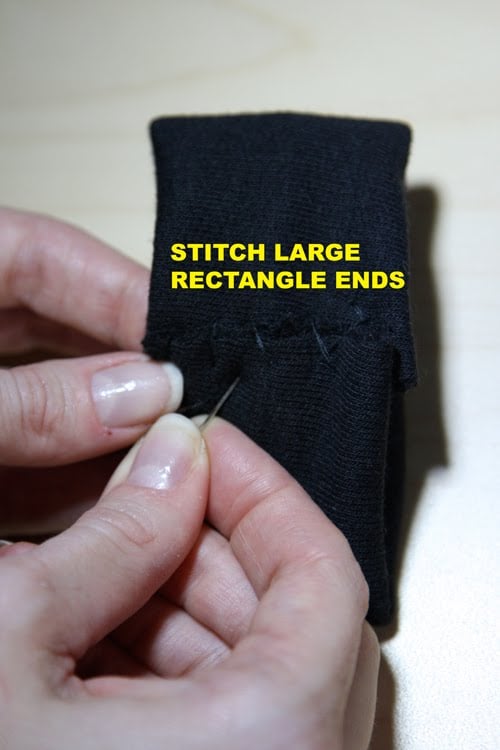
12. Flatten the larger rectangle tube you made in Step 9), roll the seam to the center, and fold each end over to meet in the middle. Hand-stitch ends together to make a bow.
 13. Flatten the smaller rectangle tube, roll the seam to the center, and stitch one end to your stitching in the center of your bow from Step 11).
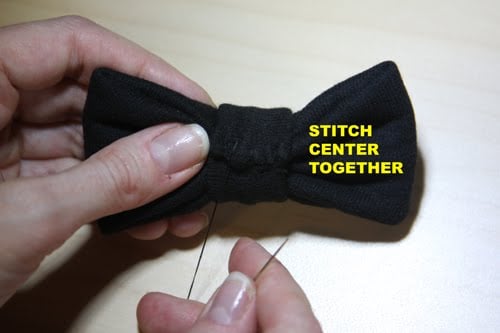 14. Roll the strip around your bow, pull tight to the back to make your bow “poufy,” and secure in the back again with more stitches.
15. Stitch bow onto the center of your cape, slightly above the ribbing seam. (not pictured)
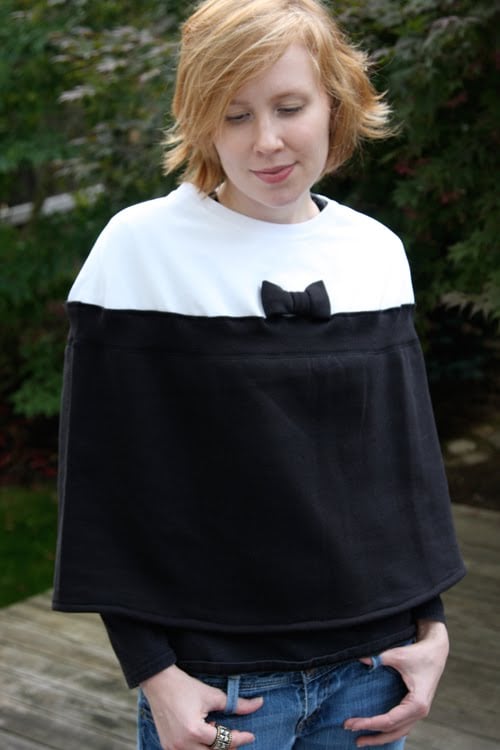 You’re done! A lovely cape – just in time for cold weather.
And don’t forget to cut the remaining parts of your sweatshirts in the same fashion – and just reverse the colors – and you can make a second cape to give to someone this holiday season! Brrrr! I feel the winter chills coming on!:-)
 Happy DIY’ing!
xoxo
Carly
Leave Comment


 Cut with a pair of sharp shears. I don’t have leather scissors, for some insane reason. Oh yes, because they’re ridiculously expensive and I just squandered my available funds on some new sewing scissors.











