Aug 6, 2011 | By Carly J. Cais, DIY
 It was my best friend’s birthday this week and I had wanted to send her something I made. Unfortunately it took me a lot longer than I had anticipated to make all the bracelets I had wanted to, so I ended up popping them in the mail a little after her birthday.
It’s been 20 or so years since I last made a friendship bracelet, and I remember back in the day only being able to make the kind with the diagonal stripes. I couldn’t for the life of me figure out how to make the chevron, crossover, diamond-patterns, or Chinese staircase bracelets. The bracelets I made back in the late 80’s were pretty horrible; too loose or too tight, bad colors, wayyy too short… Now in 2011 there are tutorials all over the place and following one closely I finally was able to make a double diamond-patterned bracelet (the navy one above).
I was thrilled.
I also sewed in rhinestones and beads into my bracelets, and did wrap bracelets with bright embroidery floss and ball-chain and rhinestone chain, similar to what Honestly, WTF had posted on their blog a little while ago.
I figured that, no matter how old we get, sometimes something as both cheesy and iconic as the friendship bracelet can bring a little pop of color to an outfit – and a smile to one’s face.
Happy Birthday, J!!!
I hope she likes them.
xoxox
Carly
Leave Comment
May 4, 2011 | DIY
 Since it’s Rings Week here at Chic Steals, I wanted to share with you a quick n easy way to add a bit of pizazz to a store-bought 2-finger ring (with a flat top) and some scrapbooking embellishments. It’s DIY in 5 – minutes, that is. The easiest, quickest ways to take a piece from blah to fab and update it to current trends.
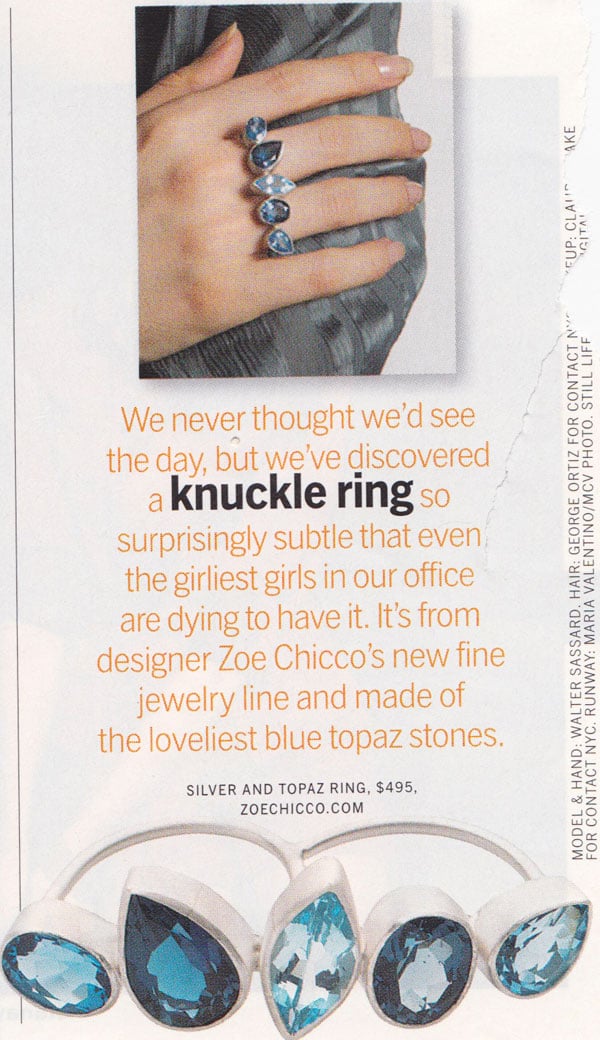 Lucky Magazine posted a photo of this gorgeous Zoe Chicco knuckle ring waaaaay back in 2008? or so, and I kept the clipping on my inspiration board. As usual, they were way ahead of the trend, since it’s only been since 2009/2010 that we’ve been seeing 2- and 3-fingered rings adorning the fingers of fashionable girls the world over. At $495, I found this beautiful ring beyond my budget back in 2008, and it’s sadly unavailable now besides. [BTW if you’re wanting this style but don’t want to DIY, Soixante Neuf sells a veeeery similar bejeweled ring so if you feel like spending $216 then the same style can be yours!] You can also probably find this double-finger ring covered in jewels from some lower-priced trendy retailer like Forever 21 or elsewhere if you look hard enough. But of course, I wanted to make my own – similar to the original!
It wasn’t until recently (around the holidays last year) that Jolee’s Jewels dimensional scrapbooking stickers came out with a new line of colored stick-on jewels in their settings…something that’s pretty hard to source for jewelry or embellishment projects, sticky-back or no. (Ever found set acrylic jewels (i.e., jewels in a silver or gold pronged or rim setting) in Jo-Ann’s or Michael’s? No? I found a small selection in M&J Trimming last time I was there, but it was very limited, and though yes, the BeDazzler will “set” gemstones onto fabric, the settings are really cheap-looking and the gemstones have to be super-small to fit into the Bedazzler nozzles. So anyway, large set gemstones as embellishments have been near-impossible to find – until NOW!)
You Need:
*Jolee’s Jewels “All that Bling” Vintage Gems dimensional stickers (I used gems from the Royal and Light Blue and the Baby Blue and Silver packs); or other set jewels
*flat-top 2-finger connector ring (the one in the photo above is the Hearts Two Finger Ring from Payless)
*jewelry glue/glue for metals (my fave is GS Hypo Cement)
How-To:
1. If using the scrapbooking stickers, you may want to pull the sticky back off first and figure out how you want to place your jewels. I found it was easy to position my jewels on the ring top while they were sticky – but super-difficult to pull them off one by one and add the glue. Your choice!
2. Once you’ve decided on the placement, just spread some glue onto your ring base, and position the jewels on top. Allow to dry for 24+ hours before wearing.
 And that’s…amazingly…it!

Here are some picks for base rings if you’re looking to buy online…though you could probably find good bases at Claire’s (which is where the ring I actually used is from), Forever 21, or other retail brick-and-mortar stores that cater to the young and trendy crowd. Here are some more picks from online:
Or alternatively, you could glue the jewels onto a piece of metal (like an old piece of jewelry; a sheet of embossing metal; or a metal jewelry blank from Michael’s newly-added hammering and embossing section)…and then glue TWO separate flat-pad ring shanks onto the back of the embellished metal, right next to each other, to create the two-fingered ring.
Happy DIY’ing!
xoxox
Carly
~If you liked this post, please share it!~
Save
Leave Comment
May 2, 2011 | DIY, Media
 Arbitrarily I have decided to make this week all about rings here on my site. One-fingered, two-fingered, sterling, precious metal, gemstones, faux, real, what-have-you – it’s all about finger-adornment!
If you have any questions about rings: how to organize them, how to clean them, and (best of all, IMHO) how to make them…either leave your questions in the comments or shoot them to me via the Formspring.me Ask me anything box in my right sidebar. —–> I’ll be getting to them all week long, so send them my way!
So first things first, here are some books to learn from and be inspired by:


1000 Rings: Inspiring Adornments for the Hand
I love this book! This is the perfect coffee table/inspiration book for anyone who loves rings.


30-Minute Rings: 60 Quick & Creative Projects for Jewelers
This is another one of my faves: beautiful photography and inspiring projects featuring a variety of techniques.


Make Your Own Rings: Easy ring projects to do at home
Another technique and tutorial book; this one also includes tutorials for rings made of Precious Metal Clay (PMC; similar to Art Clay Silver), which is a material people familiar with PolyClay can learn to use quite easily.


The Rings Book (Jewellery Handbooks)
Jinks McGrath, a well-known name in metalsmithing, has written this book which details ring-making for bench jewelers. Though this is certainly not for the hobbyist or beginner, the principles and techniques covered in this book are for fine jewelry and will familiarize anyone with how to properly create a durable piece of jewelry and work of art.


The Lord of the Rings: The Motion Picture Trilogy (Platinum Series Special Extended Edition)
Sorry, but we’re talking long-haired elves in tights. I figured a list about rings would not be complete without the One Ring, hmmmm? (Plus, the extended editions add almost an hour of cut footage to the movies -hence, more elves in tights. All the more reason!;-P)
And to get further in the mood, here are a two DIY Ring Tutorials I’ve shared here on the blog:
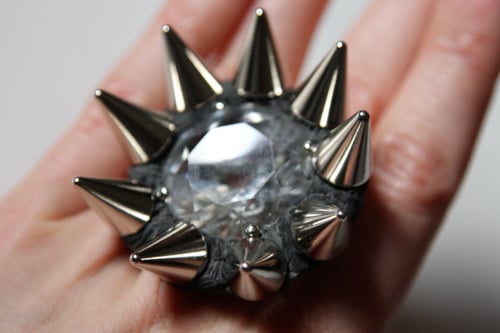 Spiked Crystal Ring
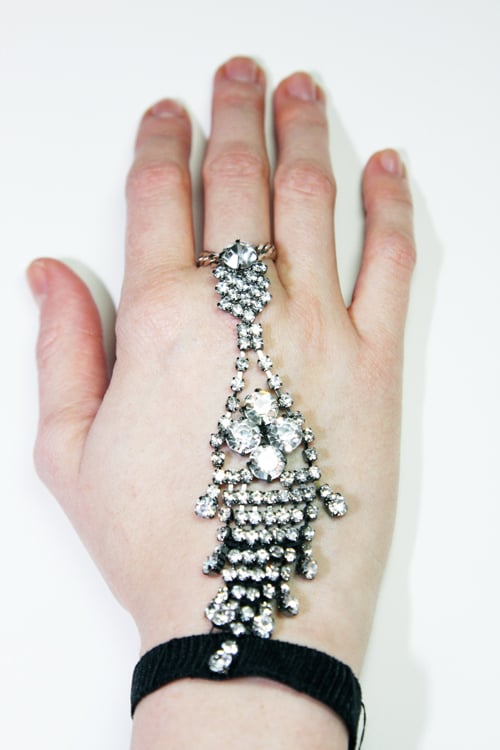
DIY Rhinestone Panja
Only…TWO??!!
Well, I’ll just have to remedy that!
xoxox
Carly
~If you liked this post, please share it!~
Leave Comment
May 1, 2011 | DIY
 I noticed these beautiful embellished ballet flats in my favorite Japanese magazine, Vivi, back in Winter of 2010. They’re Miu Miu, available in lovely pastel colors, and boast a pretty hefty pricetag ($745!).
I figured I could make my own lookalikes from a pair of shoes I already had. And it cost less than $15! Here’s how…
You Need: (more…)
Leave Comment
Nov 16, 2009 | DIY

 I became obsessed with making myself a Panja [i.e., back-of-the-hand jewelry piece] since seeing the above in Vogue October 2009. For all it’s highbrow designer, impossible-to-make-yourself fashion spreads, once in awhile the magazine showcases an idea that’s just mindblowingly awesome. How cool is this rhinestone-and-chain Alyssa Norton piece that the model above is wearing? (All her jewelry is really eclectic and covetable…to sum it up to its lowest common denominator, she likes wrapping silk thread around rhinestone chains; making rhinestones “cast” in metal and set into jewelry as if precious stones; barettes with dangling cords and rhinestones; and chain mail. Def. check out her site if you get a chance!)

But I’ve had Panjas on the brain since about 2005, when I saw the above Hahn An Su (sp?) design in a Vivi Magazine. I didn’t know what they were called then, but I definitely wanted one!

And then recently I saw this photo posted at Maverick Malone. She’s such a cool girl – and has great style – she just wrapped this broken necklace around her hand and wrist and called it a day. Love.
I don’t really know much about Panjas, so I am unable to educate anyone about them (and if they have religious significance I’m very sorry for my desecration and sacrilege) but….
Perhaps you can feel a DIY coming on?? LOL
I’m not paying $805 for the Alyssa Norton piece! So here’s the DIY:
How to Make a Panja [Back-of the Hand Jewelry]
You Need:*1 post rhinestone earring, pictured above (I used these earrings I got from Forever21 for $9.80)
*2″ flat silver curb chain
*1 small silver jumpring
*1.5″ wide x 8″ long piece of black fusible stretch mesh interfacing
*1 pair sew-on snaps
*needle + black thread (doesn’t have to be silk but can be if you like)
*pliers
*sewing machine
*iron
How-To:
1. Push the earring post through the center link in your chain piece. Using pliers, bend down and around the chain so the earring is secured and there’s no scratchy post end sticking out.
2. Wrap the chain around your index finger – cut to size. Secure with a jumpring.
3. Fold both long sides of mesh interfacing in towards center. Fold again in the center so you have a long rectangular strip with all raw edges enclosed. Iron flat – the heat of the iron will fuse the mesh together.
4. Sew along long edge of mesh to secure the folds you made.
5. Fold each shorter end over and secure with hand-stitching.
6. Place earring flat and stitch bottom rhinestone dangle to center of black mesh. This is the tricky part – you just need to weave in and out of the rhinestones with your needle, securing them both together and down. You don’t want the rhinestone dangles to move too freely across the back of your hand – so sew together inbetween the settings, and be carefuly of the thread catching on the rhinestone prongs.
7. Wrap the thread around the black mesh for a textural effect. (Here, to make it exactly like the Alyssa Norton piece, you can smudge silver fabric paint at intervals onto the black mesh, and decorate with rhinestones. I chose not to because I wanted more simplicity.
8. Hand-stitch a snap and its counterpart to each end of the black mesh.
You’re done! Super-easy, right???
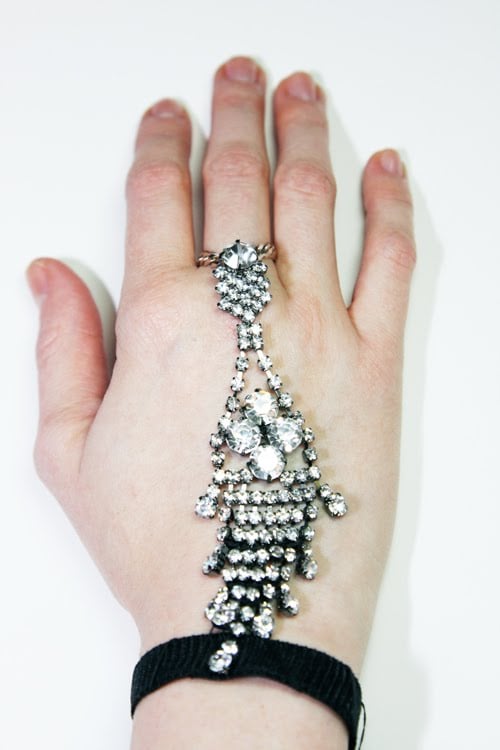
Feeling the backs of my hands are sad and naked now without my Panja….
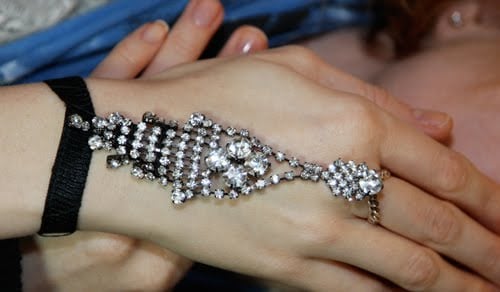
Happy DIY’ing!
xoxo
Carly
Save
Leave Comment











