Apr 9, 2014 | By Carly J. Cais, DIY
 I’ve just completed a super-fun collab with DIY kit shop Wander & Hunt – and designed 2 special DIY projects just for them.

 The first, the DIY Radiant Rhinestone Belt, was actually inspired by a rhinestone belt I spied on Anthropologie.com this past Winter, and figured it would be a snap to re-create. For $29 you get the ribbon base, felt for attaching the rhinestones, glue, a skewer, and an absolutely HUGE amount of rhinestones to deck out your waist embellishment. Gorgeous over a plain shirtdress or even a light coat, this will be an accessory you reach for again and again to dress up your outfits.
Check out the DIY Radiant Rhinestone Kit Here
 For the second project, the DIY Gem Pendant Necklace kit, I drew inspiration from a Dannijo bejeweled pendant I saw on Pinterest. Again, for just $29 you receive a bevy of gems, glue, a skewer, PVC plastic, endcaps, jump rings, and a rope for the necklace. The design is super-chic – and creates a fabulous statement!
Check out the DIY Gem Pendant Necklace Kit Here
You can also check out all the other DIY kits available at Wander & Hunt here (everything under $70!), as well as all the other supplies and materials that they offer. They have a ton of tutorials on the site as well, so you can get your DIY on without even buying a kit. Standard shipping is also free worldwide!

Thanks so much to the team at Wander & Hunt for making this happen! I had a blast designing these projects. 🙂
What do you guys think of these kits? Have you ever bought a DIY project kit – and was it worth it? Let me know in the comments!
xo
Carly
Apr 6, 2014 | DIY
 Since Easter is coming up soon, I was collecting some images of inspiring egg decoration. I landed upon this, and began thinking…what about doing this to your nails? So I did. And it turned out amaaaaaazing. (Who doesn’t love chic gold leaf, right??!)
  Here’s how to do it too:
You Need: (more…)
Apr 2, 2014 | DIY
 *This project I contributed to Snippets Magazine: The New York Issue on Cut Out + Keep in 2010, and am re-posting to my blog here.
A la Balmain or a la Jenny, this blazer is looking sharp!
 Though it only appeared onscreen for the briefest of moments, this was Little J’s take on an elegant cover-up to take her straight to the Ambassador’s Dinner and show up Damien. Making your own is easy, just by adding multiple safety pins to a blazer in need of a makeover.
Materials:
 Black fitted Blazer / Medium-large size silver Safety Pins
How To: 1. Start by inserting a couple safety pins in a fan-shape at one of the side-seams of the blazer, right where it hits your waist. Try not to push the safety pins through the jacket lining.Add more safety pins in-between the first row.
 2. Keep alternating placement as you fan out from the side and create a “starburst” pattern.
 3. Add a few larger safety pins near the edges.

4. Repeat for the other side of the blazer.

So easy- and so impactful. This piece looks great over skinny jeans, or even a slinky dress for a night out!
Happy DIY’ing!
xo
Carly
Mar 14, 2014 | DIY
 While I was in Tokyo last year, I picked up another felt macaron coin purse kit. (I think I’m a little addicted!)
 I made a cute little half-and-half cookie macaron coin purse the year before, and within 6 hours of hanging it from my handbag, I promptly lost it somewhere on the streets of Tokyo. I did look for it, but never found it. (T _ T)
 So the next time I went I intended to buy another kit and re-make the purse…except I couldn’t find the same kit again. So I bought a chocolate chip cookie version.
  Here are photos of the process of making these cute little purses. You need yellow and brown felt, a thread and needle, a 5cm-long zipper, 2 pieces of stiff cardboard (like cut from a milk carton), some fiberfill stuffing, scissors, a pencil, brown eyeshadow, and a small ball chain to make these.)
  Hope you like it! Have fun making your own version 🙂

Happy DIY’ing!
xo
Carly
Save
Mar 8, 2014 | DIY, Life
 And yup, you can do all these great St. Patrick’s Day crafts easily and at home! Here’s the full list: (more…)
Mar 6, 2014 | DIY
 Spring is headed our way, and what better way to embrace it than to whip up some quick DIY hair adornments? Here are some ideas for fun and fabulous pieces to add the crowing touch to your warm weather outfits.
For the above look at Dolce & Gabbana, wrap a thin wire headband with a string of gold beads, securing here and there with dabs of hot glue. Pull apart sprays of white and light pink silk blossoms from the craft store, and attach to a long piece of soft jewelry wire, wrapping the wire around the base of each flower. Once your hair is styled into a braided bun, poke one end of the wire into the underside of the bun, wrap around the top of the head and back down again, and finish by wrapping around the bun and tucking the end in. Complete the look by hot-gluing large gold coin buttons onto a hair clip, and clipping it just above the bun at the back.
 Go totally boho like at Anna Sui by hot-gluing distressed silk blossoms onto a bundle of long velvet ribbons. Also glue on a bridal applique in the center flower at the forehead. Tie at the back so the ribbons trail down into the hair.
 The super-luxe headbands at Tanya Taylor are easy to re-create with clusters of rhinestones and jewels, or vintage buttons or brooches, clipped along wide black satin-covered headbands.
 Valentino‘s studded headbands could be made by covering a headband base with maroon leather and gluing gold buttons in rows along the top and sides.
 The pretty flowers at Zac Posen could be made with silk or paper blooms run through with bobby pins and pinned straight into a messy updo at intervals.
 To make the interesting top clips at Elie Saab: on a stretchy gold headband base, attach a slightly curved flat gold barrette using thread to loop it onto the base. Just go around the bottom part of the clip numerous times until it won’t budge from the stretchy headband. (Goody makes an excellent dupe of that gold clip.)
 Tiny pretty flowers dotted the hair at Honor: and to make your own, I’d suggest using dimensional scrapbooking stickers (or tiny paper or silk flowers found in the same section). If the sticky side isn’t sticky enough to stick into your hair, snip a tiny piece of fine-toothed sticky-back velcro and attach to the backs of the blooms.
 The wide minimalist ponytail holders at Jason Wu could be made with some gold leather and a hair elastic (just hand-sew each end of the leather piece to the hair elastic, and slide it over a secured ponytail).
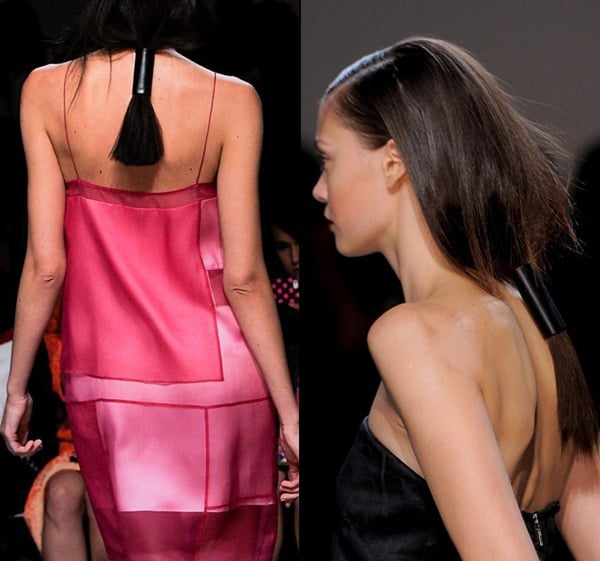 You could make a similar ponytail holder just like the above to mimic the look at Helmut Lang. In this case I believe you should use a larger rectangle of black leather and attach sticky-back velcro to both sides of it; secure the ponytail with an elastic, and wrap the leather around it, closing with the velcro.
 For Jenny Packham‘s ethereal clips, just glue or wire a vintage insect brooch, finding, or charm onto the end of a matching bobby pin in silver or gold.
Happy DIY’ing!
xo
Carly
Images via Fashionising. Read their full rundown of Spring Hair Accessories here (which also includes how to style the hair in the above hairstyles).











