Dec 28, 2012 | DIY, Fashion, Life
 Whether it’s watching the ball drop in Times Square, rocking out at a packed party of friends and party-crashers, or just having a low-key get-together with coworkers and their spouses, the perfect party outfit is only a click…or a project…away. Try this on for an elegant party style:
Star Cluster Hair Accessory: Buy It for $26 or DIY It
Faux Fur Stole: Buy It for $59.99 or DIY It
A-line Little Black Dress: Buy It for $49.99 or DIY It
Metallic Clutch: Buy It for $26.95 or DIY It
Glitter Pumps: Buy It or DIY It
Have a wonderful and chic New Year’s Eve!
Carly
Leave Comment
Dec 23, 2012 | DIY
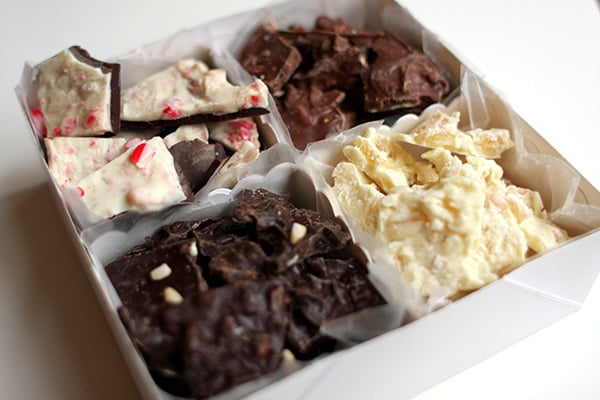 So it’s only two days before Christmas and time is running out. You want to give something thoughtful and handmade…but just can’t deal with cookies or fudge. How about Holiday Chocolate Bark? It’s super-easy (just melt chocolate chips and add mix-ins!), takes about 20 minutes to set in the fridge, and is totally customizable to your (or the recipient’s!) tastes.
  Here are 4 delicious and easy recipes I whipped up in a flash, all built upon a single basic recipe.
Basic Recipe:
1. Cover a baking sheet with foil or wax paper (a spray of cooking spray will help hold the paper or foil down).
2. Add 1/2 T canola oil to a 12 oz bag of chocolate chips in a microwave-safe bowl. This is your Base.
3. Microwave on high about 1 minute; stir. Microwave for 30-second increments a few more times, stirring in-between, until the chocolate chips are completely melted. (Be careful not to over-heat! Your chocolate will seize up – and the remedy for this is to add more oil and gently heat in 10-second increments until you can get the chocolate liquidy again.)
4. Working quickly, stir in the Flavoring (if the recipe calls for it), then stir in the Mix-Ins.
5. Pour out onto the baking sheet and use a spatula to spread out. Sprinkle with Topping if the recipe calls for it.
6. Place the sheet in the fridge about 20 minutes until firm.
7. Break into small pieces with your hands. Enjoy!
So here’s how to customize: just choose your recipe and follow the how-to above. Easy as…pie bark!
{ Coconut Pineapple Macadamia Nut Bark }

A creamy taste of the tropics. White chocolate has a pretty distinct taste, so to cover it up and make it taste more “tropical” I added some coconut flavoring.
Base: 12 oz bag of white chocolate chips + 1/2 T canola oil (I needed a little more since my white chocolate seized)
Flavoring: 1 tsp coconut flavoring (optional)
Mix-ins: 1 cup chopped dried pineapple rings, 1/2 cup chopped macadamia nuts
Topping: 1/3 cup shredded sweetened coconut
{ Double Peppermint Bark }
The perfect holiday recipe. Use the same brand of chocolate for the Base and the Top Layer for maximal adhesion between the two (I’ve used two different brands before, and had the Top Layer separate from the Base when I cracked it into pieces).
Base: 12 oz bag of milk chocolate chips + 1/2 T canola oil
Flavoring: 1 tsp peppermint flavoring
*Top Layer: 12 oz bag of white chocolate chips + 1/2 T canola oil
Mix-ins: crushed candy canes
Topping: crushed candy canes
*For this recipe, spread out the bottom flavored base layer first onto the pan, and cool in the fridge. When hard, then melt the top layer chips, add the mix-ins, and spread on top of the Base layer. Sprinkle with the topping, then place in the fridge again to harden completely.
{ Salted Caramel Cashew Bark }
 This is the at-home DIY version of my FAVORITE Godiva chocolate bark…which is a whopping $12 a bar at the store.

Base: 12 oz bag of milk chocolate chips + 1/2 T canola oil
Mix-ins: 12 chopped soft caramels (Werther’s makes a soft version of their famous caramels which works really well in this recipe…and Lil Tot ate one just before I took the above photo), 1/2 cup chopped raw cashew nuts
Topping: 1.5 tsp chunky Maldon sea salt
{ Dark Chocolate Cherry Almond Bark }
A grown-up version of chocolate-covered cherries, packed with antioxidants.
Base: 12 oz bag of dark chocolate chips + 1/2 T canola oil
Mix-ins: 1 cup whole dried sweetened cherries, 1/2 cup chopped slivered blanched almonds
Topping: fine salt sprinkles (optional)


 For gift-giving, drop broken bark bits into colored cellophane bags, or package in a beautiful gift box like this above from a gift box kit by Martha Stewart (available at Michael’s in the Scrapbooking section). And don’t forget to enjoy some chocolate bark yourself!!
Happy Holidays to one and all~
Carly
Leave Comment
Nov 29, 2012 | DIY
 Whip up some sparkling, shimmering ornaments super-quick, and with only a couple of supplies! This can even be a great project for kids to work on their fine motor skills.
Materials: sequins in leaf shapes or snowflake shapes / pearl-head pins in red or pearlized / round styrofoam balls (you can paint them different colors before using if you don’t like the white showing through) / glitter ribbon
Tools: glue gun / scissors
How to:
1. Cut a short length of ribbon, enough to go around the styro ball and create a hang loop. 2. Use the glue gun to attach around the ball at the center. Loop the end of the ribbon over itself and glue together to hang.
 3. Use the pins to attach sequins all over the ball.
  For the holly ornament, use 2-3 leaf sequins strung on one pin, and for the snowflake ornament, use 1-2 sequins on one pin.
 4. Keep adding pinned sequins until the ball is completely covered.


Hang on your tree, pile in a bowl, attach to a garland or a wreath – however you decide to display these pretty ornaments, they’re sure to be the star of your holiday decorating!
Thanks to LocalSpotter.com for featuring these DIY Sequin Ball Ornaments in their Christmas Gift Tips series today! Check out their whole Christmas Guide series for some major holiday inspiration!
Happy DIY’ing!
xoxox
Carly
Leave Comment
Nov 24, 2012 | DIY
 Rosie Martin, the incredibly-talented sewist and entrepreneur behind the UK-based company DIY Couture has (finally!) released a book by the same name. She runs DIY workshops and sewing events throughout London, and puts out a biannual line of instructions to create an entire clothing collection from scratch.

This first book, DIY Couture: Create Your Own Fashion Collection contains the instructions to create the base pattern for 10 unique pieces, each of which has an amazing 8 variations included within (and for those who are keeping track, that’s a whopping 80 different garments that can be made from this one single book!)
The basic pattern (or “block”) for each style is actually created by doing a ruboff (or copy) of an item of clothing you already have in your closet that fits the way you’d like it. The instructions are detailed, illustrated, and very easy-to-follow. There are no patterns to copy, cut out, or notch; you’re just making a pattern (or drawing directly onto your fabric) for your finished pieces…a huge timesaver in the long run. (But trace onto paper or oaktag to keep your blocks for all the variations you could do for each Collection!) 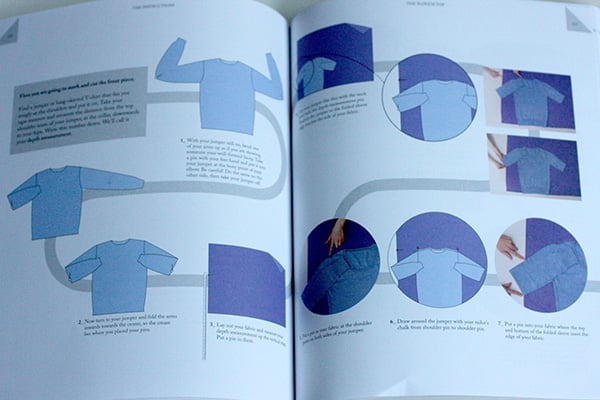

Though it’s not “Couture” and you may not end up with a pattern that’s precisely exact to please the discerning patternmaker, you end up with something that is close enough for the purposes of the home sewist or DIY’er. You can make your blocks using a minimum of tools (usually just marking chalk, pins, and a ruler…no French curves or flexible ruler needed!), and more importantly, since you’re making them using something you own that fits you already, every variation made from that block will also fit you. No grading or difficult patternmaking needed!

The “Collections” are grouped into specific styles of variations on the blocks, with funky-sounding names like “Coffee Classic,” “Acid Candy,” or “Monochrome Art.”

Though an entire collection may not be to one’s specific taste, you can easily mix-and-match the style, cutting, and details of the pieces to create exactly what you want. It’s the best road map you could ever want when it comes to DIY sewing.
I love that the style and silhouettes of the pieces are very on-trend and modern – and you can easily tailor the look of anything to mimic other pieces seen on the runways or in retail stores. Fashion that looks high-end but is totally attainable with your own skills!
 For every DIY’er interested in sewing, for every aspiring designer, for every sewist who wants the quickest route from concept to finished product: this book caters to you all. Though this is tailored more to the sewist with intermediate skills, even beginners can try their hand at the simpler projects and work through the different pieces to gain skills and confidence.
Rating:  (4 out of 4)
Overall: An amazing resource chock-full of ideas and how-tos, using the simplest of techniques to create beautifully on-trend and modern clothing. A MUST for any sewing or DIY library! (And a great Christmas gift for the fashionista in your life!)
Have any of you guys checked out this book, or visited Rosie Martin’s site? What do you think of a sewing book that has you draft patterns from clothes you already have? The perfect intro to sewing – or not precise enough to be called patternmaking?
xoxox
Carly
FTC Disclaimer: I received one copy of the book DIY Couture for review purposes. I have not received any other compensation whatsoever. The review and opinions above are my own. To read more about my Disclosure Policy, click here.
Leave Comment
Nov 19, 2012 | DIY
 Around this time of year we all want our homes to be festive and bright; our holiday table filled with cheer. These DIY glimmering, glittery Christmas napkins adorned with ornaments and made with Tulip Shimmer Sheets can help serve up a wonderful meal as a sparkling accessory. Plus, once the cutting’s done, application is a cinch! Here’s how to make your own:
(more…)
Leave Comment
Nov 12, 2012 | DIY
 Create a quick butterfly clip with a faux butterfly decoration from the floral decor section of the craft store (at Michael’s Arts & Crafts, they’re with the fake birds, nests, twigs, and vase filler).
Have you ever noticed that the most eye-catching Fashion is all about the details? Make a pretty wrapped bow bracelet with some dead-soft brass wire, available at any craft store, in spools in the jewelry-making section.
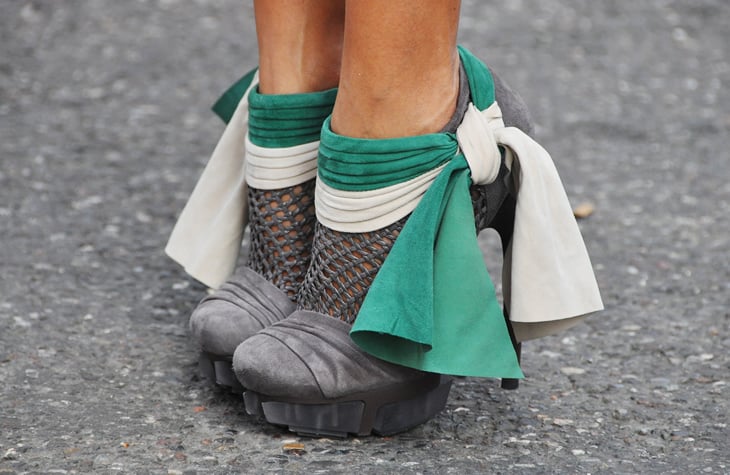 Wrap some contrasting soft leather or fabric around the tops of your ankle booties, tying in knots at the sides. Instant colorblocking!
Take the street style photos of Tommy Ton on the JakandJil blog, for instance. His amazing photos capture all the little details of outfits, accessories, jewelry, and all the tiny details about a time, place, and the fashion therein that make the viewers feel in the moment. Plus those little details that feel fresh and unique. Scribble a favorite saying on your dark bag with a silver paint marker. (Practice first in a piece of a paper before committing to something permanent!)
(And ohmigosh I just realized whose bag this is! I can’t believe I didn’t realize it before. It’s Vivi model Sara Mary‘s bag, signed by Jane Birkin herself!)
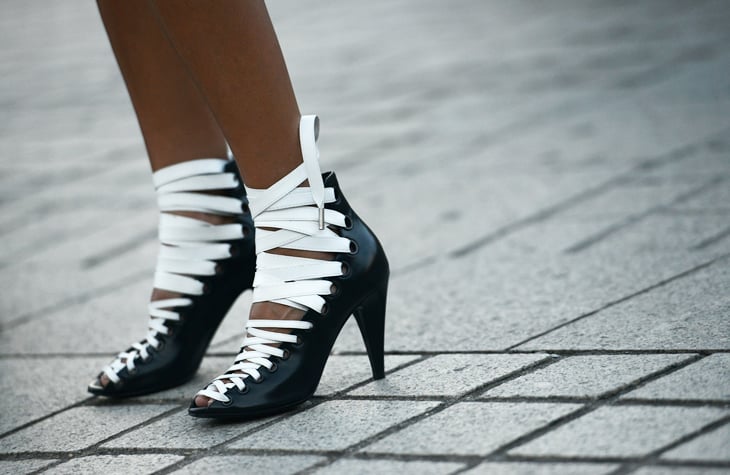 Re-string your front-laced heels with an unexpected material, like regular shoelaces, for a sporty look.
The detailing is what makes us individuals.
Click to Tweet the Above!
It’s a way to express oneself, to make that white blouse less standard, that LBD not just off-the-rack. Cut a tissue-thin tee at the shoulder seams – then re-tie in little knots to create a peekaboo effect at the neckline.
 Tack on some veil netting to something surprising, like a knit beanie (such a popular DIY!)
And the details are soooo easy to DIY. (Way easier than patternmaking, sewing from scratch, or even refashioning.)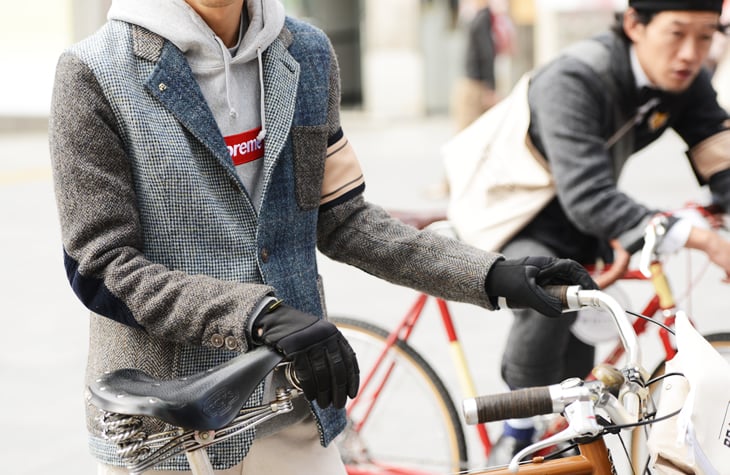 If you’re into stitchery, make a hybrid coat from parts of other coats. No so much? Cut contrasting pieces of fabric – the add some Heat ‘n’ Bond fusible to the back, and fuse onto the front and inside lapel of a blazer you may already have. Instant facelift.
 Make a one-of-a-kind necklace by twisting and knotting different-colored chains together, even incorporating some different materials, like cord or lacing. Add some charms to make it your own.
Practice looking for those details, and noticing what makes it different. If you see something you like, emulate, recreate, re-master, re-mix.
Click to Tweet the above!
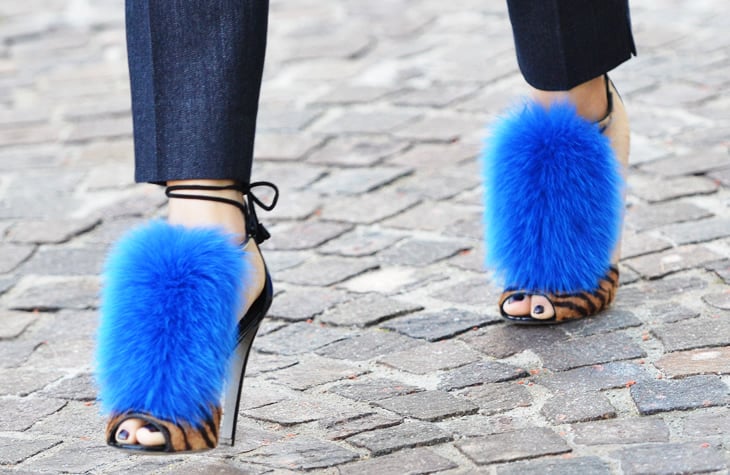 Change the look of any sandal by adding a swatch of fun fur to the front (tack in place with a couple stitches under the lacing; the fur will hide it completely). This place sells some great, and very realistic, choices.
 Do like Prada did and add chandelier drops to a plastic rainhat for some reflective rain protection.
 Add Grandma’s crocheted flowers or doilies (or crochet them yourself!) to the front of a sweatshirt for a modern vintage feel.
You are the genie of your own identity.
Click to Tweet the Above!
xoxox
Carly
All photos from JakandJil.com.
Leave Comment











