Apr 14, 2010 | DIY

Summer is almost upon is, and style inspired by ancient cultures is in. Bold prints, bright colors, beads, and lacing: we’re seeing it on the runways and on fashionable girls on the street.
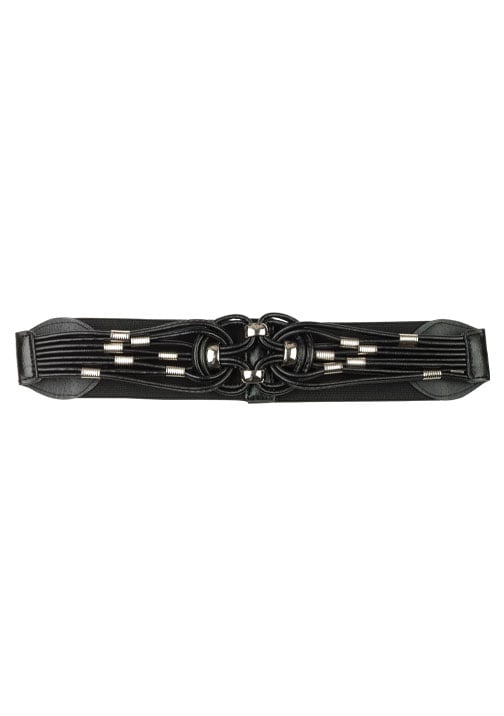
Create the above knotted belt out of satin cord and add jewelry findings for a fashion-forward Celtic infusion of style! (The lacing may look tricky, but once you get the hang of that, it’s a piece of cake!)
How to Make a Bohemian Macrame-Style Knotted Cord Elastic Belt
Materials You Need:
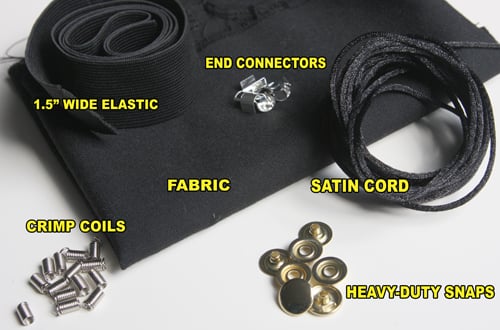
5 yd of satin cord (about 2.5 – 3 mm thick) *small amount of scrap fabric // 14 large crimp coil necklace ends (silver-tone) // 4 large silver-tone necklace end connectors // 1.5″ wide black elastic, cut to your waist circumference (we’ll be cutting it shorter below) // 2 snap fasteners
Tools You Need:
tape // scissors // wire-cutting pliers // sewing machine // regular to heavy-duty needle // thread matching belt color // snap-setting pliers or die & hammer // iron & ironing board
How To:
Prep Your Parts
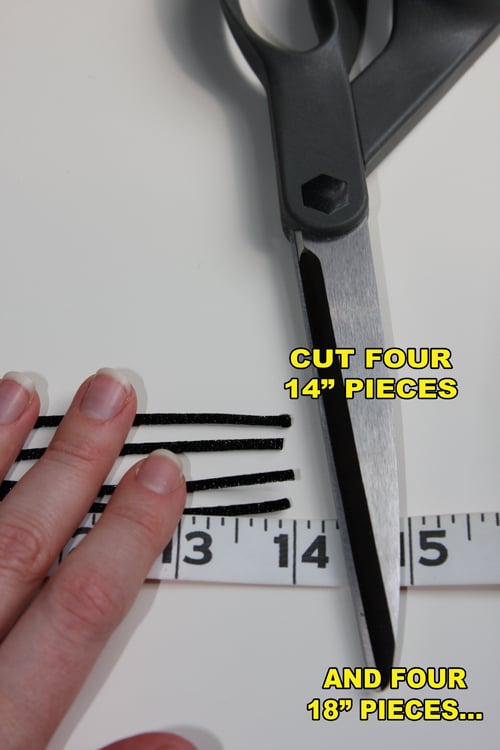
1. Cut satin cord into the following pieces:
*FOUR pieces 14″ long (to make outer loop)
*FOUR pieces 18″ long (to make center knot)
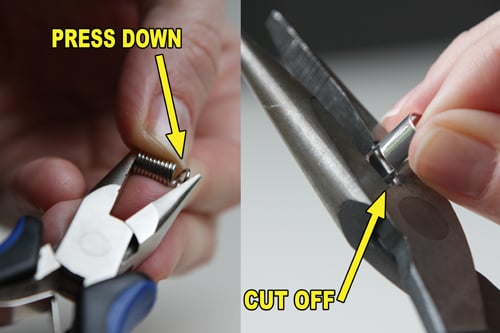
2. Use pliers to press down the end coils of the crimp ends. Cut off the hang-loops of the end connectors.
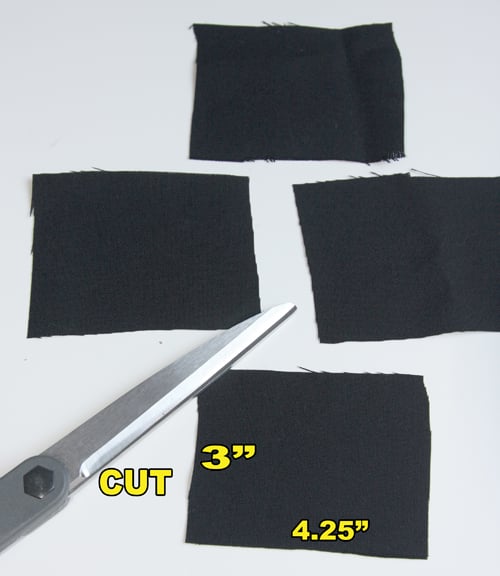
3. Cut 4 pieces from your fabric, measuring 4.25″ wide by 3″ high. We’ll come back to those fabric pieces later.
Start Weaving: Outer Loop First
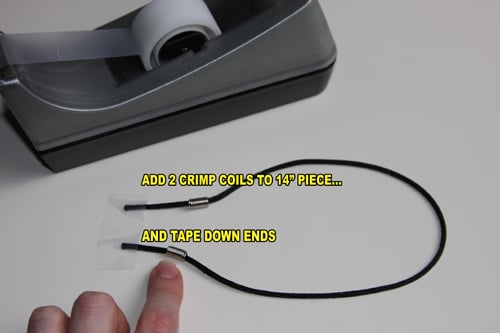
4. Thread 2 crimp ends onto a 14″ piece of cord. Loop it over and tape down the ends.
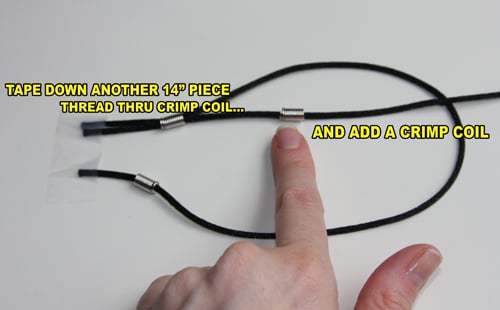
5. Tape down another 14″ piece of cord. Thread it through the crimp coil from the previous piece of cord…and add a crimp coil onto the cord.
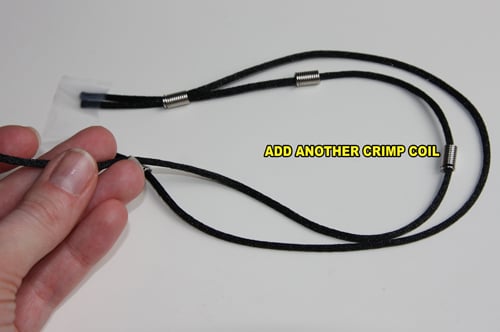
6. Add another crimp coil, and loop it around.
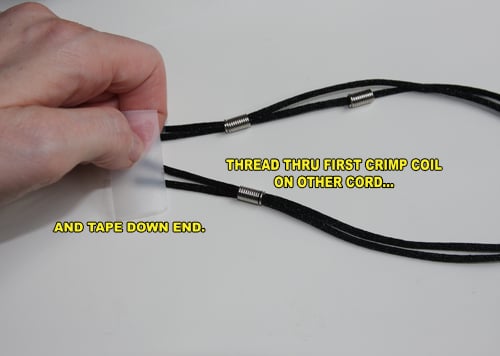
7. Thread it back through the remaining crimp coil on the first cord. Tape down the end.
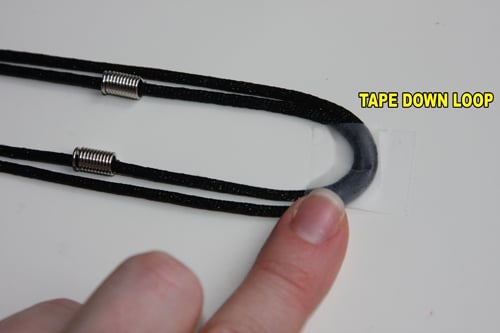
8. Secure the loop you just made with a piece of tape.
Keep Going: Inner Loop-and-Knot

9. Put a crimp coil on one of the 18″ cord pieces and tape down the end, placing it in the center and directly below the cord from the previous step.
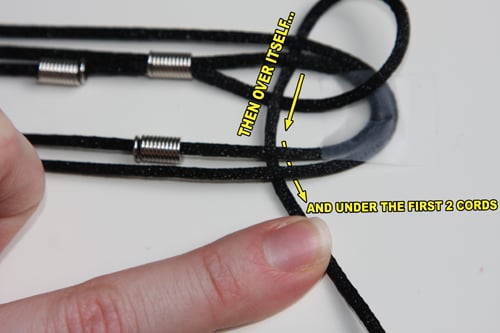
10. Thread it through the crimp coil on the adjacent cord and loop it around to the right, then back under the first two cords, heading downwards.

11. Thread it over itself, then downwards under the first two cords again.
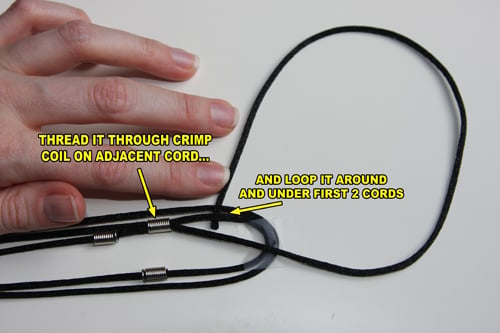
12. Loop it to the right, back over the first two cords, and then to the left under itself again.
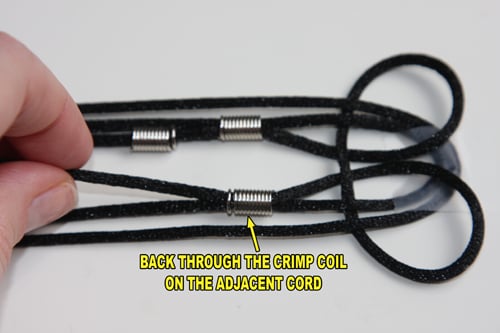
13. Thread it back through the crimp coil on the adjacent cord.

14. Add another crimp coil, and tack down the end with tape.
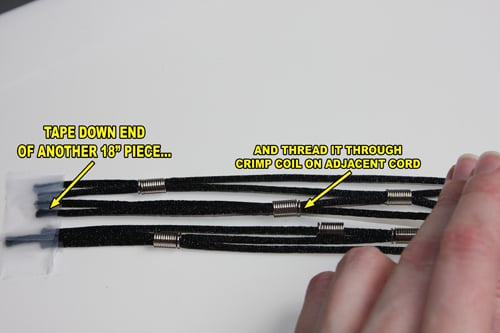
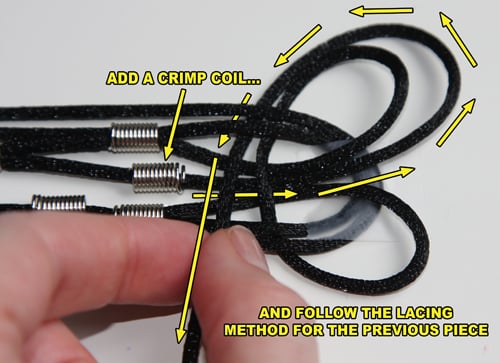
15. Time for the final cord! Tape down the end of another 18″ piece of cord, and thread it to the right and through through crimp coil on the adjacent cord.
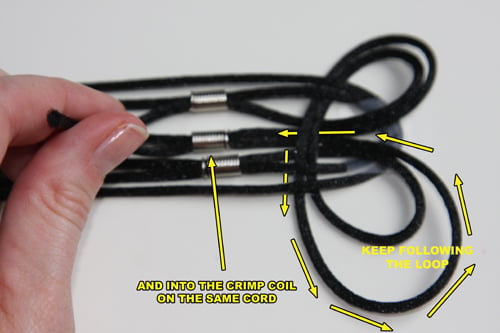
16. Add a crimp coil, and weave the cord around the center loop in the same manner as the previous piece. (It will be to the outside of the previous cord. Go under the previous piece, to the right, over the taped-down outer loop, up and around, under the outer loop cords, over the center loop cords and down…)
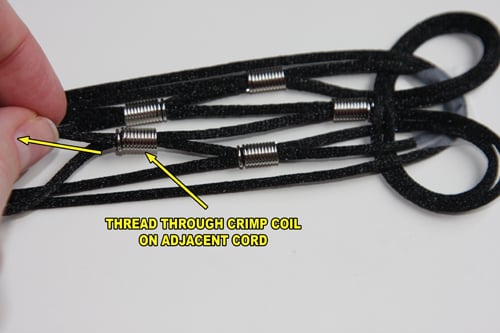
17. Keep following the center loop of the previous cord. (Around and to the right, over the taped-down center loop, back to the left, under itself…) And finally, thread it back into the crimp coil you added to it in Step 15).
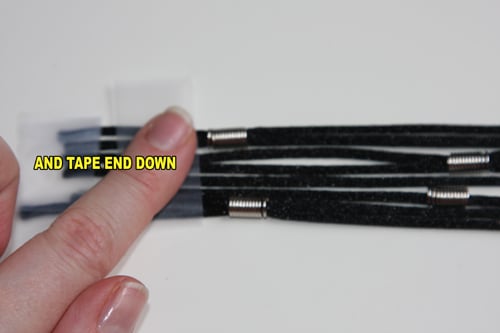
18. Then tape its end down.
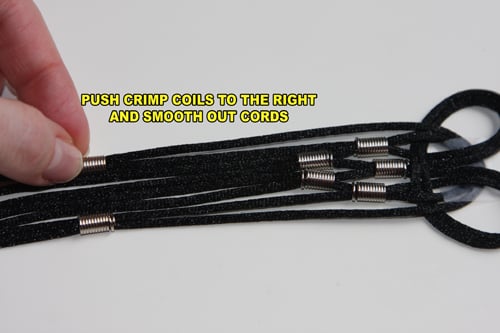
19. Shift the ends of all your cords together, re-tape, and push the crimp coils further to the right, closer to your center loop-and-knot.
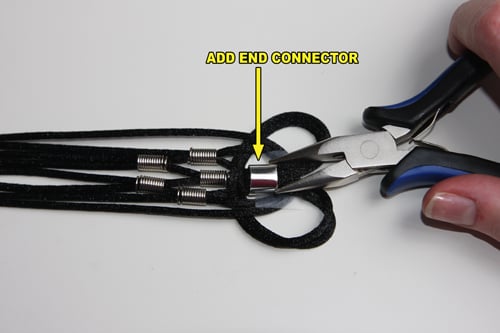
20. Use pliers to add an end connector to the center cords just to the left of the taped-down loop. Smooth out your cords – and congratulate yourself on a job well done!
Other Side & Finish Lacing
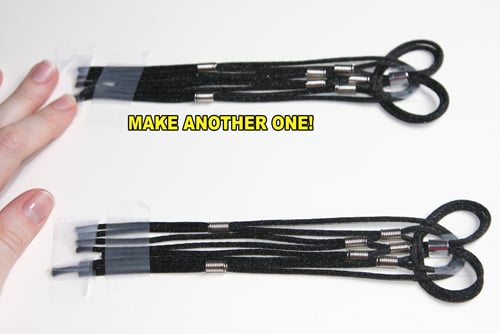
21. Make one more group of looped cords in exactly the same manner. (See Steps 4) – 20)]
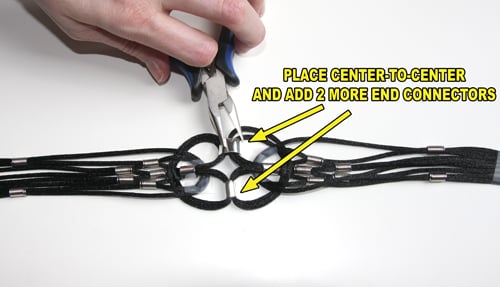
22. Place the two groups of cord side-by-side, matching up the centers. Add 2 more end connectors to the center loops to connect one side to the other. Now you’re finished with all that lacing – which probably feels fabulous!
Make the Belt
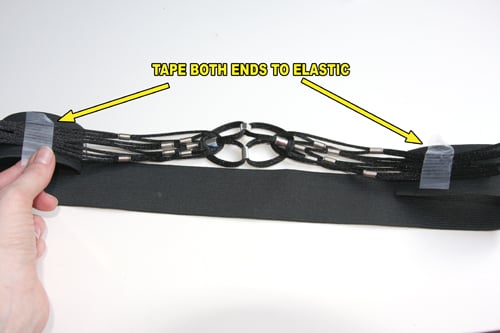
23. Tape both ends of the cord group on top of the ends of your piece of elastic. Make sure your cords are centered and each side overlaps the elastic the same amount.
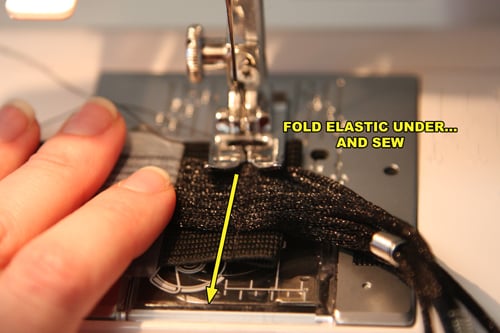
24. Fold the elastic under itself, about 3/8″, and stitch the cords down on top. (I went over the same area twice with a straight stitch, then zigzagged down it for strength.) Stitch down both sides to the elastic.
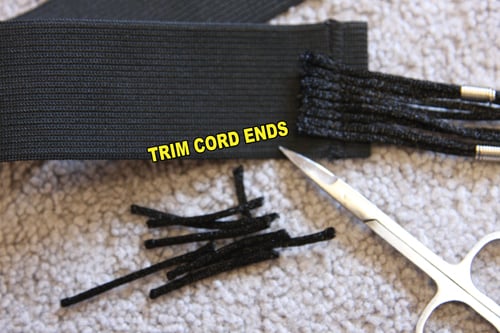
25. Trim off the cord ends on the other side of your stitching.
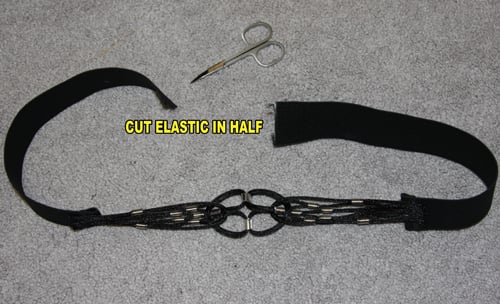
26. Cut your elastic piece in half.
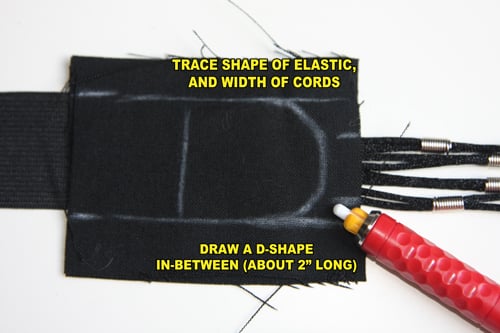
27. Place 2 fabric pieces right sides together, on top of where you’ve stitched the cords to the elastic. Trace the width of the elastic, and mark the width of the cords. Then draw a “D” shape between the elastic piece, about 2″ long.
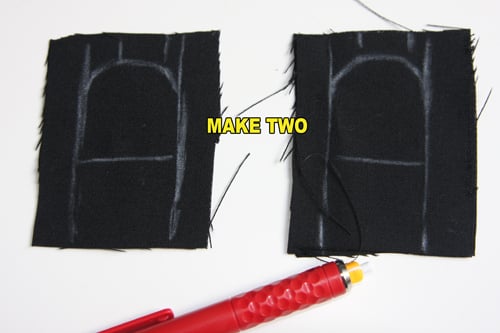
28. Do the same for the other 2 pieces of fabric.
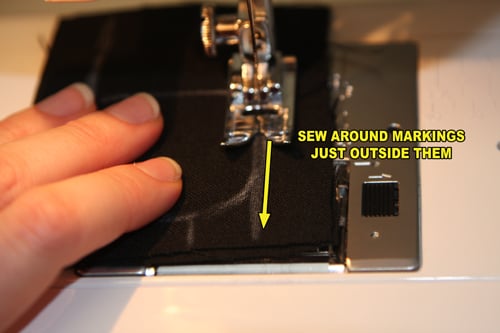
29. Sew around the “D” on each pair of fabric pieces, just outside you markings. Leave a small area unsewn on the flat side in order to turn them right-side-out.
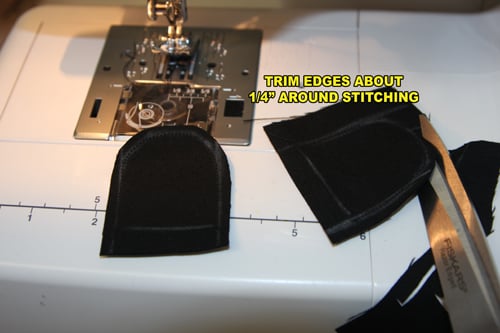
30. Trim fabric around the sewing at about 1/4″.
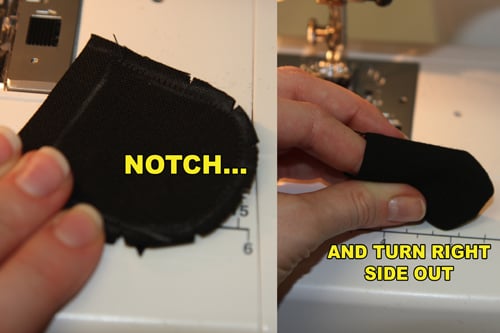
Notch, then turn the pieces right side out. Tuck the unsewn areas’ raw edges to the inside. Press both pieces with an iron to flatten.
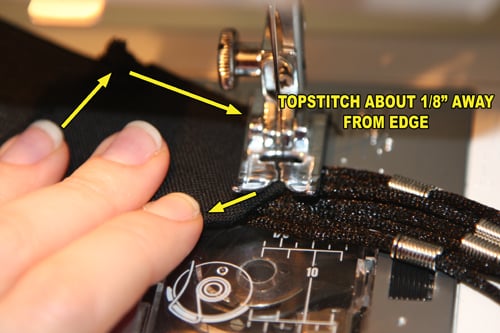
31. Place one D piece over where the cords are sewn to the elastic, in order to cover them. (Rounded edge of D needs to cover the cords but hang off the edge of the elastic.) Topstitch around edge of D, about 1/8″ from edge, to secure it to the elastic and the cords.
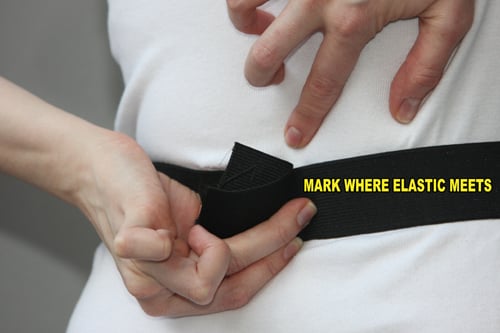
32. Try on belt, and center the knotted cord at your center front. Mark where the elastic meets at your center back. Cut elastic at that measurement.
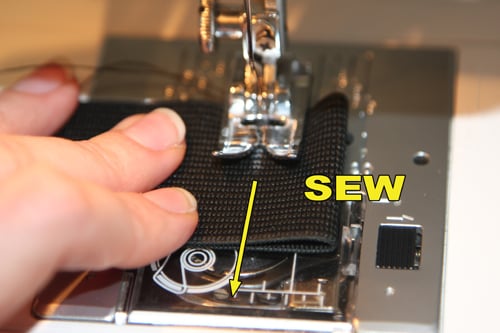
33. Fold each end of elastic under about 3/4″. Sew down about 1/2″ from edge.
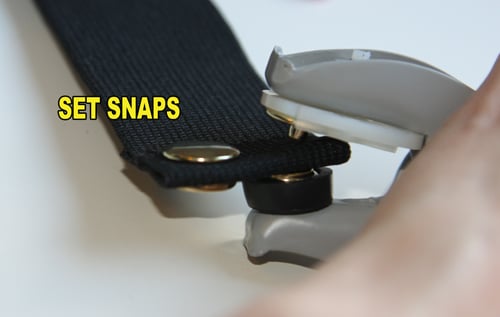
34. Set two sets of snaps in the elastic ends according to the instructions on your snap-setting pliers or die set.
Ta da! This tutorial looks complex, but doing it is incredibly rewarding – and the whole process is a lot faster than it looks!
Tip: If you want to make more of a statement piece, use thicker cord or rope, and thread it through large-hole beads instead of jewelry findings. You could even wrap strips of embossing metal around the cords instead of threading them through beads at all!
Have fun and go tribal:-)
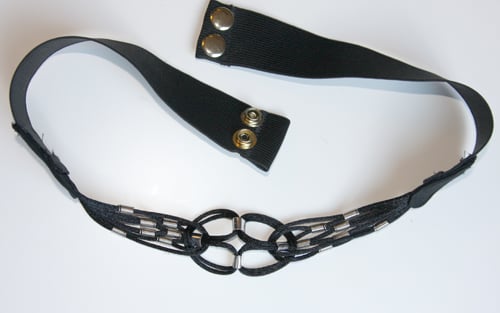
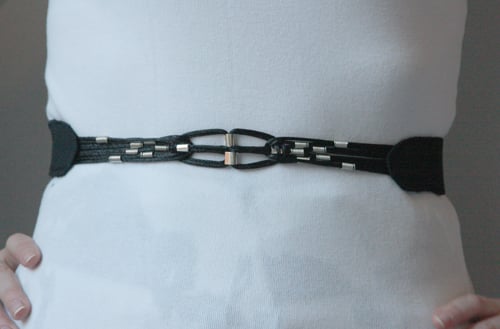
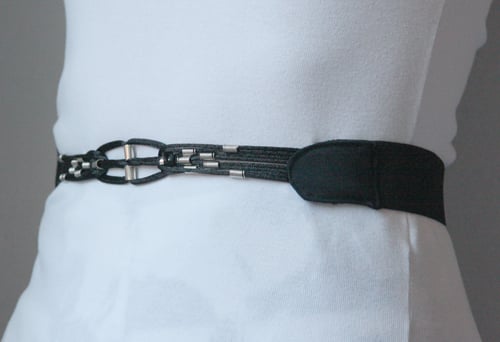
It also doubles as a cute necklace at this size!


xo
Carly
as originally posted on Threadbanger.com
Save
Save
Save
Save
Save
Save
Apr 11, 2010 | DIY
Even luxury brands are now trying to cash in on the DIY movement.
On the heels of the Fendi Paint-Your-Own Artist Baguette (now selling at a staggeringly-discounted $585 at Neiman Marcus)…comes the Fendi Baguette Needlepoint Kit.
From the Neiman Marcus website:
Craft couture—this innovative kit has everything you need to make your mark on the signature Fendi baguette. Get silly, get serious, get crafting. The entire bag is your blank canvas.
- Natural fabric bag.
- Golden hardware.
- Adjustable, interchangeable top handles; one fabric and one leather.
- Flap top with magnetic zucca closure.
- Assorted multicolor thread, three design cards, five needles, and three thimbles.
- 5″H x 10 1/2″W x 1 3/4″D.
- Made in Italy.
If you are feeling crafty (and..um…loaded), it’s available for $995 for preorder at Neiman Marcus.
What do you guys think of this? Are the luxury-items consumer and the DIY-er mutually exclusive??
Why not – gasp – buy your own needlepoint canvas, a couple of embroidery threads, a needle – and MAKE your own front flap to a little bag you already own??
Oh, that’s right. Because it wouldn’t be Fendi then.
xoxox
Carly
Apr 7, 2010 | DIY

Inspired by the original DIY’er, Martin Margiela, I’ve dipped into my overflowing stash of mismatched buttons to craft a fabulously avant-garde-style t-shirt. I’m using an old shirt that I was considering discarding because of a couple tiny stains on the front. But that’s what DIY’s for! Cover up stains, patching, pilling, or a design you don’t like…or add interest to an otherwsie boring piece. There’s a ton of great art and photos out on the internet – or you can create your own image and use it as a template for button placement. I chose monochromatic buttons so that the image would appear “pixellated” when standing from afar – and though I chose to make an eye (in my own homage to Salvador Dali), you could make anything your heart desires.
You Need:

t-shirt*large number of buttons in various sizes and shapes (preferably in shades of black, white, and gray) // Jewel-It Embellishing Glue (or other glue for affixing plastic embellishments to fabric) // piece of cardboard or t-shirt board
Optional:
printout, drawing, or photo // tape // sewing machine & needle for knits // hand-sewing needle // thread matching buttons
How To:
Prep Time
1. Pre-wash t-shirt if it hasn’t been washed already. Place cardboard or t-shirt board inside t-shirt to flatten front.2. (Optional) If you are using a piece of artwork as a template, slide it inside your tee, just on top of the board. Secure with tape.
Decorate

3. Now’s the time to channel your inner artiste! Place tee on a flat surface and start covering it with buttons. Start with the black outlines, then place the brightest white buttons on the brightest white parts of the eye. (You’ll probably spend a lot of time squinting at your picture.) Stand back every few minutes to see if you like the effect, and adjust your placement as necessary.
Make it Permanent

4. When you’re pleased with your button artwork, now you need to take each button off and affix it to the t-shirt. For the larger buttons add a daub of glue to its back; for the smaller dot glue onto the shirt itself. If you plan to go back and sew your buttons for more security – be careful you don’t get any glue in the buttonholes. (If you are using shanked buttons, you’ll have to hand-sew them on to the shirt.)
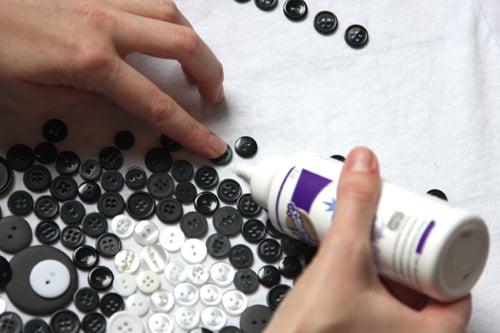
5. After you’ve glued all your buttons down, allow the glue to dry per the instructions.
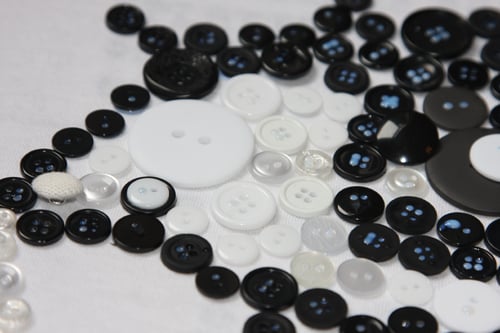

6. (Optional) Remove board from tee, and proceed to sew all the buttons down to the front of your shirt. (Drop the sewing machine’s feed dogs, and zigzag into 2 holes of each button – which should be secure to hold it on and allow you to machine-wash your shirt.)7. Wear and enjoy all the extra attention. (If you have chosen not to sew your buttons down, follow the washing instructions on the glue. Some glues are not fast when put in the wash, so be careful when choosing!)
Pair with black and white pieces to make your monochromatic look. Here’s looking at you, kid!

Thanks for reading – and if you have any questions, ask them in the Comments section below and I’ll do my best to help you out!
xoxox
Carly J. Cais
as posted on Threadbanger
Save
Apr 3, 2010 | DIY
I meant to post this yesterday so you’d have time to try this before Easter, but I fell asleep early and slacked a little bit. If you decide to make this, I hope it’s still in time! (Sorry about that.)
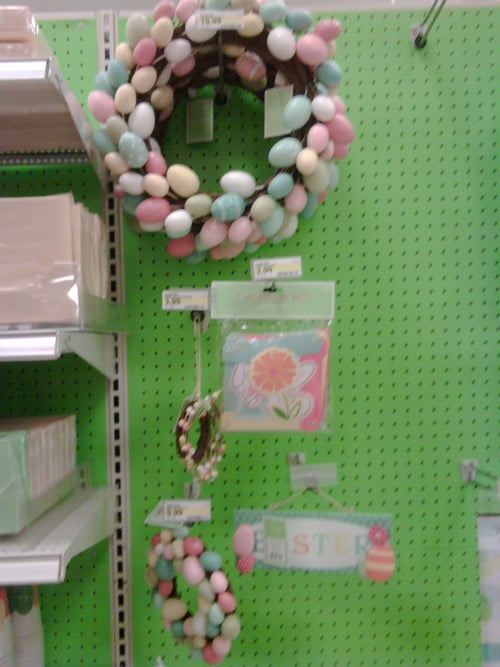
I saw this lovely Easter wreath at Target, but since it was $19.99 (and similar ones were equally-priced at Jo-Ann’s)…you can guess what went through my mind.
DIY it for less!
So a quick trip to the Dollar Tree later, about 10 minutes assembling it at home with Lil Tot, and now I have an Easter decoration I’m really proud of.
How to Make a $4 Easter Wreath
You Need:
*1 pack of Dollar Tree plastic Easter Eggs (I found some pretty pastel speckled ones)
*2 Dollar Tree leafy garlands
*1 Dollar Tree wreath base (I chose a medium size)
*floral wire (or any thin, bendable wire – you may be able to get at the Dollar store, though I didn’t look)
*wire-cutters
*hot glue and glue gun
How-To:
1. Hea t up your glue gun.
2. Using lengths of wire, attach one leafy garland around the perimeter or your wreath base. (I circled the wire around the garland + wreath, and tied the ends like a twist-tie, twisting multiple times until it was secure. Then I folded the cut ends of the wire in-between the wreath wicker pieces so there were no sharp edges sticking out.)
3. Add the second leafy garland around the wreath, paying attention to any bare spots left by the first.
4. Close all the plastic eggs. Squeeze hot glue onto an egg; press egg onto wreath in order to camouflage a wire tie.
5. Continue with all the eggs, paying attention to color, placement, and angle.
You’re done! Hang somewhere and admire.:-)
Since I got the eggs, 2 garlands, and the wreath at the Dollar store (and already had hot glue, wire, and wire cutters on hand), the project cost me a total of 4 DOLLARS.
You could also, if you were particularly enterprising, paint a layer of clear or pastel glitter on your eggs to make them even more like the $19.99 Target/Jo-Ann version.
Bwahahahaha!
Happy DIY’ing!
xoxox
Carly
~If you liked this post, please share it with other crafty people looking for a cheap n easy project for Easter!~