Aug 17, 2009 | DIY
Is it bad when DIY-oriented, non-mainstream jewelry is sold by such a large e-tailer as Uncommon Goods??
[They also sell a Recycled Bicycle Chain Bracelet ($14), a bangle formed from an oversized nail ($145), and a Zipper Pull Necklace ($90). All these items are apparently made by a couple of artists selling their wares – they’re handcrafted from recycled materials, etc. etc.]
Does anyone think the price is a little….um, steep???
Now don’t get me wrong…I love
Uncommon Goods for funky, cool gifts. But stuff we’ve seen all over the blogosphere, and on cool it-girls like Kate Lamphear (below, photo from
karen-wheredidugetthat.blogspot.com)…now being sold by such a large company online? Perhaps the trend is now officially dead.
I feel bad for the designer who made this and gave it to her in hopes of some exposure. It’s okay, but the zippers look kinda cheap and bunged-up, and the cuff part that they’re sewn to looks like a simple piece of belted webbing. Maybe Uncommon Goods did it better…?
Ooh! Plus- head over to Michael’s. Look in the bead/pendant section (bypassing all the ugly gigantic lampwork pendants). There’s a line of pendants and findings called “Tokens”..and in this line is some cool, stylish stuff, like a cast 3″ bircage with a little bird in it, or an oversized kilt pin with rhinestones.
They sell an oversized (like 2″ long) cast zipper pull pendant. Gah! And I almost bought it, too!! What is the world coming to???:-)
Leave Comment
Aug 5, 2009 | DIY
Love the necklace. Yes, love. And $45 isn’t really that bad a price. It supports an up-and-coming designer, fosters cottage industry, stimulates the economy, yada yada yada. But, I just happened to have a whole bunch of wooden beads laying around…and some ribbon…and a little paint… So, you guessed it, I DIY’d my own. Sorry Adia! Here’s how…
You will need:
-27 beads in small, medium, and large sizes (I used wood because that’s what I had, and I painted them white, oyster, marigold yellow, and charcoal gray, and then sealed them with gloss Mod-Podge…though in retrospect, spray-painting would have been easier and made the color more uniform)
-2 yd double-face matte ribbon (I had single-faced, and that means that the underside of the necklace is more obvious than if the 2 sides were the same. I also used shiny satin, which I like; the designer version uses matte.)
-thread, same color as your ribbon (I used black and it’s a little obvious)
-fabric glue
-needle
How To:
Start by triple-knotting a double-length of thread onto your needle. Push needle into center of ribbon about 8″ from one end. String on a small bead on the UNDERSIDE of your ribbon. This will create a little hump underneath the ribbon. Push needle into center of ribbon just beyond that bead, and bring to front.
Thread next bead on, and so and so forth, alternating beads. You can also go in and out with the needle a few times to anchor your beginning bead strongly at the the top of the necklace.
Once you’ve added all the beads on, alternating sizes, anchor your last bead in, and knot and cut your thread. Then apply fabric glue to about 1/2″ of the front of the ribbon, right at that thread knot at both the beginning and the end of your threaded beads. Fold ribbon over (we’re trying to disguise that thread, just to explain), press, and allow to set. I also hand-stitched under that fold to make sure it was secure, on both sides.
Cut the ends of your ribbon to the length you want, glue together and then fold over to disguise the ends in a similar manner. Hand-stitch again, to secure.
I really love the design of this – it’s elegant and simple. (Hub says it looks like I’m getting married in Hawaii at a traditional-style wedding….They place a similarly-threaded kukui nut-and-ribbon necklace on the groom instead of a flower lei in some situations. Well, I’m not getting married in Hawaii…we got married in Hawaii!! 5 years ago! Hello??!!…and Hub was not adorned with said kukui nut necklace. Well, now I’ve made him one, apparently – we can have a do-over.)
Happy DIY’ing!
xoxox
Carly
Save
Leave Comment
Aug 1, 2009 | DIY
Get This Tutorial As a PDF
This tutorial has been updated, and is now available as a full step-by-step with photos in my new book 7 DIY Men’s Shirt Makeovers, part of the DIY Men’s Shirt Makeovers System. Download this tutorial for free, below.
OR 2 Days to Make the DIY Dress from a Shirt; 4 Weeks to Write the Tutorial…
Isn’t that how it always is, for goodness’ sakes??
This is a DIY dress made from a chambray shirt by
Urban Renewal, a division of Urban Outfitters that refashions clothing into salable, new pieces. What a great idea! I came across it on
Outsapop.com, who didn’t seem to think much of the design. It really appealed to me as a cute summer dress, and I really wanted one too!
I found a men’s striped Dockers work shirt to play with – which gave me some great raw material for this project. If you have a guy in your life who’s parting with any of his button-down shirts (or you feel like thrifting one for cheap at the local Goodwill), you can DIY your own dress from a men’s shirt easily!
HOW TO MAKE A DIY DRESS FROM A MEN’S SHIRT
Note 5/2020: This tutorial has needed a major overhaul since I’d originally posted it way back in 2009. I’ve refined making this dress in the years since, so the step-by-step is much quicker, easier, and results in a perfect dress that will stand the test of time (and multiple washings in the washing machine!) You can now get this dress for free (no obligation) in PDF format by clicking below. Thanks!
Get This Tutorial As a PDF
This tutorial has been updated, and is now available as a full step-by-step with photos in my new book 7 DIY Men’s Shirt Makeovers, part of the DIY Men’s Shirt Makeovers System. Download this tutorial for free, below.

Plus, I made some accessories from the leftover shirt fabric, but that’s definitely, definitely another post! Hope you have as much fun making your dress as I did!


Enjoy your summer!
Leave Comment
Jul 28, 2009 | DIY
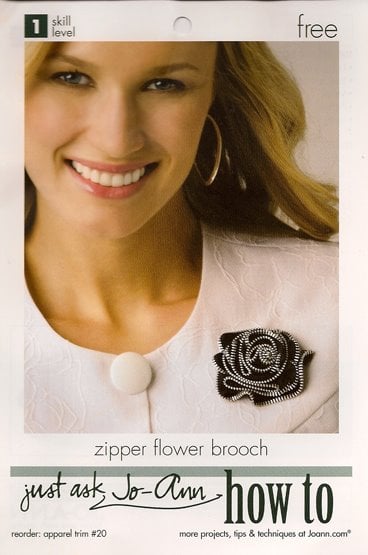
I have a love/hate relationship with Jo-Ann Fabrics. It’s the only fabric/notions store around; it’s more affordable than my local Mill End Store; it’s easy to get to. It also never seems to have exactly what I’m looking for and the notions are mostly for crafters: cheap, fall apart easily, aren’t made to industrial standards or to withstand heavy usage (don’t even get me started on their selection of snaps, buckles, and sewing machine needles for leathers…inevitably Dritz and inevitably crappy), and, compared to what I could be spending at an online wholesale place (or in NYC on fabric row!!), fairly expensive. I can definitely blow through $40 with almost nothing in my basket. $5.95 for a zipper???? 2″ wide sew-on velcro for $7.99 a yard?? I mean, come on. I understand they are a retail store and need to set the prices as such out here on the West Coast in order to make a profit…but with no alternative supply store here it makes my habits very expensive. It’s also populated with…erm…people who usually have a few decades on me and are thronged around the quilting section. But it’s always there when I really need something – and I can often improvise in their findings/notions section when I can’t find what I want.
My other quibble with them is that the majority of the free project sheets around the store are usually for projects that don’t seem…particularly fashion-forward or youthful. How to make a quilted tea-cozy, for instance. A how-to sheet on attaching 1/2″ red loop fringe to the bottom of your kid’s jeans. I guess they know their current market (which doesn’t seem to be people who are interested in trends or fashion-forward designs).
So I was pleasantly surprised to come across the project sheet above, for a zipper corsage. (Jo-Ann’s Corporate seems to be putting out more trendy products as of late, and has a variety of new and fashionable trims in, like chain, long fringe, and rhinestone chain, more fabric embellishments like sew-on rhinestones and heat-set studs, punky iron-on appliques and transfer sheets, the line of
Project Runway supplies [though no draping tape of course -oooooh! >:( ], as well as younger-looking people featured on the project sheets and more trendy projects in general. Me likey these new developments!!) So here’s the how-to for this on-trend zipper corsage (though pls ignore Ms. Dallas Texas circa 1992 modeling the look above):

Hope it’s big enough to red!
Happy DIY’ing!
-Carly J. Cais
Jul 13, 2009 | DIY, Fashion
(handmade DIY dress, Icing by Claire’s belt, Newport-News patent clutch, Forever21 ring, Nine West heels)
So, it’s been awhile since I’ve done an outfit post…what with being sick, feeling down, and just not having the physical and mental fortitude to sit in front of the computer and edit hundreds of photos means no outfit updates. I’m sure you’re all very upset. 🙂
And yes, I edit every single one of the photos Hub takes…I Photoshop Blake Lively’s head onto my body. Or vice versa. ‘Narf. (And if you get that reference, you’re a total 80’s cartoon dork just like me.;-)
So this is a dress I made awhile ago, for that infamous FashionTribes post about DIY’ing your own designer-style painterly garment…and it was never posted on the site. Harrrumph.
So I styled it on my own.
 I made the dress using Simplicity 3747. I altered the pattern to create a voluminous pleat in the front (Hub says it looks like maternity wear – totally not my intention), made an A-line shape to the skirt, and extended the lining so that it shows at the bottom. Hub also says the shape of it looks like something a patient would wear at a psych ward. (Read: neck a little too wide, shoulders shapeless, large and baggy and white.) It looks much better when belted. Maybe I shoulda stuck to the pattern? But I definitely wanted volume – very 2009.
And then I painted brushstrokes on the bottom using Tulip brand matte soft fabric paints (they don’t dry completely stiff and hard like most fabric paints, but they still, IMHO, add a little too much stiffness to the fabric for it to look “natural.”) These are really carefully done…and I had to do it twice to get it just right. I used Ebony, Lime, and Cornflower Blue, if I remember correctly.
This is the coolest ring from Forever21…it has tiny purple beads in the center…it’s like a little alien pod.
I think I’ve written that before. Man, I’m getting old.

NineWest gold Joisey-girl heels. They make my feet look like the Jolly Green Giant’s.
(in size LOL)

-Carly J. Cais
Oh, sorry – and the title of this post…well, if you were a teenage girl in the early nineties (’91, I think?)…you definitely went to see this movie. Guys stayed far, far away. This was before dude lost most of his hair and became obsolete (read: made an overblown, ridiculous production with Dennis Hopper). And before other dude decided to marry his 27-yr old granddaughter (or so says the Enquirer or some schlock as of late). Hmmm…can you tell I was a film major?? LOL
Jul 9, 2009 | DIY
I’ve been DIY’ing my heart out over here – and I meant to post this on the 4th of July, but as usual, I’m behind. So here it is, this safety-pinned tank, inspired by one I saw in a Japanese mag of yore:
You need:
*1 white tank top (2×1 rib)
*40 black small safety pins
*20 silver medium safety pins
*2 soft-feel iron-on transfers (I chose a black eagle, not because I wanted to, but because they were the only black iron-ons at the store. Jo-Ann’s, I curse you!!)
DIY It:
Easy peasy. Use a seam ripper and blunt scissors to slash one of the shoulder-straps in the center. Pin the slash and around the neckline of the tank with the black safety pins, haphazardly, crossing them over, etc. Add some silver ones for visual interest (I folded down and scrunched the other side too, just for the helluvit.) Transfer both iron-ons following the directions. Hand-wash. Or never wash. Whichever.
Punk? Yup. Patriotic? Kind of – not intentionally. But I thought it appropo for the 4th, so that’s what I wore.:-)

Hope you guys had a happy 4th! (That is, if you celebrate US holidays…;-)
-Carly
Save
Leave Comment











