Don’t Buy, DIY! How to Craft a Hardware Embellished Cuff

Safety pin accessories

Designers appear to have reached into their desk drawers for inspiration this spring, pulling out the New Wave accessory du jour: staples, pins, and zippers utilized in a variety of different ways: exposed, in contrast-color, haphazardly applied as trim, or twisted into 3D shapes. Interestingly, the largest zipper manufacturer in the world, YKK, was one of the official sponsors of Mercedes-Benz Fashion Week in NYC (even the lanyard for the press badge was a zipper). From the staples on Victor & Rolf’s beautifully cut wool jackets to Sex Pistols-style safety pins and cheeky punk jewelry by Tom Binns – thanks to this hot 2009 trend, low is the new high, and the functional…fabulous.

The hardware-heavy, craftsy felt-flower cuff by Marc Jacobs inspired us to staple, zip, and pin our own…here’s how:


Marc jacobs cuff WHAT YOU’LL NEED:
– large piece of stiff black felt (8.5″ x 11″)
– black thread
– decorative thread or staples in gold (check the scrapbooking section of the craft store)
– 1 decorative button
– heavy-duty gold snaps (2 sets)
– gold soutache braided trim
– 1 heavy-duty jacket zipper (black with gold teeth)
– gold safety pins (1 large, 15 small)
– clear, flexible plastic (like from a vinyl tabletop cover)

TOOLS:
– snap setting pliers/hammer+die for the snaps
– stapler
– needle
– felt or fabric glue

INSTRUCTIONS:

Cuff_materials

1. MAKE THE PARTS Cut the felt into 2 abstract, oblong flower “petals” 2 flower “petals”. To make the triangle-shaped petals, cut the plastic into 2 diamond shapes. Cut the zipper into 3 lengths, each piece measuring 10″ long. Fold each length in the center to make a rounded petal shape; secure the inside with 2 gold staples (or hand-sew stitches in decorative thread).

Diy cuff instructions

2. MAKE THE CUFF AND BASE From the felt, cut out the base of your flower parts: a circle measuring approximately 1.25″ in diameter. Then cut a 2″ wide strip that is long enough to go around your wrist plus a 3/4″ for overlap for the snaps. Use snap-setting pliers (like Dritz), or hammer and die to set 2 snaps (and their counterparts) into the ends. Because they are strong, we chose shanked snaps; alternatively, you could use sew-on snaps.

Diy marc jacobs cuff

3. ADD THE EMBELLISHMENT Using a needle and thread, hand-sew your parts onto the felt base. Start with a felt petal, then a zipper petal, then a plastic petal in a corkscrew design; repeat, attaching each new petal on top of the previous one. Wind the braided trim in and out of the petals in a figure-8 pattern, securing in the center with a few stitches. Then hide all of your stitching with a button sewn into the center. Pin safety pins haphazardly around the edge of one of the felt petals; thread 10 smaller pins onto the larger pin and attach. Complete the look by adding yet more staples or decorative thread.

Diy marc jacobs cuff

4. ATTACH BASE TO CUFF Glue felt base to the center of the cuff. Secure further by sewing around edge of the circle base with decorative thread.

To let the cuff rock out on its own, wear with something demure…or do a full-on Marc Jacobs style, with a nipped-in shrunken jacket, mismatched obi belt, super-long denim pencil skirt, and teeny porkpie straw hat set akilter.

Still have questions? Email me at CarlyJCais AT FashionTribes.com. Otherwise, happy DIY-ing!

– Carly J. Cais

(runway photos via style.com)

(As posted on FashionTribes.com)

Save

Leave Comment

DIY Cutout Skully T-Shirt (like Pleasure Principle and Barak)

I’ve been hankering after a cutout skull tee since I saw some in last year’s S-Cawaii Magazine [Japanese] from the brand Barak (nothing to do with Prez Obama, I assure you). Trendy Tokyo girls wearing pastel-colored lightweight tees with skull-shaped cutouts over striped tees? Lovely!

(And ironically, Childhood Flames posted her own DIY cutout skull tee inspired by a Pleasure Principle shirt a few months later that had the blogosphere all agog.) How did I go about making mine? (Okay, I know, it’s kind self-explanatory, but…keep reading…)

Regardless of who was first and all that rubbish (likely Barak ripped it off from Pleasure Principle, though they probably took it from the cutout skully tees from the 80’s that just about every hair metal band had back then…), I decided to make my own Barak-style tee, with two el cheapo tees from Target (the striped one, incidentally, is not sewn from striped fabric…the fabric was actually screenprinted with a striped pattern and then sewn together. Like that was cheaper for the manufacturers than actually sourcing a black-and-white stretch striped fabric. Sheesh.) Though I’m technically a Medium, I bought a large for my skully tee, so it will be loose enough to drape over the second layer. Here is the skull that I drew for my pattern:


If you’d like to use these drawings as a pattern for your own T-shirt, right-click on each above [or control-click if you don’t have a 2-button mouse] to save each drawing, and print out landscape format on TWO 8.5″ x 11″ pieces of paper.  Alternatively, you can just print out the entire PDF pattern + instructions here.

Line up each paper under your tissue-wight tee…

…trace the outlines lightly with sewing chalk or a fabric pen…

…and cut with fabric scissors!

Couldn’t be easier!

I also tried layering the Skully Tee over a black t-shirt for a more Gothic look, and a white tank for a summery ensemble. You could also try with just a bra if you’re daring!

Have fun cutting and slicing, and Happy DIY’ing!

xoxox
Carly

Leave Comment

Don’t Buy, DIY On-Trend Ombre

Ombre trend Ever since candy-colored ombre tights strolled down the Lacroix Spring 2008 Couture runway (top left; bottom right), the fashion blogosphere has been atwitter: check out Fashionista’s DIY ombre tights tutorial; BrightestYoungThings; Nelliina (in Finnish, but gorgeous pix!); BurdaStyle’s how-to; and The Coveted. Tie-dye’s sophisticated older sister has also proved a fun and fresh way to upgrade summer whites and chic solids.

However, the gradient- or dip-dying process is so labor intensive that the pricetags can be less than breezy, which is why you might want to save some cash and try doing it yourself.

Ready? Here’s what you’ll need to know:


1. CHOOSE THE RIGHT ITEM TO DYE For your first attempt, keep it simple by choosing something white. The fabrics that best take dye are natural: 100% cotton, linen, rayon, wool, and silk. At the very least, make sure the fabric content includes at least 50% of one of these dyeable fibers, and avoid the following: anything 100% polyester, acrylic, or labeled “COLD WATER WASH” OR “DRY CLEAN ONLY”.

2. PROPER PREPARATION It’s important to get rid of any stains or surface dirt, so be sure to pre-wash – however, there’s no need to dry it. Fill up a tub large enough to accommodate whatever you’re dying; follow the dye instructions to determine if the water should be cold, warm, or hot. Wet the article of clothing thoroughly, and wring out any excess water. And lest you want ombre’d hands, don’t forget to put on gloves!


3. CHOOSE YOUR OMBRE EFFECT For white-to-color, create two variations on a single color – eg. light green and dark green – and pour into two separate dyebaths. Take the top part of your garment that is to remain undyed, and clip to a plastic clothes hanger. Dip the end of your item in the lighter color, submerging 2/3 into the dyebath; swish back and forth for 2-10 minutes, depending on how dark you want the lighter color to be (remember: colors look darker when wet!). Then submerge 2/3 of the dyed section into the darker color. Alternatively, set up three dyebaths containing three variations of the same color, and dip in the same order: 1. Light; 2. Medium; 3. Dark. For example, start with Evening Blue (your Light color), then dip 2/3 of the Evening Blue section in Royal Blue (Medium), and finally, dip 2/3 of the Royal Blue section in Navy (Dark). As you dip, let gravity help with blending the colors. To use more than a single color, choose colors that, when mixed, create a pretty third color – for example, yellow and pink mix together to create coral. First dip 2/3 of the garment in Color #1, then turn it upside down and dip 2/3 of it into Color #2 – the overlapped 1/3 will automatically create Color #3 (in the center). For a Diane von Furstenberg inspired look (top runway photo, bottom left), try yellow, pink, and dark orange. Dip-dye 1/3 of the garment with Color #1. Turn it upside down, and dip 2/3 into Color #2. Re-dip the bottom 1/3 in the darkest color #3. The result: 3 separate colors, fading artfully into one another.

Dip dye rinsing

4. RINSE Rinse according to the dye instructions, starting from the undyed or lightly-dyed section in the direction you want the dye to concentrate. For 2- or 3- color dye jobs, keep the garment horizontal to the faucet and spray water on the surface instead.

5. MAKE IT PERMANENT Dry according to the dye package instructions, and the next time you wash your item, prevent any dye bleeding onto the rest of your laundry by washing in cold water – or, even better, hand-washing.

How to dye paint fabric HELPFUL HINTS Prefer to watch instead of read? Check out this quirky Ombre Dying Video from EdiesFashionFactory. Dig good ole’ paper? Dyes & Paints: A Hands-On Guide to Coloring Fabric is one of the most comprehensive guides on fabric dyeing and painting techniques. (Finally, a solution on how to spruce up that old t-shirt in the back of your closet!) Additionally, the RIT Dye website features yet more dyeing tips, tricks, and answers to common questions.

Still have questions? Email me at CarlyJCais AT FashionTribes.com. Otherwise, happy DIY-ing!

– Carly J. Cais

(photos: runway top left – Lacroix Couture Spring 2008; top right – Burberry Prorsum; bottom left: DVF; bottom right – Lacroix Couture; all Style.com; Ombre how-to demos – all Edie’s Fashion Factory)

(originally posted on FashionTribes.com)


Leave Comment

Outfit 6.13.09: Lilo DIY Dress

 lilo1    Jersey Dress with Rhinestone Trim, Pearls, and Chiffon Edging: handmade by me
Ripped Tights: DIY
Zipper Necklace: YKK
Necklace, cuff, and bracelets: Claire’s
Stone Cuff: White House/Black Market
Bronze Boxing Glove Handbag with Gold Tooth: LOOP
Charcoal Combat Boots: Dr. Martins

This dress was inspired by one I saw Lindsay Lohan wearing in an issue of Marie Claire (2003? memory fails…) True to form, I also completely forgot the designer of the dress, but fell in love with it regardless. (Can anyone help me out?)

The photo I ripped out of the Marie Claire mag several years ago.

So, true to form, I decided to make one myself.  6 years later, it’s finally done! (Actually, I only started making it in earnest about a year ago, then kind of slowed down once I got to the chiffon trim on the sleeve openings – I tried raw-edged chiffon, but it fell apart, and I was feeling somewhat hopeless until I found some chiffon trim at Jo-Ann Fabrics.)  I sewed every single pearl and the rhinestone trim on by hand.  After many countless hours of late-night TV sewing (thank you Whatever Martha! and Gossip Girl) I realized it was a little too short for my comfort, and so added a little of the chiffon trim to the bottom. lilo2 I also added side panels of fabric to prevent bra showage etc.

lilo-dresscuA close-up of the detail on the dress. The zipper-style necklace I received when I was in New York covering Mercedes-Benz Fashion Week for FashionTribes.com– I had to display my press pass on the necklace – which even zips up, just as a YKK zipper should!

lilo3This Loop bag is the coolest thing…I mean, who else would make a bronze bag shaped like a boxing glove?? It even has a chunky gold tooth attached to it.
DIY Ripped Tights tutorial here!  (Though I’m sure you need no help ripping your tights, LOL;-)
xoxo
Carly
Leave Comment

Fun with a Glue Gun: Flower-Adorned Shoes DIY

(photos: elle.com)

So I posted about these Junko-Watanabe flower-basket-like confections on FashionTribes.com quite a while ago….

flowershoes1 And I wanted to post photos and a how-to for what I made, inspired by said flowery things.

Everything’s coming up flowers in the garden…the rhododendrons are beginning to drop…I have a mutant foxglove that’s like 9 feet tall…my rosebushes are slowly succumbing to rose-slugs….but whatcha gonna do. I made these for my feet in-between all the yardwork – and they’re completely maintenance-free.

flowershoes3Here’s how I did it: (sorry for no step-by-step photos; I figured it was self-explanatory;-)
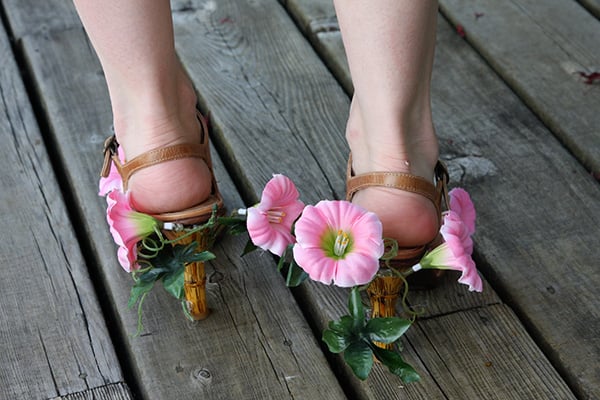
1. To get the look, pick up some inexpensive nude wedge sandals (try Payless, Go Jane, Target, Dorothy Perkins, Charlotte Russe, Topshop) with an earthy or natural vibe such as bamboo or jute espadrille. (Mine are very similar to what I think was I think a Gucci style from like 2003…remember that bamboo heel? Well, they’re TwoLips, and the heel is plastic, so to make it look more bamboo-y, I drew little vertical lines on the heels with my Sharpie.  I just love the result!)

2. Using faux flowers from the craft store (Michael’s or Jo-Ann Fabrics, where I grabbed a bunch of morning glories for $2.99), cut and attach to the undersides of the straps and twine them around the heels, affixing with a glue gun.

3. Keep the flower stems from rubbing on the inside of your straps with a strip of moleskin.

4. To prevent unraveling (cuz that’s a lot of strain in a flower stalk that’s technically not supposed to be bent that much!), secure by wrapping the heels with green floral wire here and there (which I realized I forgot to do *before* I took the photo, hello!).

flowershoes2For maximum impact, wear with a breezy frock or sassy short shorts…or a flowered frock for total floral overload!!

Easy, breezy, Springy, and totally chic!  What do you think?

Happy DIY’ing!

xoxo
Carly

Save

Leave Comment

DIY: Subversive Jewelry Sunken Treasure Necklace

subnecklace3I’m in love with Subversive Jewelry, designed by Justin Giunta. If you haven’t seen his work, it’s been featured in just about every mag you can imagine, starting sometime around 2003.  And he was nominated for an CFDA award in accessory design just this year.

His work really fueled the whole mish-mash tangle of necklaces, vintage, costumey overload (not in a bad way!) that we’re seeing designers copy be inspired by ever since, even for Fall 2009. (Dolce & Gabbana, I’m looking at you😉

(Me when I had long hair and was 10…alright, 12 lbs. lighter. Ah, those were the days.) subnecklace2 However, I could never, ever afford one of his pieces. Maybe aspire to, someday. So I made my own from a bunch of findings I had laying around, and a couple of the 8721 50mm Swarovski Crystal Teardrops. (When I made my version back in 2004, Swarovski wasn’t producing a large-size teardrop that had a flattened back…now they are. I should have just used chandelier drops like Mr. Giunta did in his design…and I could have sourced them from Cristalier.com, but I thought the 8721 drops would work fine.  The problem is that the drops I used have a point on either side, so they don’t sit flat against my skin.  The 8741 is much flatter and would have probably been the better choice overall.)  Ah well.  I threw some assorted charms and pearl chain onto the necklace for the same effect as the original. I think it turned out great – I love wearing the necklace with a simple tank or a white tee to show it off…but it is darned heavy!Here’s my comparison, side by side. Or above/below.  Sorry this isn’t specifically a DIY tutorial, but you can probably figure out how the necklace is constructed just studying the photos: basically, drape, twist, and when in doubt – add more!!

subnecklace1I hope Mr. Giunta takes it as a compliment! (I promise to buy something from him once I have a spare $600 laying about, I do promise.)

xoxox
Carly

~If you liked this DIY, please share it!~

Leave Comment

Pin It on Pinterest







