May 13, 2009 | DIY

Thank you Outsapop!
My go-to for DIY inspiration, she posted photos and a DIY for those Marc Jacobs lego accessories (as done by Dee and Ricky) waaaaay back. Since I still had a ton of Legos that I had religiously held onto since childhood, I definitely had enough to make the brooch…but I stopped by my local Lego store and bought the small size “Pick-a-Brick” bucket, choose carefully some basic brick sizes in colors that definitely weren’t available in the 80’s. (Lime green, charcoal grey, hot pink, sky blue, orange.) The effect, when paired with my old tooth-scarred Lego blocks (cuz gripping the darn Lego block between one’s teeth and just pulliing was the only way to separate the darn things back in the day….now the Lego Store sells thingies specifically for prying…one wonders why they didn’t think of that before).
I added some electrical tape between the layers and a pin back behind, so it can be pinned to clothing or even a belt front. I have short hair, so I don’t think I’ll be wearing it in my hair…plus I think 30 is probably to darn old for those things now. *sigh* Perhaps wearing any Lego accessory at my rather ancient age is a little much, but…I love the idea so much, I can’t resist!
Try channeling your inner Lego-loving kid and whip yourself up something fun like this – can’t help but grin at the irony of high fashion meets kiddie toy!
xo
Carly
Save
Save
May 8, 2009 | DIY


I have (just like probably every other crafter out there since the Dawn of Time) an unbelievable amount of pretty beads sitting in my arsenal with nowhere to go. Mismatched, funny shapes, unusual colors…acrylic, pearl, glass…you name it, I probably have it. So I love the idea of taking a dead-soft piece of fine jewelry wire and wrapping up all those unmatched beads into a more beautiful shape, thus recycling all of my unusable cast-offs. (I used 18 gauge wire, I think, in a silvertone, but you could definitely go higher-end with sterling or 14K gold…a gift for Mom, perhaps?) The wrapping takes awhile, since it takes some time to perfect your shape as you’re doing it…and then using two wires you wrap a little chain around the shape’s edges to secure the piece. Finally, add a jumpring on each side, cut a length of chain in half and attach each end – the chain gets a clasp. And voila! Finally, a use for all those extra mismatched beads.

I made a clover and a heart – and in using the beads, tried to choose ones in a similar color scheme. I think they turned out pretty well – and it’s funny, since I can pretty much remember where each bead came from…it’s like each piece in the shape has its own little story. That green rectangular glass bead I found on the floor of the A & P when I was 8…that gold filigree bead was from a birthday party favor bag when I was 10…that acrylic shimmer heart was from a grab bag I ordered when I was 23 and making jewelry from my tiny apartment in Philly….
I have both the clover and the heart up for sale in my Etsy Shop. They’re $16 each if you want to check them out! And definitely grab some jewelry wire and make your own – in any shape imaginable! It’s a fun project that takes about an hour or so.
-Carly J. Cais
Apr 2, 2009 | DIY, Life

Now, having had some experience with iron-on transfers in my DIY projects, I have to say most of them suck.
You’re stuck with whatever dopey transfer they sell ready-made at the store (though I gotta exempt Generation T stuff from that) or that you can print out from your computer. The “flexible” materials look like you just pasted something onto your shirt (read: shiny, overly matte, and muted colors [if printing from your computer), transparent areas are rendered slick and obvious if you don’t actually cut away the backing on those parts [meaning you can’t transfer tiny letters or designs with complex edges], and the materials really don’t flex. The results look oh-so-homemade, never like something you could actually buy in a store. You have to fiddle with pillowcases or sheet protectors in order to iron them, and the smell? Like burning plastic.
But instead I went straight to what the professionals use for the t-shirts they manufacture on a large scale and actually sell in stores.
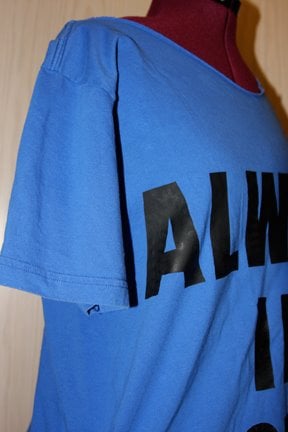
I was completely amazed with the professional results (see photo below) even with using my own home iron. It was not exactly quick (oh, to own a heat press!), but it was fun, and did I mention the results looked fabulous??! (Well, as long as you aren’t looking at it with a microscope.) Plus, as the transfer heated up, the aroma of baking cookies (no joke!) wafted into the air. And the company let me buy just 2 sheets of the stuff, without any hassle at all, making my online order a grand total of $7.
A few things to consider when using this product:
*Shiny plastic side of the sheet is UP and peeled off your clothing after the transfer has cooled. Matte side is down and stuck to the clothing. Don’t get them confused or you’ll cover your iron with gunk.
*Use a bigass wooden cutting board inside the piece of clothing to stabilize it for the transfer.
*No stupid pillowcases/protective papers needed. Iron directly onto the plastic sheet stuck to the top of your transfers.
*You are fusing the transfer onto the fibers of the shirt. Most irons have little holes in the bottom, the reason for, I assume, is to totally screw up any heat transfer appliques you ever attempt. This means that with a home iron you’re going to get areas of direct heat, and non-direct heat (thank you, stupid little holes). Therefore, your transfer is going to look “bubbly” unless you apply heat AND force AND then reposition the iron on the same area, to minimize uneven heat application.
*Cold Peel means COLD PEEL. Don’t peel off the upper plastic layer until it has shrunk away from the transfer’s edges slightly, is a little “bubbled,” and is room-temperature. The shiny decals on my version? They’re from the letters I peeled while still hot – the adhesive between the plastic layer and the transfer didn’t peel off with that layer.
*The heat transfer material comes as one big sheet, and you can do anything with it – trace letters, cut it into tiny shapes, whatever you want; the possibilities are endless. Since I was able to spell out my entire t-shirt message on one whole 9 x 15″ sheet, I still have one left over for a rainy day. Order enough to feed your DIY-cravings!
-Carly J. Cais
Nov 7, 2008 | DIY
Net-a-Porter shows us 7 easy ways to transform an outfit into something totally on-trend…
Wet Seal is throwing in a pair of leggings for $5 (brown, pink, lavender, purple, cobalt, or red) with any $35 purchase online…
FashionTribes.com dishes on Michelle Obama’s unusual dress (from her husband’s acceptance speech Tuesday night)….
ShopIntuition.com is offering free shipping on any purchase during the month of November…
Catch up on your U.K. fashion online with ASOS.com’s latest e-mag…
ELuxury is having their Fall Sale with 40% off brands like Narciso Rodriguez, Philosophy di Alberta Ferretti, Rag & Bone, Proenza Schouler and more, and is offering free shipping on purchases of $200…
CheapJAP kvells and kvetches on the evils of online shopping…
Alloy.com is offering 20% off select sweaters until 11/12/08 and free shipping on orders of $75 and up AND 15% off your entire purchase with code NEW15b until Monday 11/10 …
And don’t forget to enter the Chic Steals Regent’s Secret $50 Gift Certificate Giveaway – hurry, the contest ends Monday!
-Carly J. Cais
Sep 22, 2008 | DIY


We’re loving the idea of a multitude of gold disc pendants strung about the neck a la Me + Ro (or AlexandAni) but we ain’t paying upwards of $285 for them. No siree – we’re also not into anything stamped or overly-designed, we just want something clean and sweet, a trifecta of circles lying on the throat.
So what’s a girl to do? Do it on the cheap, of course.

We grabbed these earrings to sacrifice for our cause from Target.com for $8.99. Pulling 3 discs off the bottom with some help from our jewelry pliers was no big feat, and the earrings pretty much looked the same regardless. (Conservation, woo-hoo!) We attached them to three thin chains we’d bought from our local craft store, and voila! A perfect 3-disc necklace for less than $11.

What do you think?
Save