Jul 8, 2010 | DIY, From You
from formspring.me:
Any suggestion to DIYing something like Sergio Rossi’s Powder suede and nappa silk fishnet booties with crystals? http://www.sergiorossi.com/us/en/eStore/women/women-shoes-SpringSummer2010-Collection/Boots/P-PELLE-Powder-Suede-Nappa-Silk-Fishnet-Bootie-C
Leave Comment
May 15, 2010 | DIY, From You
She’s referring to the above booties.
I received the following question on formspring.me:
Hi! I adore your blog; your DIYs are absolutely fabulous! Anyways, I fell in LOVE with your booties from “How to Make a Pair of Boot-Covers from a Leather Jacket.” Where did you get them?! <3 always, Kaelie
Hi Kaelie! Thank you for your kind words!
Those booties I bought from Forever 21 – in early November 2009. I haven’t seen them since on the website or in the stores, but maybe there’s Ebay? I will mention they are the most hideously uncomfortable shoes EVER – there’s no padding in the sole, so you can feel the ground as you walk on it…and the top of the shoe is cut too high and grates on my ankle bone with every step I take. (You can see it digging into my ankles in the above photo.) The toe-boxes are also made too narrow…ick. They look pretty, though!
xoxox
Carly
Leave Comment
Apr 29, 2010 | DIY, Life
I received this question awhile ago from lovely reader trashywriter and I’ve been remiss about answering it. (Sorry!)
Carly, I saw an ad in the latest Vogue, absolutely LOVED the top worn by the model and have finally located it in a catalog. It looks elegant even though it is a casual material and I was wondering if it would be terribly difficult to DIY?
Here are some more photos of the top in question:
You sure know how to pick them!
In the same vein, a similar twisted Burberry skirt DIY showed up on Anywho.dk awhile back, and summarily made its way around the ‘net. (Click above for the tutorial.)
Now, as to this shirt…This top is elegant and sexy, to be sure…but it looks like a pain to DIY.
By best approximation, you could:
1. Buy a slim-fitting V-neck long-sleeved shirt (preferably RAGLAN sleeve seams) that has some stretch to it, and about 1 yd (60″ wide) of similar fabric (stretchy fabric – so important!).
2. Remove front from shirt, using a seam-ripper to preserve the seam allowance.
3. Cut fabric in half width-wise.
4. (If you have a sewing mannequin, pin shirt back together on mannequin. If not, you’ll have to place the front piece flat and pin fabric to it.) Place pieces on top of the shirt-front, gathering at the sleeve seams, pinning there, and twisting at the front in a knot. Secure the other ends of the fabric pieces with pins at the side-seams of the front piece.
5. Pin front to back again, and try it on. (If you have a sewing mannequin that is the same size as you, you probably don’t need to try it on, but you do need to get that front knot tight and conforming to a 3D shape. You can’t pin it flat and then just sew the seams back together as in the shirt tutorial, since there’s too much shape to the front half of your body.) Reform the knot to get it tighter, and re-pin to front piece.
6. Now sew the front piece back on to the shirt. If your material is S-T-R-E-T-C-H-Y enough, you should be able to wear it without needing that back zipper!
As you can see from the original, the front knot is so unfailingly tight (and I believe the shirt is a cashmere blend), so the original requires that back-zipper to get into it. I believe if you choose a material that is not cashmere but has some stretchy manmade fibers in it, you’ll be able to conform it to your shape without having to add that zipper – and without having the seams fall apart or rip when you wear it. If you can – OVERLOCK those seams for extra strength!
Hope that helps – and sorry I haven’t made an example for you; I’m a little under the weather lately.:-)
Best of luck, and please share if you make one!
xoxox
Carly
Leave Comment
Mar 6, 2010 | Life, Media
No one should underestimate the value of a good title. Take this video, entitled “Seven Style Basics that Everyone Should Know,” from Fashioncents.tv. I thought I would be watching a video detailing style rules – like the right length to hem your jeans, don’t wear blouses that are too small they gap between the buttons, etc. However this video is really about what to do with your clothing after you’ve bought it – what threads/hanging loops/tags/labels should be removed, and how to do it. Great advice all the same…just maybe a different title would be better?
Seven Style Basics that Everyone Should Know
FC: ep 024 Style Basics from K Turner on Vimeo.
from Fashioncents.tv.
I like the advice about the adhesive remover for those clear labels on the bottom of shoes – I’d pretty much given up pulling them off, since they always leave such a sticky mess.
xoxox
Carly
Leave Comment
Apr 2, 2009 | DIY, Life

Now, having had some experience with iron-on transfers in my DIY projects, I have to say most of them suck.
You’re stuck with whatever dopey transfer they sell ready-made at the store (though I gotta exempt Generation T stuff from that) or that you can print out from your computer. The “flexible” materials look like you just pasted something onto your shirt (read: shiny, overly matte, and muted colors [if printing from your computer), transparent areas are rendered slick and obvious if you don’t actually cut away the backing on those parts [meaning you can’t transfer tiny letters or designs with complex edges], and the materials really don’t flex. The results look oh-so-homemade, never like something you could actually buy in a store. You have to fiddle with pillowcases or sheet protectors in order to iron them, and the smell? Like burning plastic.
But instead I went straight to what the professionals use for the t-shirts they manufacture on a large scale and actually sell in stores.
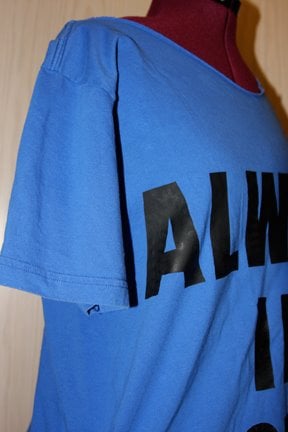
I was completely amazed with the professional results (see photo below) even with using my own home iron. It was not exactly quick (oh, to own a heat press!), but it was fun, and did I mention the results looked fabulous??! (Well, as long as you aren’t looking at it with a microscope.) Plus, as the transfer heated up, the aroma of baking cookies (no joke!) wafted into the air. And the company let me buy just 2 sheets of the stuff, without any hassle at all, making my online order a grand total of $7.
A few things to consider when using this product:
*Shiny plastic side of the sheet is UP and peeled off your clothing after the transfer has cooled. Matte side is down and stuck to the clothing. Don’t get them confused or you’ll cover your iron with gunk.
*Use a bigass wooden cutting board inside the piece of clothing to stabilize it for the transfer.
*No stupid pillowcases/protective papers needed. Iron directly onto the plastic sheet stuck to the top of your transfers.
*You are fusing the transfer onto the fibers of the shirt. Most irons have little holes in the bottom, the reason for, I assume, is to totally screw up any heat transfer appliques you ever attempt. This means that with a home iron you’re going to get areas of direct heat, and non-direct heat (thank you, stupid little holes). Therefore, your transfer is going to look “bubbly” unless you apply heat AND force AND then reposition the iron on the same area, to minimize uneven heat application.
*Cold Peel means COLD PEEL. Don’t peel off the upper plastic layer until it has shrunk away from the transfer’s edges slightly, is a little “bubbled,” and is room-temperature. The shiny decals on my version? They’re from the letters I peeled while still hot – the adhesive between the plastic layer and the transfer didn’t peel off with that layer.
*The heat transfer material comes as one big sheet, and you can do anything with it – trace letters, cut it into tiny shapes, whatever you want; the possibilities are endless. Since I was able to spell out my entire t-shirt message on one whole 9 x 15″ sheet, I still have one left over for a rainy day. Order enough to feed your DIY-cravings!
-Carly J. Cais
Leave Comment


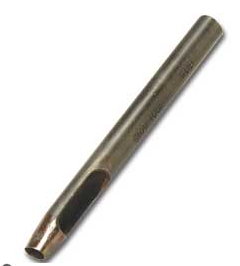 I couldn’t vouch for how well the uppers will stay on the shoe, nor the amount of damage you’d do to your base shoes without professional shoe-making tools. If you’re willing to compromise a bit, the only thing I can think of would be to buy a similar back-zip pink suede or fabric bootie, draw the pattern on the outside, and cut out each and every tiny little hole. (You could also use a leather punch if you can find one in a fan-shape to cut out the negative space – I’ve never seen one, but that’s not to say it doesn’t exist. Or you could have the shape custom-made for you by a manufacturer, for a fairly high price.) Or you could color in the negative space in black to create a contrast. The crystals are the easy part – either attach with crystal glue or use a heat-set tool (depending on the crystal type) to apply.
 I couldn’t vouch for how well the uppers will stay on the shoe, nor the amount of damage you’d do to your base shoes without professional shoe-making tools. If you’re willing to compromise a bit, the only thing I can think of would be to buy a similar back-zip pink suede or fabric bootie, draw the pattern on the outside, and cut out each and every tiny little hole. (You could also use a leather punch if you can find one in a fan-shape to cut out the negative space – I’ve never seen one, but that’s not to say it doesn’t exist. Or you could have the shape custom-made for you by a manufacturer, for a fairly high price.) Or you could color in the negative space in black to create a contrast. The crystals are the easy part – either attach with crystal glue or use a heat-set tool (depending on the crystal type) to apply.