Jan 8, 2016 | Life

“Ideas come from everything.”
-Alfred Hitchcock
One of my favorite quotes ever because it encourages you to look around yourself and feel inspiration surrounding you. Never feel that you are at a dead end…since the mind’s ability to pull new thoughts and wisdom from anywhere is unparalleled.
Thank you, Alfred Hitchcock!
xo
Carly
Leave Comment
Nov 20, 2015 | Life


OK, you guys. The holidays are coming up and I’ve been completely overwhelmed with all the things that have to be done to ready the house in time for the arrival of family, friends, and loved one. I don’t want my home looking a mess – and I certainly don’t want to spending this wonderful time of year in household drudgery. This year, it’s Hoover to the rescue!
I have a love/hate relationship with my current vacuum (or maybe it’s more of a dislike/hate relationship…?). It’s big, it’s clunky, it’s heavy – and yes, it gets the job done, but vacuuming the house takes forever and it usually feels like a workout of its own. I’m constantly tripping over the cord, having to find another plug that works as I move throughout the house, and have to lug it up and down the stairs to get it into all those little crevices.
So when Hoover sent me their new Air™ Cordless 2-in-1 Stick & Handheld Vacuum, it was like a godsend. Seriously – I had no idea how much time I was spending on this simple task until I tried this vacuum and experienced how much time it cut off of my cleaning routine.
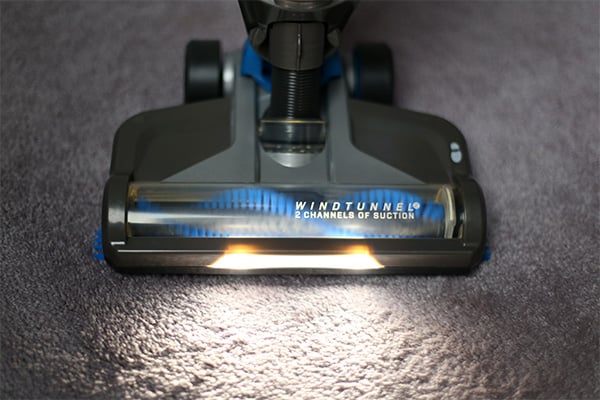
I love the light at the front – perfect for those dark corners and nooks!

The head of the vacuum is completely adjustable, and glides over stairs and height differences easily. Love!

And then – this is amaaaaazing – you can pull on the handle in the center – and remove the canister…

…And use it as a handheld vacuum by itself! Total awesomeness.
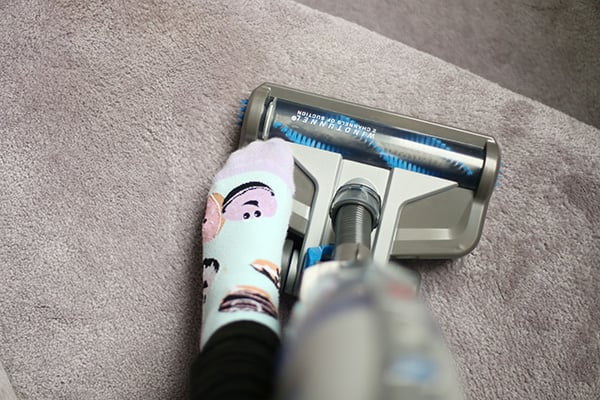
The vacuum has 2 modes: hard floor and carpet – and switching between them is an easy flip of the button.
Plus – and here’s the kicker – the vacuum is cordless. Yup, you read that right: it’s completely cordless. So no cord to trip over, no cord to unwind and wind back up again, no cord to have to unplug and plug back in. You just charge the LithiumLife rechargeable battery once and you’re good to go. And their Windtunnel 3 technology provides performance with ample suction power to lift and remove dirt.
The entire Hoover Air line is a line of 4 cordless cleaners: 3 vacuums and a hard floor wet cleaner, and the batteries are interchangeable.
A 25 minute task for me just shrunk to under 10 minutes, and saved my sanity for the coming holidays. It’s totally a #nocordnobull life for me now!
Check out the full line of Hoover Air here to see how you could make a tedious chore…finally manageable.
xo
Carly
I was selected for this opportunity as a member of Clever Girls and the content and opinions expressed here are all my own.
Leave Comment
Jun 16, 2015 | Blogging, DIY
 I’m a scheduler, and I love my To-Do lists more than anything. But…life is COMPLEX, and I can’t wander around with a million bits of paper with to do lists written on each. In managing this blog I need to be able to see at a glance all the days in the week – and the month – so I can plan out what I want to (ideally) post here. I’ve tried a digital calendar, which I’ve found doesn’t work for me because I like to jot ideas down on the side, rotate ideas for posts in and out of the hopper, or brainstorm away from the computer. I’ve tried a date book, which is too small for me to see the whole month at the size I need. And no matter what offline solution I’ve tried, I was constantly erasing things and having to rewrite posts on new days if I made the smallest change. Sooooo frustrating!
But now I think I’ve found the best solution to my blog planning problems: a DIY Blog Calendar, that uses washi tape as a way to organize posts once you’ve brainstormed them. No erasing necessary! And it’s super easy to put together. Here’s how to make your own DIY Washi Tape Blog Planner (which is yes, quite intuitive from the photos):

1. Print out your favorite calendar for the month. I turn off all my scheduled events and print a month’s view of iCal just so I can get the structure. I prefer to have a piece of paper for each month as I go, rather than using a laminated sheet and a dry erase marker, but you could do that too.
2. Tear small pieces of washi tape off, folding one edge under about 3/6″. This creates a tab for easy removal. I like to create a theme for my tape colors: one color is for DIY projects or my own designs; the other is for sponsored posts, reviews, or outfits.
3. Now comes the fun part: brainstorm! Write ideas for your posts, sponsored posts, reviews, whatever on each piece of tape. (I found that ballpoint pen or Sharpie worked best on the waxy washi tape.)
4. Then, once brainstormed, schedule into your calendar by sticking into the appropriate days. Some ideas won’t have a place just yet, so I left them floating at the top, ready to rotate into next month if needs be.
5. Follow the calendar for your posting schedule. At the beginning of each week stick your posts into the day you actually posted them (in case you missed any or the schedule moved around). Then you’ll always be up to date – and won’t miss any posts!
I like that this is a permanent way to collect your thoughts and keep your blog schedule on hand, but you can still move ideas around as you go. You could use this for anything; it doesn’t have to be a blog calendar! It could be just general life or a to-do list, and the washi tape makes it look so pretty!
 Happy DIY’ing!
xo
Carly
Save
Leave Comment
May 11, 2015 | DIY
 Sometimes you’re feeling a little ladylike…and a little edgy at the same time. This pearl and chain choker pairs so well with both demure outfits and darker streetwear easily. All you need is aluminum chain, glass beads, jumprings, and a closure.
  And of course some hematite spike beads for that necessary wild child. Here’s how to make your own with some affordable supplies from PandaHall: (and a brush up on How to Use Crimp Beads, below)
You Need:
aluminum twisted curb chain (5 mm wide) // silver color aluminum twisted curb chain (5 mm wide) // 6mm white glass imitation pearl beads // non-magnetic hematite rectangle beads / matching jumprings (6 medium, can all be the same size) // 2 crimp beads // 2 (two) 3-strand necklace ends // Beadalon nylon stringing cord // chain cutting pliers // crimp pliers // jump ring tool (or another set of pliers)
How To:
1. Attach one end of the chain to one of the necklace ends with a jumpring.
2. Hold the flat curb chain against your neck and decide how long you want it (mine was 14″). Use the chain cutting pliers to cut it at that point.
3. Attach that end to the other necklace end, being careful to keep the chain flat.
4. Attach the next oval link chain in the same way, making a little longer than the first so it will drape lower and lay flat.
How to Finish a Necklace Using Crimp Beads
5. Crimp beads are an easy, clean way to finish a cord necklace, and they look really great. Thread one crimp bead onto the end of your Beadalon cord, leaving about 1″.
6. Thread a jumpring onto the end.
7. Curve the cord around the jumpring and back into the crimp bead. Make sure the loop around the jump ring is small.
8. Use crimping pliers to first smash the crimp bead flat (in the grooves closest to the plier center), then bend the flattened ends towards each other (in the hole closest to the plier tips). You’ll make the crimp bead into a flattened hot dog shape.

Voila!
9. Attach the jumpring onto the final loop of the necklace clasp, below the chains.
10. Estimate how long you need and cut the wire a little longer than the length of the longest chain.
11. Start threadiing pearls onto the wire. Use the first pearl/s to hide the end of the wire.
12. When you are close to where the center of the wire would be, start adding hematite spike beads.
13. Add a spike bead, a pearl, and another spike bead in a graduated manner.
14. Continue adding pearls once the center spikes are finished. Once your strand of pearls is as long as you want it (slightly longer than the bottom chain so it hangs below it), add a crimp bead.
15. Be careful to hold the crimp bead close to the last pearl, and finish the end of the wire as before. Tuck the long end into the last pearl bead/s.
16. Use a jumpring to attach to the remaining open loop in the necklace closure.
And that’s it! 
It’s a little fiddly and something you’ll want to do while watching your fave TV show to pass the time…but once done this 3-strand sophisticated choker has maximum impact.
You can make your own just by checking out PandaHall.com for the best beading supplies!
Happy DIY’ing!
xo
Carly
FTC Disclosure: Pandall.com provided me with the craft supplies featured in this post for me to make a fun DIY with. I have received no other compensation. The opinions above are my own. For my full Disclosure Policy, click here.
Save
Leave Comment
May 5, 2015 | Life

Portrait photography is definitely not my strong suit, and it’s even harder when YOU are taking a photo of YOU. It’s so much easier to work with someone who knows what they’re doing and can make you relaxed enough to take a great fun photo for your blog headshot.
 I’ve had the same sidebar headshot for 3 years (above, taken by Dave Lim) simply because I liked how I looked in the photo. I’ve also had another photo on my About Me page (if you recall, that particular photo was pretty horrible) for about 5 years. I’ve been going through a brand audit of Chic Steals and felt that my head shots didn’t really reflect my blog topic and focus. They needed to be lighter, brighter, closer – and more depicting chic, creative, crafty living instead of just my head in front of a forest.
 So after playing with a couple different ideas, I settled on a photo of me in my home office in front of a wall that I decorated with gold washi tape in a triangle pattern. (Similar to what I did with my DIY Geometric Bathroom Makeover wall here.) I chose on a white-and-gold palette since I felt that was in line with my blog branding.
  I did make a little sparkly gold prop as the silhouette of the diamond in my logo, and utilize the DIY paper glitter diamond paperweight I made in this post here.
  For the overhead and sitting at the desk laptop shots, I styled the desk with my DIY Gold Succulents in Geometric Origami planters, the origami diamond paperweights, and a variety of crafty materials to touch on the “making” theme of my blog. The only piece of jewelry I wore was the DIY Free People Wrapped Quartz Bangle that has been really popular online since I shared it.
My good friend Josh of Joshua Johnston Photography took my photos, and though we shot in the late afternoon and the light was fading inside, his lighting techniques were still able to bring out all the little details and make everything white and bright. In all it took an hour and a half, and the finished photos were awesome – and, I felt, much more fitting with the look and feel of my blog.
So are you experiencing some difficulty with deciding on the perfect headshots for your blog or website? Here are 8 steps to get portrait photos you’ll love:
 How to Take Headshot Portrait Photos for Your Blog That Reflect Your Brand
1) Spend some time looking at your blog. Are there colors or elements that you could incorporate into a shoot? Do you feature the same items over and over again? What “goes together” and what doesn’t? (like using a forest background for a crafty blog…which doesn’t make any sense)
2) How can you accomplish what you want in the least cluttered, most direct way? What would make sense as a background? Can you make it, fake it, or is there a place you know that would be perfect for the locale?
3) How about props? Would they be more specific and tie a photo of you into what you write about better? Reiterate your branding or logo somehow?
4) Sketch some ideas out on paper, having in your head a firm idea of the colors and layout of the elements. Where do you want your head to appear? Should you be looking at your content to draw people’s eyes to it? Looking at the reader to connect with them? Looking away so that you’re an object of admiration and having fun by yourself? What are you trying to sell with your head shot?
5) Allow enough time to be able to properly style out your photos and capture them in the best light. Do you need to shoot during the Golden Hour? How long will it take you for hair and makeup? How about styling your props?
6) Choose a lens that has the least amount of distortion for the face: ideally, 85mm. If not, 50mm will also do quite well and create that soft blurred background. Use a tripod if you can, especially in low light situations!

7) Unless you’re used to modeling (or modeling by yourself!), shoot with someone you know well and who you’re comfortable with, preferably someone who makes you laugh. That way your smiles will be genuine and your eyes light up in your photos, which is difficult to fake. You’ll also have someone to interact with which can come out in the final images, creating more of a connection with the viewer. Don’t be discouraged if you have to take a ton of photos to get any you like. Some the framing might be right, but you have a hair out of place. Some your expression might be weird. Keep them all and look at them later.
8) Go through the photos on a large screen, ideally after some time has passed. That way you can apply a fresh eye and be more objective with the ones you choose. Choose ones that you like a lot then compare them against one another. If you like them, your readers will too. Post-process, upload, and announce your new pictures!
Thanks, Josh – I couldn’t have done it without you! Check out his website for prints of cool landscape and nature photography – especially Oregon waterfalls!
Joshua Johnston Photography
Do you have any tips for good blog headshot photos? Please share in the comments!
xo
Carly
I actually helped Josh build the website and optimize it for SEO, learning the
Smugmug platform [aff. link] in the process. I’d highly recommend it
if you’re a photographer looking for a no-hassle way to sell your prints and photos as digital downloads – since they take care of all the order processing and fulfillment for you!











