Don’t Buy – DIY! A Fabulously Faux Fur Wrap. I Die.

done   Blame it on Rachel Zoe and that fabulous vintage fox fur hip-length vest. The F/W 2010 runways followed suit, and fur – both real & faux – abounded. Designers such as Barbara Bui, Antonio Berardi, and Christian Dior made faux fur a must-have, while the release of Spike Jonze’s “Where the Wild Things Are” in October 2009 put all things furry front & center. But why buy when you can easily DIY?  This stole is a quick and easy project – very Marilyn Monroe-fabulous, and totally guilt-free. Here’s how:

You Need:
*a piece of faux fur, at least 45″ wide by 12″ tall (this Tissavel faux fur is high quality, has a plush feel and super-luxurious hand)
*piece of satin or poly acetate for the lining, same size
*matching thread
*large sew-on snap set
*brooch (optional)
*24″ of satin ribbon cut into two 12″ pieces for a ribbon-tie (optional)
TOOLS:
*box cutter or razor blade
*scissors
*pins
*sewing machine
*needle for wovens
*skewer or knitting needle
*hand-sewing needle

CUT OUT THE FABRIC PIECES:step11.Cut the faux fur. First, though, a tip about cutting any kind of fur, both real & fake: never ever use scissors, or cut from the front (fur) side. Why not? Because you’ll chop right through the fur itself, giving it a weird-looking “haircut” that will make your finished piece look anything but. (Nobody, not even a fur stole, wants to wear a fur mullet. 😉 To cut like a pro, turn the fur over so the underside is facing upward; this is also the time to make sure the nap is laying down (ie. all the fur hairs are pointing down toward the bottom of your stole).  Then use the box cutter or razor blade to delicately cut out a rectangle that is at least 12″ wide and 45″ long. By making it 10-15″ longer, you can wrap your stole scrunchie-style around your neck, belt it, or even rock it halter-style vest, cinched together with a fabulous statement belt.

2. Use the box cutter or razor to round off the corners.

3. Cut the lining: The cut-fur piece will act as your template when you cut out the satin lining. First place the cut-fur piece onto the satin, fur side down against the back side of the satin. Then carefully cut out the satin lining, taking care to not accidentally trim off any of the fur.

step2SEW IT TOGETHER:

4. Place fur and lining right-sides together (ie. fur side next to the shiny side of the satin), and match up the corners. Pin together.  Tip: Satin is slippery when you sew it, so be sure to pin in more places than you think you will need…you can’t overpin!

Optional: Add a ribbon-tie using a 12″ piece of ribbon attached to each side of the faux fur, the end of each ribbon piece sandwiched between the lining and the fur.  (The long end of the ribbon needs to sit inside the pinned stole pieces.)  Pin the ends of the ribbon down to the edges.

5. Sew the fur to the lining, Starting about 3/8″ to 1/2″ in from the edge (your seam allowance), sew the fur to the lining – but not all the way around. Along the bottom, leave about 6″ unsewn.

6. Around the sewn edge, trim away the excess fur.

7. To turn the piece right side out, pull it through the 6″ gap you left unsewn (in Step 5). Optional: If you added a ribbon tie (Step 4), the ribbons will now be on the outside of your stole and serve as closure ties.

8. Finish the remaining 6″ unsewn edge by gently tucking the excess 3/8″-1/2″ faux fur and the lining fabric into the hole.  Close the hole by topstitching as close to the finished edge as you can.

ADD CLOSURE & FINISH:step3

9. Use a skewer, pencil, or knitting needle to pick the fur hairs out of the edge seams.

10. Try on the stole and decide where you want to place the closure. Mark it with a pin.

11. Hand-sew a large snap onto your piece.  (If you made a ribbon-tie, this won’t be necessary.)

Optional: Decorate the front with a large, eye-catching brooch.

You’re done!

For a “I’m headed to the opera” look, wear your stole draped glamorously around your shoulders; to look more Russian-Anastasia, scrunch up closer to your neck. Mix it up with other faux furs in gray, leopard, or even multicolored – PreFurs.com sells high quality faux fur yardage, while Cornelia James and Charly Calder both sell chic finished items – and enjoy a fashionable walk on the wild side.

And yes, you look bananas in it!

Happy DIY’ing!
-Carly J. Cais, Contributing Editor

(as contributed to FashionTribes.com)

A note about this piece: I actually started out doing a DIY for a faux-fur vest, and then discovered a tute at P.S. I Made This – which I thought was so fantastic I lost the will to do mine.  So if you want to do a vest – try those instructions out – can’t go wrong with just cutting and wearing!:-)

Have fun any way you try your flirt with the faux!

Leave Comment

DIY: The Easiest Party Skirt To Make…Ever

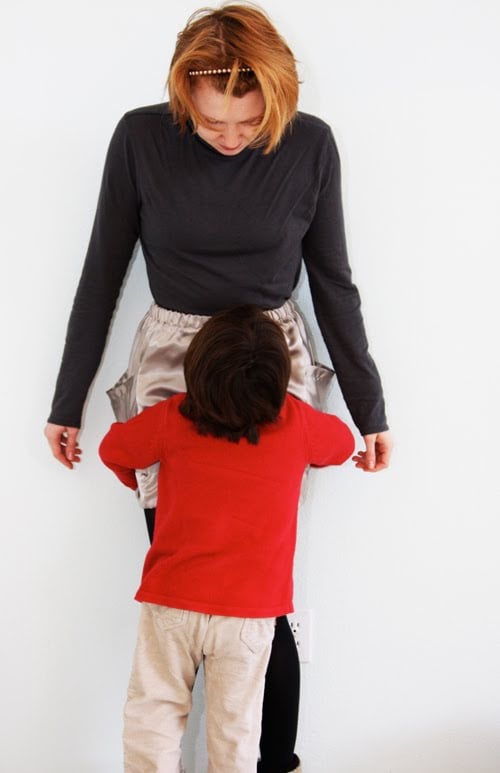
Okay, maybe not the easiest skirt in the history of the world…but pretty darn simple nonetheless!

It took me about an hour and a half to make – tops! And it’s a simple, sweet party skirt that also works great for the everyday.

You Need:
*1 yd. of medium to heavy-weight satin, sateen, satin peau, or taffeta
*7/8″ width woven no-roll elastic (length of elastic = your waist circumference – 1″)
*matching thread

*scissors
*pins
*measuring tape
*iron & ironing board
*sewing machine
*sewing needle for wovens
*1 safety pin/bodkin
*overlocker/serger (optional)

How To: (sorry no step-by-step photos)

(I think this size will work on Small-Medium-Large…for a Small, the skirt will be fuller and more cinched in at the waist. If you want more width to the skirt, increase the width of the panels. My waist is 27″; hips are 34.5″. Cutting directions, marker, and yield are using a 60″ wide piece of fabric.)

CUT PIECES
1. Cut two rectangles on-grain for the front and back pieces: both are 21.75″ long; the front piece is 14 3/16″ (that’s fourteen and three-sixteenths, if the way I’ve typed it is confusing). For the width of the back piece rectangle, add 1/2″ (therefore width of back piece = 14 and 11/16″).

2. Cut 2 rectangular side panels on-grain: both 21.75″ long and 11.125″ (eleven and 1/8″) wide.

3. Cut 2 pockets: both are the same width as the side panels (11 and 1/8″) and are 9″ high. (The front, back, and side panels you can all fit side-by-side on a 60″ wide piece of fabric, but the pockets can’t fit and will have to be placed above this row when cutting. So technically, when using a 60″ wide piece of fabric, you only need 30.75″, not really a whole yard. For a 45″ wide piece of fabric, you can only fit the front, back, and one side panel side-by-side; the next row up you could place the other side-panel on-grain and thereby require 43.5″ of fabric (about 1 yd. and a quarter), or, alternatively, you could place one side panel on the crossgrain and only use 11 1/8″ + 21.75″ = just about a yard total. This is what I did because I thought I had bought a piece of 60″ wide fabric but it turned out to be only 45″ wide – so I had to conserve fabric. In satin, I honestly think on-grain vs. crossgrain difference is negligible.)

4. Overlock/zigzag stitch on top and bottom edges of pockets.

FINISH TOPS OF POCKETS
5. Fold 1″ under on tops of pockets. Iron to set the crease. Stitch seam at 3/4″ down from top of crease.

SEW POCKETS TO SIDE PANELS
6. Start by placing pocket on top of side panel, right sides together. Align top of pocket about 4″ above bottom of side panel, and align pocket side edges to side panel side edges. Stitch 3/8″ below top of pocket, through both layers, from side to side.

7. Fold pocket up, taught against the seam you just sewed; iron to set the crease. Pin side edges of pocket to side edges of side panels – then staystitch the pocket to the side panels a scant 1/4″ from side edges.

ASSEMBLE THE SKIRT
8. Overlock or sew each side panel to either side of the front piece; join back piece in the same way.

HEM THE SKIRT
9. Overlock/zigzag bottom edge of skirt all the way around.

10. Turn up 3.25″ from bottom of skirt; iron to set the crease. Stitch hem at 3″ up from crease.

ADD THE WAISTBAND
11. Overlock/zigzig top edge of skirt all the way around.

12. Turn under top of skirt 1.25″ from top edge. Iron to set the crease. Stitch at 1″ from crease – leaving 2″ unsewn, to create the waistband casing.

13. Attach safety pin or bodkin onto end of elastic. Thread elastic through the waistband casing, entering and exiting through the unsewn area.

14. Overlap ends of elastic by 1/2″. Pull elastic ends out of the unsewn gap in the casing, and stitch a square shape on the top of the elastic to secure.

15. Tuck elastic back into casing area – then sew the last 2″ of the casing closed.

You’re done!

This skirt is super-cute and can be worn in a casual ensemble.
Or you can dress it up and pair it into a party outfit – layer over a corset, for instance, or under a sequined vest.

People will feel a strange attraction to it when you wear it.

Everyone will love it unconditionally!

Happy DIY’ing…and Happy New Year!

xo
Carly

Leave Comment

DIY: Lace Top to Lace Vest

I’ve stuffed the stockings, laid out piles of prezzies under the Christmas Tree, emailed 18 of my closest friends holiday greetings, realized I’ve forgotten to stock my fridge with eggnog – and now I’m DIY’ing.
Isn’t that what Christmas is all about???:-)

The lacy ruffled vest: I know, it’s a strange concept. But I’ve been seeing these since summer in Tokyo – on all the coolest girls, and plastered all over the Japanese mags – where girls are using it as a feminine layering peice to tone down the masculinity of all that black, denim, and studs.

And it’s super-easy to make!

You Need:
*lacy long-sleeved top (I found mine at Goodwill – but you can probably find one at any thrift store – or even off-the-rack, since 80’s lacy stuff is experiencing a huge revival right now)

*fabric scissors
*sewing machine
*matching thread
*needle for finer woven fabrics

How To:

step11. Cut the sleeves off your top carefully so you leave the finished armhole seams on the shirt. Cut straight down the center of the shirt. (If your shirt didn’t have a V-neck before, cut the neck into a V-shape.)

2. Cut each sleeve in half vertically and spread open.

3. Place one sleeve on one side of the cut front of the top. (Orient the top of the sleeve cap at the end of the V- of the V-neck; and the sleeve itself centered on the cut CF edge. The sleeve bottom/cuff area will likely be slightly longer than your top length.) Stitch the sleeve to the top along your shirt’s cut edge. (not pictured)

4. Repeat for the other sleeve – attaching to the other side of the top’s center front vertical cut edge.

step55. Cut the sleeve edges into a scalloped pattern – you can follow the pattern of your lace – or cut in a vertical zigzag – or scalloped – it’s up to you. It may take a couple tries of cutting and then trying the piece on to see how the fabric falls – and adjusting after that.

done2You’re done!

Wear under a denim vest (my DIY here), layer under a fur vest, throw on over a slim-fit turtleneck – pair under a leather jacket or a men’s plaid top for the ultimate Victor/Victoria.

And if you don’t want to DIY – just buy – this adorable piece for $30 from jadelouse1’s Etsy store. (above)

Happy DIY’ing if you so choose – and Merry Christmas – Happy Hanukkah – and Superb (?) Kwanzaa!

xoxox
Carly

Leave Comment

Don’t Buy, DIY: Embellished Short-Sleeve Sweater

Okay, there’s not much of a price difference there, but still…

Fa la la la la! I love the holidays!!

But one thing I don’t love is all the correspondence it entails. Email just won’t cut it at this time of year.

Sorry for the short absence from the WWW – just been overwhelmed with sending holiday packages, cards, New Year’s greetings, baking Christmas cookies, and gift-shopping.

7 packages, 27 cards, 11 packages of cookies, 9 holiday letters with photos later…I always overachieve this time of year and end up dropping off the face of the planet for about a week. Plus, spending an hour and a half standing in line at the post office yesterday (in THREE separate lines – one for parking, one for the automatic postal machine, and one for the window) can put anyone into a bit of a bah humbug mood. Or make one go postal. Yuk yuk yuk. Can anyone relate?

But I love the holidays – all the festivities of, all the traditions – seriously, the most happy times growing up.

So anyway…
I wanted to share a DIY I finished a little while ago with all of you.

Perhaps you or your SO has a fuzzy gray sweater or fleece in need of a makeover?

Who says winter sweaters have to be long-sleeved? This one is super-cute with armwarmers, gloves, or another layer underneath for when the weather outside is frightful.

Scanned from Vivi December 2009 issue. What can I say – I love this magazine maybe a bit too much!:-)

So I figured, why not make this from an oversized sweater? (after the jump)

DIY: MEN’S SWEATER TO EMBELLISHED SHORT-SLEEVE TOP

You Need:
oversized sweater (nubby knit or fleece, preferably men’s)  //  9 faceted sew-on jewels

scissors  //  pins  //  needle and thread  //  sewing machine  //  sewing machine needle for knits

How To:

1. Cut off sleeves and trim neckline into a V-neck.

2. Turn under sleeve cuffs and stitch raw edges down. (not pictured)

3. To size the sweater smaller (if using a men’s sweater), try on sweater and pinch extra fabric at back of neck until V-neck lays properly on your collarbone (i.e., not too wide). Have a friend stick a pin in the excess, take off the shirt, and turn inside-out. Pin in a line down the center back, all the way to the hem.

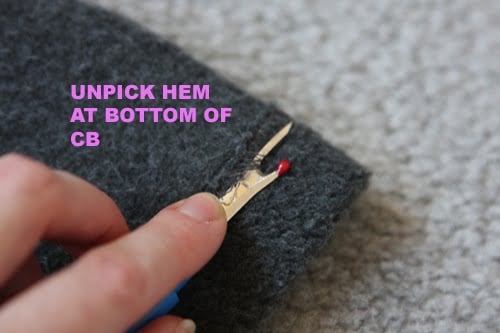
4. Unpick the bottom hem of the shirt so you can flatten the line you pinned all the way down to the cut edge of the fabric. (Probably about 1″ or so on either side of the line you pinned.)

5. Sew CB line all the way to the cut edge. (not pictured)

6. Turn hem under once more and re-stitch hemline. (not pictured)

7. Cut off excess of CB seam. (not pictured – obviously, I got lazy here)

8. Turn under seam allowance around neckline, and stitch down. (not pictured)

9. Sew jewels around neckline.

Done!

I’m thinking about resetting the sleeves so the shoulder seam is shorter, which I think might make this less matronly and more like the original.

But maybe I’ll leave it as is!These little jewels were in a multisize pack of 25 for about $3.99 at Jo-Ann’s. And the shirt was $6.99 at Goodwill. Super-warm!

Happy DIY’ing…and Happy Birthday to me! (It’s today!) Not quite sure the appropriate emotional response…but hopefully I’m another year wiser! (Maybe to avoid the P.O. after December 15 next year?)

xoxox
Carly

Save

Leave Comment

DIY: 2 Men’s Shirts to Cute Babydoll Dress

Get This Tutorial As a PDF

7 DIY Men's Shirt Makeovers ebook

This tutorial has been updated, and is now available as a full step-by-step with photos in my new book 7 DIY Men’s Shirt Makeovers, part of the DIY Men’s Shirt Makeovers System.

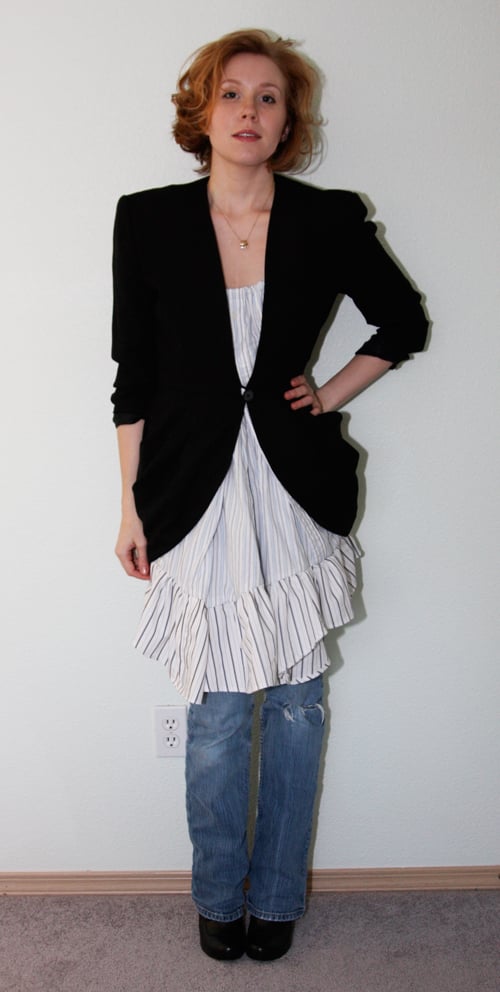
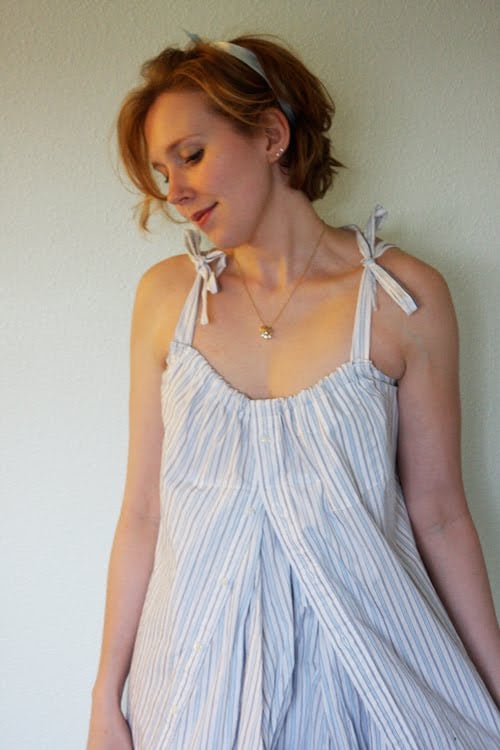
To take a break from my usual uniform of dark skinny jeans, black blazer, dark vest, and dark tee…I’ve created this adorable ruffled hem pleat-front ribbon-tie striped babydoll dress from 2 men’s button-down shirts.

(Sorry for the super-dark photos – my sewing room is lit only by a firefly, various glow-in-the-dark toys, and a sputtering birthday candle.)

You Will Need:

2 men’s button-down shirts in coordinating colors (I used size 16 – I think that’s an L, but I recommend using an XL if you are a S/M Misses’…an XXL if you are L/XL Misses.’)  /  thread matching topstitching thread in shirts  /  23″ of 3/4″ wide flat elastic (white)  /  3 m elastic cord (white)…we’ll be gathering fabric so only about 1m will be used eventually, but you need a longer length to do the gathering properly.

Tools:

sewing machine  /  needle for wovens  /  fabric scissors  /  seam ripper  /  iron (optional)  /  1 safety pin

How To:
PREP YOUR PARTS

1. Cut Shirt #1: the sleeves off the shirt and straight across the top just under the second button.
This will serve as the body for your dress.


MAKE THE FRONT INSERT & DRESS BODY

2. To make the front insert, first cut the cuffs off both sleeves and discard. Pin the sleeves together on the long side closest to the sleeve opening placket. Sew together with a 3/8″ seam allowance, open up the piece you just sewed, and lay flat.

3. Turn insert upside-down and pin both sides of it to the underside of the opened shirt front we cut in Step 1), matching bottom hemline. (Underlap about 3/8 – 1/2″ on button placket.)

Sew to shirt front vertically along button plackets.

4. Close top button. On underside, create pleats in front insert, and pin to underside of front.

5. Sew a line straight across the top of the insert, through all layers, catching all the pleats. (This will result in a visible line of stitching through the front of your dress.) Then sew button placket closed above the line you just sewed, going through all layers.

MAKE THE BOTTOM RUFFLE

6. Button up Shirt #2 and lay flat. Mark 7.5″ up from the bottom, and 7.5″ above that. Cut shirt straight across, through both layers, at both marks.

7. Using the bottom of the shirt as a guide, hem the upper strip in a similar fashion (note the center front and center back of the shirt is lower than both sides). I just traced the shape of the bottom hem, added 3/8″, turned under, and stitched a 1/4″ hemline. (I know, technically the top strip needs to be 7 and 7/8″ tall, not 7.5″…but we won’t tell anyone.;-) It’s easier to explain this way.)

8. Cut Shirt #2 according to the photo above: cut the sleeves off, and cut the yoke off the back (we’ll use the yoke later on).

As to the sleeves, mark 7.5″ down from the top of each sleeve, and 7.5″ down below that. Cut sleeves straight across at those marks. (We won’t be using the cuff pieces.)

Pin each sleeve piece together at sides to make one long continuous piece. (In this order: Sleeve cap + bottom piece + sleeve cap + bottom piece. If you’re totally anal about this piece matching the hemmed pieces from Step 7), cut one of the bottom pieces in half widthwise – and pin each half to the outside edges of this joined piece. I.e., bottom piece half + sleeve cap + bottom piece + sleeve cap + bottom piece half.)

Sew sleeve pieces together. Hem the edge that has the rounded part of the sleeve caps in a similar fashion to the piece you hemmed in Step 7), cutting off the extra to create a similar hemline.

9. Connect all 3 ruffle pieces together by sewing them at their sides with a 3/8″ seam allowance. (Connect all so you’ve made a continuous piece.)

10. Make a double knot in the end of your elastic cord. Place it on the wrong side, along the top of the ruffle piece you just sewed (about 3/8″ from the edge). Using a loose zigzag stitch on your sewing machine, zigzag over the elastic cord all the way around the ruffle piece. Do not stitch through the cord – it must remain free and moveable under your stitches. Backstitch a couple times at the beginning and end of your stitching to strengthen it.

11. Pull on the un-knotted end of the cord, gathering the fabric underneath it. Gather the ruffle piece until it is basically the same circumference as the bottom of your dress.

12. Pin the gathered ruffle to the bottom of the dress, right sides together. The bottom of the dress is already a curvy hem – pin the straight side of your ruffle around these curves. This will create a beautiful wavy hem when finished. Double-knot the elastic cording again once you have verified the pinned length of the ruffle – then cut off the extra cord.

13. Stitch ruffle to bottom of dress, stitching below the elastic cording.


GATHER THE DRESS TOP

14. Fold under top of dress about 1″+. Stitch straight across bottom of folded edge to create a casing.

15. Attach safety pin to one end of your flat elastic. Thread through the casing and out the other side.

16. Match end of elastic to edge of dress; stitch down the edge to secure.

17. Hold the elastic firmly and gather the front fabric – the finished width of your dress front needs to be 11.5″.

18. Once at the correct width, stitch down the other end of the elastic, and trim so nothing is visible from the front.

19. Repeat for the back of the dress – the finished length for the back of the dress needs to be 10.5.” 

MAKE THE SHOULDER-STRAPS

20. Cut back yoke off Shirt #1 as well as from Shirt #2…which we did in Step 8). (The yoke is usually double-sided; if yours isn’t, you have to scavenge fabric from somewhere else on your shirt. I think the ties look best when the stripe pattern is going up and down the length of the tie, not across, so I chose an area where I can get a piece of fabric 17.5″ long with the stripes going up and down.)

21. Sketch out the following shape onto both pieces: a tall trapezoid, with the top side 1.25″ wide, the bottom 2.5″ wide, and the entire piece 17.5″ tall. Cut shape out, separate the front and the back, and remove any labels with a seam ripper.

22. Fold each piece over, right sides together, and sew along longest edge, pivot, and along shortest edge. Turn piece right side out, and topstitch along unstitched edge to flatten it. (You can also iron it at this point to flatten it out further.)

23. Pin each piece under the top of the dress, at both front and back, about 1/2″ down from top hem, on either side. I positioned the pieces matching the dress body at the front, and the pieces matching the ruffle at the back.

24. Stitch across strap through all layers using a zigzag stitch for strength.

25. Tie bows tightly to prevent slippage.

You’re done!

You now have a super-cute dress perfect for lounging about, a sweet babydoll nightie appropriate for the boudoir – or even, under a blazer and over jeans or leggings, a chic piece to add into any day ensemble. Or you can wear it out as is during warmer months – rocking it with some lace-up sandals, a little metallic clutch, and a rhinestone clip in your hair.

(Daiso 100yen shop multi-ring necklace, vintage blazer, handmade dress, DKNY jeans, Payless Victorian button booties)

Notes: 

When I created the front of the dress, I sewed 2 sleeves together – resulting in a wide pleat at the front which can, in profile, make the wearer look preggers.:-P If you prefer a less generous A-line, create use a single sleeve instead for the front insert. This dress, because of the generous front pleat, would also be great maternity wear! (It’s kind of cute-sexy, so I think it would work great!)

I would recommend if you wanted fuller bows – to either use fabric from other parts of the shirt and double the width of the cut parts…or cut the pieces as I wrote above and instead of folding them in half, just fold under the raw edges about 1/4″ and topstitch to keep in place (eliminating Step 22)- thus leaving you with single-layer fabric bows instead of double layer.

The finished dress may be somewhat short for some people -I’ve thus recommended an XL men’s shirt to hopefully deal with the length problem. Making the ruffle 8″ or 8.5″ high before you cut it out may also help with this if you’re concerned about the length – I am 5’6″.

I’d also recommend ironing your shirts first! My blue-striped shirt was a little rumply – which is reflected in the finished piece. The dress is now extremely difficult to iron due to all the ruffles – so make sure your shirts are free of wrinkles first!


Happy DIY’ing!
xo
Carly

Get This Tutorial As a PDF

7 DIY Men's Shirt Makeovers ebook

This tutorial has been updated, and is now available as a full step-by-step with photos in my new book 7 DIY Men’s Shirt Makeovers, part of the DIY Men’s Shirt Makeovers System.

Leave Comment

Pin It on Pinterest