Jul 15, 2010 | DIY
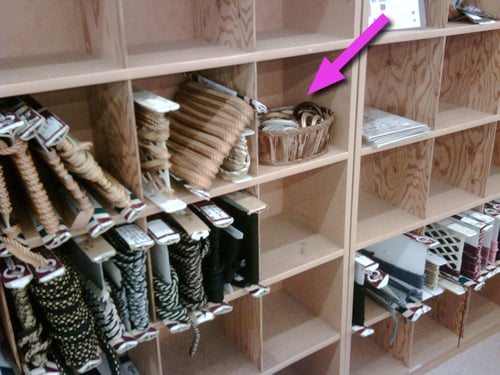
The other day I was just browsing in my local fabric and notions store, and something in the interior fabrics and curtains section caught my eye.
Yes, this little basket. Full of wooden and antiqued curtain rings for super-large curtain rods.
Gold, bronze, and bone craquel enamel carved rings, and dark wooden rings.
It was like a basket full of happiness.
Not that I was really looking for curtain rings. I just had my cheapskate ‘n’ DIY thinking cap on.
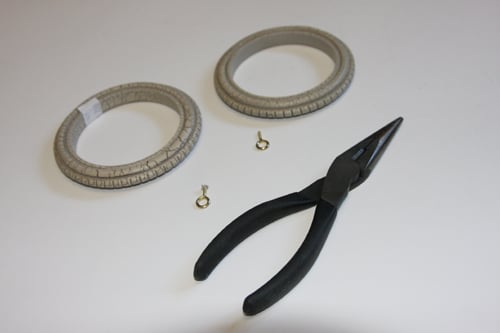
These curtain rings are so beautifully unique with the enamel craquelure! I’ll just remove the eye screws…
And now I have a one-of-a-kind pair of boho bangles!
You can also find large rod curtain rings in flea markets, antique stores, and interior hardware shops, so keep an eye out and your cheapskate cap on…
Though at $2.50 apiece maybe Forever21 is cheaper??
xoxox
Carly
Leave Comment
Nov 25, 2009 | DIY

While the economic news of the past couple of seasons has been somber & depressing, accessories have been anything but! Bold, funky, colored, and exuberant pieces crafted from unusual, low-end materials like plastic, acrylic have a larger-than-life 80’s feel but with modern, penny-pinching sensibilities – the perfect counterpoint to a sleek dress or structured, tweedy suit. Inspired by the likes of Marni and Alex + Chloe, we’ve put together this little D.I.Y. so you can outfit yourself with bold shapes cut out of shrink plastic and layered with mirror for the ultimate Eighties Revival Necklace.
This is what you’ll need:
*shrink plastic (found at the craft store or online at ShrinkyDinks.com; we chose the pack of Ultra Thick Misty White shrink plastic for about $7)
*sheet of cuttable mirrored plastic (craft store or online at Scrapbook.com)
*glue (like GOOP)
*jump rings
*chain necklace
*scissors
*sheet of cardboard (if using an oven to bake the shrink plastic), or a heat gun
*pen
*awl, thick needle, or other sharp instrument
*pliers

MAKE THE PENDANT SHAPES
1. Cut the shrink plastic into your desired shapes (such as randomly-sized triangles) to make pendant backings. Remember: Your plastic will shrink to about 45% of its original size – so cut almost twice as large as you want the finished piece to be!
2. Bake pieces in oven (or using heat gun) according to package directions.
3. Allow to cool. When cool, trace pendant shapes onto wrong side of a sheet of mirrored plastic.
4. Cut out mirrored plastic and glue onto shrunk plastic pendant backings.

ATTACH TO NECKLACE
5. Using an awl, thick needle, or other sharp tool (it works best when heated), poke a hole at the top of each of your pendant pieces.
6. Add jumprings and attach to chain necklace.
VOILA! A girl can never have too many shiny, mirrored things in her life! Pair over a white tee and some dark skinny jeans for a rocker, glam-girl vibe; layer under tangled chains and rhinestones for a Renaissance revival; or let it stand on its own as a statement necklace with a gorge printed wrap dress.
Rather not do all the cutting and baking yourself? Order your pendant pieces ready-made at Ponoko.com, where you can get your own sheets of mirrored plastic, acrylic, vinyl, or balsa wood lasercut to your specifications. String onto a necklace or earrings and enjoy your creation – or even sell your finished products through their marketplace.
TIP: Don’t be afraid to experiment further with shrink plastic! Besides making pendants, you can also form bracelets and rings, make tags and charms, craft buttons, curl it over while warm to create 3D shapes…the possibilities are only limited by your imagination. You can stamp it, paint it, airbrush it, lacquer it, decoupage it, marble it, or add crystals or heat-fix studs. It’s a really interesting medium that lends itself superbly to a variety of different designs – and allows you to mimic the look of designer accessories for very little investment.
Happy DIY’ing!
-Carly J. Cais, Contributing Editor
(as posted on FashionTribes)
Save
Leave Comment
Nov 16, 2009 | DIY

 I became obsessed with making myself a Panja [i.e., back-of-the-hand jewelry piece] since seeing the above in Vogue October 2009. For all it’s highbrow designer, impossible-to-make-yourself fashion spreads, once in awhile the magazine showcases an idea that’s just mindblowingly awesome. How cool is this rhinestone-and-chain Alyssa Norton piece that the model above is wearing? (All her jewelry is really eclectic and covetable…to sum it up to its lowest common denominator, she likes wrapping silk thread around rhinestone chains; making rhinestones “cast” in metal and set into jewelry as if precious stones; barettes with dangling cords and rhinestones; and chain mail. Def. check out her site if you get a chance!)

But I’ve had Panjas on the brain since about 2005, when I saw the above Hahn An Su (sp?) design in a Vivi Magazine. I didn’t know what they were called then, but I definitely wanted one!

And then recently I saw this photo posted at Maverick Malone. She’s such a cool girl – and has great style – she just wrapped this broken necklace around her hand and wrist and called it a day. Love.
I don’t really know much about Panjas, so I am unable to educate anyone about them (and if they have religious significance I’m very sorry for my desecration and sacrilege) but….
Perhaps you can feel a DIY coming on?? LOL
I’m not paying $805 for the Alyssa Norton piece! So here’s the DIY:
How to Make a Panja [Back-of the Hand Jewelry]
You Need:*1 post rhinestone earring, pictured above (I used these earrings I got from Forever21 for $9.80)
*2″ flat silver curb chain
*1 small silver jumpring
*1.5″ wide x 8″ long piece of black fusible stretch mesh interfacing
*1 pair sew-on snaps
*needle + black thread (doesn’t have to be silk but can be if you like)
*pliers
*sewing machine
*iron
How-To:
1. Push the earring post through the center link in your chain piece. Using pliers, bend down and around the chain so the earring is secured and there’s no scratchy post end sticking out.
2. Wrap the chain around your index finger – cut to size. Secure with a jumpring.
3. Fold both long sides of mesh interfacing in towards center. Fold again in the center so you have a long rectangular strip with all raw edges enclosed. Iron flat – the heat of the iron will fuse the mesh together.
4. Sew along long edge of mesh to secure the folds you made.
5. Fold each shorter end over and secure with hand-stitching.
6. Place earring flat and stitch bottom rhinestone dangle to center of black mesh. This is the tricky part – you just need to weave in and out of the rhinestones with your needle, securing them both together and down. You don’t want the rhinestone dangles to move too freely across the back of your hand – so sew together inbetween the settings, and be carefuly of the thread catching on the rhinestone prongs.
7. Wrap the thread around the black mesh for a textural effect. (Here, to make it exactly like the Alyssa Norton piece, you can smudge silver fabric paint at intervals onto the black mesh, and decorate with rhinestones. I chose not to because I wanted more simplicity.
8. Hand-stitch a snap and its counterpart to each end of the black mesh.
You’re done! Super-easy, right???
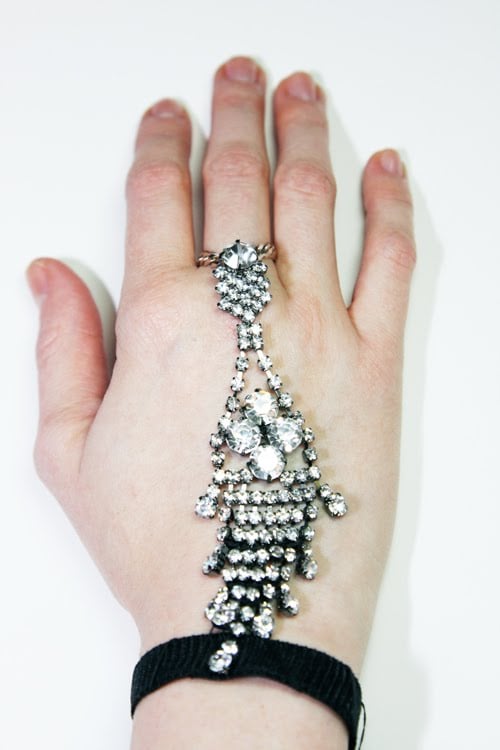
Feeling the backs of my hands are sad and naked now without my Panja….
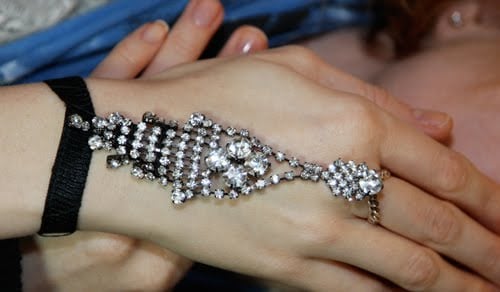
Happy DIY’ing!
xoxo
Carly
Save
Leave Comment
Nov 8, 2009 | DIY

A little DIY project for your Sunday!:-)
I wore my version of the hardware necklace in the latest styling challenge for America’s Most Stylish Blogger Competition.
(And if you may remember, in the video intro’ing the look for this week Tibi designer Amy Smilovic said I should have worn tights with my look. Funny thing…
I brought TWO pairs of tights to the studio one the night we shot: one gray, and one brown. For almost 20 minutes I debated the tights, and then finally decided against them, because:
- I wanted the shoes to pop. If the legs were almost the same color, the shoes got drowned out.
- Bare legs evoke far more sensuality and romance than covered legs…since almost everything else on me is covered.
- Wearing tights took away the “glam” factor and downgraded it to a casual day look. Not what I was going for.
And it doesn’t need a pop of color since I was going for monochromatism (I know that’s not a word, just bear with me) and I wanted the gold, silver, and shoe studs to be gleaming out from a sea of textures of brown and gray.
Just sayin.’)
Here’s the whole photo again, just to refresh:
 Ah, the fickleness of fashion!
Okay, back to the necklace. Here’s a closeup from my photo:

We all saw last season’s Lanvin runway collection and those chunky, statement necklaces made from what looked like bits and bobs from the hardware store.
Queen Michelle over at Kingdom of Style did her own DIY tutorial on the trend for Vogue Girl Korea – so there’s really no reason for me to rehash it in step-by-step detail. It’s pretty straightforward.
(photo: Kingdom of Style)
Basically, in order to make this necklace, I purchased from the Home Depot plumbing section:
*1 pack of 3/4 x 3/4 straight couplings (5 to a pk)
*2 packs of 1/2″ compression nuts (3 to a pk)
*1 pack of 5/8″ compression nuts (3 to a pk)
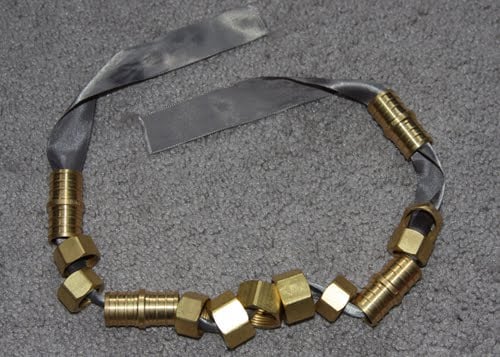 And strung them on a dark gray satin ribbon. I folded the ends of the ribbon over 2 gold split rings I had banging around in my findings box (D-rings would have been better, but whatever); machine-stitched to reinforce the ends, and attached a heavy-duty lobster claw clasp and jumpring to one side.
Presto! In less time than it’s taken me to write this post, I had a gorgeous, shiny chunky statement necklace – for about $8 from the hardware store. (You may want to wipe your findings with alcohol to clean off any machinery grease/hardware store/raging testosterone smell from them.)

And…funny story…while I was in line at the register to pay for my findings, a sort of a roughneck-looking man with a little Jack terrier in tow lined up behind me. (Though why the dog was allowed inside the Home Depot I’m not quite sure – he definitely was too tiny to be a seeing-eye dog LOL) The guy goggled at all the findings I had plunked on the register conveyer belt and said “I see someone gave you a list” in that condescending ‘what’rya doin’ here, li’l lady?’ sort of tone. (This is my imagined scene from some Dirty Harry movie, none of which, I hate to admit, I’ve ever seen.)
It took me a moment to figure out what he was talking about. “Oh no,” said I. “No list.”
His eyebrows shot up almost into his thinning hairline. “You mean you picked all that out yourself?”
“Yup,” I said.
“Got a job to do, eh?”
I laughed and then said (which I ended up mentally kicking myself for later), “It’s not like I was looking for anything specific.”
He started to chortle. (I’m sure ladies don’t know s*** about plumbing was going through his mind about then.) “What did you need them for then? You making some sort of art piece?”
“No, jewelry,” I said.
“Ah. Jewelry.” Everything clicked in Mr. Females Don’t Know Hardware’s brain, and all was right with the world.:-)
Hope you all are having a great weekend!
Happy DIY’ing!
xoxo
Carly
Save
Leave Comment
Oct 3, 2009 | DIY

So apparently I’ve missed the few screenings of Coco Avant Chanel here in Portland that happened earlier this month. *sigh* I soooo wanted to see it, but looks like I’ll have to wait for it to come out on DVD (whenever that will be). Inspired by the sheer idea of the film (since I haven’t seen it), I crafted a few things Chanel-inspired:
Double-C Sequined Perfume-Bottle Brooch
 Gold sequins glued onto black fabric in the shape of the iconic Chanel No. 5 perfume bottle, then bordered by silver bugle beads stitched around the edge. I glued on some rhinestone chain that I salvaged from a broken necklace in the shape of two interlocking C’s. Counterfeit couture. (Though I’m using the word “couture” loosely, since I used glue to attach the sequins.) I made this at least 5 years ago now…the bugle beads look absurdly crooked upon closer inspection; a mere shadow of the real thing.
Black & White Bow Shoe Clips
Made from frilly white chiffon ribbon and black satin wired ribbon wrapped around, and then stitched onto shoe clips.
Black & White Bow-Detail Cape
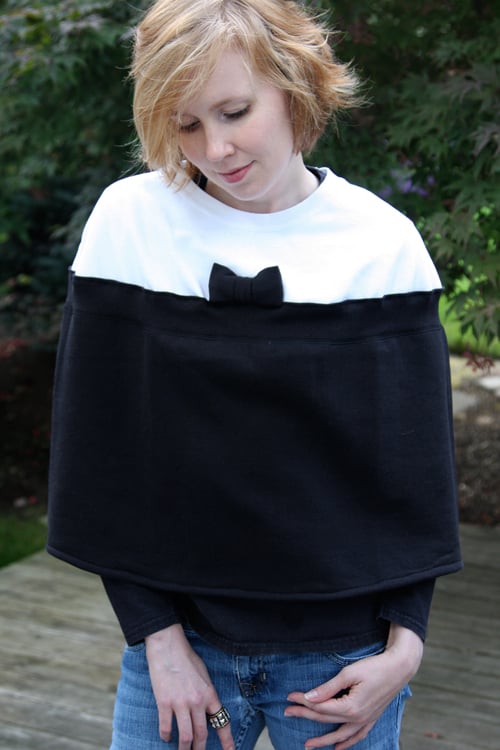

Made from two men’s sweatshirts. I’m posting the tutorial next, so stay tuned! I’ve posted the tutorial here, so check it out!!
Pirate Triple Pearl Necklace

The messy hair is on purpose. That’s the only way it can be explained.

I know this is a little bit of a deviation from the standard Chanel pearls, but I liked the pirate-esque nature of them. I made them from some cheap pearl rope I had laying about – and I added some little charms and this cool carved nut I found at a bead show. I know they would be much better if they were real – or even faux! – pearls and not these pearls fused to the string like this…but this would seriously take so many pearls and so much knotting in order to make I got tired of the idea before even attempting it.
Chanel-Style Camellia Brooch
This is the photo from the book; I didn’t actually make the brooch, sorry.
Adapted from the book “Ima Sugu Tsukuritai Co-saju” [“Corsages I Want to Make Right Now” Bunka Publishing, 2006]. Here’s the scanned, translated-by-me instructions below – just omit the instructions for the stem and attach the brooch back to the back of the flower for a Chanel-style piece. See here for more DIY corsage patterns, by the way!
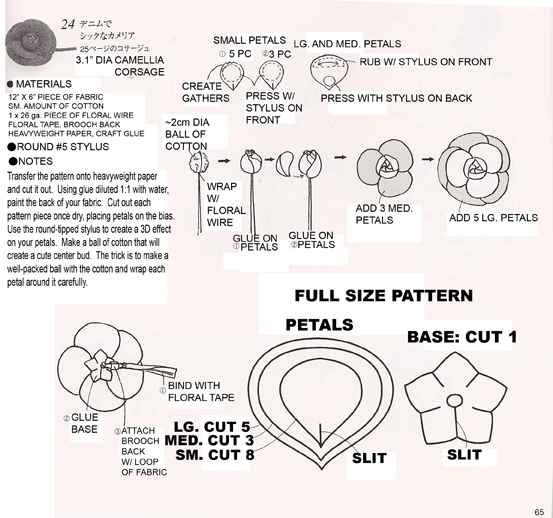
Click above for full size.
The book page is 8 1/8″ wide by 7 7/8″ high if you want to print it out, in order to make sure the petal pattern is sized correctly. The pattern requires the use of a round-headed stylus in order to create the rounded, 3D-effect to the petals. Not completely necessary, but it helps create a finished, professional look to your corsage. I haven’t sprung for the $30 heated stylus tool specifically for this purpose; I just use a metal muddler that has a small ball on the end. You could probably find a paint mixer or similar stylus tool at a crafts store. [And if you’re wondering where I found the muddler, it’s actually for mixing cel paints, courtesy of animation school in Japan. I don’t think you’ll find anything similar stateside.:-)
Hope this helps to get you into a Chanel-style mood – and hankering after black and white, stark contrasts, tweedy fabrics, pearls, and girly flowers. Have a lovely Chanel day!
xoxox
Carly
Save
Leave Comment