Jun 16, 2010 | DIY
While I am still distressing over our lost family pet (now missing for over a week), the only thing I have been able to do besides put up posters, hand out flyers, and spend hours staring outside and waiting for the phone to ring…has been to watch reruns of Law & Order. They always find the missing person in the end.

And blog-land wise, the only thing I have been able to do on the computer is indulge myself in a blog I cam across called Tea Rose Home. The writer of it, Sachiko, is a stay-at-home mom with 3 children, and she blogs about beautiful items: ruffles, quilts, t-shirt makeovers, children’s clothing, and home decoration projects that add beauty and happiness to her life. I’m amazed at the number of creations she makes, and the feminine quality to each one. Plus her attitude (in the face of 3 rare disorders that have had her in and out of the hospital her whole life) is inspiring and uplifting. Reading her words about how much she loves her family, the happiness she finds in crafting, and her positive attitude has really helped lend me strength in this dark time. Plus, her projects are just beautiful – and she loves forming baskets into handbags – something I love as well!
I made this basket after seeing something similar in a Japanese magazine awhile back. It is real fur, sadly – a rabbit fur that I had bought a long, long time ago and had put in my materials bag to try and figure out what to do with it. In the years after I began to feel disgusted about using real fur, and so couldn’t bring myself to use it in anything. But I also couldn’t bring myself to throw it away, which would be so disrespectful to the life of the animal.
Muffin [our lost cat] loved it, and often pulled it out of my bag, playing with it, stroking it, and sometimes sleeping with it. So I put it on a basket, kind of like a good-luck charm. It’s removable for when Muffin comes back, and now sits on my desk so I can stroke it and remember how much she loved it, while I am willing her quick return.
A cheap basket from Michael’s which didn’t have a lid was transformed into this by cutting two pieces of foamcore that would become a hinged lid inside. I added hinges and a latch from the hardware store, securing the screws I drilled into the foamcore with hot glue. The latch I secured onto the basket with thin wire from the jewelry-making section.
I then hot-glued a layer of lace around the edge of the lid from a lace table runner I found at Goodwill for $1. (Come to think of it, Goodwill had TONS of baskets there too – I should have bought there instead of spending $6.99 at Michael’s. Next time.)
Finally, I wound a lace ribbon around the handle, and added some lace bows on either side. I then added a muslin liner, and my pretty bag was done!
Once Muffin returns and wants her fur back, I will probably replace it with a layer of pretty fabric, or some faux fur on top instead.
Have any of you ever remade a basket before? Hope this gives you some ideas – and for more great ideas for basket makeovers, check out Tea Rose Home and all the beautiful basket handbags Sachiko creates there.
xoxox
Carly
linking to Tea Rose Home link party No. 12 and Avid Accents Make My Style Monday #6
Leave Comment
Jun 3, 2010 | DIY
Pillowcases come in a variety of prints that work just as well for pieces clothing. Plus, they have just enough fabric (and are roughly the same shape) as a cute little A-line mini-skirt – and can be transformed easily, with just a couple seams. (You can of course also transform them into dresses and skirts for small children.) And now there’s no need to worry when you have a lone pillowcase and can’t find its mate.
Take Exhibit A, a dot-printed piece that I pulled out of my 48-lb. haul of clothing I sourced at my local Goodwill Outlet. I was drawn to it because of the fabulous print – and I could only find one of them, so I had no intention of using it as a pillowcase…thus I thought it would work great as a skirt! The whole process took me maybe 30 minutes – a quick-sew project to be sure!
How to Make an Elastic-Banded Mini-Skirt from a Pillowcase
You Need:
*a standard-size (or larger!) pillowcase
*2″ wide piece of black elastic
*tape measure
*marking chalk
*pins
*fabric scissors
*thread and machine needle for wovens
*iron & ironing board
How To:
1. Turn pillowcase inside out and cut off all the sewn seams, leaving two large rectangles.
2. Turn rectangles sideways and fold in half. Cut edge on a slight A-line angle to the top. (I know in the photo above the fabric isn’t folded in half – but you should probably do that to ensure the right and left sides of each piece are at exactly the same angle.)
3. Unfold your pieces. Measure 1/2″ in from the angled edges of one of the pieces, and cut. This piece will become the back of the skirt.
4. Pin back to front of the skirt at the angled sides, and sew together.
5. Wrap piece of elastic at your natural waist (or where you want to wear the skirt). Make sure it is taut on your waist – not so tight you can’t breathe – but fairly tight. Overlap ends by 1/2″ and cut.
6. Sew piece of elastic in a circle on your machine with a 1/2″ seam allowance. (I used a straight stitch, then flattened each end and zigzagged over it to further secure it.)
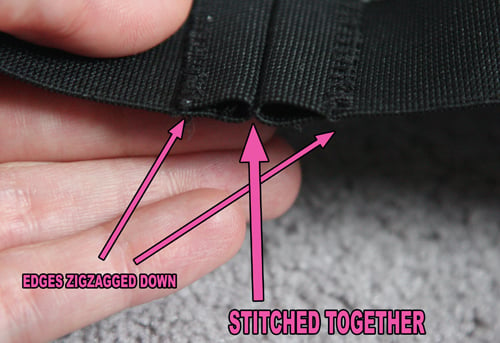 7. Place elastic band over pillowcase top, overlapping about 1/2″. Match pillowcase skirt center front to center of elastic band, and skirt center back to the seam you sewed in Step 6). Pin the two sides as well.
8. Sew pillowcase to elastic band using a stretch stitch on your machine, with the elastic on the top and the fabric below being thread through by the machine’s feed dogs. Stretch the elastic between the pins so the pillowcase “gathers” naturally to the elastic.
 9. Try on the skirt, mark where you want your hem to fall, and turn the hem (about 1″). Sew a 3/4″ hem on the bottom.
10. Iron to set the hem and remove any creases.
 And that’s it! And the great thing is, the waist is elastic, so you can wear it belted higher up with a wide belt…or wear it lower near your hips for a different look. Hope you have as much fun making yours as I did mine!
 Happy DIY’ing!
xoxo
Carly
~If you liked this post, please share it!~
Save
Leave Comment
May 28, 2010 | DIY
 These sunglasses (a dupe of the Alexander Wang for Linda Farrow zipper sunglasses) are a bit fiddly to make, but the results are totally impressive! My tutorial was featured in Free Magazine, the official magazine of Club 18-30.
 Those of us stateside may not be familiar with Club 18-30, but for our friends across the pond it’s sort of known as Europe’s version of Club Med (except catering to a younger clientele, hence the name).
My DIY Alexander Wang Sunglasses have been featured in the Summer 2010 issue, which is available in all Club 18-30 destinations from May – October. (Available in 10 countries, including Bulgaria, Crete, Cyprus, Turkey, and Ibiza.)
Unfortunately they spelled my name wrong (there’s no U in it) – but ohwell! A feature’s a feature!
Since I submitted this in February, in the meantime Style Hurricane also DIY’ed her own version using a real zipper around the edge of the sunglasses.
My version is a lot more labor-intensive, but I was going for as exact a copy as possible.:-) Whichever way you go, now these fabulous designer-style sunnies can be yours at a fraction of the price!
Happy DIY’ing!
xoxox
Carly
Leave Comment
May 14, 2010 | DIY
I’ve been on the fence regarding these boots for awhile because to me, they fall into what I call the “split personality” category: where something looks totally different from the front as it does from the back or the side. These shoes look so chic from the front – but from the side I always felt the heel was a bit too low and clunky-chunky. I just wasn’t into the shape of it – but still wanted a pair of open-front booties for the warmer months of summer.
I was planning on doing a DIY of this style by just buying a pair of boots which had the pieces anchoring the laces separated a bit, with a single piece of material as the toe-box and tongue. (All you would need to do is cut out the tongue and toe box, leaving the sides and laces intact.) But even I’m a sucker for a cheat – if there’s an easier way to do something, I’m all for it!

Enter Forever 21‘s Lace-Up Sandal Heels. As soon as I saw them, I knew they would be perfect – as the only DIY’ing that needs to be done is eyelet punching. Yay for simplicity! I bought them and then set them on my “DIY’s to Do” desk and left them there for a bit while I was too sick to really bother about making things. In the meantime, The Look 4 Less answered a reader question who was searching for an alternative to those Ann D’s with a recommend for the exact same Forever 21’s I had snagged. (Cripes, I’ve searched for over an hour on their site to find the post, but can’t. Sorry!) Well, I’ve been beat to the punch but it finally provided the kick in the pants I needed to do the DIY for these iconic shoes. Very simple (but your hands will hurt afterwards!)
You Need:
*Forever 21 Lace-Up Sandal Heels
*rotary leather punch
*a pack of small silver-tone 1/4″ eyelets (if you can get 2-part grommets, so much the better! I couldn’t find them at my local Jo-Ann’s…Jo-Ann’s = argggggh!)
*eyelet/grommet setter (I used setting pliers)
*small scissors
*pliers
How-To:
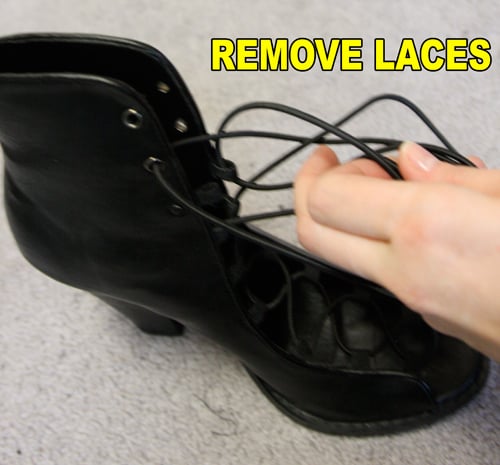
1. Remove laces from the shoes.
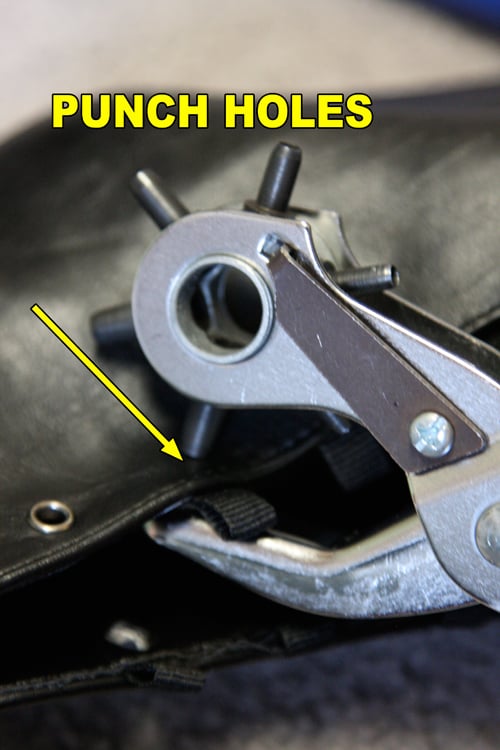
Using the rotary leather punch, punch holes in the shoe leather about 1/4″ from the edge, where each ribbon lacing anchor is located. I used the second-largest punch on the rotary.
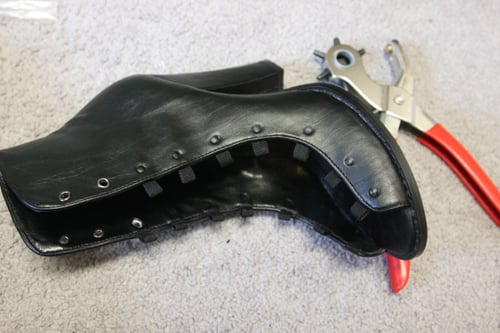
As you can see, the punch doesn’t go all the way through the leather in most cases. (I also then applied the punch from the inside of the shoe for each hole.)
2. Use the small scissors to cut out all the extraneous material that wasn’t punched out of the holes by your pliers – there’s a couple layers to go through, including the outer vinyl, inner lining vinyl, ribbon ends, glue, and in some cases, the inner buckram stiffener, and usually, the pliers can’t handle it.
3. Use the scissors like an awl, and twist them back and forth in the holes to stretch the holes a little larger.
4. Use the scissors to cut off the protruding ribbon ends – what the Forever 21 boots used as lacing anchors for their laces.
5. Set the eyelets (or grommets!) in each hole. Since the eyelet plier setter is a sucky piece of equipment, and the eyelets are equally sucky, I had to go back in with pliers and press down the backs where the eyelets split, leaving jagged metal edges. If you’re using better-quality tools and eyelets (i.e., not Dritz brand) you probably won’t have this problem.
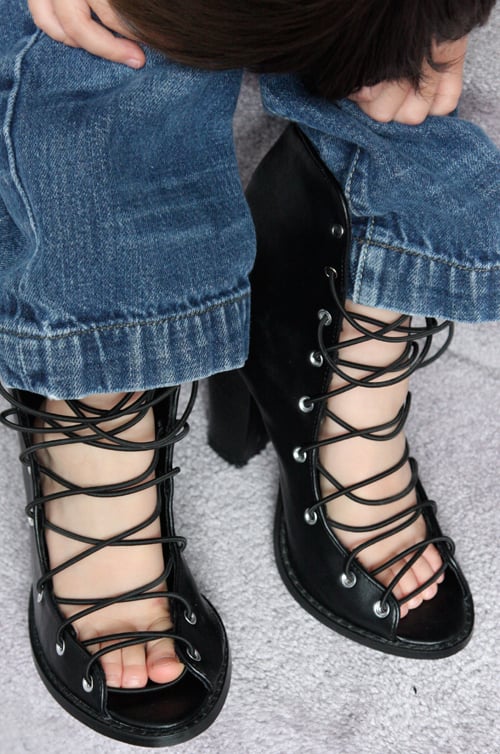
6. Thread the laces through the eyelets in a zig-zag pattern.
Wear proudly! They’re pretty darn good doppelgangers, and the heel is now a little more tapered and chic.
Love!
Not feeling very photogenic today.
And Lil Tot was so enamored with them that he wanted to pose wearing them as well.
Not sure why his pants are undone. He doesn’t seem to like pants much, considering that the few times I’ve shared his photo on this blog he’s pantless.
Appeals to all ages!
xoxoxo
Carly
P.S. And if I never have to spell “Demeulemeester” again, I will be one happy lady.;-) That, and if I could just get Lil Tot to wear pants done-up for a photo op.
Save
Leave Comment
May 9, 2010 | DIY
Like I wrote in an earlier post, I’ve had flowers on the brain. (Thus all those fabric flower patterns in that post, and in my Threadbanger roundup.) I was going to do these as a DIY tutorial for my Tuesday Threadbanger post, but then realized they weren’t really worthy of a full-fledged tutorial. I got the idea from a lovely pair of furfur flowered ballet flats I spotted online recently. (I do love furfur!) To make them was almost embarrassingly easy, but here’s the how-to if you guys are interested:
You Need: (more…)
Leave Comment