Jul 16, 2010 | DIY
To continue on in the theme of strange things to wear on your wrists…
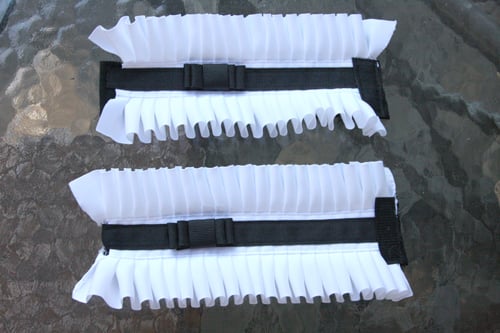
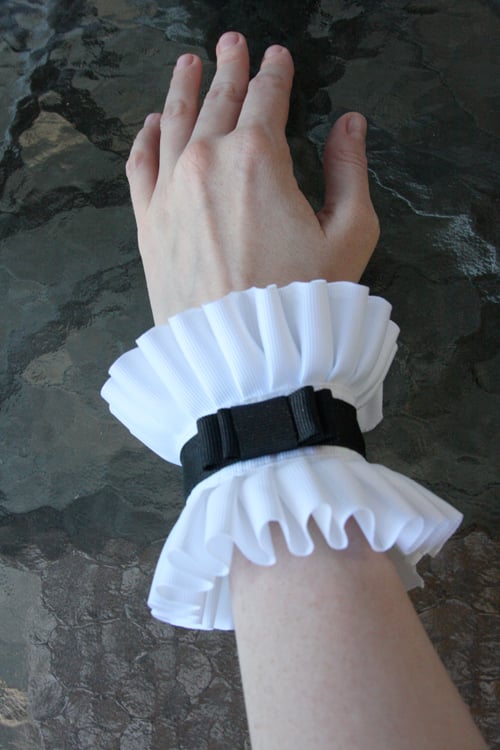
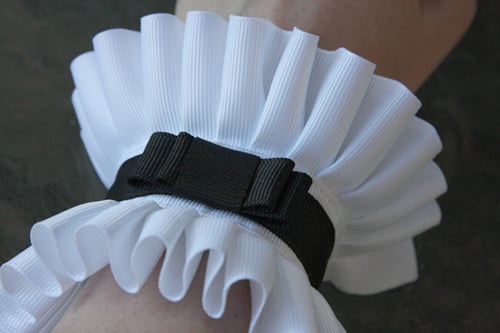
I’d like to share with you how to make your very own pair of pleated wrist cuffs.
As an accessory they may be somewhat unusual – but maybe you noticed them on China Chow from a previous episode of Bravo’s Work of Art? (Episode 3; the one where the artists have to create a piece of art for a book cover; I can’t find the screencap from Bravotv.com. She’s wearing them though!!)
They’ve been seen on celebrities such as Audrina Patridge and Brooke Hogan, courtesy of Cuffs Couture, but at $58-$90 for a single cuff I find this brand a bit out of my budget.
I actually saw the cuffs I got the idea from in a February 2010 issue of Vivi magazine, and thought they were a great idea to wear with bare arms to add a bit of romance to an outfit.
You Need: (sorry for the hand-drawings, I didn’t photograph the step-by-step)
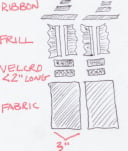
*2 pieces of black woven fabric, each about 3″ wide and long enough to wrap loosely around one wrist with about a 2″ overlap
*2 sets of black velcro strips (the furry side and the hooked side = 1 set), each about 2″ long
pleated white trim (mine was grosgrain ribbon trim I found at Jo-Ann’s Fabrics, though if you can find pleated silk or cotton that would be soooo much better)
*black grosgrain ribbon, 1/2″ wideAnd…
*fabric scissors
*flame
*sewing machine and needle for wovens
*hand-sewing needle
*black thread
*white thread
*fabric glueHow To:
1. Turn under all the raw edges of each fabric piece about 1/2″, and sew.
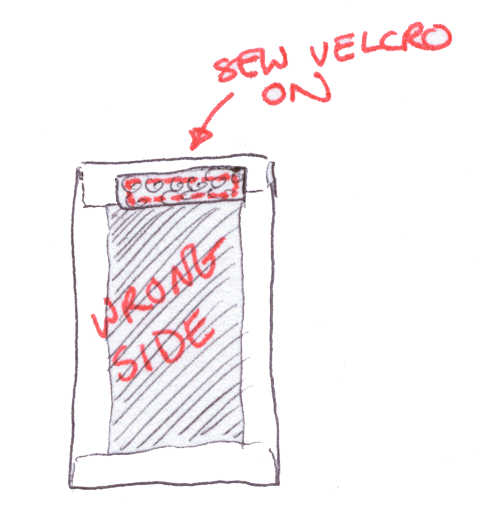
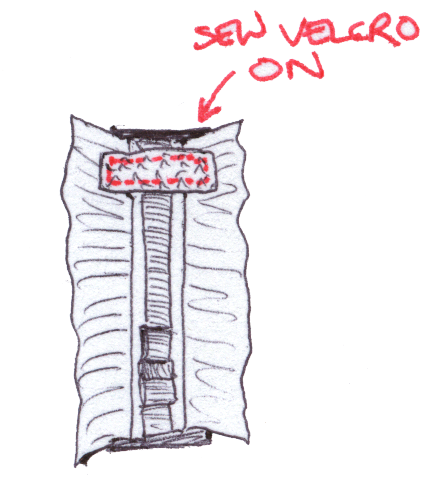
2. On the underside of one of the smaller ends of a fabric piece, sew a piece of velcro (the furry side out). Do the same for the other fabric piece.
3. Cut 2 pieces of your black grosgrain ribbon and 4 pieces of pleated trim to the same length as your finished fabric pieces.
Use an open flame to heat-seal the edges if they are synthetic fibers; if cotton you will have to either fold the raw edges under or seal them with Fray-Check.
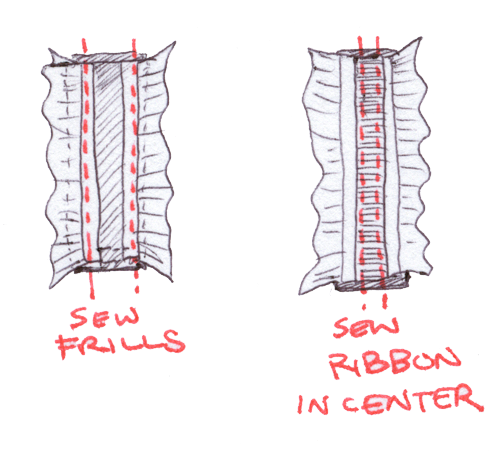
4. Sew 2 pleated trim pieces onto each long side of one of the fabric pieces. Place them just far apart enough so that the 1/2″ wide ribbon placed in-between them will just overlap them in the center. Do the same for the other fabric piece and remaining pleated trim.
5. Sew each piece of black grosgrain ribbon down in the center of the fabric pieces.
6. Make the bow: (For my bow I made two loops; one a little smaller than the other, and placed them on top of each other, gluing the top loop onto the bottom one, then wrapping the center and securing with stitching underneath. You can make two or one or however many loops you want! The methodology is the same anyway. The following directions are for a single-loop bow🙂
*Cut a 2.5″-long piece and a 1.5″ piece of grosgrain ribbon. Double-thread your hand-sewing needle with black thread, and double-knot the end.
*Create a loop with the longer piece of ribbon, underlapping the ends.
*Push your needle into the underlapped pieces to the inside of the loop, then back through and out, pulling the knot tight onto the ribbon underside.
*Pierce the end of the smaller piece of ribbon and push it all the way down to anchor it onto the underside of the loop you just made.
*Curl the small ribbon around the loop, and anchor the other side of it with the needle and thread.
*Sew an X through all layers except for the tops of the loops, knot, and cut the thread.
*Make one more bow.
7. Use a dab of fabric glue to glue each bow onto the center ribbon of each cuff.
8. Sew the other velcro strips onto the opposite ends of the fabric cuffs, onto the right sides, the hooked side facing outwards.
Each cuff is fastened by pressing the strips of velcro together on the underside of your wrists.
The stiffness of the ribbon pleats makes it stand out from the wrist more than I had hoped, thus something that is softer or thinner would be a better choice for the pleating. You could even make the pleating by hand (with the help of an iron) if you were particularly hardcore.
I think they look equally as good with a casual ensemble as with a slinky LBD!
Hope this has inspired you to make your own!
Happy DIY’ing!
xoxox
Carly
~If you liked this post, please share it!~
Save
Leave Comment
Jul 15, 2010 | DIY
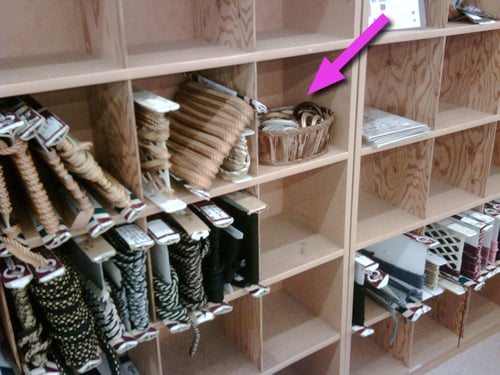
The other day I was just browsing in my local fabric and notions store, and something in the interior fabrics and curtains section caught my eye.
Yes, this little basket. Full of wooden and antiqued curtain rings for super-large curtain rods.
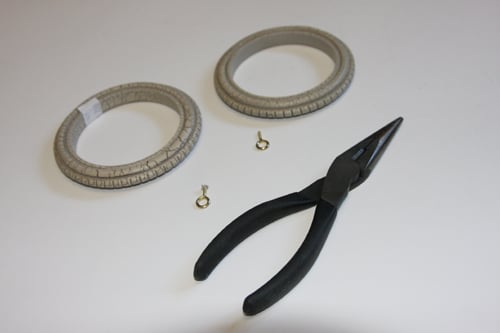
Gold, bronze, and bone craquel enamel carved rings, and dark wooden rings.
It was like a basket full of happiness.
Not that I was really looking for curtain rings. I just had my cheapskate ‘n’ DIY thinking cap on.
These curtain rings are so beautifully unique with the enamel craquelure! I’ll just remove the eye screws…
And now I have a one-of-a-kind pair of boho bangles!
You can also find large rod curtain rings in flea markets, antique stores, and interior hardware shops, so keep an eye out and your cheapskate cap on…
Though at $2.50 apiece maybe Forever21 is cheaper??
xoxox
Carly
Leave Comment
Jul 7, 2010 | DIY
After a fairly uneventful flight (no passing out in the aisle this time; the only thing that happened was the entire left side of the plane from row 35 back had no armrest power – so no light, no attendant call button, no radio, and no sound to the overhead movies, which made passing the 10 hours on the plane pretty much like pulling teeth)…I have finally arrived in Japan. It’s like wall-to-wall humidity that plasters your hair to your face and has mosquitoes swarming on you the moment you step out the door. Lil Tot has, amazingly, suddenly become incredibly talkative and can actually carry on an intelligent, logical conversation in the 2 weeks he’s been here. His comprehension, vocabulary, and maturity skyrockets whenever he spends time here.
Anyway, I wanted to share with you what I made before I left Oregon.
I was playing around on the computer the other day and made these.
I’ve had a pack (a measly 3 sheets for $10!!) of printable inkjet tattoo paper for awhile and had been undecided on what to make. (I’m not really a tattoo person – I’ve always felt that since I have freckles I really don’t need any more marks on my body;-) …But once in awhile I’ve liked wearing a stick-on tattoo, just to change things up.) 
Collage from Fashiontribes.com
Since the Fall ’09 Chanel Couture Runway show, I’ve been coveting those pearl necklace and chain bracelet tattoos…but there’s no way I’m going to blow $75 on the set now available at retail.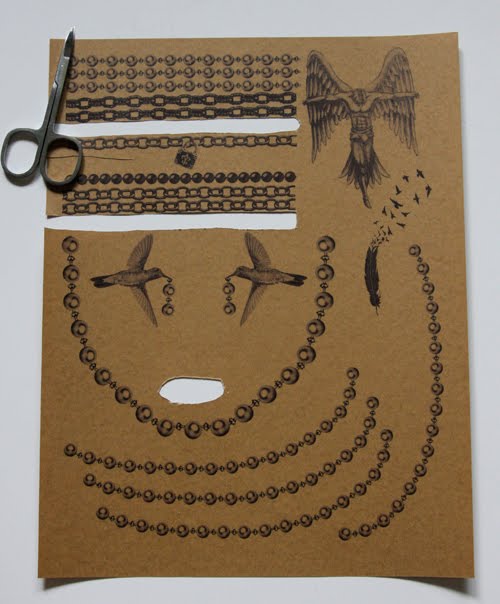 So… (surprise, surprise) I decided to make my own with the printable tattoo paper. I found some tattoo images online here at Inkwear Tattoos, and collaged them together with other images from the Inkwear catalog.
I was sooooo psyched since the final printed product looked pretty awesome. But my good mood ended when I cut out the tattoos and tried to apply them.
I always thought that if I ever did decide to get a tattoo, I would have the word *lifeline* tattooed on my right wrist. My hands are the source of all my creativity!
They’re stickers. No matter how closely you trim the tattoo, it’s made up of this clear film that’s extremely obvious and tacky. (Also visible in any gaps in the image.) White spaces will of course, not print. You do not apply with water – you just peel and stick – which means that they will come of the next time you take a shower. Oh, and you can’t get any water or moisture on the image because, since it’s inkjet ink, it will just smudge.
You can see the edges lifting up already.
What a junky product! As I wore throughout the day, the stickers just got increasingly wrinkled and lifted up at the edges, snagging in my clothing and hair.
What a disappointment. By the end of the day, I peeled some of them off before I took a bath, but the wrist tattoos I decided to remove as per the instructions: soap and water. BIG MISTAKE. They dry tattoos peeled off fine, but once I used soap and water, the tattoos when wet became a gluey, sticky, smudgy, runny mess, and my skin got really red where I had to rub to abrade them off.
Utterly sad. I would definitely NOT recommend these Cre8 Ink Jet Tattoo Sheets at all.
I did find online there are some e-stores that will print temporary tattoos for you – though I wonder if they’re the same, single-use stickers? (From the online description is appears they are not.) Does anyone have any experience with this?
(And if you are wanting to purchase from Inkwear Tattoos to get the original images I used, they deliver worldwide, so you could potentially buy some sets from them and get them delivered to you instead of going the DIY route!)
xoxox
Carly
Save
Leave Comment
Jul 1, 2010 | DIY
Uber-simple. (So simple you don’t even need step-by-step photos to illustrate!)
You Need:
*2 silk flowers (I chose cream-colored peonies)
*small piece of stiff felt
*2 shoe clips
*scissors
*glue gun
How To:
1. Pull the flowers off their stems and trim off any jutting plastic from the underside.
2. Cut two small circles from the felt – large enough to become the base for each flower, but small enough to not show through in-between the petals.
3. Use glue gun to attach each felt circle to the underside of each flower and press the felt to cup the flower’s shape. In order to stop the top layers of petals from falling off, you may also need to glue in-between each layer, near the center.
4. Open the shoe-clips, place a daub of hot glue on the felt (I chose near the top of the circle to minimize the amount the flower protrudes from the edge of the shoe), and press the non-toothed side of the shoe clip into the glue. Squeeze more glue over that part to firmly attach it to the felt.
5. Allow to dry and remove gluey strings.
I’m liking this girly look on chunky clogs at the moment – found this pair at my local Goodwill and wanted to soften them up for the romantic look that’s so in right now. I love the flower as juxtaposition to the organic wood of the soles. Speaking of clogs, I also have a different pair [brown] of size 7 Nine West clogs up for sale here if anyone is interested.
Happy DIY’ing!
xoxoxo
Carly
~If you liked this post, please share it!~
Leave Comment
Jun 27, 2010 | DIY
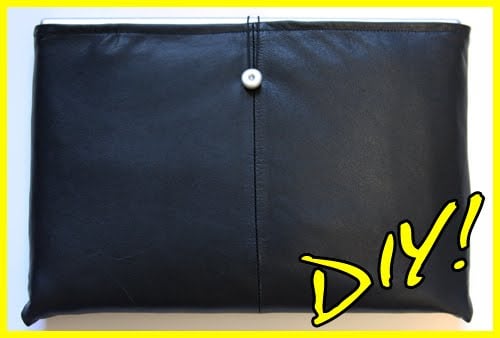
As you may recall from a previous project I posted, we still have the rest of the thrifted leather jacket leftover to something fantastic with! So with my Hubby’s birthday quickly approaching, I decided to make him a homemade sleeve for his laptop computer. Sure you can buy one from the store – and I did scrounge up a tutorial for using some neoprene from an old wetsuit [and here, too!] (like I have many of those laying around!)…but I wanted to try a different material. Leather is cushioning and sleek – but if you prefer manmade leather or vinyl (or even fabric, corderuoy, or denim!) this project will work just as well. I was inspired by those wraparound manila envelopes – but you can always use a strip of material and velcro as a closure, or fashion a long strip with a parachute buckle around the entire laptop, or extend one side of the outer material and use it as a closure flap, or even add a couple inches to each end and use a zipper as closure, turning this sleeve into a simple zippered bag. The possibilities are endless!
You Need:
*leather jacket with lining (or leather/other material + lining fabric, if you are not repurposing a jacket)
*quilt batting (I used Low-Loft crib-sized batting, and had quite a bit left over)
*1 button
*black elastic cord
and…
*marking chalk
*leather shears
*fabric scissors
*matching All Purpose thread
*sewing machine needle for leather
*sewing machine needle for wovens
*hand-sewing needle (not needed if your button is not shanked)
*leather/vinyl glue
*tape
Optional
*matching upholstery thread
*walking foot or Teflon foot for sewing machine
*clothespins or binder clips
How To:
Prep Your Parts
1. Place laptop on your sleeve material, right side up, front edge facing away from you. Trace around laptop on all sides, adding 1″.
2. Lift and rotate laptop up on its back edge towards you, then wrong side up on top of the material. (Front edge will be facing towards you.) Keep drawing 1″ around all edges. (I know this sounds somewhat confusing, so I included the diagram above to show how the material was measured.)
3. Cut the rectangle out of the material (cutting through both outer and lining if you are using a jacket), using leather shears. If you do not have a lining, place this rectangle on top of your lining material, trace around, and cut using fabric scissors.
4. Cut a small piece of leather about 1″ square.
5. Unroll batting from package, and leave it doubled up as you flatten it out. Place rectangle of material on top of the batting. Cut a piece of batting the same size as the lining, then trim batting about 1/2″ on the sides only.
Time to Sew!
6. Fold material rectangle in half, and machine-stitch the edges together, using a needle for leather and upholstery thread. (Upholstery thread is not a must-have…but it is a lot stronger that regular cotton/poly mercenized, and is more suited to sewing leather and taking the stress of repeat usage. Also, f you have a walking foot or Teflon foot for your machine, it can help the leather from sticking.)
Clip corners and turn right side out.
7. Fold lining rectangle in half, and machine-stitch the edges together, using a needle for wovens and regular thread. This will make the lining into a “pouch.” Do not turn right side out; the right side needs to remain on the inside.
8. Wrap batting around the outside of the lining pouch. Fold upper edges of lining pouch down and overlap batting piece at top edges. (Trim batting top edges if they are too bulky or long.)
Machine-stitch the lining edges down over the batting, at about a 3/8″ hem.
Closing It Up
9. Sew button to the material pouch you made in Step 6), about 2″ down from the top edge on the front of the pouch.
10. Slide the lining into the material pouch, and slip the laptop inside to check for sizing. On the back side of the material pouch, tape one end of the elastic cord to the center, about 2″ down from the top edge.
11. Wrap elastic cord around button, and bring the other end to the back, cutting it and gluing it down next to the other end. Make sure the cord is taut around the button and will keep the laptop from falling out.
12. Trim the cord to meet the taped-down end.
13. Re-tape cords down with the ends free. Place a dab of glue under the ends and press them into it.
13. Remove tape and glue the small square over the ends of the cords.
14. Remove laptop and lining from the material pouch, and machine-sew the square over the elastic cord ends, first sewing a square around the edge, then an “X” shape in the center.
Finishing
14. Spread glue on the inside of the outer pouch, close to the top edge. Turn down top edge about 3/8″; clamp until dry.
15. Slip the lining back inside the outer pouch, pushing the corners all the way in.
Stitch around upper edge of laptop sleeve to secure the lining to the outer material, using a needle for leather and upholstery thread.
Et voila!
Finally, a homemade FUNCTIONAL accessory that my husband will actually use! (And it’s unisex, so can be a great gift for a man or woman!)
Happy DIY’ing and Happy Birthday, Hub!
xoxox
Carly
This is my last post for Threadbanger – wish I could do more! Hasta la vista, TB!
Save
Leave Comment











 , $9.99, Amazon.com.