Sep 12, 2009 | DIY
Tom Binns is one haute designer who’s been refashioning the way we look at “precious jewelry.” Pieces from his safety pin collection from last year popped up in just about every fashion mag on the planet – and there’s been some cool DIY tutorials for his safety pin necklace (bracelet, in the case of this tute) but earrings there have not been. In fact, the Tom Binns earrings from this collection were notoriously difficult to buy anywhere…leading me to DIY my own. (Well, I would have DIY’d them anyway, since I’m such a cheapskate and like to put my own stamp on things…)
Here’s how (for my version):
You need:
-med-size or small-sized safety pins (I used black)
-pearls (faux, of course!)
-silvertone eyepins
-8″ rhinestone chain (med size rhinestones) (you can scavenge this from a piece of jewelry you already have, or something found at a thrift store, Forever21, or even by the yard from Joann Fabrics)
-8″ rhinestone chain (small size rhinestones)
-oversized rhinestone post earrings with drops below them (scavenged from an ugly pair of F21 earrings)…I know, the original earrings use french hooks, but I wanted a more glitzy, drippy effect to mine
-silvertone jumprings
1. Remove the dangly earring part from your rhinestone earring posts, since we’ll only be using the top.
2. Cut each of your rhinestone chains in half.
3. Pair up one med rhinestone chain length and one small. Thread halfway through a silver jumpring, and attach the jumpring to the earring post drop loop. Each chain will sort of dribble on either side of the jumpring as your earring dangles.

4. Using pliers, thread an eyepin through a pearl, cut, bend and loop around the end so the pearl is suspended between two loops. Repeat for each pearl.
5. Using small jumprings, connect the pearl eyepin loops you just made, creating a teardrop shape.
6. Attach teardrop of pearls to main jumpring from Step #3.
7. Randomly pin safety pins throughout the cascade of pearls and rhinestone chain, making sure that the pins will prevent the rhinestone chains from slithering up through the large main jumpring and falling out of your earring.
As you can see, my earrings a bit heavy, so I’ll probably switch out the backs to the comfort acrylic backs that have a larger pad to prevent the whole thing ripping from my earlobe because of the huge weight of them. I also haven’t snipped off the ends of the rhinestone chain where the connector loops were – I’m that lazy!
I feel like a punky Russian princess! Thank you Mr. Binns for such great inspiration!
Happy DIY’ing!
xoxox
Carly
Save
Leave Comment
Sep 7, 2009 | DIY
So I fell in love with the image above from the J. Crew August 2009 catalog. I already wrote that, I know.
And I wanted those necklaces. But $98 apiece (the model’s wearing two necklace, BTW) for glass rhinestones??? Swarovski I can understand. But that’s more expensive than quartz gemstone would be, honestly. Buy these from FireMountainGems.com for $4.27 and string ’em yasself and have a gemstone necklace.
But I digress. I wanted rhinestone, I wanted similar styles – and so I headed to my old standby for cheap jewelry finds that I can rip apart: Forever21. (I know, some poor Chinese laborer likely working long hours crafted these pieces, by hand, in a factory somewhere in mainland Chaina [according to the label]. I’m very sorry, unknown Chinese craftsperson, to be destroying your handiwork. I wish there was a place here in the U.S. that wholesaled components like these, I truly do. But until there is, I will have to rip apart the work you slaved over. 🙁 ) Anyway, apologies to the Chinese factoryperson aside, I bought these styles:

You can buy the necklaces here but the bracelet is no longer available online. You basically need a stretch bracelet with large rhinestones on it to do the trick.
The two necklaces were simple; here’s the how-to:
DOUBLE RHINESTONE NECKLACE WITH RIBBON
1. Open up the jumprings on either end (before the clasp and large ring on the end), pull off the clasp and ring, and reattach both jumprings onto larger 12 mm silvertone jumprings . (Both necklace ends share the same ring.)
2. Then tie some black grosgrain ribbon (should have been 3/8″, but I could only find 1/4″ at the store urrr) around the large rings.
3. Tuck the ends of your ties into the knots themselves to conceal them. Secure with some fabric glue, and voila! Your own version of the J. Crew Tiered Crystal Libretto Necklace, for about $11.60 for the two necklaces + $1.99 for the ribbon. (on the left, below)
LARGE RHINESTONE CHAIN NECKLACE
1. Cut the large rhinestones off the bracelet by cutting through the stretchy elestic and pulling them off. (Oversized jewels used in stretch bracelets usually have two holes on each side of the jewel to allow two rows of stretch elastic through.)
2. Thread a goldtone eye pin through the rhinestone holes side-to-side [through the top set of holes on each rhinestone only].
3. Cut off the eyepin to the correct length, bend and curl the length to create a loop (for each rhinestone eyepin).
4. Add goldtone jumprings to each loop, and link the rhinestones together.
5. Add some goldtone chain and a necklace clasp set to the ends (I had decided to make my necklace more like J. Crew’s Majesty Stone Necklace ($115) than the Crystal Symphony Necklace simply because the F21 bracelet rhinestones were pretty big – but of course you can attach the black grosgrain ribbon instead of a gold chain to be more like the J. Crew version.)
Anyway, the bracelet from F21 was I think $3.80, and I already had all the findings, so I felt pretty satisfied with the job. I love wearing both necklaces layered, like in the catalog, but they are each pretty on their own.
Happy DIY’ing! Hope all of you are having a fabulous Labor Day!
xoxox
Carly
Save
Leave Comment
Sep 6, 2009 | DIY
I’m sure (for those of you who have SO’s who are male) you’ve got a man’s white underwear-style t-shirt bangin’ around somewhere. Probably Hanes, no?
Hub has this ridiculous tendency to toss his clothes in the trash the minute they have the slightest stain, look a little dingy, exhibit some pilling, or stretch out of shape a little. Wasteful! Though I donate as much as I can of his used clothes to Goodwill/Salvation Army, his ol’ white tees were begging to be given a new life.
And there’s no end to the possibilities with a little fabric dye or paint on hand. Tie dye, potato printing, brushstrokes…it’s all up to you. 80’s-style, abstract tees are all over the place right now.
So why buy when you can DIY?
I used
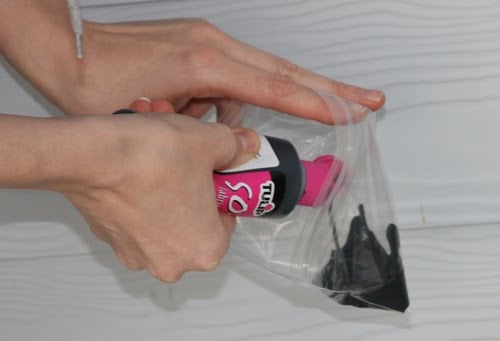
Tulip Brand Soft Fabric Paint (because it dries soft and flexible unlike a lot of other brands out there), but found that the bottle it comes in has too wide a mouth to distribute a thin scribble-like line (and fabric markers will skip over the fabric, not producing a continuous line, which is what I wanted). So I poured the paint into a Ziploc bag, snipped the tip off (I made the snip too tiny and the paint wouldn’t come out at first – this stuff is surprisingly viscous).

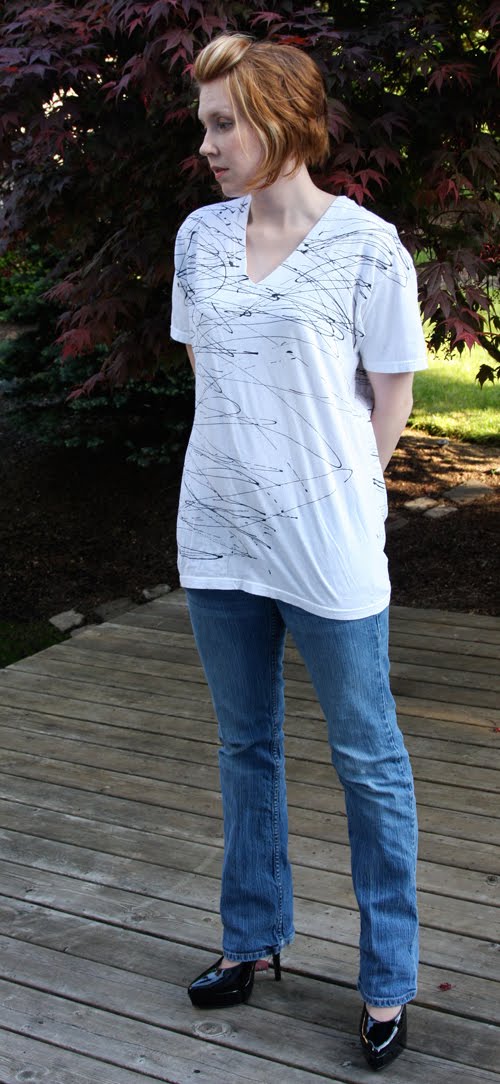
Then – scribble, scribble, scribble front, let dry, turn over, and scribble, scribble, scribble back – and you’re done!
I know the scribbles don’t exactly hide the pilling and the stains – but they draw the eye away, leaving me with a very wearable t-shirt. It also looks casual cool under a blazer/suit combo.
Something to try over the long weekend, perhaps?
Happy DIY’ing!
xoxox
Carly
Sep 1, 2009 | DIY
So you can buy your own even at Fred Flare ($18) or Macy’s now…but early this Spring I couldn’t find these anywhere except online for the staggering price of $72 or something (this was somewhat before the trend broke and Lucky Magazine had showcased one of those headbands in January or so, sparking my interest). So I made my own with a pack of feathers bought at Michael’s for $2.99 (I think they’re guinea?? but don’t quote me on it LOL), and a plain black headband from Claire’s for $3.50.
I cut out an oval from a stiff piece of felt, and hot-glued the feathers onto it, beginning at the top of the oval and working my way to the bottom. This created a nice overlap and I was able to use the fluffy down feathers at the bottom that goes right above the ear, so I look like I have some nice old-man fuzz growing out of my ear there – exactly what I was going for!!
Then I cut out another oval of felt and sandwiched the headband in-between the two ovals, to create a stiff curve. The whole process took about an hour because I was picky about the placement of the feathers.
Of course, I could have just bought a hat pad at Michael’s (which they NOW carry, 6 months after I completed my project) or online at plumesnfeathers.com. (But then again DIY’ing it really gives you complete control over the types of feathers and the placement of them…so to each her own!)
Happy DIY’ing!
xo
Carly
Leave Comment
Aug 23, 2009 | DIY
(My DIY version, left) I fell in love with this necklace (found on SixSixSick, right photo), originally by artist Anni Albers. They sell the DIY necklace kit on Urban Outfitters for $14.
(A little bit about Anni Albers and the necklace kit from the UrbanOutfitters website: “This German-born American textile artist was always creating, even during WWII when fine materials were in short supply. Back then, she’d use unlikely objects from hardware and stationery stores to constantly make new and exciting pieces. A pioneer of 20th century Modernism, Anni, along with her husband Josef, revamped and challenged the purpose and aesthetics of modern art. Based on an original 1941 piece that was featured in Anni’s exhibition of “common object jewelry”, this Washers and Ribbon kit lets you easily create an eye-catching piece. A simple, easy project, the kit includes all the components needed to create the necklace shown plus a photo of the finished product as a guide.”)
Now I was all ready to plonk down my $14 for the kit at my local Urban Outfitters, but the store didn’t have it, and the salespeople were so unbelievably rude when I asked about it (admittedly I was holding an upset-looking toddler and looked somewhat sweaty and disheveled myself) that I decided no way, no how was I buying it from Urban. So I just put together the parts – one trip to Home Depot, and one trip to Michael’s later, I was set. Figuring out how the ribbon was woven through took a few false starts, but here is the DIY anyway, just in case anyone’s interested:
You will need:
-2 M of 5/8″ double-sided ribbon (I chose satin-the UO version is grosgrain. Whatever you like, just make sure both sides are the same! I also grabbed a 3 M remnant spool out of Michaels’ $1 bucket near the cash registers.)
-4 small (5/16″ dia) zinc cut washers (loose washers in the drawers below the washer/screw section)
-2 packs (of 6) 1/2″ dia SAE washers (they come in little orange plastic packs hanging on the wall at Home Depot, item#19861)
-7 x zinc cut washers1/2″ (again, loose from the drawer below)*
*I know it looks like we just bought a whole bunch of 1/2″ washers, but for some reason the loose 1/2″ dia washers actually ARE 1/2″, whereas the loose, in the drawer “cutwashers1/2″ are larger (like 7/8” if truth must be told). Not sure why. Anyway, those are what I used; choose whatever sizes you like!
Total cost of washers? $3.74.
How to: Thread one of the smallest washers onto your length of ribbon, about 8″ or so from one end. Follow lacing instructions below, adding washers on in this order:
(S= small washer, M=medium washer, L=large washer)
S-S-M-M-M-M-M-M-L-L-L-L-L-L-L-M-M-M-M-M-M-S-S
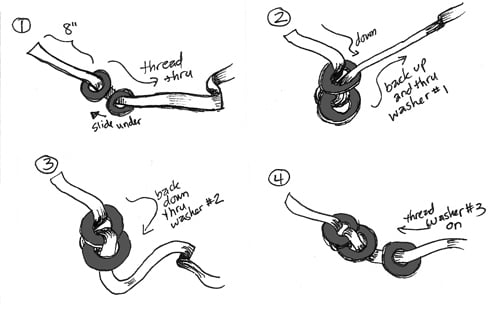
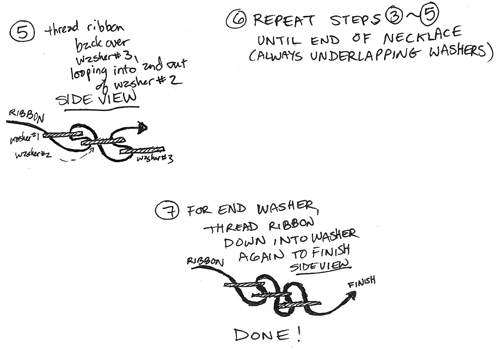
Make sure you underlap the washers as you add each new one; the new one goes underneath the previous one. And they’re single-sided (a shiny side, and a matter side), so make sure you’re keeping the same side out for each one as you add it on!
Leave 6-8″ on the end once you’re done , and tie the end of the ribbon. You can also treat the ends with Fray-Stop, or fold them over twice and stitch a narrow hem to encase the edges (neither of which I’ve done in the photo cuz I’m just too lazy). I think I’ll just leave the ends tied – am not sure I like the bow I made. Anyhow.
Project Cost: $4.74.
Time to Make: 40 min since I had to rethread it 3 times before I figured out the tying method. Should take you less!
The necklace (though heavy) sits beautifully on the body, almost like a flat snake. Very nice, Anni Albers!
I’m wearing it with my DIY cut-off Hanes shirt that I got from the Dollar Tree for…yup, you guessed it…ONE WHOLE DOLLAR. I was thrilled to find blank white and colored M and L sized Hanes tees at Dollar Tree. The bottom half of this shirt went to my DIY necklush, which I’ll probably post a photo of to bore you all with later. I kept the top half, then realized it looks more than slightly like that little Loose Crop Tee that American Apparel is selling for $17 (which I’ve had my eye on for awhile)…so ka-ching! I feel $16 richer. Funny how DIY works that way!
Happy DIY’ing!
xoxox
Carly
Save
Leave Comment











