DIY Petal-Front Top: Create Couture Challenge

I probably won’t be able to post all of these because the contest is only open until the 10th of August.
But I’ll do my best!

Myself and 9 other DIY bloggers were selected to compete in Style Sample Magazine and New York Design Shop’s Create Couture Challenge.

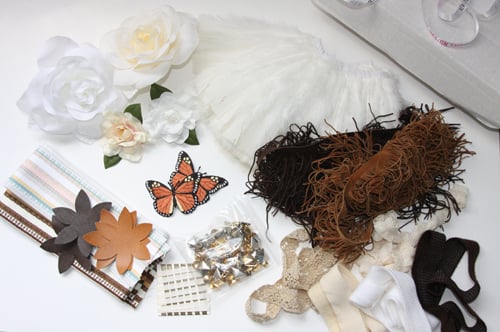
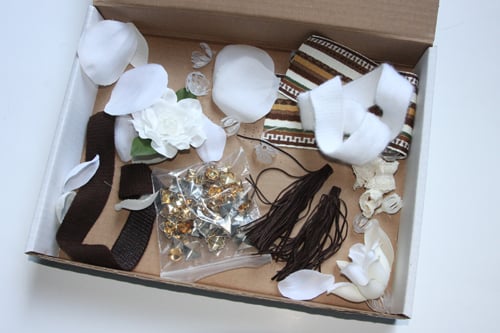
We were all sent the same box packed to the gills with trims, studs, and flowers, and were asked to make “one or more projects.”  I made 12!

The leftovers.

I used almost the entire contents of the box, hoping to create as many different projects as possible that could appeal to a wide range of ages and styles, as well as making the projects as simple as possible (so anyone could replicate them) and using as few outside materials as possible, in order to truly showcase New York Design Shop’s products.  But I wanted my finished creations to be durable, wearable, and look polished – and be pieces that could potentially stand up to scrutiny in any retail store.

So here’s the first of my projects:

Petal-Front Top

You Need:

*White Rose Pin (petals only)
*Cream Rose Pin (petals only)

Additional Tools/Materials:
*t-shirt
*scissors
*fabric glue

[prep: wash and dry shirt to remove sizing and chemicals]

How to:

1. Pull apart Rose Pins, and separate into petal pieces.

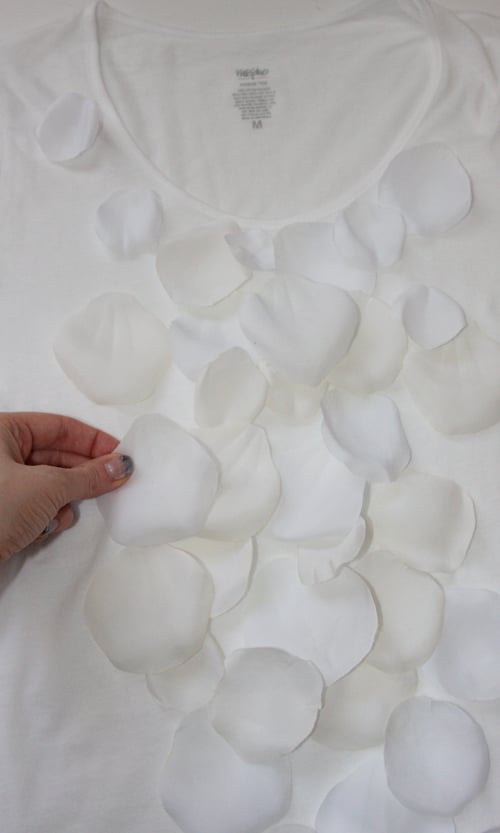
A pile of petals!

2. Trim petals apart, and round their tops so they are really “petal”-like.

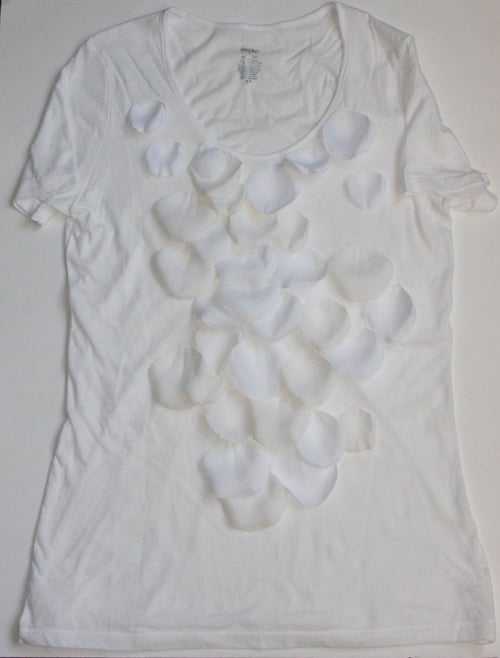
3. Use fabric glue to glue petals onto t-shirt.  (You can sew their tops instead for a more RTW look.)

You’re done!

This top also looks sophisticated tucked into a slim skirt for work or under a soft cardigan.:-)

If you enjoyed this project I’d love to have your vote!

(One vote is allowed per unique IP address, anywhere in the world.  You don’t have to register or leave your name or anything!  But if you do leave a comment in your vote, you are automatically entered to win one of the projects by the Contest Winner.  Now that’s a great way to share the love!!:-)

Thanks for looking!
xoxo
Carly
linked to

make it wear it
Leave Comment

Formspring.me Question: Applique T-Shirt Idea

from formspring.me:
hi carly! it’s me judith chen 🙂 I have a plan to remake my bf’s Giordano plain tee with some patchwork.I have some black velvet leftofers I’d like to work with.do you have any ideas, and um..some kind of cat/wolf related design ideas, if possible. thanks
Hi Judith! Well…I have a FABULOUS idea that’s been sitting on my DIY’s To Do pile…how about a t-shirt with leopard “spots” that are cut out of black velvet? You could make each spot slightly abstract-shaped, and sew them onto the tee wherever you like (my choice would be on the shoulders or down one side).
It’s not *literally* a cat design…but somewhat “inspired by” if you will. If you want to go more literal, how about a silhouette of a wolf howling at the moon, done in black velvet a la Twilight?
 Anyone else have some ideas for Judith?
xoxox
Carly
t-shirt photo from Saks.com; detailing added by Photoshop
Twilight wolf phase img from bebo.com
Leave Comment

DIY How-To: Twisted Burberry Top

I received this question awhile ago from lovely reader trashywriter and I’ve been remiss about answering it.  (Sorry!)

Carly, I saw an ad in the latest Vogue, absolutely LOVED the top worn by the model and have finally located it in a catalog. It looks elegant even though it is a casual material and I was wondering if it would be terribly difficult to DIY?

Here are some more photos of the top in question:

You sure know how to pick them!

In the same vein, a similar twisted Burberry skirt DIY showed up on Anywho.dk awhile back, and summarily made its way around the ‘net.  (Click above for the tutorial.)

Now, as to this shirt…This top is elegant and sexy, to be sure…but it looks like a pain to DIY.

By best approximation, you could:

1. Buy a slim-fitting V-neck long-sleeved shirt (preferably RAGLAN sleeve seams) that has some stretch to it, and about 1 yd (60″ wide) of similar fabric (stretchy fabric – so important!).

2. Remove front from shirt, using a seam-ripper to preserve the seam allowance.

3. Cut fabric in half width-wise.

4. (If you have a sewing mannequin, pin shirt back together on mannequin.  If not, you’ll have to place the front piece flat and pin fabric to it.)  Place pieces on top of the shirt-front, gathering at the sleeve seams, pinning there, and twisting at the front in a knot.  Secure the other ends of the fabric pieces with pins at the side-seams of the front piece.

5. Pin front to back again, and try it on.  (If you have a sewing mannequin that is the same size as you, you probably don’t need to try it on, but you do need to get that front knot tight and conforming to a 3D shape.  You can’t pin it flat and then just sew the seams back together as in the shirt tutorial, since there’s too much shape to the front half of your body.)  Reform the knot to get it tighter, and re-pin to front piece.

6. Now sew the front piece back on to the shirt.  If your material is S-T-R-E-T-C-H-Y enough, you should be able to wear it without needing that back zipper!

As you can see from the original, the front knot is so unfailingly tight (and I believe the shirt is a cashmere blend), so the original requires that back-zipper to get into it.  I believe if you choose a material that is not cashmere but has some stretchy manmade fibers in it, you’ll be able to conform it to your shape without having to add that zipper – and without having the seams fall apart or rip when you wear it.  If you can – OVERLOCK those seams for extra strength!

Hope that helps – and sorry I haven’t made an example for you; I’m a little under the weather lately.:-)
Best of luck, and please share if you make one!

xoxox
Carly

Leave Comment

How to Make a Ruffled Top from a Men’s Shirt

Get This Tutorial As a PDF

7 DIY Men's Shirt Makeovers ebook

This tutorial has been updated, and is now available as a full step-by-step with photos in my new book 7 DIY Men’s Shirt Makeovers, part of the DIY Men’s Shirt Makeovers System.

Tomorrow being Administrative Professionals’ Day I wanted to create something that’s fashionable yet doesn’t scream “look at me!” (and is totally appropos for the office!).  openingimg
 
With Earth Day just around the corner as well, what could be more eco than upcycling?  Steal a button-down from your guy’s closet and give it a feminine makeover…that will make it a mainstay in yours.
 

You Need:

before1 man’s button-down shirt (sized larger than you are; doesn’t matter what size)  /  thread matching topstitching in shirt

Tools:
fabric scissors  /  seam ripper  /  pins  /  marking chalk  /  sewing machine  /  needle for wovens  /  iron and ironing board  / hand-sewing needle (optional)

How To:
Prep Time:

1. Put shirt on.  Button 3rd and fourth buttons on shirt.  Place one hand underneath your armpit; mark where armscye depth should be on the front of your shirt, as close to the side seam as possible. (I used a pin.)  Take off the shirt and also mark the armscye depth for the other arm.

2. Lay your shirt on  a flat surface and cut off the sleeves.  Cut off the cuffs and discard; slit the sleeves down their side seams (as close to the seams as possible without going through any lapped seam detail).  Remove the pocket with a seam ripper and discard.

3. Cut off the center button placard and buttonhole placard, below the fourth button, leaving enough allowance at the sides of each placard to fold under about 1/4″.  (If your placard is finished and bound, you won’t need the folding allowance, but mine wasn’t, so I have the extra step of finishing it below.)  Cut the collar from the front of the shirt (as close to the collar band as possible without going through it), and cut about 1″ along the bottom line of collar band into the back of the shirt.  (You won’t remove the collar entirely from the back of the shirt; you’ll just be freeing it from the front of the shirt.  We want that sucker still attached at the back!!)

4. Turn shirt inside out and button remaining buttons on the shirt.

Sew Front Center Seam 

5. Sew front together, down buttoned placard that’s still attached to the shirt, so you only have a single center front seam.

6. Trim seam and buttoned placard off on the inside.

Adjust Fit

7. Take shirt off and lay it flat.  Pin down sides, straight down from the pins you added at the armscye depth.

8. Turn shirt right-side-out and try it on.  Adjust pins as necessary for a more tapered fit at the waist, and a freer fit at the hip.  Make sure the armscye depth is still correct, and that you can get the shirt over your head.

9. Take shirt off, turn inside out, and trace a “best-fit” line between your pins at the sides.  Remove pins.  Add 1″ to the outside of the lines, and retrace the shape of the sides.

10. Cut shirt front from shirt back at the sides, cutting along the outside lines you drew in the previous step.

11. Trace shirt front onto shirt back.Draw lines on back about 3/8″ to the inside of the lines you just draw.  Cut shirt back on these lines.

12. Pin shirt front to shirt back.  (Your shirt front should now be about 3/4″ larger than the back.)

Sew the Sides

13. Sew shirt sides together.

14. Iron shirt and sleeves flat, paying special attention to the button placard still attached to the collar.

If your button placard is not finished on one side, now is the time to fold the unfinished side under, and topstitch so that both sides are finished.

Make the Ruffles 

15. Lay your sleeves flat and cut two pieces from the sleeves, next to the angled sleeve seams. (These pieces will be your Angled Ruffles.) Cut on the grain, cutting a piece about 1.5″ wide at its smaller end and 5.5″ wide at the widest end.  Trim any raw edges near the bound edge off.

16. Cut 2 long rectangles from each sleeve about 3″ wide by  the length of your sleeve.  Square off the ends.  These pieces will be your Long Ruffles.

17. Sew 2 long rectangles together, short end to short end.  Repeat for the other 2 pieces.

18. Fold over the long edge of one of the pieces from the previous step about 1/4″; sew a scant 1/16″ from the edge. Trim the raw edge next to your line of stitching.  Fold over the stitched edges about 1/4″ again; topstitch close to the edge to create a bound seam.  Do the same for the other connected long rectangle piece.

19. Using either a hand-sewing needle or a long basting stitch on your machine (or a gathering foot if you have it!), stitch long, basting stitches along the long raw edge of each long rectangle, and along the unbound raw edges of the angled ruffles.  Pull the thread to gather the pieces into ruffles.

Finish the Collar

20. Pin one long ruffled rectangle under the button placket of your collar piece, matching the length by pulling on the basting thread. Pin the angled ruffled piece underneath the long ruffled piece – the piece will only go down about 3/4 of the way of the placket.  Fold the bottom of the placket under the long rectangle ruffle end about 1/4″.21. Topstitch the edge of the placket, through all layers to secure.  (I chose to connect the top of the rectangle ruffle under my collar band piece, but leave the top of the angled ruffle free, like “wings.”)

21. Repeat for the other side and the buttonhole placket.

23. We need to re-connect the collar to the shirt now – so start with the button placket side, and pin down overlapping the open hole in the front of the shirt.  (Make sure the buttons are centered over the center front seam!)  Pin the placket to the shirt, going straight upwards all the way to the collar area.

Pin the collar to the back of the shirt, overlapping the back of the shirt as much as you can by angling the collar downward.  Between the top of the placket and the shoulder seam of the shirt, you’re going to have excess fabric, so gather it and pin the collar over it.24. Topstitch the button placket to the shirt.  (I had to zigzag over the collar band connection at the back of the shirt – there was a small gap that no amount of angling that collar piece was going to fix.)

25. Place buttonhole placket end over end of button placket, and do up the bottom button.

Topstitch end down, through all layers, and reinforce stitching.

26. Un-button bottom button, and pin buttonhole placket to front of shirt in the same manner as you did the button placket.  Topstitch through all layers.

Finish the Armscyes

 27. Try on the shirt and draw the shape of the shoulder how you want it.

28. Take off the shirt, and cut the armscye shape about 1/2″ on the outside of your markings.  Trace the shape onto the other shoulder, and cut it out too.

29. Turn under 1/2″ of an inch, and stitch about 3/8″ from the edge to finish, notching as you go.  (If you want a more finished look, cut the armscye 3/4″ outside of your markings, turn once and topstitch; turn again and topstitch to create a bound seam.  I find this very difficult along a curve, as often the armscye becomes tighter and smaller the more times you turn the edge, and notching the inside on such a small seam allowance is quite difficult.  If anyone has any tips, I’d love to hear them!)

Hem and You’re Done!

30. Try on the shirt and mark where you want the hem to be.

Cut about 1/2″ below this line, fold under, and stitch at a 3/8″ hem on your machine.

done3

Voila!  A super-ruffly, super-feminine piece for the office.

DONE1 (As you can see, I also added 2 bust darts to make the feminine fit even better; you might need to do the same depending on the size of your bust and how you “fill out” the bust area of the top.  I do also need to press the armscye seams and remove the yellow chalk lines…I was just so excited to be done and couldn’t wait to take the photo…;-)

Thank goodness there’s someone around to redo all these stuffy men’s shirts and breathe some girly life into them!

done2Happy DIY’ing!

xo
Carly

as posted on Threadbanger.com in 2010 (no longer hosted there since they changed networks)

Get This Tutorial As a PDF

7 DIY Men's Shirt Makeovers ebook

This tutorial has been updated, and is now available as a full step-by-step with photos in my new book 7 DIY Men’s Shirt Makeovers, part of the DIY Men’s Shirt Makeovers System.

Leave Comment

DIY Avant-Garde Artistic Button-Embellished Top

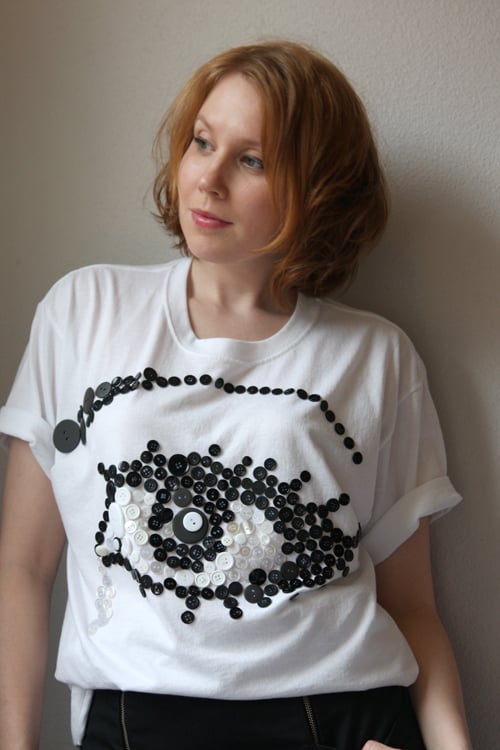
Inspired by the original DIY’er, Martin Margiela, I’ve dipped into my overflowing stash of mismatched buttons to craft a fabulously avant-garde-style t-shirt. I’m using an old shirt that I was considering discarding because of a couple tiny stains on the front.  But that’s what DIY’s for!  Cover up stains, patching, pilling, or a design you don’t like…or add interest to an otherwsie boring piece.  There’s a ton of great art and photos out on the internet – or you can create your own image and use it as a template for button placement.  I chose monochromatic buttons so that the image would appear “pixellated” when standing from afar – and though I chose to make an eye (in my own homage to Salvador Dali), you could make anything your heart desires.

You Need:

t-shirt*large number of buttons in various sizes and shapes (preferably in shades of black, white, and gray)  //  Jewel-It Embellishing Glue (or other glue for affixing plastic embellishments to fabric)  //  piece of cardboard or t-shirt board

Optional:

printout, drawing, or photo  //  tape  //  sewing machine & needle for knits  // hand-sewing needle  //  thread matching buttons

How To:

Prep Time

1. Pre-wash t-shirt if it hasn’t been washed already.  Place cardboard or t-shirt board inside t-shirt to flatten front.2. (Optional) If you are using a piece of artwork as a template, slide it inside your tee, just on top of the board. Secure with tape.


Decorate

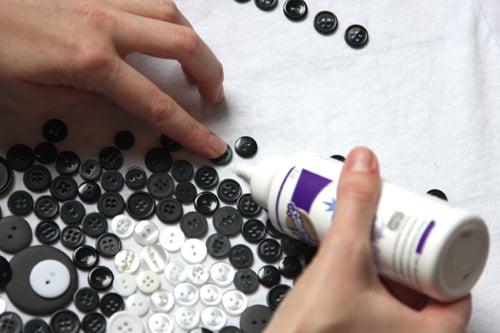
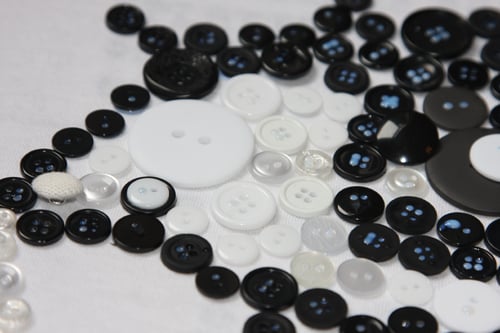
3. Now’s the time to channel your inner artiste!  Place tee on a flat surface and start covering it with buttons.  Start with the black outlines, then place the brightest white buttons on the brightest white parts of the eye.  (You’ll probably spend a lot of time squinting at your picture.)  Stand back every few minutes to see if you like the effect, and adjust your placement as necessary.

Make it Permanent

4. When you’re pleased with your button artwork, now you need to take each button off and affix it to the t-shirt.  For the larger buttons add a daub of glue to its back; for the smaller dot glue onto the shirt itself.  If you plan to go back and sew your buttons for more security – be careful you don’t get any glue in the buttonholes.  (If you are using shanked buttons, you’ll have to hand-sew them on to the shirt.)

5. After you’ve glued all your buttons down, allow the glue to dry per the instructions.

6. (Optional) Remove board from tee, and proceed to sew all the buttons down to the front of your shirt.  (Drop the sewing machine’s feed dogs, and zigzag into 2 holes of each button – which should be secure to hold it on and allow you to machine-wash your shirt.)7. Wear and enjoy all the extra attention.  (If you have chosen not to sew your buttons down, follow the washing instructions on the glue.  Some glues are not fast when put in the wash, so be careful when choosing!)


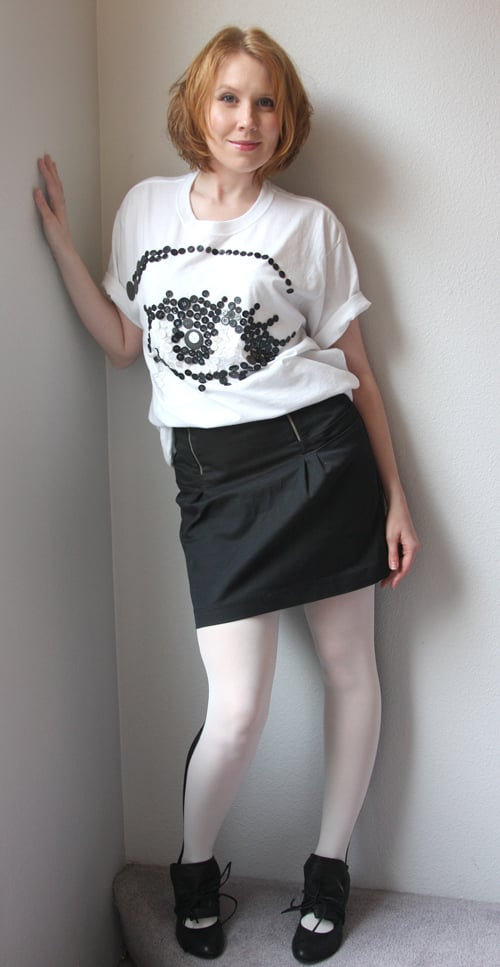
Pair with black and white pieces to make your monochromatic look.  Here’s looking at you, kid!

Thanks for reading – and if you have any questions, ask them in the Comments section below and I’ll do my best to help you out!
xoxox
Carly J. Cais

as posted on Threadbanger

Save

Leave Comment

Pin It on Pinterest