Jul 1, 2010 | DIY
Uber-simple. (So simple you don’t even need step-by-step photos to illustrate!)
You Need:
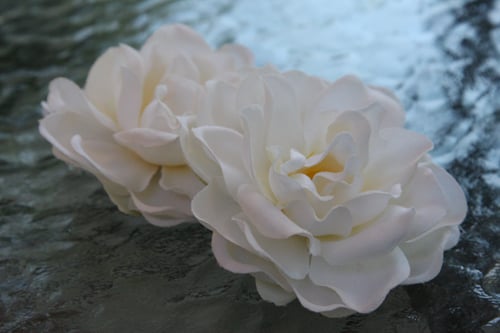
*2 silk flowers (I chose cream-colored peonies)
*small piece of stiff felt
*2 shoe clips
*scissors
*glue gun
How To:
1. Pull the flowers off their stems and trim off any jutting plastic from the underside.
2. Cut two small circles from the felt – large enough to become the base for each flower, but small enough to not show through in-between the petals.
3. Use glue gun to attach each felt circle to the underside of each flower and press the felt to cup the flower’s shape. In order to stop the top layers of petals from falling off, you may also need to glue in-between each layer, near the center.
4. Open the shoe-clips, place a daub of hot glue on the felt (I chose near the top of the circle to minimize the amount the flower protrudes from the edge of the shoe), and press the non-toothed side of the shoe clip into the glue. Squeeze more glue over that part to firmly attach it to the felt.
5. Allow to dry and remove gluey strings.
I’m liking this girly look on chunky clogs at the moment – found this pair at my local Goodwill and wanted to soften them up for the romantic look that’s so in right now. I love the flower as juxtaposition to the organic wood of the soles. Speaking of clogs, I also have a different pair [brown] of size 7 Nine West clogs up for sale here if anyone is interested.
Happy DIY’ing!
xoxoxo
Carly
~If you liked this post, please share it!~
Jun 27, 2010 | DIY
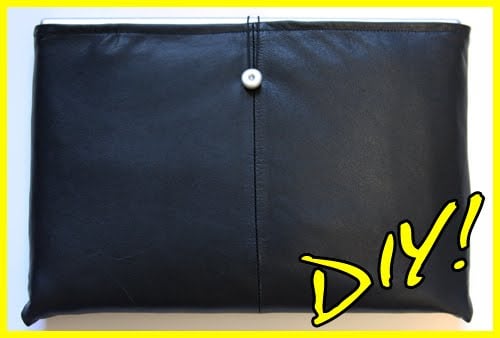
As you may recall from a previous project I posted, we still have the rest of the thrifted leather jacket leftover to something fantastic with! So with my Hubby’s birthday quickly approaching, I decided to make him a homemade sleeve for his laptop computer. Sure you can buy one from the store – and I did scrounge up a tutorial for using some neoprene from an old wetsuit [and here, too!] (like I have many of those laying around!)…but I wanted to try a different material. Leather is cushioning and sleek – but if you prefer manmade leather or vinyl (or even fabric, corderuoy, or denim!) this project will work just as well. I was inspired by those wraparound manila envelopes – but you can always use a strip of material and velcro as a closure, or fashion a long strip with a parachute buckle around the entire laptop, or extend one side of the outer material and use it as a closure flap, or even add a couple inches to each end and use a zipper as closure, turning this sleeve into a simple zippered bag. The possibilities are endless!
You Need:
*leather jacket with lining (or leather/other material + lining fabric, if you are not repurposing a jacket)
*quilt batting (I used Low-Loft crib-sized batting, and had quite a bit left over)
*1 button
*black elastic cord
and…
*marking chalk
*leather shears
*fabric scissors
*matching All Purpose thread
*sewing machine needle for leather
*sewing machine needle for wovens
*hand-sewing needle (not needed if your button is not shanked)
*leather/vinyl glue
*tape
Optional
*matching upholstery thread
*walking foot or Teflon foot for sewing machine
*clothespins or binder clips
How To:
Prep Your Parts
1. Place laptop on your sleeve material, right side up, front edge facing away from you. Trace around laptop on all sides, adding 1″.
2. Lift and rotate laptop up on its back edge towards you, then wrong side up on top of the material. (Front edge will be facing towards you.) Keep drawing 1″ around all edges. (I know this sounds somewhat confusing, so I included the diagram above to show how the material was measured.)
3. Cut the rectangle out of the material (cutting through both outer and lining if you are using a jacket), using leather shears. If you do not have a lining, place this rectangle on top of your lining material, trace around, and cut using fabric scissors.
4. Cut a small piece of leather about 1″ square.
5. Unroll batting from package, and leave it doubled up as you flatten it out. Place rectangle of material on top of the batting. Cut a piece of batting the same size as the lining, then trim batting about 1/2″ on the sides only.
Time to Sew!
6. Fold material rectangle in half, and machine-stitch the edges together, using a needle for leather and upholstery thread. (Upholstery thread is not a must-have…but it is a lot stronger that regular cotton/poly mercenized, and is more suited to sewing leather and taking the stress of repeat usage. Also, f you have a walking foot or Teflon foot for your machine, it can help the leather from sticking.)
Clip corners and turn right side out.
7. Fold lining rectangle in half, and machine-stitch the edges together, using a needle for wovens and regular thread. This will make the lining into a “pouch.” Do not turn right side out; the right side needs to remain on the inside.
8. Wrap batting around the outside of the lining pouch. Fold upper edges of lining pouch down and overlap batting piece at top edges. (Trim batting top edges if they are too bulky or long.)
Machine-stitch the lining edges down over the batting, at about a 3/8″ hem.
Closing It Up
9. Sew button to the material pouch you made in Step 6), about 2″ down from the top edge on the front of the pouch.
10. Slide the lining into the material pouch, and slip the laptop inside to check for sizing. On the back side of the material pouch, tape one end of the elastic cord to the center, about 2″ down from the top edge.
11. Wrap elastic cord around button, and bring the other end to the back, cutting it and gluing it down next to the other end. Make sure the cord is taut around the button and will keep the laptop from falling out.
12. Trim the cord to meet the taped-down end.
13. Re-tape cords down with the ends free. Place a dab of glue under the ends and press them into it.
13. Remove tape and glue the small square over the ends of the cords.
14. Remove laptop and lining from the material pouch, and machine-sew the square over the elastic cord ends, first sewing a square around the edge, then an “X” shape in the center.
Finishing
14. Spread glue on the inside of the outer pouch, close to the top edge. Turn down top edge about 3/8″; clamp until dry.
15. Slip the lining back inside the outer pouch, pushing the corners all the way in.
Stitch around upper edge of laptop sleeve to secure the lining to the outer material, using a needle for leather and upholstery thread.
Et voila!
Finally, a homemade FUNCTIONAL accessory that my husband will actually use! (And it’s unisex, so can be a great gift for a man or woman!)
Happy DIY’ing and Happy Birthday, Hub!
xoxox
Carly
This is my last post for Threadbanger – wish I could do more! Hasta la vista, TB!
Save
Jun 25, 2010 | DIY, From You
from formspring.me:
Could you do a tutorial on how to make one of these headbands?
That’s an easy one! They’re exactly the same principle as the instructions for making the main fabric part of my DIY Jennifer Behr Spiked Turban, except these headbands use a slightly wider piece of fabric, folded over and knotted in the middle. (You don’t need to do an underpanel like in the Jennifer Behr turban; that was merely to protect the forehead from being scratched by the spikes. For this version, “fluff up” the center knot to give it more volume so it doesn’t cinch the fabric too tightly.) To me – it looks like one of the headbands is a stretch black velvet, but that could just be the lighting. Definitely use a piece of fabric that has some stretch to it (i.e., lycra).
Hope that helps!
Have fun making your own-
xoxox
Carly
Jun 25, 2010 | DIY
Sneak peek of a current project on my DIY desk…will be revealing the results shortly! (Think flowers, summery…hair???!!)
But now it’s that time again! If you have a DIY project or tutorial, please feel free to link below! (However you can only link YOUR OWN PROJECT. Please do not link others’ projects!)
If you’ve linked up your project to the Roundup, feel free to grab the button below.
Can’t wait to see everyone’s projects!
xoxox
Carly
Jun 25, 2010 | DIY, From You
from formspring.me:
Hi Carly – I recently discovered your blog and I love it! You are doing a great job. I have a question – as you love DIY and fashion, I am curious if you could tell us about your wedding dress! Hope you have a great day, Liz
Hi Liz! hehe, you make me blush.:-) My wedding dress…well, that was an attempted DIY if you want to hear the story…
Ever since I was a kid I was sketching what type of wedding dress I would wear when I was all grown up and getting married. I sort of knew even then that I wanted to design my own, because since I’m such a cheapy I would never be able to stomach the immense guilt over spending thousands of dollars on a single piece of clothing to only be worn once. (Unless I became a movie star and my priorities changed!) Once I hit my mid-teens, I had kind of settled on the design: form-fitting, fishtail, long silvery-satin with a low-cut back.
But then I did get married – Hub and I married in a civil ceremony when I was 26. We both wanted to take some time and plan a beautiful wedding, we wanted to save up some money, and we wanted both our families to be in attendance, and it just wasn’t possible at the time, so we made it legal but put off having an “official” wedding until the timing was better. Then, a year later, I found out I was pregnant, and suddenly we had to plan a wedding super-quick since I refused to walk down the aisle “showing,” if you know what I mean.;-) The question of the wedding dress was still in my head, and form-fitting, silvery-white, low-cut back seemed now totally inappropriate considering the circumstances (plus I was worried showing that much skin at my wedding would scandalize the inlaws). I had seen a photo of Gwen Stefani’s Galliano gown from her wedding – the one with the pink ombre at the hem – and thought it FABULOUS!

So I made one similar. I bought 5 yards of raw silk from a store online (sorry, I don’t remember which store), and hand-dyed the silk with Procion dye in 076 (Cobalt Blue) to make the outer bodice fabric. After a bit of trial-and-error, I came up with a mottley light blue.
As you can see the ombre color at the hem of the skirt is almost invisible since the silk was so thin and see-through, and I didn’t extend the lining down to the bottom. But it’s there! You can see it better in the first picture.
I used a pattern for the dress lining and the skirt outer (made from undyed raw silk). I hand-ruched the bodice fabric and attached it to the bodice lining. Then I mixed up a batch of the same dye in my bathtub, wet the skirt, and dipped the bottom hem in it, praying all the while. The dye slowly crept up the skirt and then I brought the dress into the living room, suspending it over a bucket and attaching threads around the skirt perimeter to anchor it outwards so the skirt wouldn’t shut on itself and ruin the ombre effect. (Of course, our cat Muffin got all tangled in the threads at one point and I almost had a heart attack since the dress was still wet.) But it finally dried, and the ombre effect was quite a bit lighter than I had really wanted – but good enough.
I also made my veil out of a doubled-over piece of white tulle I sewed to a silver flower hair-comb from Claire’s.
The whole process took me about 2 months working on it a little bit at a time as I was planning the entire wedding by myself and working full-time…and as my stomach grew, I had to alter the dress twice – adding larger fabric panels and opening the waist darts. I had to work right up until the day before the wedding (at first the hotel where I worked wasn’t even going to give me time off for my wedding day!) and I was hand-sewing the bodice to the dress while answering the switchboard [I was working as a PBX Operator/Linguist]. My supervisor called me in and said I was not allowed to “do arts and crafts” at work, which really made it difficult to get it finished in the critical last 2 weeks. (All the other women working read magazines, newspapers, drew, journaled, or worked on homework [if they were going to school.]) I was even tacking the skirt lining to the outer on the day of my wedding as I was getting my hair done in the salon.
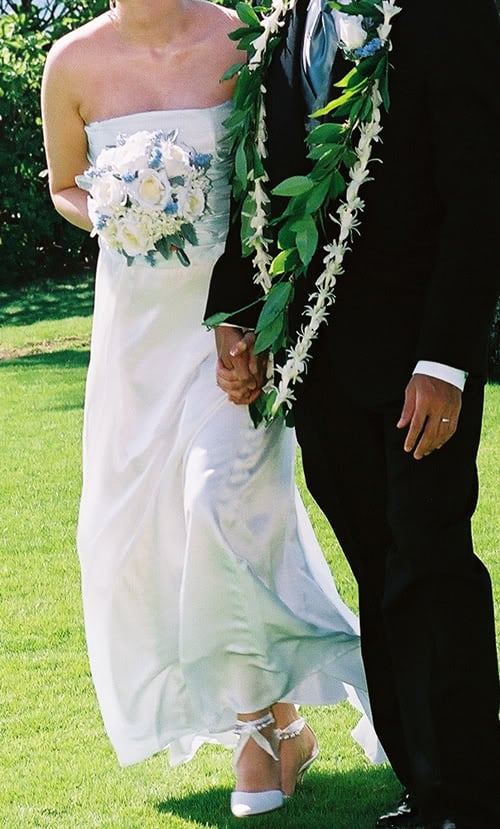
The whole dress and veil cost about $150 – the shoes were Payless!!
My mother-in-law made my bouquet and provided flowers for my hair that matched the blue of my dress.
Had I known then what I do now about construction (and the see-thru nature of silk!!!!), I would have probably done something more like that Galliano dress with the full skirt supported with layers of tulle underneath – but considering everything, I was pretty happy with my version.:-)
Thanks for your question – it was a real trip down memory lane!
xoxox
Carly
Jun 25, 2010 | DIY
Thank you to all of you who submitted your DIY projects in my first Thursday DIY Roundup! I had so much fun visiting all your blogs and seeing the wonderful results of your creativity. So, as for total views, out of the 21 projects posted here are the top 3:
Taking a classic jean from boring to babe with the addition of a cropped elastic hem. Love it!
An intriguing title leads to a beautiful scarf gussied up with colorful embellishments.
and congratulations to AvidAccents, whose project had the most views from our readers!
Amazing that she made the flowers from cut soda cans. Just…amazing!
If you’ve been featured here or would like to link to the Roundup, feel free to grab the button below.
(That above code is supposed to be in a scrollbox and right now I’m just inept and can’t get it to work properly. Sorry!) Thank you so much for sharing, and stay tuned for the next DIY Roundup – coming soon!
xoxox
Carly