Jun 24, 2010 | DIY
from formpspring.me:
I have an old military jacket from my father. Its a little too big and i was wondering if you had any ideas to change it. -Mishelle
Hmmm. What kind of military jacket? Could you provide a photo of the type of jacket? Or a link to something similar on the internet? How much you can do to it (and whether the finished product will look cute or not!) depends heavily on its construction – i.e., what type of lining, whether the sleeves are set-in or raglan, if it has a back-yoke or not, material, material weight, pockets, patches etc. If you don’t have a photo can you describe it?
Thanks so much!
xoxox
Carly
Leave Comment
Jun 17, 2010 | DIY, Life
So I’ve decided to forgo my “DIY Links of the Week” roundup since I honestly can’t keep up with all the great stuff out there, and by the time I come across it I’m often late to the game. So here’s something new! First off, please allow me to share a couple projects that have been on my radar that are just plain awesome.
These are embroidered, people. Embroidered. EMBROIDERED.
And then I must have had shoes on the brain because I became a little obsessed with the shoe makeovers.
Blogger Nurinia from shares her tutorial on making ribbon-tied wedge shoes with removable ribbon. I love her idea for securing the ribbons, and how you can change them out when you tire of them.
ItsaboutSarah added lace and pearls to a pair of black heels to make these fantastic ladylike shoes. Think of how well this would work on a pair of beat-up plain thrift store pumps!
Speaking of thrift stores, they almost never have shoes in my size (which is a very popular size 7.5). But now I can start foraging for shoes that are too big for me, too! Cut out the toes of a too-large boot and shave down the sole to create a peep-toe bootie, just like Lions, Tigers, and Fashion Oh My! did. Oh My! And she made some DIY Miu Miu maryjanes.
So now here’s what’s new…I’d love to see all the projects you’ve been working on. Here is my first…
DIY ROUNDUP
Can’t wait to see everyone’s projects!
xoxox
Carly
Leave Comment
Jun 16, 2010 | DIY
While I am still distressing over our lost family pet (now missing for over a week), the only thing I have been able to do besides put up posters, hand out flyers, and spend hours staring outside and waiting for the phone to ring…has been to watch reruns of Law & Order. They always find the missing person in the end.

And blog-land wise, the only thing I have been able to do on the computer is indulge myself in a blog I cam across called Tea Rose Home. The writer of it, Sachiko, is a stay-at-home mom with 3 children, and she blogs about beautiful items: ruffles, quilts, t-shirt makeovers, children’s clothing, and home decoration projects that add beauty and happiness to her life. I’m amazed at the number of creations she makes, and the feminine quality to each one. Plus her attitude (in the face of 3 rare disorders that have had her in and out of the hospital her whole life) is inspiring and uplifting. Reading her words about how much she loves her family, the happiness she finds in crafting, and her positive attitude has really helped lend me strength in this dark time. Plus, her projects are just beautiful – and she loves forming baskets into handbags – something I love as well!
I made this basket after seeing something similar in a Japanese magazine awhile back. It is real fur, sadly – a rabbit fur that I had bought a long, long time ago and had put in my materials bag to try and figure out what to do with it. In the years after I began to feel disgusted about using real fur, and so couldn’t bring myself to use it in anything. But I also couldn’t bring myself to throw it away, which would be so disrespectful to the life of the animal.
Muffin [our lost cat] loved it, and often pulled it out of my bag, playing with it, stroking it, and sometimes sleeping with it. So I put it on a basket, kind of like a good-luck charm. It’s removable for when Muffin comes back, and now sits on my desk so I can stroke it and remember how much she loved it, while I am willing her quick return.
A cheap basket from Michael’s which didn’t have a lid was transformed into this by cutting two pieces of foamcore that would become a hinged lid inside. I added hinges and a latch from the hardware store, securing the screws I drilled into the foamcore with hot glue. The latch I secured onto the basket with thin wire from the jewelry-making section.
I then hot-glued a layer of lace around the edge of the lid from a lace table runner I found at Goodwill for $1. (Come to think of it, Goodwill had TONS of baskets there too – I should have bought there instead of spending $6.99 at Michael’s. Next time.)
Finally, I wound a lace ribbon around the handle, and added some lace bows on either side. I then added a muslin liner, and my pretty bag was done!
Once Muffin returns and wants her fur back, I will probably replace it with a layer of pretty fabric, or some faux fur on top instead.
Have any of you ever remade a basket before? Hope this gives you some ideas – and for more great ideas for basket makeovers, check out Tea Rose Home and all the beautiful basket handbags Sachiko creates there.
xoxox
Carly
linking to Tea Rose Home link party No. 12 and Avid Accents Make My Style Monday #6
Leave Comment
Jun 5, 2010 | DIY, From You
From my formspring.me inbox:
Love your blog! Advice on how to DIY this elastic savant bralette? https://www.idontlikemondays.us/Merchant2/inventory/savant_bralette_am.jpg Can’t imagine paying almost $200 for this!
The basic idea is you just pin the elastic onto your dress form, keeping the elastic taut but not *too stretched.* If you don’t have a dress form, then enlisting the help of a friend would be great, and pinning it onto a tight-fitting tanktop that you are wearing. Then, pull off the piece, and stitch down the connections on your machine using a regular stitch (not a stretch stitch) in black thread. It doesn’t even need a closure since it is elastic!
Best of luck – and you’re definitely right – $200 is way, way too much for some elastic!
xoxox
Carly
Leave Comment
Jun 3, 2010 | DIY
Pillowcases come in a variety of prints that work just as well for pieces clothing. Plus, they have just enough fabric (and are roughly the same shape) as a cute little A-line mini-skirt – and can be transformed easily, with just a couple seams. (You can of course also transform them into dresses and skirts for small children.) And now there’s no need to worry when you have a lone pillowcase and can’t find its mate.
Take Exhibit A, a dot-printed piece that I pulled out of my 48-lb. haul of clothing I sourced at my local Goodwill Outlet. I was drawn to it because of the fabulous print – and I could only find one of them, so I had no intention of using it as a pillowcase…thus I thought it would work great as a skirt! The whole process took me maybe 30 minutes – a quick-sew project to be sure!
How to Make an Elastic-Banded Mini-Skirt from a Pillowcase
You Need:
*a standard-size (or larger!) pillowcase
*2″ wide piece of black elastic
*tape measure
*marking chalk
*pins
*fabric scissors
*thread and machine needle for wovens
*iron & ironing board
How To:
1. Turn pillowcase inside out and cut off all the sewn seams, leaving two large rectangles.
2. Turn rectangles sideways and fold in half. Cut edge on a slight A-line angle to the top. (I know in the photo above the fabric isn’t folded in half – but you should probably do that to ensure the right and left sides of each piece are at exactly the same angle.)
3. Unfold your pieces. Measure 1/2″ in from the angled edges of one of the pieces, and cut. This piece will become the back of the skirt.
4. Pin back to front of the skirt at the angled sides, and sew together.
5. Wrap piece of elastic at your natural waist (or where you want to wear the skirt). Make sure it is taut on your waist – not so tight you can’t breathe – but fairly tight. Overlap ends by 1/2″ and cut.
6. Sew piece of elastic in a circle on your machine with a 1/2″ seam allowance. (I used a straight stitch, then flattened each end and zigzagged over it to further secure it.)
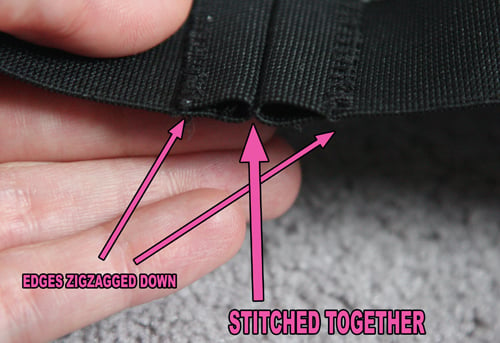 7. Place elastic band over pillowcase top, overlapping about 1/2″. Match pillowcase skirt center front to center of elastic band, and skirt center back to the seam you sewed in Step 6). Pin the two sides as well.
8. Sew pillowcase to elastic band using a stretch stitch on your machine, with the elastic on the top and the fabric below being thread through by the machine’s feed dogs. Stretch the elastic between the pins so the pillowcase “gathers” naturally to the elastic.
 9. Try on the skirt, mark where you want your hem to fall, and turn the hem (about 1″). Sew a 3/4″ hem on the bottom.
10. Iron to set the hem and remove any creases.
 And that’s it! And the great thing is, the waist is elastic, so you can wear it belted higher up with a wide belt…or wear it lower near your hips for a different look. Hope you have as much fun making yours as I did mine!
 Happy DIY’ing!
xoxo
Carly
~If you liked this post, please share it!~
Save
Leave Comment
Jun 1, 2010 | DIY
You gals have dresses on the brain, as evidenced by my formspring.me inbox.
Okay, first to the reader who is looking for more men’s shirt dresses:
I’m sure you’ve already seen mine but in case you had missed any I’ve relinked them above. All were made by repurposing men’s shirts.
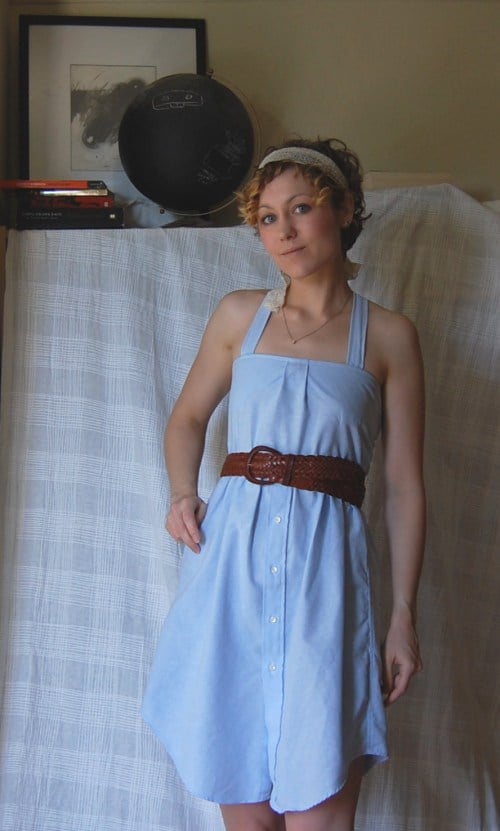
I’m also working on another tutorial for you guys for the dress above, made from a men’s long-sleeved shirt.
Here are a couple others I’ve noticed around the web:
midnightintern‘s FABULOUS Rockstar Sack Dress. Have I mentioned it’s fabulous?? (And I’m making a similar one in cobalt blue right now!)
Adventures in Dressmaking posted a tutorial about turning a blouse (men’s shirt will work just as well) into a dress by adding the bottom skirt. Also, read back through her archives to see other tutorials and transformations, as well as a great tute for turning a man’s shirt into a skirt.
Rachel at Transient Expression linked her Shirtdress tutorial in the comments – which I had seen awhile ago and forgot to add in! Thank goodness she caught it – because her chambray pinafore-style dress is just perfect for 2010!
Though it’s in French, km17 has posted the finished results of some men’s shirt refashioning that she did following the instructions from a Japanese pattern book. [I do think those Japanese refashioning books are really cute and innovative (and they can really makeover your man’s shirts!! But then again, I’m biased.;-)] She hasn’t posted the how-to, but you can probably figure out how she did it by looking closely at the finished pieces.
And Wardrobe Refashion, CraftStylish, Craftster.org, CutOutandKeep.net, and Threadbanger are all great resources for refashions!
Thanks for your questions, as always:-)
xoxox
Carly
Ask me anything
Save
Leave Comment